Free Crochet Photo Holder Amigurumi Pattern
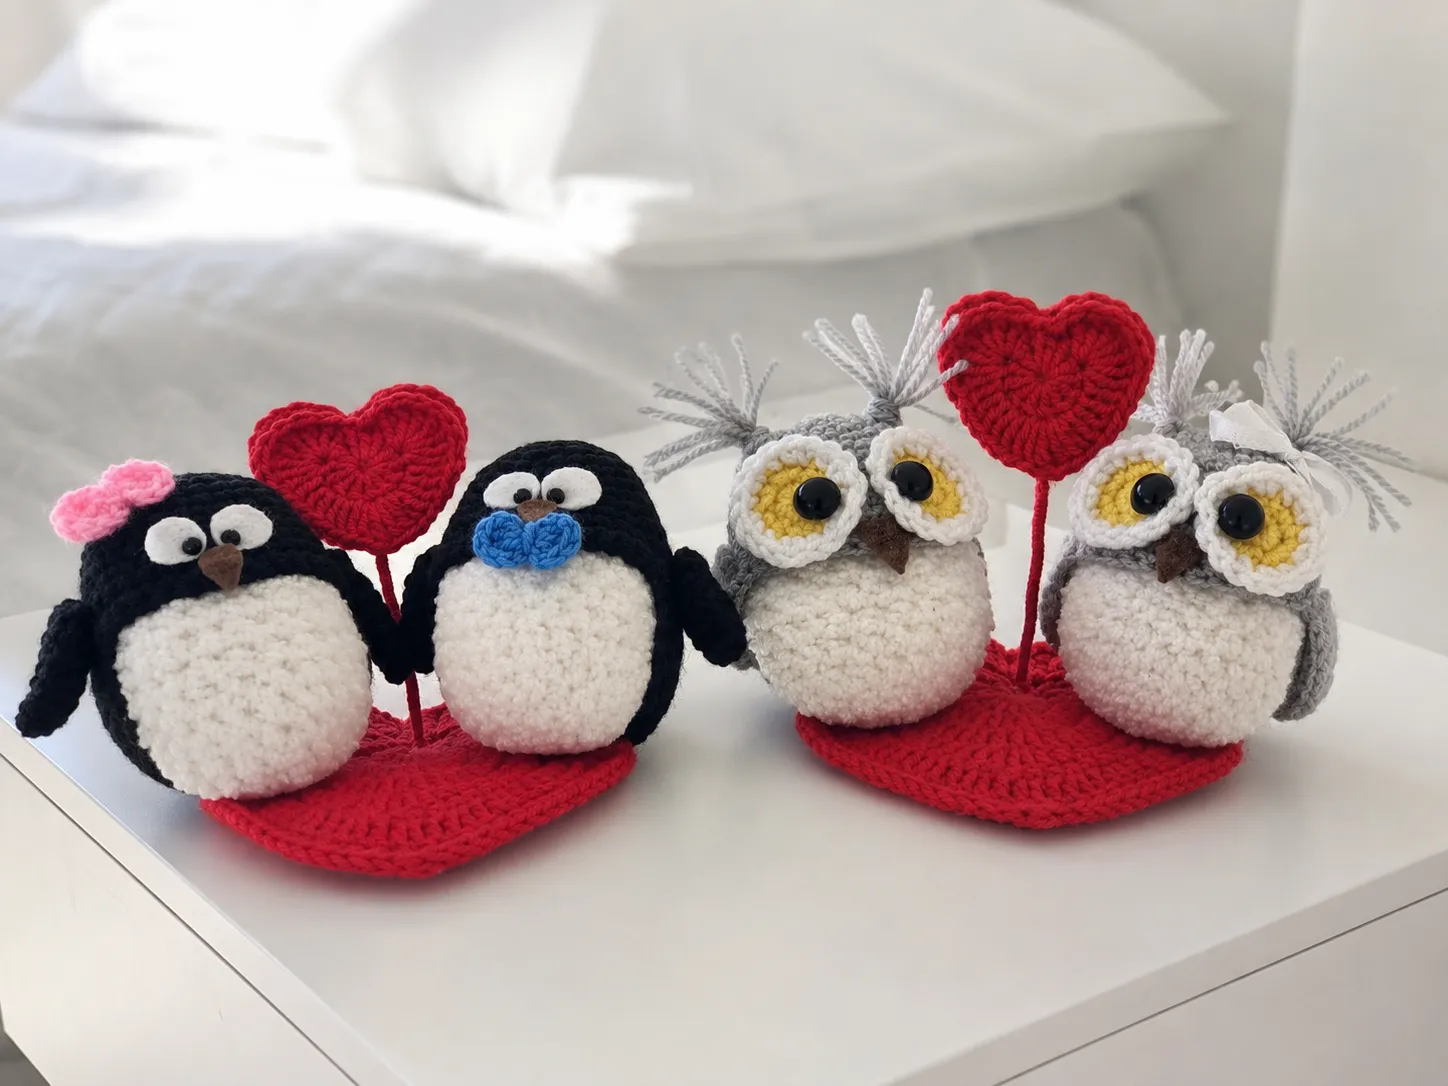
This free crochet photo holder amigurumi pattern turns leftover scraps of white, black, red, gray, and chenille yarn into a badge-clip photo stand with two swappable covers — an owl and a penguin. It’s built around a small stuffed body, a wire-and-cardboard heart base, and two little crocheted “outfits” that slip on and off. This one takes more patience than a quick keychain, but almost every piece is worked from small amounts of yarn you likely already have.
🧶 What You’ll Need
- 💰 Yarn Needed: A small amount of each color — white, black, red, gray, pink, light blue, and yellow, plus a small amount of bulky chenille/textured yarn for the bodies. Exact yardage wasn’t included in the source pattern, so treat any amount you have leftover as fair game and confirm totals on your first test-make.
- 🎨 Colors: white, black, red, gray, pink, light blue, yellow (or similar DK/light worsted cotton-blend scraps from your stash)
- 🪝 Hook: 1.5 mm, 1.7 mm, and 2.5 mm (approx. US C/2) — see the hook size note below, since two of these don’t have a clean US letter match
- ⏱️ Time: 4-6 hours, spread across the crochet parts and the mixed-media assembly
- 📏 Finished Size: Not specified in the source pattern — flagged for a test-make measurement before publishing
- 💡 Difficulty: Intermediate, leaning Advanced once you factor in the wire armature and felt details
- 🎁 Great For: desk photo displays, badge clips, gift sets, market items
Materials for This Crochet Photo Holder Amigurumi Pattern
Here’s the honest list. You don’t need full skeins of anything here — this is a “raid your scrap bin” project through and through.
- White DK/light worsted yarn — a small amount, for the body top and eye backgrounds (or similar from your stash)
- Black DK/light worsted yarn — a small amount, for the penguin cover and both wing pieces
- Red DK/light worsted yarn — a small amount, for the small and large hearts
- Gray DK/light worsted yarn — a small amount, for the owl cover
- Pink and light blue yarn — tiny scraps, just enough for one bow each
- Yellow yarn — a small amount, for the eye centers
- Bulky chenille or textured yarn (the source used Alize Softy) — a small amount for each stuffed body, for that soft velvety finish. This falls under Bulky (5) weight on the standard yarn weight chart, so any similar chenille or thick worsted from your stash will work.
- Hooks: 1.5 mm, 1.7 mm, and 2.5 mm (approx. US C/2)
- Polyfill stuffing
- Tapestry needle
- White felt and brown felt (or foamiran/faux leather) for the owl beak and penguin face details
- 2 mm and 5 mm half-beads for eyes
- 1.5 mm copper wire (about 20 cm / 7.9 in)
- Thick cardboard or a plastic sheet (a cut-up plastic folder works well)
- Badge clip
- Satin ribbon, glue, and an awl
🧶 Scrap Check: Almost every part of this pattern uses a small amount of one color. If your scrap bin has leftover bits of white, black, red, gray, pink, light blue, and yellow DK-weight yarn, you can very likely make this entire project without buying a single new skein.
A Quick Note on Hook Sizes
This pattern calls for three metric hook sizes, and not all of them line up neatly with a US letter size. The 2.5 mm hook is close enough to call it approx. US C/2. But the 1.5 mm and 1.7 mm hooks used for the smaller pieces (wings, small hearts, and parts of the body) fall below the standard US lettered range entirely — they’re closer to steel thread-crochet hook territory. If you don’t own hooks that fine, the nearest common substitutes are a US B/1 (2.25 mm) for the 1.7 mm parts, sized down carefully, though tension and finished size will shift slightly. This is flagged for editorial review since there’s no exact US equivalent on record.
Abbreviations Used in This Crochet Photo Holder Amigurumi Pattern
| Abbreviation | Meaning |
|---|---|
| mr | magic ring |
| sc | single crochet |
| dc | double crochet |
| hdc | half double crochet |
| tr | treble crochet |
| inc | increase (2 sc in same stitch) |
| dec | invisible decrease |
| ch | chain |
| sl st | slip stitch |
| dc-inc | double crochet increase |
| hdc-inc | half double crochet increase |
| tr-inc | treble crochet increase |
| sc3tog | single crochet 3 together (decrease across 3 stitches) |
| ( ) | work instructions in parentheses into the same stitch |
| ( ) × n | repeat the instructions in parentheses n times |
Smart Crafter Tips for This Photo Holder Pattern
Before you dig in, here are a few tricks that will save you time, yarn, or a headache during assembly.
If magic ring starts still trip you up, our magic ring tutorial covers it in under two minutes — you’ll use this start on almost every single piece in this pattern, so it’s worth getting comfortable with it first.
This project uses three different hook sizes on purpose, which is unusual for amigurumi. Our crochet hook size guide is a good refresher if you want to understand why smaller hooks show up for the fine details and larger ones for the bodies.
Because there are so many small pieces to attach — wings, bows, eyes, felt details, two heart layers — take the time to pin everything in place before you sew. Our guide to sewing amigurumi parts together walks through keeping stitches invisible, which matters here since there’s no room to hide a messy seam on pieces this small.
And when you get to stuffing the two bodies, don’t overstuff — these covers need to slip on and off, so a slightly softer body will save you frustration later. Our stuffing tutorial covers how to get an even shape without overstuffing.
Pattern: Crochet Photo Holder Amigurumi Pattern
Body (make 2)
Yarn: bulky chenille/textured yarn, then Kamteks “Detskaya Zabava” white (or similar). Start with a magic ring.
Row 1: 6 sc in mr [textured yarn, 2.5 mm hook] (6)
Row 2: 6 inc (12)
Row 3: (1 sc, inc) × 6 (18)
Row 4: 18 sc (18)
Row 5: (2 sc, inc) × 6 (24)
Rows 6–11: 24 sc in each round (6 rounds total) (24)
Rows 12–15: 24 sc in each round [switch to Kamteks “Detskaya Zabava” white, 1.7 mm hook] (4 rounds total) (24)
Row 16: (2 sc, dec) × 6 (18)
Row 17: (1 sc, dec) × 6 (12)
Row 18: 6 dec (6)
Place a stitch marker after Row 2 to keep track of your round starts.
Stuff the body with fiberfill before closing. Cut yarn and cinch the opening shut with your tapestry needle.
🧶 Scrap Check: The color switch at Row 12 means each body only needs a small amount of chenille and a small amount of white — great news if you’ve only got a partial ball of chenille sitting around.
Wings (make 2)
Yarn: black. Start with a magic ring, 1.5 mm hook.
Row 1: 6 sc in mr (6)
Row 2: 6 sc (6)
Row 3: (1 sc, inc) × 3 (9)
Row 4: (2 sc, inc) × 3 (12)
Rows 5–8: 12 sc in each round (4 rounds total) (12)
Row 9: 6 dec (6)
Place a stitch marker after Row 2.
Cut yarn, leaving a tail for sewing. Do not stuff — these stay flat.
Penguin Cover
Yarn: black. Start with a magic ring, 1.5 mm hook.
Row 1: 6 sc in mr (6)
Row 2: 6 inc (12)
Row 3: (1 sc, inc) × 6 (18)
Row 4: (2 sc, inc) × 6 (24)
Row 5: (3 sc, inc) × 6 (30)
Rows 6–9: 30 sc in each round (4 rounds total) (30)
Row 10: (4 sc, inc) × 6 (36)
Rows 11–12: 12 sc, then 24 hdc, worked across 2 rounds (36)
Row 13: ch 1, turn, 24 hdc, ch 1, turn (24)
Rows 14–18: 24 hdc, ch 1, turn (5 rows total) (24)
Row 19: (2 hdc, dec) × 6, ch 1, turn (18)
Row 20: (1 hdc, dec) × 6, ch 1, turn (12)
Row 21: 6 dec, ch 1, turn (6)
Rows 22–23: 6 sc, ch 1, turn (2 rows total) (6)
Row 24: 2 sc, dec, 2 sc, ch 1, turn (5)
Row 25: 5 sc, ch 1, turn (5)
Row 26: dec, 1 sc, dec, ch 1, turn (3)
Row 27: sc3tog (1)
Row 28: ch 1, sc around the entire edge of the piece (total varies — work evenly around the opening)
Place a stitch marker after Row 2.
Fasten off and weave in ends. Row 13 is where the piece switches from working in the round to working flat in turned rows, shaping the front opening of the cover — take it slowly here since it’s the trickiest transition in the whole pattern.
Bow (make as needed — pink and light blue)
Start with a magic ring.
Row 1: in mr: ch 2, 3 dc, ch 2, sl st, ch 2, 3 dc, ch 2, sl st (10 sts + 2 sl st)
Pull the ring tight to cinch the bow’s center. Cut yarn, leaving a tail for attaching it later.
Small Heart (make 2)
Yarn: red, 1.5 mm hook. Start with a magic ring.
Row 1: in mr: ch 3, 12 dc, sl st (12)
Row 2: skip 1 sc, 7 tr, 1 dc, (2 dc) × 2, (2 dc, 1 tr, 2 dc), (2 dc) × 2, 1 dc, 7 tr, sl st (30)
Fasten off, leaving a tail for assembly.
Owl Cover
Yarn: gray. Start with a magic ring.
Row 1: 6 sc in mr (6)
Row 2: 6 inc (12)
Row 3: (1 sc, inc) × 6 (18)
Row 4: (2 sc, inc) × 6 (24)
Row 5: (3 sc, inc) × 6 (30)
Rows 6–9: 30 sc in each round (4 rounds total) (30)
Row 10: (4 sc, inc) × 6 (36)
Rows 11–12: 36 sc in each round (2 rounds total) (36)
Row 13: ch 1, turn, 24 sc, ch 1, turn (24)
Rows 14–19: 24 sc, ch 1, turn (6 rows total) (24)
Row 20: (2 sc, dec) × 6, ch 1, turn (18)
Row 21: 18 sc, ch 1, turn (18)
Row 22: (1 sc, dec) × 6, ch 1, turn (12)
Row 23: 12 sc, ch 1, turn (12)
Row 24: 6 dec, ch 1, turn (6)
Rows 25–27: 6 sc, ch 1, turn (3 rows total) (6)
Single crochet around the entire edge of the piece to finish the opening. Fasten off and weave in ends.
Eyes (make 2)
Yarn: yellow, then white. Start with a magic ring.
Row 1: 6 sc in mr [yellow] (6)
Row 2: 6 inc (12)
Row 3: (1 sc, inc) × 6 [change to white] (18)
Fasten off, leaving a long tail for sewing.
Large Heart (make 2 — this forms the photo holder base)
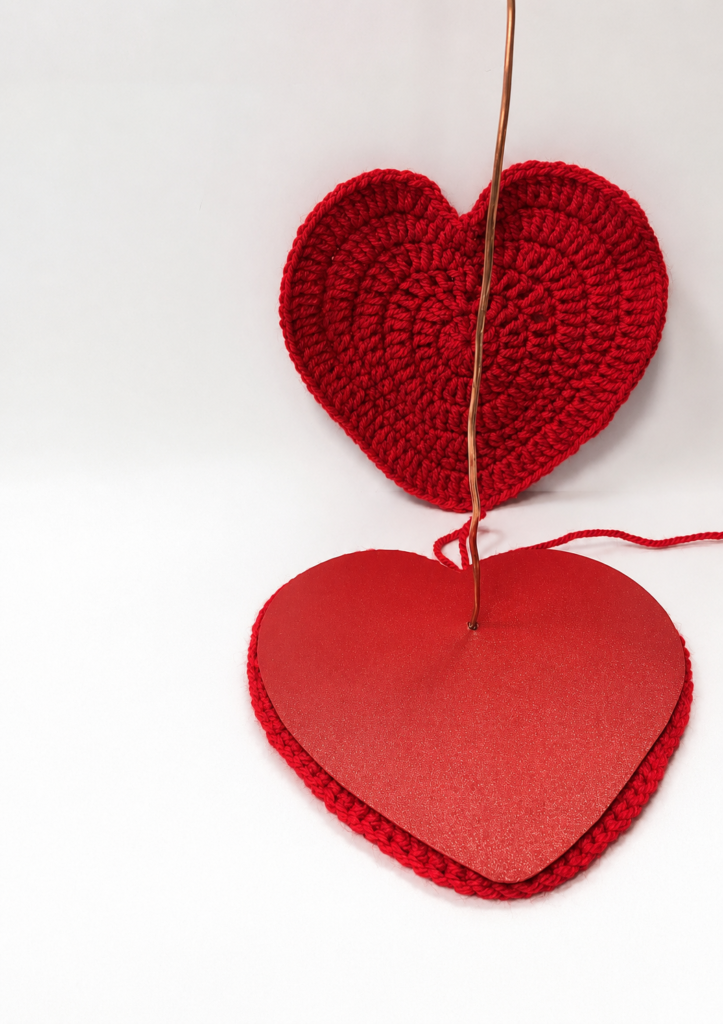
Yarn: red. Start with a magic ring.
Row 1: in mr: ch 2, 11 dc, sl st (11)
Row 2: ch 2, 11 hdc-inc, sl st (22)
Row 3: ch 2, (hdc-inc, dc) × 11, hdc-inc, sl st (35)
Row 4: sc, (hdc, dc), 5 dc-inc, 2 dc, 2 hdc, 4 sc, hdc, dc, 3 dc, dc, hdc, 4 sc, 2 hdc, 2 dc, 5 dc-inc, (hdc, dc), sc, sl st (48)
Row 5: sl st, sc, hdc, (hdc, dc), 6 dc-inc, 3 dc, 2 hdc, 19 sc, 2 hdc, 3 dc, 6 dc-inc, (dc, hdc), hdc, sc, sl st (64)
Row 6: 3 sc, (dc, dc-inc) × 28, 3 sc, sl st (92)
On the second heart, do not cut the yarn after Row 6 — you’ll need it still attached for assembly.
Assembly
- Cut a heart shape out of cardboard or a plastic sheet, matching the size of your crocheted Large Heart.
- Cut a 20 cm (7.9 in) piece of copper wire.
- Use an awl to make a hole in the center of the cardboard heart, then thread the wire through.
- Form a small loop at the bottom end of the wire, underneath the cardboard, so it can’t slip back through.
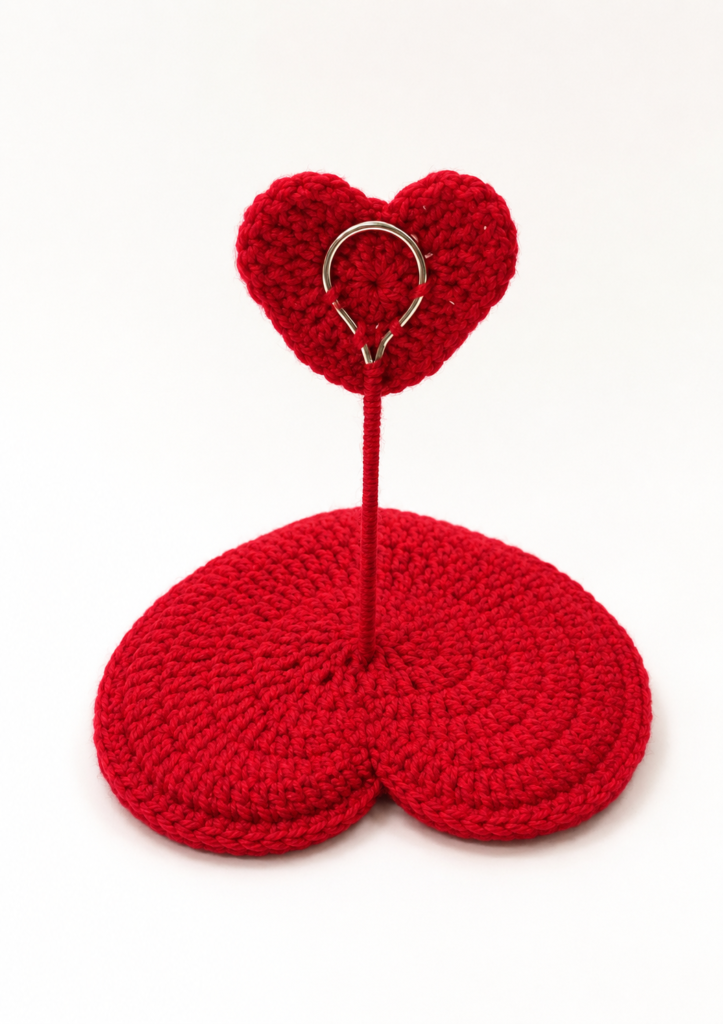
- Thread one crocheted Large Heart onto the wire through its magic ring center, then place the second heart (with working yarn still attached) wrong-side-down beneath the cardboard base — you’re sandwiching the cardboard between the two crocheted hearts.
- Single crochet the two hearts together around the outer edge, enclosing the cardboard insert as you go.
- Form a loop at the top of the wire and sew the first Small Heart onto it.
- Wrap the exposed section of wire tightly with red yarn to hide it.
- Glue or otherwise secure the badge clip to the back of the base.
- For extra dimension at the top, glue or sew the second Small Heart to the front, opposite the first one.
- Glue the two stuffed bodies onto the heart base.
- Sew the wings and bows onto the owl and penguin cover pieces.
- Slip the finished owl and penguin covers over the two bodies — this is the swap that lets you change the display.
Decoration
Owl: Glue or sew the crocheted eyes onto the owl cover, then glue a pupil half-bead onto each yellow center. Cut a small triangle from brown felt (or foamiran) for the beak and glue it just below the eyes. For the ear tufts, cut several 10 cm (3.9 in) strands of gray yarn, fold them in half, and attach with a simple loop at the sides of the cover.
Penguin: Cut oval eye patches from white felt and a small beak from brown or yellow felt. Glue both in place along with the eye half-beads.
💡 Stretch It Further: Once you’ve got the wire-and-heart base down, you can make new covers in almost any color combination — try a fox and a bunny cover using the same shaping, just swap gray for orange and white. Made in bulk, this is a genuinely giftable market item: badge-clip photo holders sell well at craft fairs precisely because they’re small, useful, and personal. Since almost everything here comes from scrap yarn, your only real cost is the wire, cardboard, felt, and beads — likely under $3 per finished piece if you already crochet.
Mia’s Take
This one’s more of a weekend project than a quick win, but it’s the kind of piece that actually gets used — clipped to a desk, a bag, or a bulletin board, with a swappable little friend riding along on top. Every piece here comes from a small amount of yarn, which makes it a genuinely good excuse to finally use up those seven half-used colors sitting in your stash. Make the owl and penguin as shown, or design your own swap-in covers once you’ve got the base figured out.
If you’d rather start smaller before committing to the full wire-and-heart base, our amigurumi penguin pattern uses the same stash-friendly approach on its own, and our mini bee keychain pattern is a good next scrap-buster once this one’s off your hook.
FAQ
What yarn weight is best for this crochet photo holder amigurumi pattern?
You can use DK or light worsted weight cotton scraps for all small pieces and covers, along with a small amount of bulky chenille yarn for the stuffed body cores.
Can beginners make this photo holder amigurumi pattern?
This pattern is rated Intermediate to Advanced due to small hook sizes (down to 1.5mm), fine felt details, and mixed-media wire assembly.
How long does it take to complete this photo holder project?
It takes approximately 4 to 6 hours total, including all crocheted pieces, wire frame shaping, and decorative assembly.