Free Turtle Amigurumi Pattern — 7-Color Stash Buster
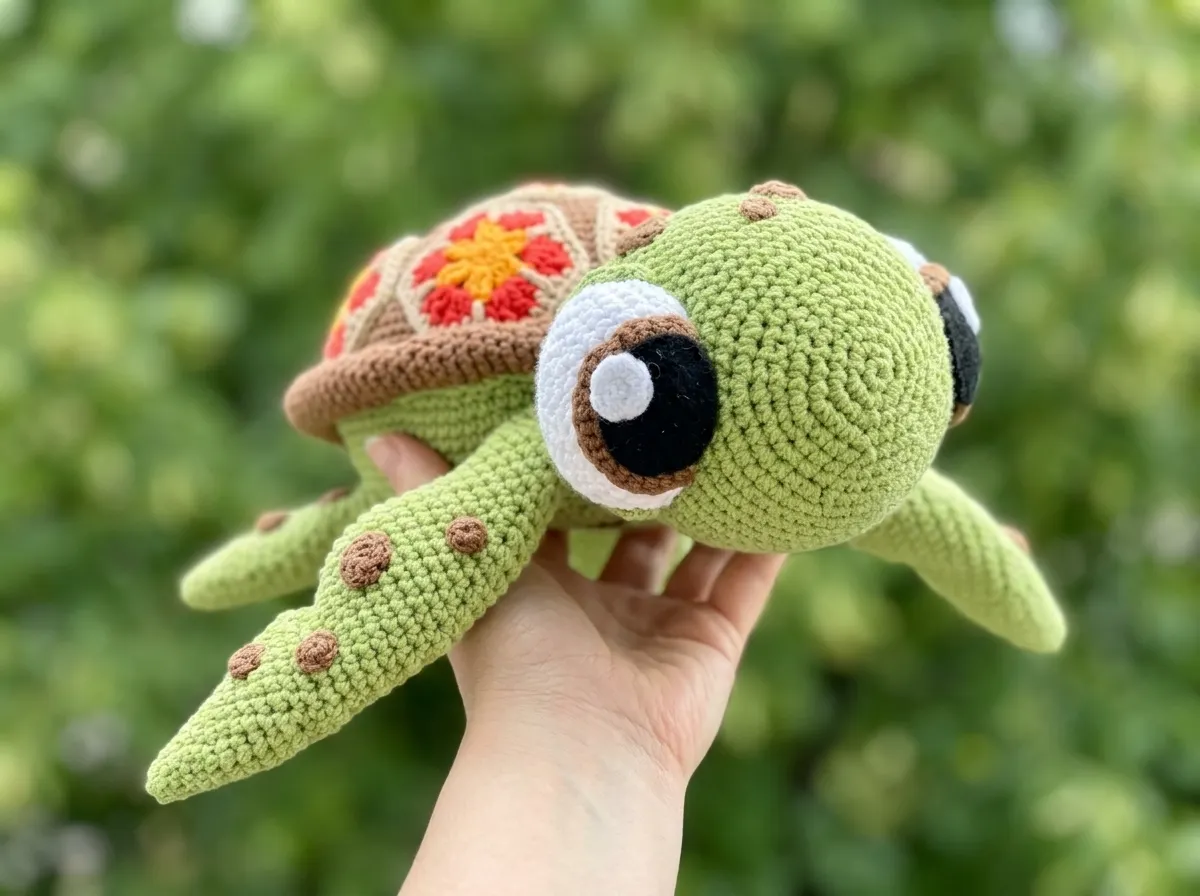
This turtle amigurumi was designed for the crafter who refuses to throw anything away. Seven colors total — and most of them only appear in small accent pieces: the flowers, the spots, the crocheted eyes. Green carries most of the work, and your brown handles the shell. Everything else? That’s scrap territory. A few solid sessions and you’ll have a 12-inch turtle that looks like it took a lot more than it did.
🧶 What You’ll Need From Your Stash
- 💰 Yarn Needed: ~400 yards total (green ~200 yd, brown/orange ~100 yd, brown ~50 yd, yellow/red/beige ~15 yd each, white ~30 yd, black small amount) — estimates; check against your gauge
- 🎨 Colors: green, brown or orange, brown (for spots and border), yellow, red, beige, white, black — or whatever 7 scrappy colors you’ve got
- 🪝 Hook: 3.0mm (no direct US equivalent; between US C/2 and D/3)
- ⏱️ Time: 10–15 hours across multiple sessions
- 📏 Finished Size: 11.8 in (30 cm)
- 💡 Difficulty: Intermediate–Advanced
- 🎁 Great For: gifts, shelf display, nature-themed collections
What’s Already in Your Stash: Materials for This Turtle Amigurumi
The yarn for this project is DK/Light Worsted (3) cotton-blend — the original calls for 55% cotton at 159 yards per 50g skein. That category covers a lot of commonly available yarns, and you probably have something close enough already. US alternatives that work well: Lion Brand 24/7 Cotton, Paintbox Simply DK Cotton, or any DK-weight cotton blend sitting in your stash. For a quick reference on yarn weight categories, the Craft Yarn Council’s yarn weight guide is the clearest breakdown out there.
- Green yarn: approximately 200 yards — head, body base, and all four legs
- Brown or orange yarn: approximately 100 yards — shell upper section
- Brown yarn: approximately 50 yards — shell border strip and all spots
- Yellow yarn: approximately 15 yards — shell flower accents
- Red yarn: approximately 15 yards — shell flower accents
- Beige yarn: approximately 15 yards — shell flower accents
- White yarn: approximately 30 yards — eye bases
- Black yarn: small amount — eye accents
- Polyester fiberfill for stuffing
- Small piece of black felt — for pupils, cut to shape during assembly
- 3.0mm crochet hook
- Tapestry needle
- Stitch markers
- Scissors
All seven color slots here are genuinely scrap-friendly. The flowers and spots use almost nothing individually — 15 yards goes a long way when you’re making pieces this small. If you’re flexible on exact shades, this is a solid project for clearing out a drawer of mismatched leftovers that technically shouldn’t work together but somehow do.
Abbreviations
| Abbreviation | Meaning |
|---|---|
| mr | Magic ring — an adjustable starting loop that closes completely with no center hole |
| ch | Chain |
| sc | Single crochet |
| hdc | Half double crochet |
| dc | Double crochet |
| inc | Increase — 2 single crochets worked into the same stitch |
| dec | Invisible decrease — insert hook through front loops only of next 2 stitches simultaneously, yarn over, pull through, yarn over, pull through 2 loops |
| sl st | Slip stitch — insert hook, yarn over, pull through loop and stitch in one motion |
| hdc-inc | Half double crochet increase — 2 hdc worked into the same stitch |
| dc-inc | Double crochet increase — 2 dc worked into the same stitch |
| FO | Fasten off — cut yarn and secure the tail |
Smart Crafter Tips for This Turtle Amigurumi
Always use the invisible decrease. Wherever the pattern writes “dec,” that means the invisible decrease — insert through the front loops only of the next two stitches. It keeps the surface of your turtle clean and gap-free, which matters a lot on a piece this size. If you’re not sure how it’s done, our invisible decrease tutorial walks through it clearly and shows you why it makes such a difference on amigurumi surfaces.
Label your yarn before you start. Seven colors sounds manageable until you’re mid-project with bits of brown and beige sitting next to each other on the table. A small piece of tape on each ball takes 30 seconds and saves real confusion later — especially for the flowers and spots, where the amounts are tiny and it’s easy to grab the wrong scrap.
Make all the small pieces first. The spots and flowers are quick. Knock out all of them before you start the main body so everything’s ready to go at assembly. Got leftover brown from another project? The entire spots section — every single spot across all four legs and the head — uses maybe 10 yards total.
🧶 Scrap Check: The seven flowers use roughly 15 yards per color — yellow, red, and beige. If you’ve made anything recently in those shades, you almost certainly have enough sitting in your bin right now. Check before you buy a new skein of anything.
Nearly every part of this pattern starts with a magic ring. If you’re not comfortable with it yet, our magic ring tutorial covers it in a few clear steps — it’s simpler than it looks and makes a significant difference in how clean your starting center looks.
Turtle Amigurumi Pattern
Head (×1) — Green
Start with a magic ring.
Row 1: 6 sc in mr (6)
Row 2: inc × 6 (12)
Row 3: (sc, inc) × 6 (18)
Row 4: (2 sc, inc) × 6 (24)
Row 5: (3 sc, inc) × 6 (30)
Row 6: 30 sc (30)
Row 7: 4 sc, inc, sc, inc, sc, inc, 6 sc, inc, 6 sc, inc, 6 sc, inc (36)
Row 8: (2 sc, inc) × 12 (48)
Row 9: 6 sc, inc, sc, inc, 9 sc, inc, sc, inc, 21 sc, inc, sc, inc, 3 sc (54)
Row 10: 8 sc, inc, sc, inc, 11 sc, inc, sc, inc, 22 sc, inc, sc, inc, 4 sc (60)
Rows 11–20: 60 sc (60)
Row 21: (8 sc, dec) × 6 (54)
Row 22: 54 sc (54)
Row 23: (7 sc, dec) × 6 (48)
Row 24: 48 sc (48)
Row 25: (6 sc, dec) × 6 (42)
Rows 26–27: 42 sc (42)
Row 28: (2 sc, dec, sc, dec) × 6 (30)
Row 29: (3 sc, dec) × 6 (24)
Row 30: 24 sc (24)
Row 31: (2 sc, dec) × 6 (18)
Row 32: (sc, dec) × 6 (12)
Row 33: (sc, dec) × 4 (8)
Row 34: 4 dec (4)
Stuff firmly before the opening gets too small. Fasten off, leaving a long tail for sewing.
Body — Lower Section (×1) — Green
Start with a magic ring.
Row 1: 6 sc in mr (6)
Row 2: (sc, inc, 3 sc in 1 st) × 2 (12)
Row 3: 3 sc, 3 inc, 3 sc, 3 inc (18)
Row 4: 4 sc, 3 inc, 6 sc, 3 inc, 2 sc (24)
Row 5: (3 sc, inc) × 6 (30)
Row 6: (2 sc, inc) × 10 (40)
Row 7: (3 sc, inc) × 10 (50)
Row 8: (4 sc, inc) × 10 (60)
Row 9: (5 sc, inc) × 10 (70)
Row 10: (6 sc, inc) × 10 (80)
Rows 11–12: 80 sc (80)
Row 13: (7 sc, inc, 8 sc) × 5 (85)
Rows 14–17: 85 sc (85)
Fasten off, leaving a long tail for joining to the shell.
Shell — Upper Section (×1) — Brown or Orange
Start with a magic ring.
Row 1: 6 sc in mr (6)
Row 2: (sc, inc, 3 sc in 1 st) × 2 (12)
Row 3: 3 sc, 3 inc, 3 sc, 3 inc (18)
Row 4: 4 sc, 3 inc, 6 sc, 3 inc, 2 sc (24)
Row 5: (3 sc, inc) × 6 (30)
Row 6: (2 sc, inc) × 10 (40)
Row 7: (3 sc, inc) × 10 (50)
Row 8: (4 sc, inc) × 10 (60)
Row 9: 60 sc (60)
Row 10: (5 sc, inc) × 10 (70)
Rows 11–12: 70 sc (70)
Row 13: (6 sc, inc) × 10 (80)
Rows 14–16: 80 sc (80)
Row 17: (7 sc, inc) × 10 (90)
Rows 18–22: 90 sc (90)
Fasten off, leaving a long tail for joining to the body.
Shell Border (×1) — Brown
This piece is worked as a narrow tube of 8 stitches that gets coiled and sewn around the outer edge of the finished shell.
Row 1: 8 ch, join into a ring (8)
Rows 2–962: 8 sc (8)
💡 Practical Note: The row count here is based on a specific gauge. Work this tube until it measures the full circumference of your shell edge — hold it against your finished shell as you go and stop when it fits rather than committing to an exact row count. Fasten off and coil it around the shell edge during assembly.
Front Legs (×2) — Green
Make two. Start each with a magic ring.
Row 1: 6 sc in mr (6)
Row 2: (sc, inc) × 3 (9)
Row 3: (2 sc, inc) × 3 (12)
Row 4: 12 sc (12)
Row 5: 3 sc, inc, 4 sc, 2 inc, 2 sc (15)
Row 6: 3 sc, inc, 11 sc (16)
Row 7: 3 sc, dec, 5 sc, inc, 5 sc (16)
Row 8: 10 sc, inc, 5 sc (17)
Row 9: 2 sc, dec, 6 sc, 2 inc, 5 sc (18)
Row 10: 10 sc, inc, 7 sc (19)
Row 11: sc, dec, 7 sc, inc, 8 sc (19)
Row 12: 10 sc, inc, 8 sc (20)
Row 13: 8 sc, 3 dec, 6 sc (17)
Row 14: dec, 7 sc, dec, 6 sc (15)
Row 15: 7 sc, 3 inc, 5 sc (18)
Row 16: 4 sc, inc, 4 sc, 2 inc, 4 sc, inc, 2 sc (22)
Row 17: dec, 9 sc, 2 inc, 9 sc (23)
Row 18: 23 sc (23)
Row 19: dec, 10 sc, 2 inc, 9 sc (24)
Row 20: 24 sc (24)
Row 21: dec, 22 sc (23)
Row 22: 11 sc, dec, 10 sc (22)
Row 23: dec, 9 sc, dec, 9 sc (20)
Row 24: dec, 18 sc (19)
Row 25: 19 sc (19)
Row 26: dec, 17 sc (18)
Row 27: dec, 16 sc (17)
Row 28: dec, 13 sc, dec (15)
Row 29: dec, 13 sc (14)
Row 30: 7 sc, inc, 4 sc, dec (14)
Row 31: dec, 5 sc, inc, 6 sc (14)
Row 32: dec, 2 sc, dec, 3 sc, dec, sc, dec (10)
Row 33: 10 sc (10)
Row 34: dec, 8 sc (9)
Rows 35–36: 9 sc (9)
Row 37: (2 sc, inc) × 3 (12)
Row 38: 11 sc, sl st (12)
Lightly stuff the widest section of each leg. Leave the narrow attachment end unstuffed — it makes sewing onto the body much easier. Fasten off, leaving a long tail.
Hind Legs (×2) — Green
Make two. Start each with a magic ring.
Row 1: 6 sc in mr (6)
Row 2: (sc, inc) × 3 (9)
Row 3: (2 sc, inc) × 3 (12)
Row 4: 12 sc (12)
Row 5: 3 sc, inc, 4 sc, 2 inc, 2 sc (15)
Row 6: 3 sc, inc, 11 sc (16)
Row 7: sc, dec, 6 sc, 3 inc, 4 sc (18)
Row 8: 10 sc, 3 inc, 5 sc (21)
Row 9: sc, dec, 8 sc, 2 inc, 8 sc (22)
Row 10: 22 sc (22)
Row 11: sc, dec, 19 sc (21)
Row 12: dec, 9 sc, dec, 8 sc (19)
Row 13: dec, 17 sc (18)
Row 14: dec, 16 sc (17)
Row 15: dec, 6 sc, dec, 7 sc (15)
Row 16: dec, 2 sc, dec, 4 sc, dec, 3 sc (12)
Rows 17–21: 12 sc (12)
Row 22: (2 sc, inc) × 4 (16)
Fasten off, leaving a long tail for sewing.
Spots — Brown
These are the most scrap-friendly pieces in the entire project. Make them all in one sitting — they take almost no time and use almost no yarn. Refer to the distribution below when sewing on.
Spot Distribution:
- Front leg 1: 1 large, 2 medium spots
- Front leg 2: 1 large, 1 medium, 2 small spots
- Hind leg 1: 1 medium, 2 small spots
- Hind leg 2: 1 medium, 1 small spot
- Head: 2 large, 1 medium, 2 small spots
Small Spots:
Row 1: 4 sc in mr, ch 1 (turning chain), 4 sc (4)
Fasten off, cut yarn.
Medium Spots:
Row 1: 6 sc in mr, ch 1 (turning chain), 6 sc (6)
Fasten off, cut yarn.
Large Spots:
Row 1: 4 sc in mr (4)
Row 2: 3 sc in 1 st, sc, 3 sc in 1 st, sl st (8)
Fasten off, leaving a short tail for sewing.
🧶 Scrap Check: Every spot in this pattern combined uses roughly 10–12 yards of brown. Whatever’s left over from your shell border strip is more than enough to cover all the spots too. Don’t cut a new skein for this one.
Shell Flowers (×7) — Yellow, Red, Beige
Make 7 flowers total, distributing your three accent colors however you like. Each flower starts with a magic ring.
Row 1: 6 sc in mr (6)
Row 2: 3 ch, dc, (dc-inc) × 5 (12)
Row 3: 3 ch, dc, ch, dc-inc, then (dc-inc, ch, dc-inc) × 5 (32)
Row 4: inc, (2 sc, dec, 2 sc, inc) × 5, 2 sc, dec, 2 sc (42)
Fasten off, leaving a tail for sewing onto the shell.
Eyes (×2) — White, Brown, Black
The eyes are the most involved part of this turtle amigurumi. Each one is assembled from four separate pieces. Make them both before you start assembly so they’re ready to go.
Eye Base — White:
Start with a magic ring.
Row 1: 6 sc in mr (6)
Row 2: inc × 6 (12)
Row 3: (sc, inc) × 6 (18)
Row 4: (2 sc, inc) × 6 (24)
Row 5: (3 sc, inc) × 6 (30)
Row 6: (2 sc, inc) × 10 (40)
Row 7: (7 sc, inc) × 5 (45)
Rows 8–9: 45 sc (45)
Fasten off, leaving a long tail for assembly.
Iris — Brown or Black:
Row 1: 20 ch (20)
Row 2: 19 sc (19)
Fasten off, leaving a tail for sewing.
Highlight — White:
Start with a magic ring.
Row 1: 4 sc in mr (4)
Row 2: 4 inc (8)
Fasten off, leaving a tail for sewing.
Eyelid — Brown:
Row 1: 25 ch (25)
Row 2: 2 ch, 6 sc, 2 [sts], 4 [sts], 2 hdc, 6 sc, 2 sl st (24)
Row 3: along the second side, into the second loop: sl st, sl st, 4 sc, hdc, 8 dc, hdc, 4 sc, sl st (21)
Fasten off, leaving a long tail for sewing.
Assembly: Putting Your Turtle Amigurumi Together
Before you start sewing, cut your felt pupils to size — round circles from black felt that will sit on the eye bases. Have all pieces laid out so you know where each one goes. The eyes and head placement will define the turtle’s whole expression, so take a moment before committing to any stitches.
- Sew the 7 flowers onto the shell upper section, distributing them evenly across the surface.
- Sew the shell border strip along the outer edge of the shell, coiling it in place as you go.
- Join the shell upper section and the body lower section together, sewing along the edges to connect them.
- Cut round pupils from black felt and sew them onto the eye bases.
- Sew the iris and highlight pieces onto each eye base, layering them on top of the felt pupil.
- Sew the eyelid piece onto each finished eye.
- Attach the completed eyes to the head.
- Sew the spots onto the head and legs following the distribution listed in the Spots section above.
- Sew the head onto the shell at the front, checking the angle before you sew.
- Sew the front and hind legs onto the body, positioning them symmetrically on both sides.
The eyes and head are the first thing anyone looks at — pin or hold them in place and check from a few angles before you make a single stitch. For getting all these parts sewn on cleanly, our guide to sewing amigurumi parts together is worth a read before you start this stage.
💡 Stretch It Further: The shell flowers are the most flexible part of this pattern. Swap yellow, red, and beige for any three accent colors you’ve got — lavender, coral, and sage work just as well and make the turtle feel completely different. Got enough green for two? Make a pair in contrasting shell colorways and you’ve got an instant gift set. Same pattern, totally distinct results — that’s the kind of math I like.
Mia’s Take
Seven colors, about 400 yards total, and a few solid sessions of work — and you end up with a 12-inch turtle that accounts for a surprising amount of what was sitting in your scrap bin. The accent pieces are where this pattern really earns its keep: spots, flowers, and those detailed eyes all use almost nothing individually, but together they make the whole thing look genuinely considered. If you’ve got a good chunk of green, a skein’s worth of brown, and a grab-bag of small leftovers, you probably have most of what you need already. Don’t sleep on this one. 🧶
What yarn weight is best for this turtle amigurumi pattern?
This pattern is optimized for DK or Light Worsted weight cotton-blend yarn. The original pattern specifies a 55% cotton blend at 159 yards per 50g skein, making it highly adaptable for stash-busting.
How long does it take to crochet this turtle amigurumi?
It typically takes between 10 to 15 hours across multiple crochet sessions, depending on your individual experience level and pacing.
Is this turtle pattern suitable for beginners?
It is rated Intermediate-Advanced because it involves managing 7 yarn colors and building a detailed multi-piece eye structure. However, determined crafters can complete it by utilizing our linked step-by-step tutorials.