Free Bee Crochet Amigurumi Keychain Pattern — Scrap-Friendly Mini
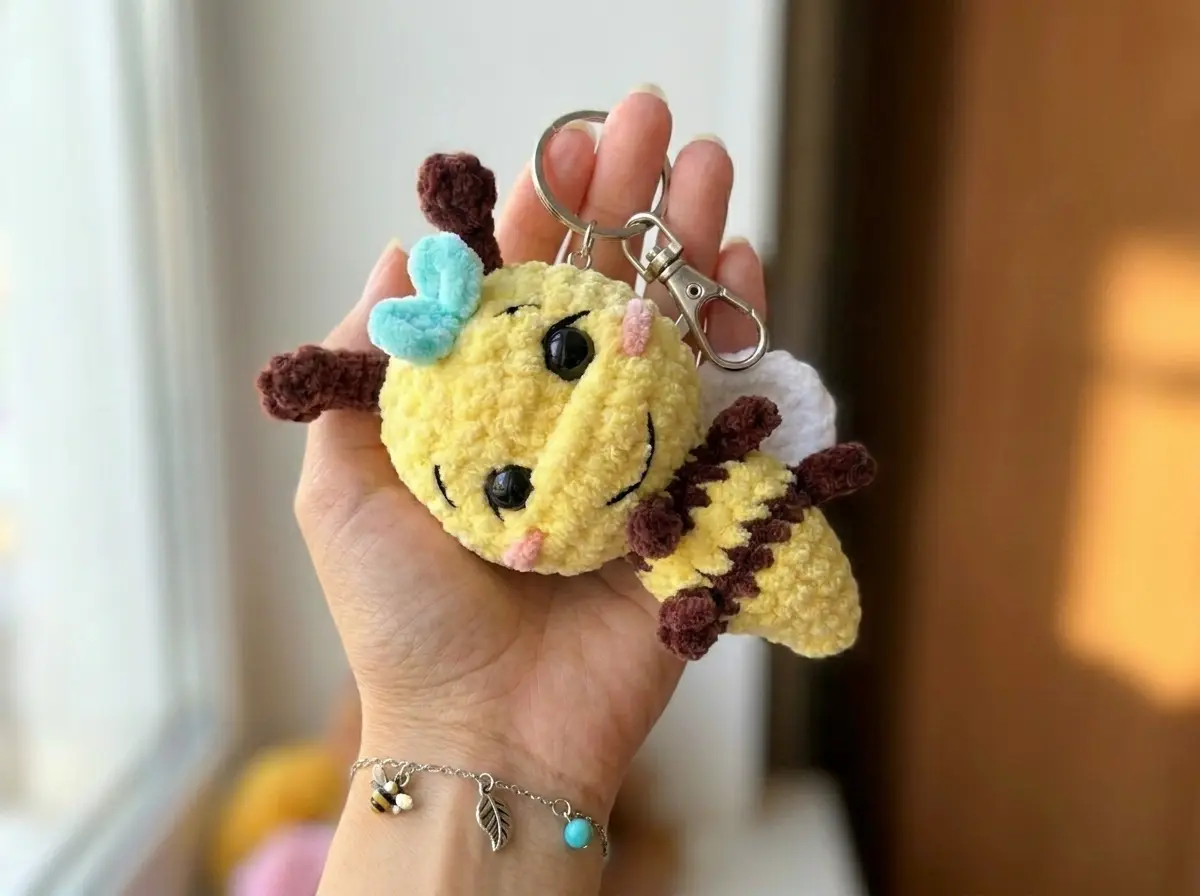
This bee crochet amigurumi keychain pattern is built for your scrap bin — it uses about 50 yards of bulky chenille yarn total and works up in under an hour once you’ve made the body a couple of times. At roughly 3.5 inches tall with tiny striped arms, little antennae, and a bow on her head, she makes a ridiculously good keychain, bag charm, or last-minute gift. Grab your yellow scraps. Let’s go.
🧶 What You’ll Need From Your Stash
- 💰 Yarn Needed: ~50 yards total (yellow ~35 yds, brown ~8 yds, white ~5 yds, plus scrap thread for embroidery)
- 🎨 Colors: yellow (main), brown (stripes + antennae), white (wings), black thin thread (embroidery), pink or peach thread (cheeks)
- 🪝 Hook: G/6 (4.0mm) for body and head; J/10–K/10½ (6.0–7.0mm) for wings only
- ⏱️ Time: 1–2 hours
- 📏 Finished Size: approx. 3.5 in (9 cm) tall
- 💡 Difficulty: Beginner–Intermediate
- 🎁 Great For: gifting as a crochet amigurumi keychain, bag charms, spring gift sets, market bundles
Materials for This Crochet Amigurumi Keychain Bee
The main yarn in this pattern is a Bulky (5) weight chenille — specifically Himalaya Dolphin Baby, which is the original designer’s choice. If you’re in the US and don’t have that on hand, Bernat Baby Velvet and Premier Parfait are both solid alternatives you can find at Joann or Michaels. Any bulky chenille or velvet-type yarn in yellow will work. You probably already have something close enough.
This yarn falls under Bulky (5) weight on the Craft Yarn Council’s standard scale — the thick, squishy kind that makes every stitch look plump and polished with almost no effort.
- Yellow Bulky (5) chenille — approximately 35 yards (body + head)
- Brown Bulky (5) chenille — approximately 8 yards (stripe rows + antennae)
- White Bulky (5) chenille, held double — approximately 5 yards (wings)
- Black thin cotton thread — small amount (embroidering eyelids, eyebrows, mouth)
- Pink or peach thread — small amount (embroidering cheeks)
- Strong thread — for facial tightening (any sturdy thread works)
- Polyester fiberfill — small amount for stuffing
- 10–12mm safety eyes — 1 pair
- G/6 (4.0mm) crochet hook — main hook for body and head
- J/10–K/10½ (6.0–7.0mm) crochet hook — wings only, worked with loose tension
- Tapestry needle and scissors
- Stitch marker — 1
- Keychain ring or lobster clasp (optional — attach to antenna or body top)
Don’t have brown chenille? A darker gold or tan works just as well for the stripe rows. The stripes are small — you need almost nothing. A 6-inch tail from a previous project would honestly cover it.
Abbreviations for This Crochet Amigurumi Keychain Pattern
| Abbreviation | Meaning |
|---|---|
| mr | magic ring |
| ch | chain |
| sc | single crochet |
| inc | increase — 2 sc worked into the same stitch |
| dec | decrease |
| sl st | slip stitch |
| dc | double crochet |
| tr | treble crochet |
| ( ) × n | repeat instructions inside brackets n times |
| (number) | total stitch count at end of row |
Smart Crafter Tips for This Crochet Amigurumi Keychain
The body and head are one continuous piece. You don’t fasten off between them. After finishing the body’s final decrease row, you’ll have 8 stitches left — and you work directly into those to start building the head. This saves you one sewing step and creates a cleaner join. The trick is to stuff the body before that final row so you can close it up as you go.
If you’ve never worked a magic ring before, don’t skip it — it’s what keeps the bottom of the bee from having a hole. Our magic ring tutorial covers the whole thing in under two minutes. Chenille yarn makes it feel slightly slippery at first, so go slowly on that first loop.
Two hooks for one project. The body and head use a G/6 (4.0mm) hook — smaller than you’d typically use with bulky yarn, which is exactly the point. The tight gauge keeps the stuffing from showing through. The wings switch to a larger J/10–K/10½ (6.0–7.0mm) hook with yarn held double and intentionally loose tension. Don’t try to force the wings tight — they’re meant to look airy and slightly open.
First time attaching safety eyes? Our safety eye guide walks through placement, sizing, and exactly when to attach them (before you close the head — there’s no going back after). For this bee, 10–12mm eyes work best with bulky chenille. If this bee is going to a child under 3, embroider the eyes instead of using safety hardware.
🧶 Scrap Check: The stripe rows (body rows 7 and 10) use brown yarn only for the arm and leg chains — a few stitches each. If you’ve got a leftover yard or two of any dark brown or tan from a previous project, that’s genuinely enough. No need to buy a new skein for this.
Free Bee Crochet Amigurumi Keychain Pattern
Body (×1)
Yellow and brown chenille, G/6 (4.0mm) hook. Start with yellow.
Row 1: 4 sc in mr (4)
Row 2: (1 sc, inc) × 2 (6)
Row 3: (2 sc, inc) × 2 (8)
Row 4: (3 sc, inc) × 2 (10)
Row 5: (4 sc, inc) × 2 (12)
Row 6: (2 sc, inc) × 4 (16)
🧶 Scrap Check: Rows 1–6 use about 12–14 yards of yellow chenille. If you’ve got a short leftover ball, check how much you have before continuing.
Row 7: Switch to brown. 5 sc along body, ch 4, starting from 2nd ch from hook work 3 sc back along ch, 6 sc along body, ch 4, starting from 2nd ch from hook work 3 sc back along ch, 5 sc along body (16)
💡 Note — Lower Legs: Row 7 creates the two lower legs. When you chain 4 and work back along the chain, you’re making a small tab that sticks out from the body — that’s the leg. Don’t worry if they look a little floppy at this stage. They settle nicely once the body is stuffed. Keep your tension consistent along the chain.
Rows 8–9: Switch back to yellow. Work 16 sc across each row (2 rows total) (16)
Row 10: Switch to brown. 6 sc along body, ch 3, starting from 2nd ch from hook work 2 sc back along ch, 4 sc along body, ch 3, starting from 2nd ch from hook work 2 sc back along ch, 6 sc along body (16)
💡 Note — Upper Arms: Row 10 works exactly like Row 7 but with shorter chains — these are the upper arms. After finishing Row 10, fasten off and cut the brown yarn. You won’t need it again for the body.
Rows 11–12: Switch back to yellow. Work 16 sc across each row (2 rows total) (16)
🧶 Scrap Check: Stuff the body with fiberfill now, after Row 12, before working Row 13. Add filling gradually and check the shape as you go — you want it firm but not stretched. Our stuffing guide covers how to get the density right without lumps.
Row 13: 8 dec (8)
Do not fasten off. Continue directly into Head Row 1 with the remaining 8 stitches.
Head (×1)
Yellow chenille, G/6 (4.0mm) hook. Worked continuously from the 8 remaining body stitches — no joining required.
Row 1: (3 sc in 1 st) × 8 (24)
💡 Note: Working 3 sc into each of the 8 remaining body stitches is what expands the head outward from the body in one smooth continuous motion. No sewing, no seam, no separate starting ring. This is the clever bit.
Row 2: (3 sc, inc) × 6 (30)
Rows 3–5: 30 sc (3 rows) (30)
Row 6: (8 sc, dec) × 3 (27)
Row 7: 27 sc (27)
Row 8: (7 sc, dec) × 3 (24)
Row 9: (2 sc, dec) × 6 (18)
Row 10: (1 sc, dec) × 6 (12)
Row 11: 6 dec (6)
Finishing: Close the opening with a tapestry needle. Weave in the end inside the head.
Antennae (×2)
Brown chenille, G/6 (4.0mm) hook. Worked directly onto the head — no separate starting required.
Working one row above the eyes, at the side of the head: join brown yarn. Ch 4, starting from 2nd ch from hook work 4 sc (this creates the bobble tip of the antenna), then work 2 sc back along the chain, sl st into neighboring stitch on head.
Fasten off, cut yarn, and weave all ends inside the head. Repeat for the second antenna on the opposite side.
💡 Note: The 4 sc worked into the tip of the chain create a little bobble — that’s the round end of the antenna. Work them snugly for a defined bump. The sl st at the end anchors it back to the head.
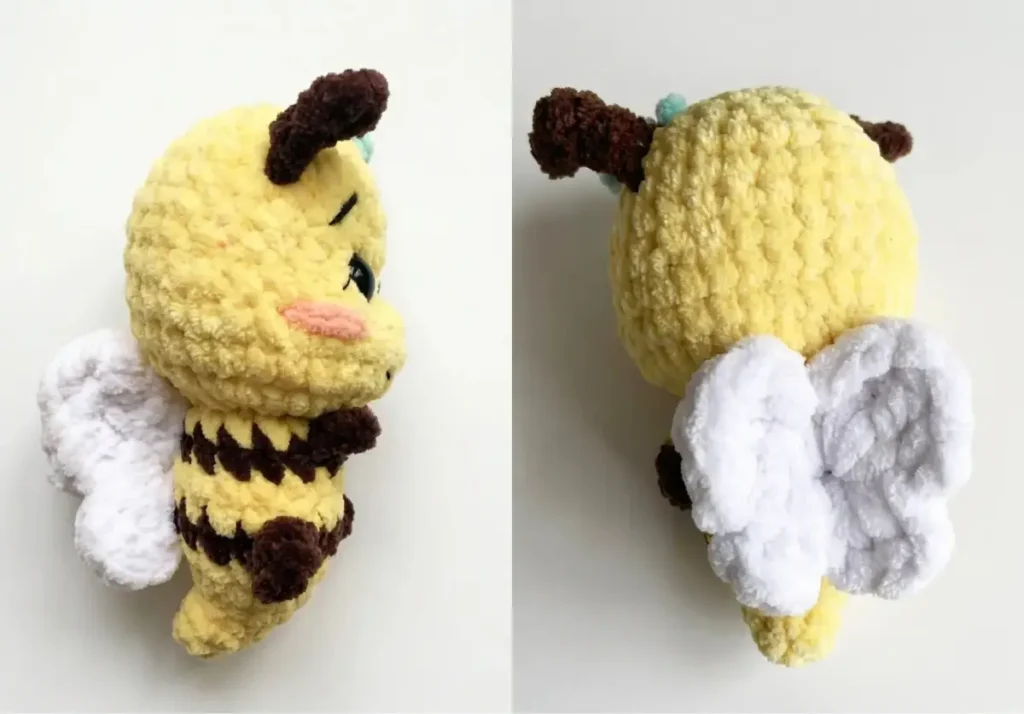
Wings (×1 piece, two wings connected)
White chenille held double (2 strands together), J/10–K/10½ (6.0–7.0mm) hook. Work with intentionally loose tension — the wings should drape softly, not pucker.
Ch 6, join into a ring with sl st These wings will be sewn onto the back of your finished crochet amigurumi keychain.
First side: Into the ring: ch 3, 2 dc, ch 3, sl st under ring; ch 3, 1 dc, 3 tr, ch 4, sl st under ring.
Second side: Ch 4, 3 tr, 1 dc, ch 3, sl st under ring; ch 3, 1 dc, ch 3, sl st under ring.
Finishing: Fasten off. Cut yarn, leaving tails long enough to sew onto the back of the body.
💡 Note: Holding two strands together creates the slight thickness that makes the wings look defined without being heavy. If your yarn is thicker and they’re coming out stiff, go up one more hook size. The wings should look airy.
Bow (×1)
Any scrap yarn or thin ribbon yarn in your preferred color. This is a tiny decorative piece — a 12-inch yarn tail from almost any project is enough.
Ch 4. Into the first chain: 1 dc, ch 3, sl st; ch 3, 1 dc, sl st.
Finishing: Fasten off. Leave a tail for sewing onto the head.
🧶 Scrap Check: The bow uses almost nothing — a short leftover in any color works. Pink bows are the classic choice, but a yellow or red bow in a contrasting texture looks great too.
Assembling Your Crochet Amigurumi Keychain
- Attach safety eyes. Position them between rows 6 and 7 of the head. Leave a gap of 1 stitch between the inner posts of the two eyes. Press the locking washers firmly on from inside — this is permanent, so check placement before you commit. If this bee is a gift for a small child, embroider the eyes in black thread instead.
- Facial tightening. Thread a needle with strong thread. Insert the needle under the chin and bring it out at the inner corner of the left eye (facing you). Insert back in to the right of the inner corner of the right eye and bring it out under the chin again. Pull the thread gently but firmly — the eyes will indent slightly and the face will round out into a more expressive shape. Use your fingers to adjust symmetry as you pull. Tie off with several knots and weave the ends inside the head. This step makes a noticeable difference, so don’t skip it.
- Embroider the face. Using thin black thread, embroider the eyelids, eyebrows, and a small curved mouth. Keep stitches small and tidy — chenille is forgiving but a chunky stitch will show. Use pink or peach thread for a few small cheek stitches on each side of the face.
- Attach the wings. Sew the wings onto the center of the back. Use the long yarn tails you left when finishing — thread them through to the inside and weave in securely. The two-sided wing piece should sit symmetrically, with both sides fanning out from the center join.
- Sew on the bow. Position the bow on top of the head, centered between the antennae. Sew down with the tail you left, tie off, and weave ends inside the head.
- Attach keychain hardware (optional). Thread a keychain ring or lobster clasp through the top of the head or loop it around one antenna. Craft stores and Amazon carry keychain lobster clasps in multi-packs for under $5 — you can get enough hardware for 20–30 keychains from one pack.
💡 Stretch It Further: Make three in one sitting using the same pattern — swap the yellow for orange (Halloween bee), gold (autumn version), or pale yellow with a pink bow. Bundle them in a small kraft gift box with tissue paper and you’ve got a handmade gift set for under $5 in total materials. These also sell consistently well at craft fairs: small chenille keychains like this price out at $8–12 each with no argument from buyers. Three from one leftover skein of yellow = serious profit margin if that’s your thing.
Mia’s Take
About 50 yards of yarn, one small hook, a scrap of brown, and an even smaller scrap of white — that’s a complete, giftable, sellable little bee with a bow on her head. That’s the whole project. I’ve made these in every shade of yellow I had in my bin (butter yellow, golden yellow, dusty mustard) and they all worked. Make her in a set of three with different bow colors and you’ve got a handmade gift that looks like you spent way more time than you did. Attach a ring, tuck her into an envelope, done. 🧶
What yarn is best for this bee crochet amigurumi keychain?
Bulky (size 5) chenille works best — Bernat Baby Velvet or Premier Parfait are popular US choices. Any leftover chenille from a plush or baby blanket project will do, as the entire bee uses under 50 yards total.
How long does it take to crochet this bee keychain?
Most crafters finish in 2–3 hours. The built-in limb construction eliminates most separate sewing, so assembly is much faster than a standard amigurumi of the same size.
Can beginners make this crochet amigurumi keychain?
The pattern is rated intermediate due to the built-in limb rows and facial tightening technique. Beginners who are comfortable crocheting in the round and working basic increases and decreases can manage it by following the tips provided.