Free Amigurumi Penguin Pattern — Tiny Button Penguin
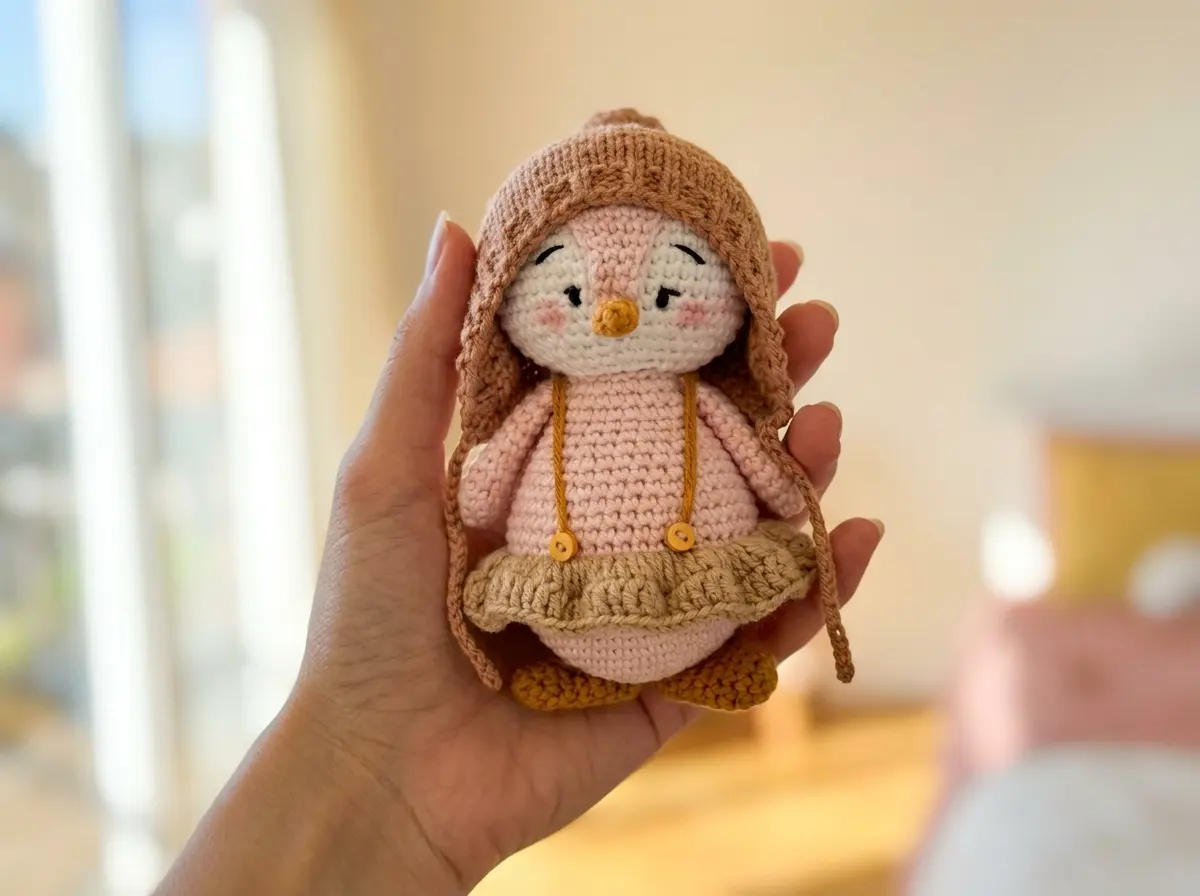
This free amigurumi penguin pattern is everything — a plump little penguin in the softest pink, wearing a beige skirt with tiny mustard straps, a knitted brown hat with the sweetest little ties, and hand-embroidered eyes full of personality. She stands just under 5 inches tall and radiates charm from every single angle. Every detail on this button penguin is just too much. The best kind of too much.
🩷 Pattern Highlights
- Cuteness Rating: 🩷🩷🩷🩷🩷
- Finished Size: 4.75 in (12 cm)
- Difficulty: Intermediate
- Hook Size: Steel 4 (2.0 mm)
- Yarn Palette: blush pink, soft white, warm beige, golden mustard, rich brown
- Key Detail: hand-embroidered eyes, dusty pink eyeshadow cheeks, and mustard shoulder straps
- Estimated Time: 6–10 hours
Materials for Your Amigurumi Penguin
Getting the colors right is everything with this little one. The soft blush pink of her body against the creamy white of her face, the warm golden mustard of the beak and tiny feet peeking out from under the skirt — it all comes together into something that looks almost too sweet to be real.
- Blush pink yarn — DK/Light Worsted (3), such as Gazzal Baby Cotton or US alternatives: Drops Safran or Paintbox Cotton DK. Used for the body, hood, and wings. Approximately 1 skein.
- Soft white yarn — same weight as above. Used for the head. Less than 1 skein.
- Warm beige yarn — same weight. Used for the skirt. A small amount.
- Rich brown yarn — same weight. Used for the hat. Less than 1 skein.
- Golden mustard yarn — same weight. A small amount used for the feet, beak, and those adorable little shoulder straps.
- Hook: Steel 4 (2.0 mm) — yes, this is a fine hook. The tiny gauge gives the fabric that perfectly tight, dense texture that makes amigurumi look so clean and polished at this scale.
- Knitting needles: US size 0 (2.0 mm) straight needles — used for the hat section only. Basic knitting skills are needed: cast on, knit stitch, purl stitch, and k2tog decreases.
- Black sewing thread or black embroidery floss — for embroidering the eyes.
- Polyfill stuffing — for the head and body. The Poly-Fil brand by Fairfield is widely available at Joann, Michaels, and Hobby Lobby.
- Stitch marker — to track the beginning of each round. Absolutely non-negotiable for this one.
- Tapestry needle — for sewing parts together and weaving in ends.
- Dry pink eyeshadow and a small brush or cotton swab — for the blush cheeks. This little detail is everything.
This yarn is classified as DK / Light Worsted (3) by the Craft Yarn Council — lightweight, smooth, and perfect for showing off tiny stitch details at this fine gauge.
Abbreviations
Crochet Abbreviations
| Abbreviation | Meaning |
|---|---|
| mr | magic ring |
| ch | chain |
| sc | single crochet |
| dc | double crochet |
| sl st | slip stitch |
| inc | increase (2 sc in same stitch) |
| dec | invisible decrease — insert hook through front loops only of next 2 stitches simultaneously, yarn over, pull through, yarn over, pull through 2 loops |
| BLO | back loop only |
| FLO | front loop only |
| st(s) | stitch(es) |
| FO | fasten off |
Knitting Abbreviations (Hat Section Only)
| Abbreviation | Meaning |
|---|---|
| k | knit stitch |
| p | purl stitch |
| k2tog | knit 2 stitches together (decrease) |
Before You Begin — Details That Make This Amigurumi Penguin Special
This is a pattern that rewards patience and attention to detail. There are eight separate parts to make, plus a finishing stage that is genuinely the most fun part of the whole project. A few things worth knowing before you start your first magic ring:
Working at 2.0 mm feels different from most amigurumi — the scale is finer, and the fabric will feel satisfyingly firm. That’s exactly right. A tight fabric keeps the stuffing from showing through and gives the finished piece that clean, rounded shape. Let your hands adjust to the smaller scale and trust the process.
This pattern includes a knitted hat — a wonderful mixed-medium element that adds so much charm to the finished piece. You’ll need basic knitting skills for that section: casting on, the knit stitch, the purl stitch, and k2tog decreases. The hat is small and works up quickly once you find your rhythm.
Almost every part begins with a magic ring. If you’re new to this technique or want a quick refresher, our guide to the amigurumi magic ring walks through it step by step so your rounds start perfectly clean every time.
🩷 Chloe’s Detail Tip: The eyes on this penguin are embroidered rather than safety eyes — each eye is one single crochet in height. Before you make a single stitch, use pins to mark the exact position on both sides of the face and check symmetry under a bright lamp. Getting them perfectly level before you commit is the detail that transforms a cute penguin into an absolutely irresistible one.
Amigurumi Penguin Pattern Instructions
Head (×1)
Yarn color: soft white | Starting method: magic ring
A smooth, round sphere of cream white — this is the canvas for everything that comes after. Stuff it firmly before you close. A well-filled head gives the face that satisfyingly plump shape that makes amigurumi so irresistible to hold.
Row 1: 6 sc in mr (6)
Row 2: 6 inc (12)
Row 3: (1 sc, inc) × 6 (18)
Row 4: (2 sc, inc) × 6 (24)
Row 5: (3 sc, inc) × 6 (30)
Row 6: (4 sc, inc) × 6 (36)
Row 7: (5 sc, inc) × 6 (42)
Row 8: (6 sc, inc) × 6 (48)
Row 9: (7 sc, inc) × 6 (54)
Rows 10–16: 54 sc (54)
Row 17: (7 sc, dec) × 6 (48)
Row 18: (6 sc, dec) × 6 (42)
Row 19: (5 sc, dec) × 6 (36)
Row 20: (4 sc, dec) × 6 (30)
Row 21: (3 sc, dec) × 6 (24)
Row 22: (2 sc, dec) × 6 (18)
Row 23: (1 sc, dec) × 6 (12)
Row 24: 6 dec (6)
Stuff firmly before closing. Close the opening, FO, and cut yarn.
Hood (×1)
Yarn color: blush pink | Starting method: magic ring
The hood is shaped just like the head but slightly smaller, and it has the most precious little forehead flap that folds down over the front of the face. This is the detail that gives her that bundled-up, cozy winter look — like she is absolutely ready for a tiny adventure in the cold.
Row 1: 6 sc in mr (6)
Row 2: 6 inc (12)
Row 3: (1 sc, inc) × 6 (18)
Row 4: (2 sc, inc) × 6 (24)
Row 5: (3 sc, inc) × 6 (30)
Row 6: (4 sc, inc) × 6 (36)
Row 7: (5 sc, inc) × 6 (42)
Row 8: (6 sc, inc) × 6 (48)
Row 9: (7 sc, inc) × 6 (54)
Rows 10–15: 54 sc (54)
After completing Row 15, identify and mark the center front 6 stitches. You will now work only these 6 stitches back and forth in turned rows to shape the forehead flap. The remaining 48 stitches are left unworked.
Row 16: 1 ch, 6 sc (6)
Row 17: 1 ch, 1 dec, 2 sc, dec (4)
Row 18: 1 ch, 4 sc (4)
Row 19: 1 ch, 4 sc (4)
Row 20: 1 ch, 1 dec, 2 sc (3)
Row 21: 1 ch, 3 sc (3)
Leave a tail for sewing. Do not stuff the hood.
Body (×1)
Yarn color: blush pink | Starting method: magic ring
Watch for Row 14 — it is worked in BLO and creates a little ridge that the skirt will attach to later. It is such a clever construction detail, and it makes the skirt sit so naturally on the finished piece. Do not skip the BLO on that row!
Row 1: 6 sc in mr (6)
Row 2: 6 inc (12)
Row 3: (1 sc, inc) × 6 (18)
Row 4: (2 sc, inc) × 6 (24)
Row 5: (3 sc, inc) × 6 (30)
Row 6: (4 sc, inc) × 6 (36)
Row 7: (5 sc, inc) × 6 (42)
Row 8: (6 sc, inc) × 6 (48)
Row 9: (7 sc, inc) × 6 (54)
Row 10: 54 sc (54)
Row 11: (7 sc, dec) × 6 (48)
Rows 12–13: 48 sc (48)
Row 14: 48 sc in BLO (48)
Rows 15–16: 48 sc (48)
Row 17: (6 sc, dec) × 6 (42)
Row 18: 42 sc (42)
Row 19: (5 sc, dec) × 6 (36)
Row 20: 36 sc (36)
Row 21: (4 sc, dec) × 6 (30)
Rows 22–26: 30 sc (30)
Stuff firmly. Leave a tail for sewing.
Wings (×2)
Yarn color: blush pink | Starting method: magic ring | Make two
Small and quick to make, and those little folded wings are so endearing once they’re stitched onto the sides of the body. They barely reach past the skirt and somehow that makes them look even more precious.
Row 1: 6 sc in mr (6)
Row 2: 6 sc (6)
Row 3: 6 inc (12)
Rows 4–11: 12 sc (12)
Do not stuff. Fold the wing flat in half and work 6 sc across the open edge to close it. Leave a tail for sewing.
Feet (×2)
Yarn color: golden mustard | Starting method: magic ring | Make two
These tiny mustard feet are everything. They barely peek out from under the skirt once assembled, which somehow makes them even more charming — a little flash of golden yellow against the beige hem.
Row 1: 6 sc in mr (6)
Row 2: 6 inc (12)
Rows 3–9: 12 sc (12)
Row 10: (1 sc, dec) × 4 (8)
Close the opening. Do not stuff. Leave a tail for sewing.
Beak (×1)
Yarn color: golden mustard | Starting method: magic ring
Five stitches. Four rows. The smallest thing in the entire project, and somehow one of the most important. This tiny mustard beak is what gives the face its whole expression.
Row 1: 5 sc in mr (5)
Rows 2–4: 5 sc (5)
Do not stuff. Leave a tail for sewing.
Skirt (×1)
Yarn color: warm beige | Worked directly from the body
This is where it gets magical. You will attach your beige yarn directly into the front loops you left waiting in Row 14 of the body. Those loops were saved just for this moment — and the skirt grows out of them naturally, flaring gently with every double crochet. The construction is so satisfying to work.
Row 1: Ch 3 (counts as first dc), 1 dc in same FLO st, 2 dc in each remaining FLO st around (96)
Row 2: 1 dc in each st around (96)
FO and cut yarn. Weave in ends.
Hat (×1)
Yarn color: rich brown | Starting method: cast on 45 stitches on US size 0 (2.0 mm) knitting needles
The hat is knitted — a delightful little mixed-medium moment that adds so much personality to the finished penguin. The ribbed brim, the smooth stockinette body, the tiny crocheted tie strings along the edges — it is a lot of character for a very small accessory.
Rows 1–4: Work 4 rows in 1×1 ribbing (k1, p1) (45)
Rows 5–28: Work 24 rows in stockinette stitch (45)
Crown Decreases
After completing Row 28, begin shaping the crown. At the beginning of every row going forward, work 3 decreases as follows:
- First decrease: Knit the edge stitch together with the next stitch (k2tog).
- Second decrease: Place the resulting stitch back onto the left needle and knit it together with the following stitch (k2tog).
- Third decrease: Repeat the same as the second decrease.
- Continue knitting to the end of the row.
- Repeat these 3 decreases at the beginning of each row — including purl rows, where the decreases are also worked as knit stitches — until 3–4 stitches remain on the needles.
Finishing the Crown
Leave a yarn tail. Place the remaining stitches on a crochet hook, pull the yarn through all of them, and cinch tightly. Sew the hat closed along the uneven side edge.
Tie Strings
- Ch 12.
- Work sc along the entire bottom edge of the hat.
- At the opposite end of the edge, ch 12 again.
- Cut yarn and fasten off.
The two chain-12 tails become the sweet little dangling ties. So precious.
Assembling Your Amigurumi Penguin
This is where all the separate little pieces come together into one perfect tiny creature. Take your time with placement — especially the hood and the beak, since their positions set the whole expression of the face before you ever embroider the eyes. For tips on positioning and pinning parts evenly before sewing, our guide to sewing amigurumi parts together has everything you need.
- Sew the head to the body.
- Sew the hood over the head, positioning the forehead flap at the front of the face. The flap should frame the face softly and sit just slightly above where the eyes will go. Pin it in place and check from the front before sewing.
- Sew the wings to the sides of the body. Check from directly in front to confirm they sit at the same height on both sides.
- Sew the feet to the bottom of the body so they peek out just slightly from under the skirt hem.
- Sew the beak to the center of the face, below the midpoint and centered horizontally. This placement sets where the eyes will go.
- Place the hat on top of the head and hood, position it at a gentle angle if desired, and sew it in place. Let the ties hang naturally on either side of the face.
Making It Extra Cute — Finishing Details for Your Amigurumi Penguin
Okay. This is the part I live for. The penguin is assembled, she has her shape — and now we are going to give her a face and a personality. This is where it goes from a very sweet little doll to something completely irresistible.
Embroidering the Eyes
Each eye is the height of one single crochet stitch. Use black sewing thread or black embroidery floss and a fine needle. Before you make a single stitch, hold the assembled face under a bright lamp and use pins to mark the exact placement of both eyes. They should sit symmetrically — same height, same distance from the center, same distance from the beak on each side.
Work slowly and keep each stitch small and tidy. When you’ve finished both eyes, turn the face in several directions and check symmetry from multiple angles. A little distance actually helps — hold the piece at arm’s length and squint slightly. Small asymmetries that aren’t obvious up close become much clearer from farther away, and it is infinitely easier to redo one eye now than to notice the difference every time you look at her afterward.
🩷 Chloe’s Detail Tip: If you’re not sure about the eye position, take a photo on your phone and look at it — the camera sees asymmetry that your hands-on perspective sometimes misses. A tiny adjustment before you commit a stitch makes all the difference in the final expression.
Blush Cheeks
Dry pink eyeshadow is the absolute secret weapon here and I will never stop talking about it. Take a small amount on a dry makeup brush or clean cotton swab and dust it gently onto the cheeks — just below and slightly outside the eyes — in soft, circular motions. Build the color gradually. It is much easier to add more than to remove too much.
Choose a cool-toned pink rather than a warm peach — it reads as a true rosy blush against the white of the face and gives that soft, delicate quality that makes kawaii faces so completely appealing. Apply the cheeks before you attach the hood so you have full access to the face. The result is this beautiful flush that makes the penguin look like she has been outside in cold air. Okay but those cheeks though.
Mustard Shoulder Straps
These tiny suspender straps are one of the most charming details on the entire piece and they are so simple to add. Thread a tapestry needle with mustard yarn and make a knot at the end. Insert the needle from the back, under the skirt, and bring it out over the penguin’s shoulder. Insert the needle from the front, back down under the bottom edge of the skirt on the same side, make a knot, and hide the tail end. Repeat for the second strap on the opposite shoulder.
Measure from the center back to each strap placement before you start so they sit evenly. When they’re symmetrical and those little golden lines cross neatly over the pink of the body — I may have squealed a little when this part came together on mine.
Optional Hat Bow
A tiny bow made from thin yarn can be added to the front of the hat for one final sweet flourish. Keep it very small — a bow that’s too large competes with the face. Soft cream or pale pink against the brown of the hat looks absolutely dreamy. This is completely optional but genuinely very cute.
Stuffing Check
The head and body both need to be stuffed before closing, and how firmly you stuff them affects the final silhouette. Our guide to stuffing amigurumi has great tips on distributing the filling evenly so the shape stays smooth and round without lumpy spots — it makes a real difference in how the finished piece holds its shape over time.
Chloe’s Final Look
I have been staring at this finished button penguin for an unreasonable amount of time and I regret absolutely nothing. The blush on the cheeks against the white of the face, the mustard straps crossing over the soft pink of the body, the little knitted hat with its dangling tie strings, those embroidered eyes with all their tiny personality — she is layered and detailed and precious from every single angle. Try making a set of three in different hat colors — lavender, mint, and soft caramel — and lining them up on a shelf together. You will not be able to walk past them without smiling. 🩷
What yarn is best for this amigurumi penguin pattern?
DK/Light Worsted weight yarn (weight 3) is recommended. The pattern uses Gazzal Baby Cotton, with alternatives like Drops Safran or Paintbox Cotton DK — smooth, lightweight yarns that show off fine stitch details clearly at the 2.0 mm gauge.
How long does it take to crochet this amigurumi penguin?
This pattern takes approximately 6–10 hours from start to finish. That includes all eight crocheted and knitted parts, assembly, and finishing details like embroidered eyes and blush cheeks.
Can beginners make this amigurumi penguin?
This pattern is rated intermediate. It requires comfort with amigurumi construction techniques, working at a fine 2.0 mm gauge, and basic knitting skills — specifically cast on, knit stitch, purl stitch, and k2tog decreases — for the hat section.