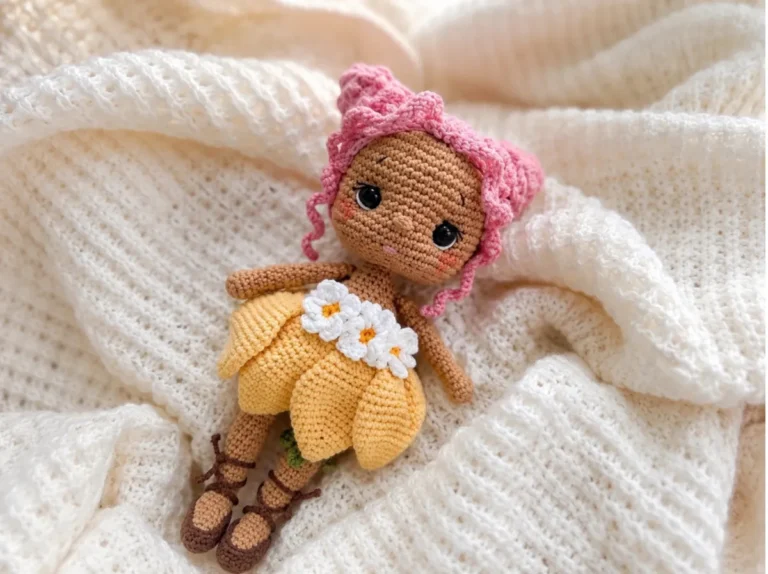
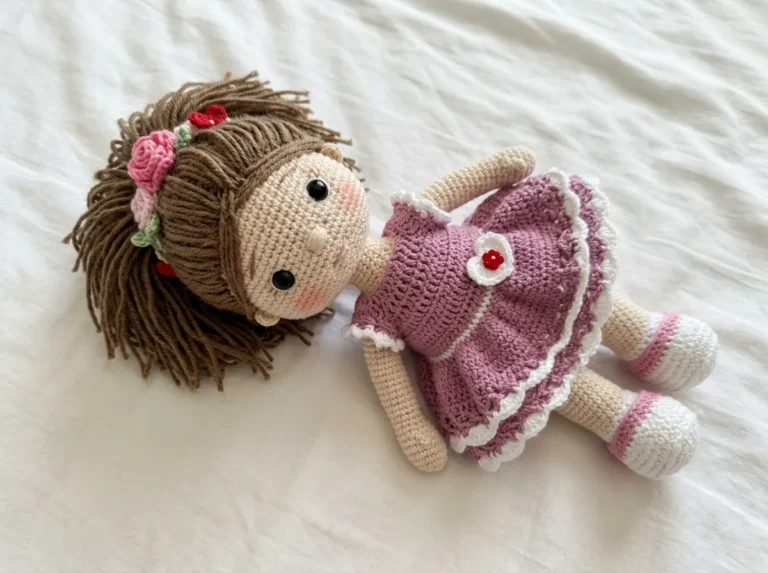
A Crochet Baby Doll That Earns Every Yard of DK Sitting in Your Stash
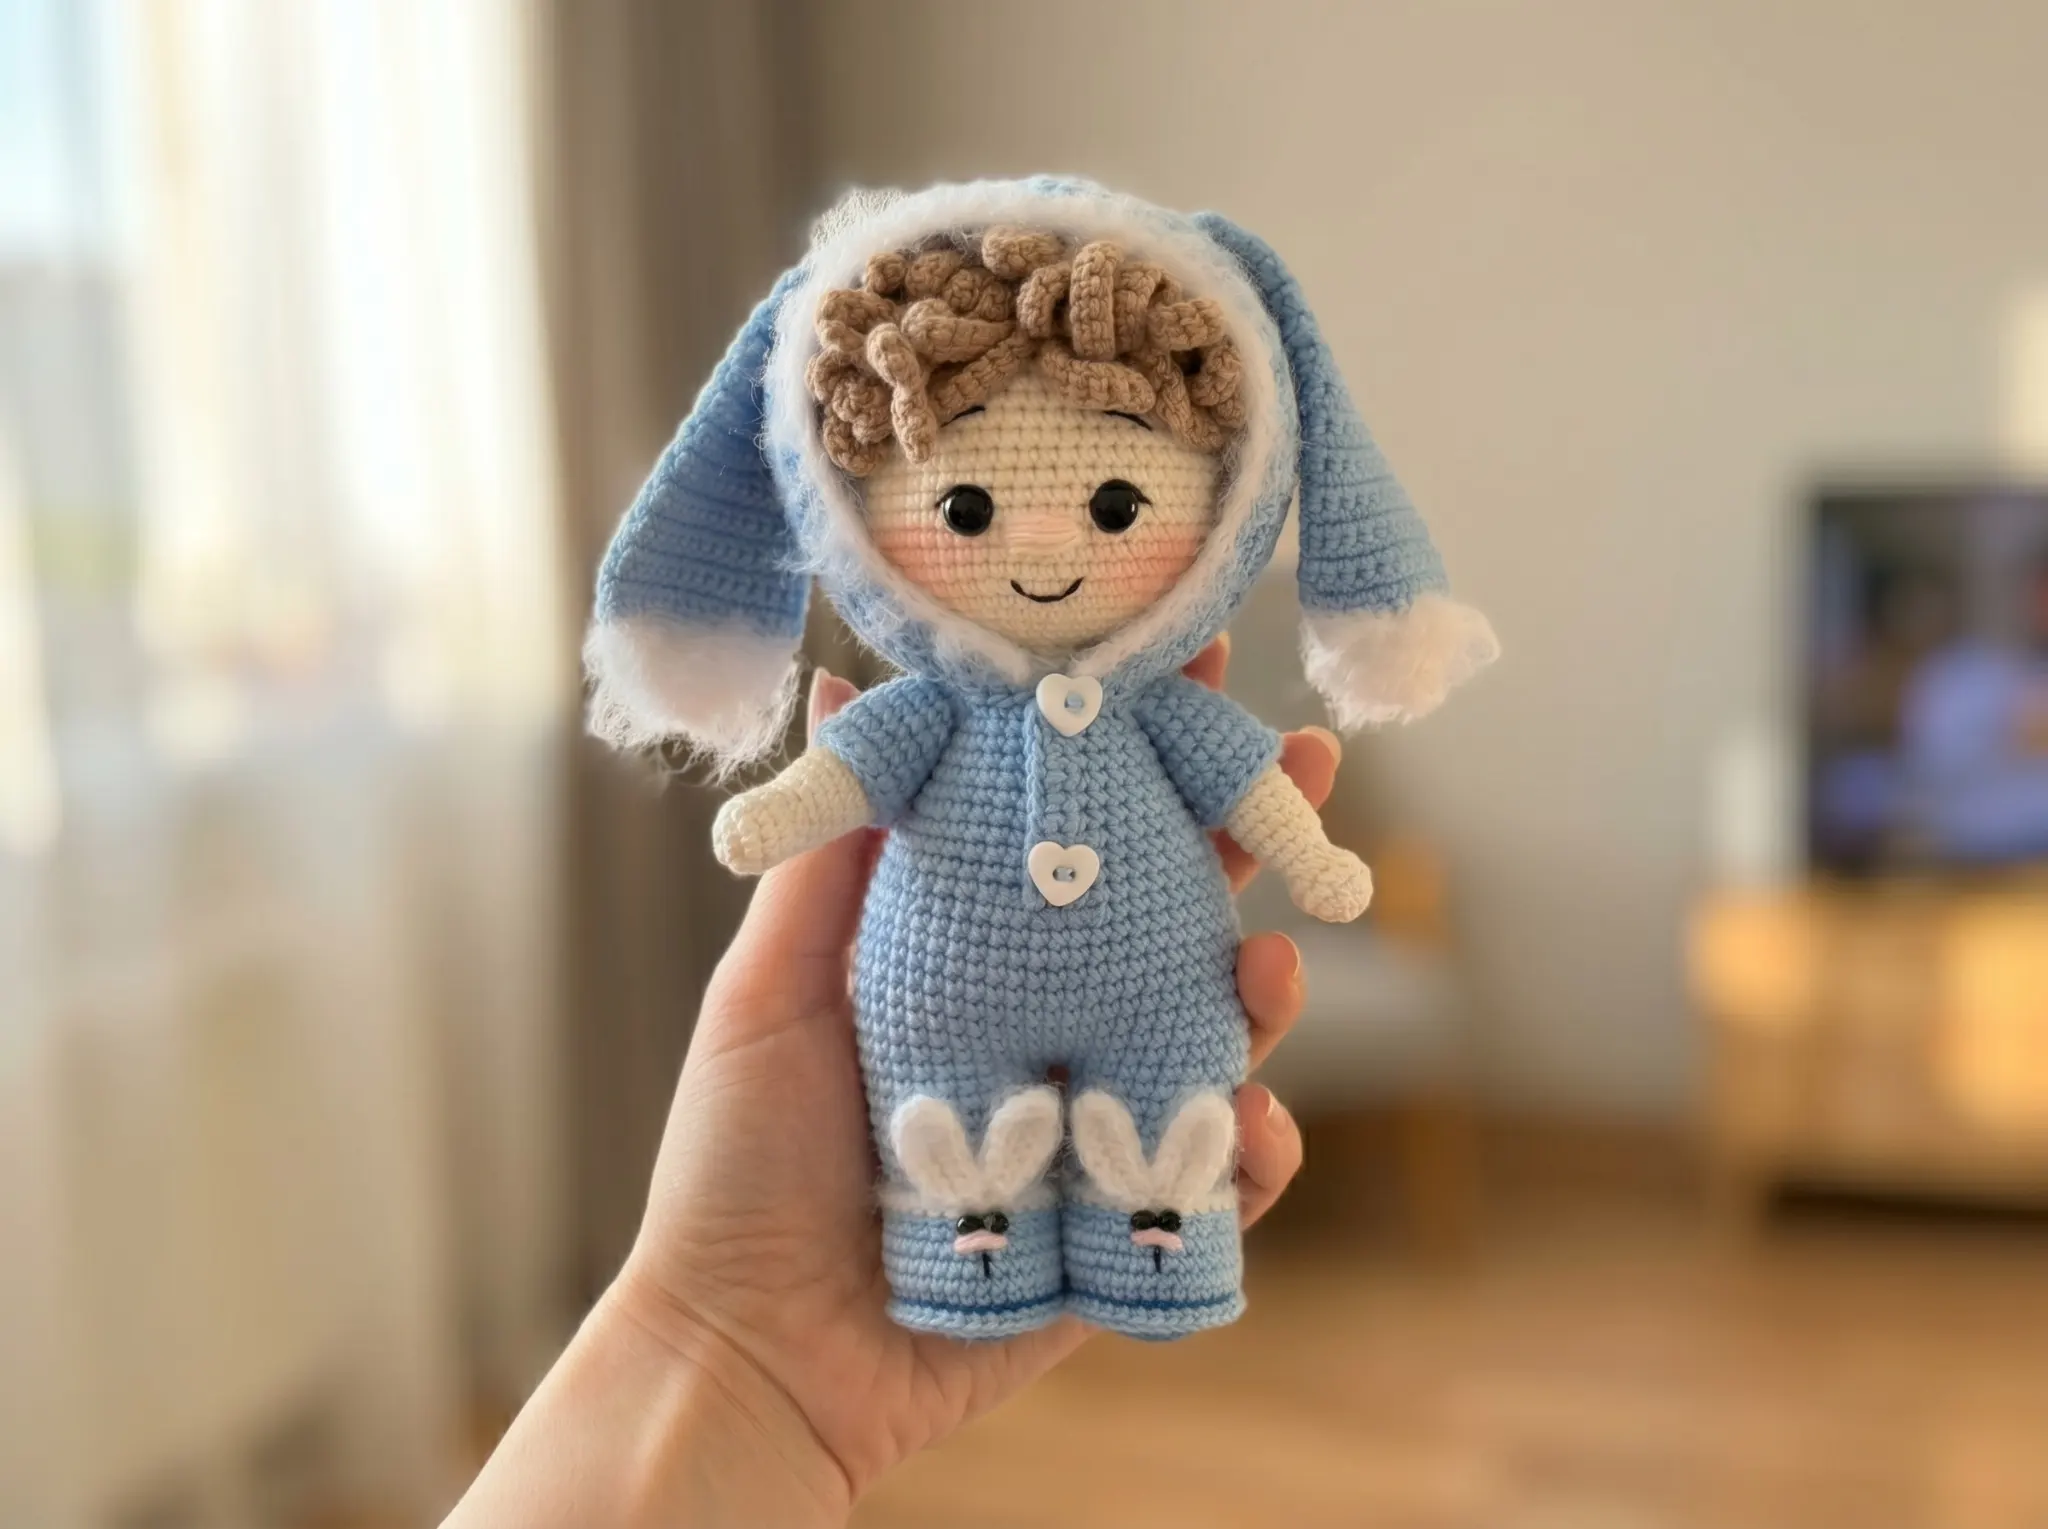
This crochet baby doll pattern gives you a fully dressed 7.9 in doll — crocheted body, curly wig, tiny shoes, and a knitted bunny jumpsuit with a hood — mostly from DK yarn you already have. Yes, there’s knitting involved for the costume. Yes, it’s worth it. The body is pure crochet, the clothing is worked flat on US size 0 needles, and the whole thing comes together in a weekend if you commit to it. Got DK scraps in three or four colors? You have almost everything you need.
🧶 What You’ll Need
- 💰 Yarn Needed: ~390 yds total (body color ~180 yds DK/Light Worsted; light blue ~150 yds DK/Light Worsted; white ~20 yds DK/Light Worsted; dark blue/navy ~15 yds DK; worsted for wig ~30 yds)
- 🎨 Colors: skin tone (body color), light blue, white, dark blue or navy — or any DK scraps in similar weights you have on hand
- 🪝 Hook: 1.9 mm (main body and clothing details), 1.7 mm (shoe ear flaps), 2.0 mm / US Steel 4 (wig)
- 🧵 Needles: US size 0 (2.0 mm) knitting needles — for the jumpsuit and hood
- ⏱️ Time: 10–15 hours
- 📏 Finished Size: 7.9 in (20 cm)
- 💡 Difficulty: Advanced — combines crochet and knitting
- 🎁 Great For: handmade gifts, baby showers, nursery décor, heirloom toys
Materials for This Crochet Baby Doll
- Body color yarn (DK / Light Worsted — CYCA 3): approximately 180 yards — YarnArt Jeans, Drops Muskat, or Paintbox Simply Cotton DK all work well; any smooth DK cotton or cotton-acrylic blend in a skin tone
- Light blue yarn (DK / Light Worsted — CYCA 3): approximately 150 yards — for the jumpsuit, hood, hood ear flaps, and shoes; any light blue DK yarn from your stash works
- White yarn (DK / Light Worsted — CYCA 3): approximately 20 yards — NAKO Paris or any smooth white DK; used only for edging and ear flap tips, so a small leftover is plenty
- Dark blue / navy yarn (DK — CYCA 3): approximately 15 yards — for the shoe soles only; scrap bin material
- Worsted weight yarn (CYCA 4): approximately 30 yards — for the wig; Alize Cotton Gold Hobby, Lion Brand 24/7 Cotton, or any smooth worsted in your hair color of choice
- Black embroidery thread (iris or pearl cotton): a small amount — for the mouth, eyelashes, and shoe face details
- Hooks: 1.9 mm (body, jumpsuit details, shoes), 1.7 mm (shoe ear flaps), 2.0 mm / US Steel 4 (wig)
- Knitting needles: US size 0 (2.0 mm)
- Safety eyes (screw-back style): 2 — check the U.S. Consumer Product Safety Commission guidelines if this doll is intended for a child under 3; embroidered eyes are the safer option for very young recipients
- Small beads: 2 — for shoe decoration
- Buttons: 2 — for the jumpsuit closure
- Polyfill stuffing
- Tapestry needle
- Stitch markers
🧶 Scrap Check: The dark blue shoe soles use about 15 yards. The white edging on the hood and shoes uses about 20 yards combined. Both of those are genuine scrap amounts — the kind of thing you’d normally wind into a little ball and forget about. Don’t forget about them. They’re on this doll.
Crochet Baby Doll — Abbreviations
Crochet Abbreviations
| Abbreviation | Meaning |
|---|---|
| mr | magic ring |
| ch | chain |
| sc | single crochet |
| hdc | half double crochet |
| dc | double crochet |
| sl st | slip stitch |
| inc | increase — 2 sc worked into the same stitch |
| dec | invisible decrease — insert hook through front loops only of next 2 stitches simultaneously, yarn over, pull through, yarn over, pull through 2 loops |
| hdc-dec | half double crochet decrease — yarn over, insert hook in next st, pull up loop, insert hook in following st, pull up loop, yarn over, pull through all 5 loops |
| BLO | back loop only |
| FLO | front loop only |
| FO | fasten off |
| st(s) | stitch(es) |
Knitting Abbreviations (Jumpsuit and Hood)
| Abbreviation | Meaning |
|---|---|
| k | knit |
| p | purl |
| yo | yarn over |
| k2tog | knit 2 together (right-leaning decrease) |
| M1 | make 1 — use a crossed yarn over (no hole); not a regular yarn over |
| BO | bind off |
| selvedge st | edge stitch — slip the first stitch of every row; purl the last; these are NOT counted in stitch totals |
Smart Crafter Tips Before You Start
The magic ring is your starting point for almost every crocheted part. Legs, arms, shoes, ears — they all open with a magic ring. If you haven’t made one before or you’re still getting a gap in the center, our magic ring tutorial is worth two minutes of your time before you pick up the hook.
The invisible decrease is the only decrease this doll uses. The pattern calls it “dec” — and on a doll this size, with this much visible surface, a visible gap at every decrease would show. Our invisible decrease guide shows you exactly how to do it cleanly. Takes about five minutes to get the hang of, saves you from having to frog the whole body closure.
Assembly is where this project earns its “advanced” label. You have 10 separate parts to sew together at the end, including a button-joint arm attachment that gives the arms movement. Don’t skip the pinning step — read through our guide to sewing amigurumi parts before assembly and you’ll save yourself a lot of repositioning. The wig especially needs to be centered precisely before you commit to sewing it down.
If you’ve never knitted before: the jumpsuit and hood are worked flat in stockinette with increases for a raglan yoke. If you can knit, purl, and do a yarn over, you have enough to follow it. The M1 increase should be worked as a crossed yarn over to avoid holes — standard M1L or M1R will also work.
Stuff as you go. The pattern calls out specific stuffing checkpoints in the body-head section — rows 13, 24, 47, and 51. Don’t skip them. Trying to stuff a nearly closed head is how you get lumps.
How to Make This Crochet Baby Doll — Full Pattern
Legs (×2) — Body Color
Work each leg in continuous rounds starting with a magic ring.
Row 1: 6 sc in mr (6)
Row 2: 6 inc (12)
Row 3: (1 sc, inc) × 6 (18)
Row 4: ((1 sc, inc) × 3, 3 sc) × 2 (24)
Row 5: ((2 sc, inc) × 3, 3 sc) × 2 (30)
Row 6: BLO 30 sc (30)
Rows 7–9: through both loops 30 sc (30)
Row 10: 2 sc, 6 dec, 16 sc (24)
Row 11: 5 dec, 12 sc, 1 dec (18)
Rows 12–19: 18 sc (18)
FO on the first leg only — cut yarn and weave in ends. Stuff with polyfill. Work the second leg the same way, but do not cut the yarn.
Joining the legs: Ch 3. Position the legs so they stand straight. Join to the first leg, then work 18 sc along the first leg, 3 sc across the ch-3 bridge, 18 sc along the second leg. You now have 42 sts and are ready to begin the body.
🧶 Scrap Check: Both legs together use roughly 50–55 yards of body color. That’s well within scrap territory for most DK stashes.
Body-Head (×1) — Body Color
Continue working in continuous rounds directly from the joined legs.
Row 1: 42 sc (42)
Row 2: 3 sc, inc, (6 sc, inc) × 5, 3 sc (48)
Row 3: (7 sc, inc) × 6 (54)
Rows 4–6: 54 sc (54)
Row 7: 12 sc, (1 sc, dec) × 3, 15 sc, (1 sc, dec) × 3, 9 sc (48)
Row 8: (14 sc, dec) × 3 (45)
Row 9: 45 sc (45)
Row 10: (13 sc, dec) × 3 (42)
Row 11: 42 sc (42)
Row 12: (12 sc, dec) × 3 (39)
Row 13: 39 sc (39)
💡 Stuffing checkpoint: Add stuffing now before the body gets narrower. Don’t pack it — fill to a firm but squeezable density.
Row 14: (11 sc, dec) × 3 (36)
Row 15: 36 sc (36)
Row 16: (10 sc, dec) × 3 (33)
Row 17: 33 sc (33)
Row 18: (9 sc, dec) × 3 (30)
Row 19: 30 sc (30)
Row 20: (3 sc, dec) × 6 (24)
Row 21: 24 sc (24)
Row 22: (4 sc, dec) × 4 (20)
Row 23: (2 sc, dec) × 5 (15)
💡 Stuffing checkpoint: Add a little more stuffing to the neck/upper body area before the head begins to expand.
Row 24: 15 sc (15)
Row 25: 15 inc (30)
Row 26: 2 sc, inc, (4 sc, inc) × 5, 2 sc (36)
Row 27: (5 sc, inc) × 6 (42)
Row 28: 3 sc, inc, (6 sc, inc) × 5, 3 sc (48)
Row 29: (7 sc, inc) × 6 (54)
Row 30: 4 sc, inc, (8 sc, inc) × 5, 4 sc (60)
Row 31: (9 sc, inc) × 6 (66)
Rows 32–42: 66 sc (66)
Row 43: (9 sc, dec) × 6 (60)
Row 44: 4 sc, dec, (8 sc, dec) × 5, 4 sc (54)
Row 45: (7 sc, dec) × 6 (48)
Row 46: 3 sc, dec, (6 sc, dec) × 5, 3 sc (42)
Row 47: (5 sc, dec) × 6 (36)
💡 Stuffing checkpoint: Stuff the head now — this is your last easy access point. Fill it firmly; the head needs to hold its shape.
Row 48: 2 sc, dec, (4 sc, dec) × 5, 2 sc (30)
Row 49: (3 sc, dec) × 6 (24)
Row 50: 1 sc, dec, (2 sc, dec) × 5, 1 sc (18)
Row 51: (1 sc, dec) × 6 (12)
💡 Stuffing checkpoint: Add any final stuffing now — last chance before you close.
Row 52: 6 dec (6)
Sl st to close. FO, cut yarn and weave in ends.
Arms (×2) — Body Color
Row 1: 5 sc in mr (5)
Row 2: 5 inc (10)
Row 3: (1 sc, inc) × 5 (15)
Rows 4–9: 15 sc (15)
Row 10: dec, sl st, dec, 3 sc, hdc, hdc-dec, hdc, 3 sc (12)
Rows 11–12: 3 sl st, 3 sc, 3 hdc, 3 sc (12)
Rows 13–18: 12 sc (12)
Add a small amount of stuffing after Row 18 — just enough so the arm doesn’t collapse. Don’t overstuff.
Row 19: 6 dec (6)
Row 20: 6 inc (12)
Rows 21–22: 12 sc (12)
Row 23: 6 dec (6)
Stuff the fist section lightly. Close the opening and weave in ends. Make two.
🧶 Scrap Check: Both arms together use roughly 30 yards of body color — a small leftover ball is more than enough.
Wig (×1) — Worsted Weight, Wig Color
The wig uses worsted weight yarn on a 2.0 mm hook, giving the curls extra definition and volume. Work with joined rounds.
Row 1: 10 sc in mr (10)
Row 2: BLO 10 inc, ch 2 (20)
Row 3: (1 hdc, inc) × 10, sl st, ch 2 (30)
Row 4: (2 hdc, inc) × 10, sl st, ch 2 (40)
Row 5: (3 hdc, inc) × 10, sl st (50)
Making the curls: Work into the front loops left from Row 2’s BLO row. Work curls as follows: (ch 10, starting from the 2nd ch from hook work 9 sc, sl st) — repeat to end of round. Then work into the FLO of each round in turn, working in the opposite direction in a spiral: sl st, ch 10 and 9 sc from the 2nd ch from hook, sl st into the next st, sl st into the following st. Continue to end of round, placing curls every two stitches: work a curl into one stitch, then sl st into the next without a curl. For the last round near the crown, place curls more frequently — into every stitch.
Ears (×2) — Body Color
These small ears are worked flat in rows — no magic ring join needed.
Row 1: 6 sc in mr (pull ring closed but do not join; ch 1, turn) (6)
Row 2: 6 sc (6)
Leave a long tail for sewing. Cut yarn. Make two.
Jumpsuit (×1) — Light Blue, Worked on Knitting Needles
The jumpsuit is worked flat on US size 0 (2.0 mm) knitting needles. The first and last two stitches of every row form the button band — work them as knit in every row. Selvedge stitches are not counted in the stitch totals; slip the first stitch of each row, purl the last.
Cast on 30 sts (28 working sts + 2 selvedge sts).
Row 1: 28 k (28)
Row 2: 26 k, yo, k2tog (buttonhole) (28)
Row 3: 2 k, 2 k, yo, k, yo, 4 k, yo, k, yo, 8 k, yo, k, yo, 4 k, yo, k, yo, 2 k, 2 k (36)
Row 4: 2 k, 32 p, 2 k (36)
Row 5: 2 k, 3 k, yo, k, yo, 6 k, yo, k, yo, 10 k, yo, k, yo, 6 k, yo, k, yo, 3 k, 2 k (44)
Row 6: 2 k, 40 p, 2 k (44)
Row 7: 2 k, 4 k, yo, k, yo, 8 k, yo, k, yo, 12 k, yo, k, yo, 8 k, yo, k, yo, 4 k, 2 k (52)
Row 8: 2 k, 48 p, 2 k (52)
Row 9: 2 k, 5 k, yo, k, yo, 10 k, yo, k, yo, 14 k, yo, k, yo, 10 k, yo, k, yo, 5 k, 2 k (60)
Row 10: 2 k, 56 p, 2 k (60)
Row 11: 2 k, 6 k, yo, k, yo, 12 k, yo, k, yo, 16 k, yo, k, yo, 12 k, yo, k, yo, 6 k, 2 k (68)
Row 12: 2 k, 64 p, 2 k (68)
Row 13: 2 k, 7 k, yo, k, yo, 14 k, yo, k, yo, 18 k, yo, k, yo, 14 k, yo, k, yo, 7 k, 2 k (76)
Row 14: 2 k, 72 p, yo, k2tog (buttonhole) (76)
Row 15: 2 k, 9 k, BO 16 sts (sleeve), 1 st remains on right needle, 20 k, BO 16 sts (sleeve), 1 st remains on right needle, 9 k, 2 k (44)
Row 16: BO 2 sts (for button band), 40 p, 2 k (42)
Row 17: 1 k, (4 k, M1) × 10, 1 k (52)
Row 18: 52 p (52)
Row 19: 2 k, (6 k, M1) × 8, 2 k (60)
Row 20: 60 p (60)
Row 21: 60 k (60)
Row 22: 60 p (60)
Row 23: 60 k (60)
Row 24: 60 p (60)
Row 25: 60 k (60)
Row 26: 60 p (60)
Row 27: 60 k (60)
Row 28: 60 p (60)
Row 29: 60 k (60)
Row 30: 60 p (60)
Note on M1: Use a crossed yarn over for M1 throughout — this closes the gap. A standard yarn over will leave a hole.
Jumpsuit Legs — Left and Right
Work the first leg on 30 stitches; place remaining stitches on a spare needle.
Row 31: 30 k, turn (30)
Row 32: 29 p (29)
Row 33: 29 k (29)
Row 34: 29 p (29)
Row 35: 29 k (29)
Row 36: 29 p (29)
Row 37: (4 k, k2tog) × 4, 5 k (25)
Row 38: 25 k (25)
BO all stitches. Leave a long tail for seaming. Join yarn and work the second leg the same as the first.
Finishing the jumpsuit: Sew the legs together on the wrong side up to the crotch seam, then continue along the right side using mattress stitch up to the button band. Overlap one button band side over the other and tack in place with a few stitches.
🧶 Scrap Check: The full jumpsuit — body, yoke, and both legs — uses roughly 100–120 yards of light blue. If you have an older partial skein in DK that’s at least that amount, you’re set for the whole garment.
Hood (×1) — Light Blue, Worked on Knitting Needles
Pick up 30 stitches along the neckline edge of the jumpsuit.
Row 1: 29 k, 1 p (selvedge) (30)
Row 2: 2 k, 24 p, 2 k (28)
Row 3: 2 k, (1 k, M1) × 24, 2 k (52)
Row 4: 2 k, 48 p, 2 k (52)
Row 5: 2 k, (4 k, M1) × 12, 2 k (66)
Row 6: 2 k, 60 p, 2 k (64)
Row 7: 2 k, 60 k, 2 k (64)
Row 8: 2 k, 60 p, 2 k (64)
Rows 9–44: Repeat rows 7–8 (64)
Note: Selvedge stitches are not counted. Always slip the first stitch; work the last stitch as purl.
BO all stitches. Leave a long tail for seaming. Sew the top of the hood using mattress stitch on the right side. Join white yarn and work a row of sc around the entire hood edge. FO, cut yarn.
Hood Ear Flaps (×2) — Light Blue and White
Worked flat in crochet rows. Use 1.9 mm hook. Leave a longer yarn tail at the start for sewing the ear flap onto the hood.
Ch 9.
Row 1: Starting from 2nd ch from hook: 8 sc, ch 1, turn [light blue] (8)
Rows 2–7: 8 sc, ch 1, turn [light blue] (8)
Row 8: 2 sc, inc, 2 sc, inc, 2 sc, ch 1, turn [light blue] (10)
Rows 9–11: 10 sc, ch 1, turn [light blue] (10)
Row 12: 2 sc, inc, 4 sc, inc, 2 sc, ch 1, turn [light blue] (12)
Rows 13–15: 12 sc, ch 1, turn [light blue] (12)
Row 16: 2 sc, inc, 6 sc, inc, 2 sc, ch 1, turn [light blue] (14)
Rows 17–25: 14 sc, ch 1, turn [light blue] (14)
Row 26: Change to white: 2 sc, dec, 6 sc, dec, 2 sc, ch 1, turn [white] (12)
Row 27: 2 sc, dec, 4 sc, dec, 2 sc, ch 1, turn [white] (10)
Row 28: 2 sc, dec, 2 sc, dec, 2 sc, ch 1, turn [white] (8)
Row 29: 2 sc, 2 dec, 2 sc, ch 1, turn [white] (6)
Row 30: sc, 2 dec, sc, ch 1, turn [white] (4)
Row 31: 2 dec, ch 1, turn [white] (2)
Row 32: 1 dec [white] (1)
Cut yarn and weave in ends. Make two.
Shoes (×2) — Dark Blue / Navy, Light Blue, White
Use 1.9 mm hook. Work in continuous rounds.
Row 1: 6 sc in mr [dark blue / navy] (6)
Row 2: 6 inc [dark blue / navy] (12)
Row 3: (1 sc, inc) × 6 [dark blue / navy] (18)
Row 4: ((1 sc, inc) × 3, 3 sc) × 2 [dark blue / navy] (24)
Row 5: ((2 sc, inc) × 3, 3 sc) × 2 [dark blue / navy] (30)
Row 6: ((3 sc, inc) × 3, 3 sc) × 2 [dark blue / navy] (36)
Row 7: Change to light blue: BLO 36 sc [light blue] (36)
Rows 8–10: through both loops 36 sc [light blue] (36)
Row 11: 5 sc, 6 dec, 19 sc [light blue] (30)
Row 12: 7 sc, 1 dec, 21 sc [light blue] (29)
Join white yarn and work sc around the top edge of the shoe. FO, cut yarn. Join light blue yarn to the back loop of Row 7 at the back of the shoe and work sc around the sole edge. FO, cut yarn and weave in ends. Make two.
🧶 Scrap Check: Both shoes combined use about 15 yards of dark blue (sole), 30–35 yards of light blue (upper), and 5 yards of white (edging). Each of those is a genuine scrap amount.
Shoe Ear Flaps (×4) — White
Worked flat. Use 1.7 mm hook. Leave a longer yarn tail at the start for sewing to the shoes.
Ch 7.
Row 1: Starting from 2nd ch from hook: 6 sc, ch 1, turn (6)
Row 2: 1 sc, 1 hdc, 1 dc, 1 dc, 1 hdc, 1 sc, sl st (7)
Cut yarn, FO. Fold the ear in half and sew closed. Make four total (two per shoe).
Assembly
- Attach the arms using the button-joint method — this is a technique where buttons are threaded through both shoulders so the arms can pivot. Sew securely using thread that closely matches the body color. Instructions for this method are widely available in knitting and doll-making tutorials.
- Sew the wig to the head. Place the wig on the head and align the center points — crown of wig to crown of head. Pin all the way around before committing. Sew first around the outer edge, then work toward the crown row by row.
- Sew the ears (body-color, flat pieces) to the head at eye level.
- Sew 2 buttons onto the jumpsuit at the button band, aligning with the buttonholes at rows 2 and 14.
- Sew the hood ear flaps onto each side of the hood, using the starting yarn tails.
- Sew the shoe ear flaps onto each shoe, using the starting yarn tails.
- Sew two small beads onto each shoe for the bunny eye detail.
Take your time on the wig — it’s the centerpiece of the whole look. Misaligned by even half an inch and it reads as slightly off. Pin, step back, adjust, then sew.
For everything else in the assembly, our guide to sewing amigurumi parts together has the technique detail you need for clean, invisible joins.
Decoration
- Counting down 17–18 rows from the crown, insert the screw-back safety eyes (secure with a drop of craft glue if desired). Space the eyes 5 sc apart.
- Embroider the nose using body-color yarn.
- Embroider the mouth and eyebrows using black embroidery thread (iris or pearl cotton).
- Blush the cheeks with a small amount of pink cosmetic blush or chalk pastel.
- On each shoe: embroider a small mouth using pink yarn, then sew the bead eyes using the same black thread you used for the doll’s face.
- Optional: crochet a small heart from any scrap and tie it to the doll as a finishing accessory.
Stretch It Further
💡 Stretch It Further: The body, head, arms, and legs of this crochet baby doll are completely neutral — it’s the costume that defines the character. Swap the light blue for mint green and you’ve got a frog costume. Use yellow with white ear flaps and it’s a chick. The jumpsuit and hood pattern stays identical; only the color and ear shape change. Make two or three versions from different DK scraps and you’ve got a handmade gift set that looks like it took serious planning. It mostly took serious stash-digging. Dress them in contrasting jumpsuits, tuck them into a kraft box with tissue paper, and nobody needs to know you made all three from the same basket of leftovers.
Mia’s Take
Four or five DK colors, a small bag of polyfill, two buttons, and a weekend — that’s the actual cost of this doll. The jumpsuit requires knitting needles, which I know isn’t everyone’s comfort zone, but the payoff is a garment that looks genuinely tailored on a 7.9 in doll. If you already have mixed DK scraps sitting around from other projects, this is the pattern that uses them up in the most satisfying way possible. Make the same doll in a different colored costume next time — you already have the body pattern memorized. 🧶
If you liked making a fully dressed doll, our crochet ladybug baby doll uses a similar approach with a different character costume — also a great use for small amounts of red and black DK.
How long does it take to make this crochet baby doll?
It takes approximately 10 to 15 hours to complete this pattern, including crocheting the doll body and knitting the detailed bunny jumpsuit.
Can a beginner make this crochet baby doll pattern?
This is labeled as an advanced pattern because it combines amigurumi crochet techniques, intricate assembly (like button joints), and flat knitting with shaping for the jumpsuit.
What yarn is best for crocheting this baby doll?
Smooth DK or Light Worsted (CYCA 3) cotton or cotton-acrylic blends work best for the doll’s body and clothes, while worsted weight yarn gives the best volume for the wig.