Free Crochet Doll Amigurumi Pattern — Meet This Sweet Spring Girl with Rosy Cheeks
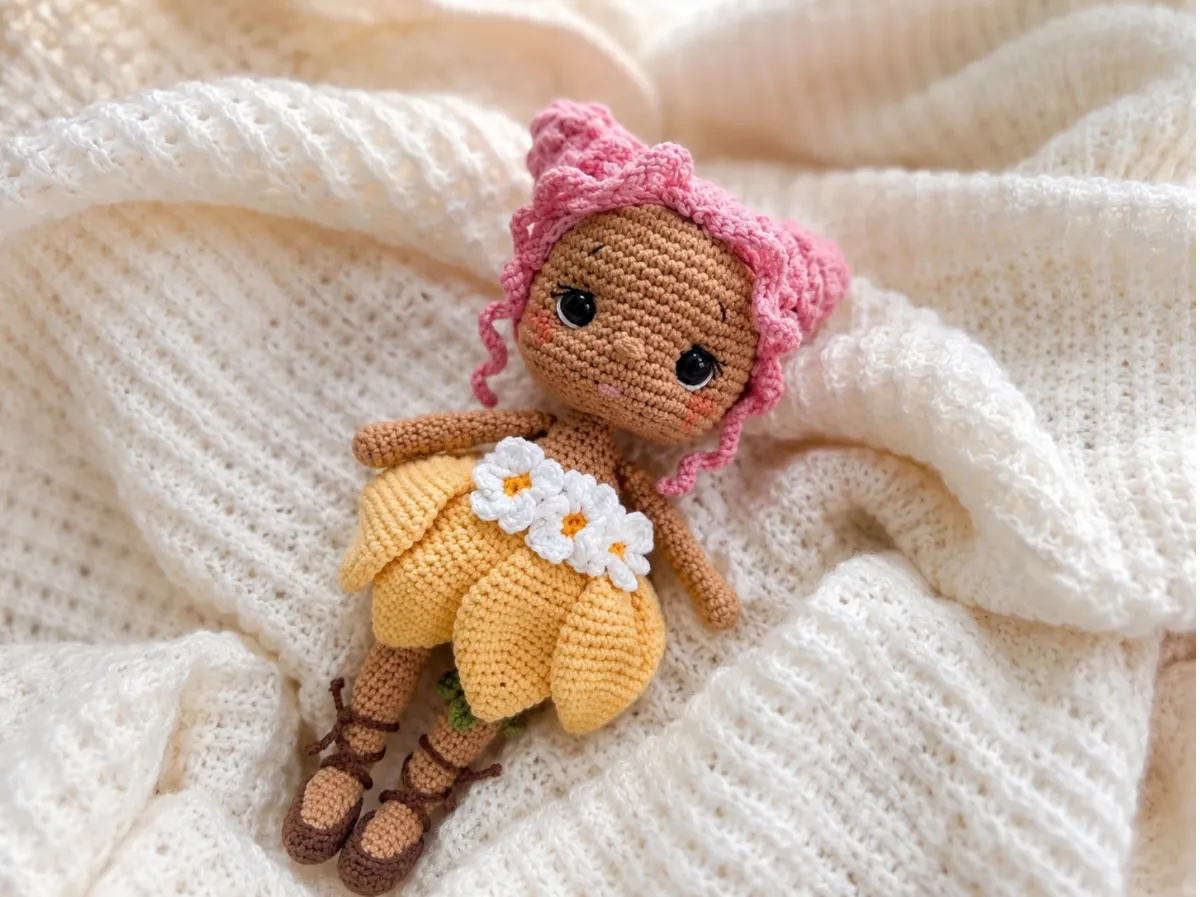
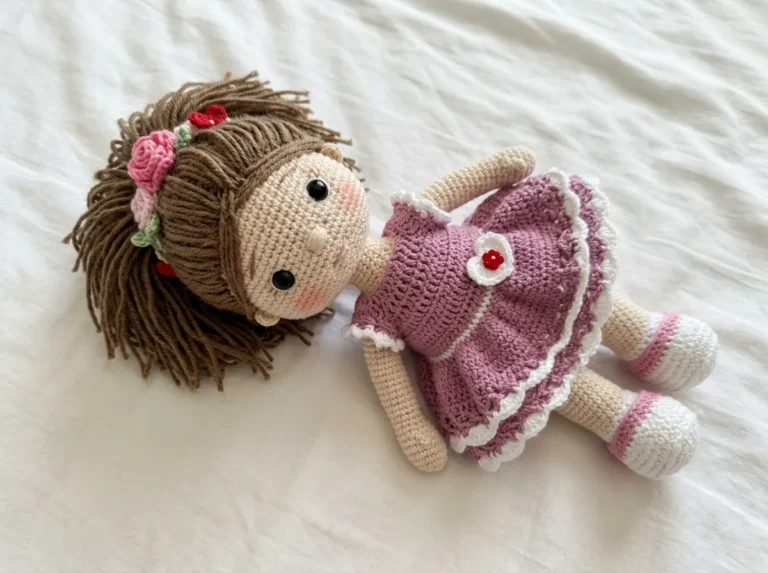
This free doll amigurumi pattern creates the most delicate little spring girl you’ve ever seen — soft skin-tone yarn, a petal-hem dress, glossy 12mm safety eyes, and the sweetest embroidered freckles that make her look like she just stepped out of a sun-warmed garden. She stands about 10–10.5 in tall, which means she has real presence — she’s not pocket-sized, she’s display-worthy. The flower hair buns, the tiny apron ties, the blush on her cheeks — every detail has been thought through and every detail shows. Let me walk you through her from the very first magic ring.
🩷 Pattern Highlights
- Cuteness Rating: 🩷🩷🩷🩷🩷
- Finished Size: approx. 10.2–10.5 in (26–27 cm)
- Difficulty: Intermediate
- Hook Size: 2.0 mm (approx. US B/1) — or 2.25–2.5 mm if your tension is tight
- Yarn Palette: warm skin tone, chestnut or golden hair, soft dress color, blush pink, ivory, leaf green, dusty shoe tone
- Key Detail: embroidered freckles, needle-sculpted eyes and mouth, twisted flower buns, 12mm glossy safety eyes
- Estimated Time: 12–18 hours
Materials for Your Doll Amigurumi
The yarn quantities are small — this is a fine-weight project, and the detail it gives you is worth it. Each color change is a moment where she comes more to life.
- Main yarn — DK/Light Worsted (weight 3), approximately 50 g / 160 yds per skein
US alternatives: Drops Muskat, Paintbox Simply DK Cotton
Colors you’ll need:
– Warm skin tone — body, head, arms, ears (main color)
– Chestnut or golden brown — hair base and strands (one or two shades)
– Soft blush or coral — freckle embroidery
– Creamy ivory or pale lavender — eyelash and eye accent embroidery
– Your chosen dress color — panties, apron, petals (a single soft hue or a gentle complement)
– Sunny yellow + soft white — flower centers and petals
– Warm dusty tone — shoes
– Leaf green — leg band and leaves
– Pink — embroidered mouth - Hook: 2.0 mm (US B/1) — if your tension runs tight, go up to 2.25 mm (US B/1) or 2.5 mm
- Safety eyes: 12mm, black and glossy — this size gives her exactly the right wide, expressive look
- Toy stuffing / polyfill: Poly-Fil by Fairfield works beautifully — available at Joann, Michaels, and Hobby Lobby
- Wire for neck frame: 3–5 mm thickness, 9.8–11.8 in (25–30 cm) length — for poseable neck support
- Medical tape or adhesive bandage wrap — for wrapping the wire before inserting
- Tapestry needle — blunt tip for sewing parts; long sculpting needle for face details
- Dry pastel or pink pressed powder blush — for those soft, dreamy cheeks
- Scissors, stitch markers
🩷 Chloe’s Detail Tip: The wire neck frame is what gives this doll her poseable elegance — her head can tilt just slightly and suddenly she looks like she’s listening to something wonderful. Wrap the wire generously with medical tape before inserting; it prevents any sharp ends from poking through and keeps the yarn looking smooth.
Abbreviations Used in This Doll Amigurumi Pattern
| Abbreviation | Meaning |
|---|---|
| mr | magic ring |
| sc | single crochet |
| hdc | half double crochet |
| dc | double crochet |
| inc | increase — 2 sc worked into the same stitch |
| dec | invisible decrease — insert hook through front loops only of next 2 stitches simultaneously |
| ch | chain |
| sl st | slip stitch |
| FLO | front loop only |
| hdc-inc | half double crochet increase — 2 hdc in one stitch |
Before You Begin — Making Her Extra Special
A doll amigurumi this detailed rewards patience at every stage. A few things to keep in mind before your first stitch:
1. Tight tension is your friend here. At 2.0 mm with DK weight, your stitches should be firm and close — no gaps for stuffing to peek through. If you’re a naturally looser crocheter, drop to this hook size gradually over your first few rows and feel how the fabric wants to sit. Our guide to crochet hook hold and tension has a lovely section on adjusting your grip for fine amigurumi work.
2. Safety eyes at 12mm. That size is larger than most small amigurumi use, and it’s what gives this doll her wide, dreamy expression. Install them between rows 15 and 16 of the head, with 11 stitches between the posts. Before pressing the washers in, hold her under a bright lamp and view her straight on — symmetry at this stage is everything. Our safety eyes tutorial walks through positioning and securing them so they’re perfectly even every time.
3. The invisible decrease. All decreases in this pattern use the invisible method — inserting through the front loops only of two stitches simultaneously. It’s the secret to smooth, gap-free shaping on her face and body. If you’d like a refresher, our invisible decrease tutorial has you covered with step-by-step photos.
🩷 Chloe’s Detail Tip: Her face gets a lot of hand-finishing — needle sculpting for the eyes and mouth, embroidered freckles, blush cheeks. Don’t rush any of it. This is the part where she goes from “finished” to irresistible. Set aside a quiet hour just for the face.
Doll Amigurumi Pattern Instructions
Head (×1)
Yarn: warm skin tone | Start: magic ring | Work in continuous rounds
Row 1: 6 sc in mr (6)
Row 2: 6 inc (12)
Row 3: (1 sc, inc) x 6 (18)
Row 4: (2 sc, inc) x 6 (24)
Row 5: (3 sc, inc) x 6 (30)
Row 6: (4 sc, inc) x 6 (36)
Row 7: (5 sc, inc) x 6 (42)
Row 8: (6 sc, inc) x 6 (48)
Row 9: (7 sc, inc) x 6 (54)
Rows 10–21: 54 sc (12 rows) (54)
🩷 After row 21, install your 12mm safety eyes between rows 15 and 16, with 11 stitches between the eye posts. Hold her up to the light, check from the front — take your time. Once those washers are in, the whole face starts to come together.
Row 22: (7 sc, dec) x 6 (48)
Row 23: (6 sc, dec) x 6 (42)
Row 24: (5 sc, dec) x 6 (36)
Row 25: (4 sc, dec) x 6 (30)
Row 26: (3 sc, dec) x 6 (24)
Row 27: (2 sc, dec) x 6 (18)
Row 28: (4 sc, dec) x 3 (15)
Begin stuffing before the decreases start at row 22. Stuff very firmly — especially through the decrease rows. The more firmly you stuff the head, the better the needle sculpting will sit later.
Finish with sl st. Cut yarn and hide the tail.
Legs (×2)
Yarn: warm skin tone | Start: magic ring | Work in continuous rounds
Row 1: 6 sc in mr (6)
Row 2: (1 sc, inc) x 3 (9)
Rows 3–5: 9 sc (3 rows) (9)
Row 6: 4 sc, do not finish the row — turn work and begin row 7 (4)
Row 7: 4 sc, turn work (4)
Row 8: 4 sc, turn work (4)
Row 9: 4 sc, turn work (4)
Row 10: 1 sc, dec, 1 sc, 2 sc in the gap, 5 sc in FLO, 2 sc in the gap (12)
Row 11: 1 sc, dec, 9 sc (11)
Row 12: dec, 9 sc (10)
Rows 13–17: 10 sc (5 rows) (10)
Row 18: 1 sc, inc, 8 sc (11)
Rows 19–20: 11 sc (2 rows) (11)
Row 21: 1 sc, inc, 2 sc, inc, 6 sc (13)
Rows 22–25: 13 sc (4 rows) (13)
Row 26: 4 sc, dec, 7 sc (12)
Row 27: 3 sc, dec, 5 sc, inc, 1 sc (12)
Row 28: 2 sc, inc, 2 sc, inc, 4 sc, inc, 1 sc (15)
Rows 29–30: 15 sc (2 rows) (15)
Row 31: 2 sc, inc, 4 sc, inc, 5 sc, inc, 1 sc (18)
Row 32: 18 sc (18)
Row 33 — First leg: 13 sc (do not finish the row; crocheting ends at center of inner leg side — shift stitches if needed). Sl st, hide the yarn. Cut yarn. (13)
Row 33 — Second leg: 18 sc + 3 sc (crocheting ends at inner side of leg). Do not cut yarn — continue to body. (21)
🩷 Alignment note: The increase in row 18 and the decrease in row 26 should both fall symmetrically at the center back of the leg, directly above the heel. If yours doesn’t align naturally, crochet shift stitches to correct it — it makes a real difference to how prettily the legs sit.
Stuff the lower leg firmly after row 11. Continue stuffing firmly as you crochet upward.
Body (×1)
Yarn: warm skin tone | Start: continue from second leg
Row 34: 3 ch, insert hook into the 14th stitch of the last row of the first leg, crochet 18 sc along the first leg, 3 sc along the ch chain, 18 sc along the second leg, 3 sc along the ch chain. Place a stitch marker at end of this row — this is the new beginning of round. (42)
Row 35: (6 sc, inc) x 6 (48)
Row 36: (15 sc, inc) x 3 (51)
Row 37: 8 sc, inc, (16 sc, inc) x 2, 8 sc (54)
Row 38: (17 sc, inc) x 3 (57)
Rows 39–41: 57 sc (3 rows) (57)
Row 42: (17 sc, dec) x 3 (54)
Row 43: 8 sc, dec, (16 sc, dec) x 2, 8 sc (51)
Row 44: (15 sc, dec) x 3 (48)
Row 45: 7 sc, dec, (14 sc, dec) x 2, 7 sc (45)
Row 46: (13 sc, dec) x 3 (42)
Row 47: 6 sc, dec, (12 sc, dec) x 2, 6 sc (39)
Row 48: (11 sc, dec) x 3 (36)
Row 49: 5 sc, dec, (10 sc, dec) x 2, 5 sc (33)
Row 50: (9 sc, dec) x 3 (30)
Row 51: 4 sc, dec, (8 sc, dec) x 2, 4 sc (27)
Row 52: (7 sc, dec) x 3 (24)
Row 53: 3 sc, dec, (6 sc, dec) x 2, 3 sc (21)
Row 54: (5 sc, dec) x 3 (18)
Row 55: 2 sc, dec, (4 sc, dec) x 2, 2 sc (15)
Rows 56–57: 15 sc (2 rows) (15)
Begin stuffing after row 48, stuffing the upper leg area first. Continue stuffing firmly as you close the body.
Finish with sl st, cut yarn, hide tail.
Arms (×2)
Yarn: warm skin tone | Start: magic ring
Row 1: 6 sc in mr (6)
Row 2: 6 inc (12)
Rows 3–4: 12 sc (2 rows) (12)
Row 5: (1 sc, dec) x 4 (8)
Rows 6–19: 8 sc (14 rows) (8)
Stuff the lower part of the arm firmly after row 5. Leave the upper arm (the long tube) unstuffed — this lets it drape naturally and sew flat.
Finishing: Fold flat, crochet 4 sc through both layers to close. Cut yarn, leave a long tail for sewing.
Ears (×2)
Yarn: warm skin tone | Start: magic ring
Row 1: 6 sc in mr (6)
Do not sl st at the end. Cut yarn, leave a tail for sewing.
Hair — Base Cap (×1)
Yarn: hair color | Start: magic ring
Row 1: 6 sc in mr (6)
Row 2: 6 inc (12)
Row 3: (1 sc, inc) x 6 (18)
Row 4: (2 sc, inc) x 6 (24)
Row 5: (3 sc, inc) x 6 (30)
Row 6: (4 sc, inc) x 6 (36)
Row 7: (5 sc, inc) x 6 (42)
Row 8: (6 sc, inc) x 6 (48)
Row 9: (7 sc, inc) x 6 (54)
Row 10: (17 sc, inc) x 3 (57)
Rows 11–20: 57 sc (10 rows) (57)
🩷 Fit check: After row 20, try the cap on the head. At the back it should just touch the neck; at the front, it should reach to about row 6 of the head. Too long? Frog a row or two. Too short? Add another. The fit here determines how beautifully the hair frames her face.
Hair — Long Strands (×6)
Yarn: hair color | Start: chain
Row 1: Ch 111, turn, starting from 2nd ch from hook crochet 110 sc. (110)
Cut yarn, tie both tails together, trim one tail.
Hair — Short Strands (×2)
Yarn: hair color | Start: chain
Row 1: Ch 46, turn, starting from 2nd ch from hook crochet 45 sc. (45)
Cut yarn, tie both tails together, trim one tail.
Dress — Panties (×1)
Yarn: dress color | Start: foundation chain
Row 1: Ch 52 and join in a circle. (52)
Rows 2–7: 52 sc (6 rows — work in continuous spiral, no joining sl st) (52)
Row 8: 5 sc, turn work, begin turning rows (1 ch to start each row) (5)
Row 9: 10 sc (10)
Row 10: 4 sc, dec, 4 sc (9)
Row 11: 4 sc, dec, 3 sc (8)
Row 12: 3 sc, dec, 3 sc (7)
Row 13: 3 sc, dec, 2 sc (6)
Row 14: 2 sc, dec, 2 sc (5)
Row 15: 2 sc, dec, 1 sc (4)
Row 16: 1 sc, dec, 1 sc (3)
Row 17: 3 sc (3)
Row 18: 1 sc, inc, 1 sc (4)
Row 19: 1 sc, inc, 1 sc, inc (6)
Row 20: 1 sc, inc, 4 sc (7)
Row 21: 1 sc, inc, 5 sc (8)
Row 22: 1 sc, inc, 6 sc (9)
Row 23: 1 sc, inc, 7 sc (10)
Cut yarn, leave a long tail for sewing.
Dress — Apron (×1)
Yarn: dress color | Start: join to panties
Work in turning rows; begin each row with 1 ch.
Row 1: Join yarn to the 1st of the 12 center stitches of row 1 of the panties. 1 sc in same stitch, 11 sc. (12)
Rows 2–3: 12 sc (2 rows) (12)
Row 4: 5 sc, dec, 5 sc (11)
Row 5: 2 sc, dec, 4 sc, dec, 1 sc (9)
Finishing: From one corner of the apron, chain 46 for the first tie. Cut yarn, knot the end. Join yarn to the opposite corner, chain 46 for the second tie. Cut yarn, knot the end.
Dress Petals (×8)
Yarn: dress color | Start: magic ring | No stuffing needed
Row 1: 6 sc in mr (6)
Row 2: (1 sc, inc) x 3 (9)
Row 3: (2 sc, inc) x 3 (12)
Row 4: (3 sc, inc) x 3 (15)
Row 5: (4 sc, inc) x 3 (18)
Row 6: (5 sc, inc) x 3 (21)
Row 7: (6 sc, inc) x 3 (24)
Row 8: (7 sc, inc) x 3 (27)
Row 9: (8 sc, inc) x 3 (30)
Row 10: (9 sc, inc) x 3 (33)
Row 11: (9 sc, dec) x 3 (30)
Row 12: (8 sc, dec) x 3 (27)
Row 13: (7 sc, dec) x 3 (24)
Row 14: (6 sc, dec) x 3 (21)
Row 15: (5 sc, dec) x 3 (18)
Row 16: (4 sc, dec) x 3 (15)
Fold flat, crochet 7 sc through both layers. Cut yarn, leave tail for sewing.
Flowers (×3)
Yarn: yellow (center) + soft white (petals) | Start: magic ring
Row 1: 6 sc in mr [yellow] (6)
Row 2: Change to white. (3 ch, 3 dc in one stitch, 3 ch, sl st in same stitch) — repeat 6 times across all 6 stitches.
Tie the yarn ends together. Trim all but one yellow tail — use it to sew the flower in place.
Shoes (×2)
Yarn: shoe color | Start: foundation chain
Row 1: Ch 7 (7)
Row 2: Starting from 2nd ch from hook: 1 inc, 4 sc, 3 sc in one stitch, 4 sc, inc (15)
Row 3: 2 inc, 4 sc, 3 inc, 5 sc, inc (21)
Rows 4–6: 21 sc (3 rows) (21)
Finishing: 1 additional sc, sl st. From that same stitch, chain 46 for the first tie. Cut yarn, knot. Rejoin yarn to the same stitch, chain 46 for the second tie. Cut yarn, knot.
Leg Band (×1)
Yarn: leaf green | Start: chain
Chain 17. Cut yarn.
Leaves (×3)
Yarn: leaf green | Start: chain
Row 1: Ch 4 (4)
Row 2: Starting from 2nd ch from hook: 1 sl st, hdc-inc, 1 sl st, 1 ch, 1 sl st, hdc-inc, 1 sl st
Cut yarn, leave a tail for sewing.
Assembly — Bringing Your Doll Amigurumi Together
- Head to body: Cut a piece of wire 3.1–3.5 in (8–9 cm) long. Wrap it thoroughly with medical tape. Insert one end into the neck opening of the body, the other into the base of the head. Thread a long tail of skin-tone yarn through your tapestry needle with a thick knot at the end. Find the center of the body top (15 stitches), align with the center of the head base (15 stitches), and sew stitch to stitch — 15 stitches total. Stuff the neck area firmly as you work.
- Hair base cap: Sew the crocheted cap down onto the head, covering the top and back.
- Long hair strands: Sew 3 strands on each side of the head between rows 13 and 14 of the cap. Their placement determines where the buns will sit — choose carefully. Braid each set into a pigtail, secure the end, then twist each braid tightly into a bun and anchor it with hair-colored yarn on a needle.
- Ears: Sew one ear on each side of the head at rows 16–17.
- Short hair strands: First anchor the center of each short strand at the top of the head, then secure each end in the ear area. You can gently stretch the strand by hand to adjust the length and drape.
- Arms: Sew the arms between rows 55 and 56 of the body, at a slight outward angle.
- Panties: Locate the 10 center stitches on the front of the panties. Sew the last row of the gusset to those 10 center front stitches.
- Dress petals: Sew all 8 petals between rows 1 and 2 of the panties, overlapping them slightly so they fan out evenly — like real flower petals.
- Flowers: Sew the 3 small flowers onto the apron using the yellow yarn tail.
- Leg band and leaves: Wrap the green chain around one leg and sew it in place using both yarn ends. Sew the 3 leaves onto the band.
Making Your Doll Amigurumi Extra Cute — The Face and Finishing Details
This is the part I love most. This is where she stops being a crocheted object and starts being a person. Take your time here — every element matters.
Eye sculpting: Using a long sculpting needle and skin-tone yarn, do needle sculpting to set the eyes more deeply into the face. Insert between the outer edges of the eye and the surrounding stitches and pull gently to create soft definition. This is what gives doll amigurumi that slightly sleepy, expressive quality.
Eye accent: With a single strand of creamy ivory or white yarn, add a small accent stitch along the lower edge of each eye. This tiny highlight makes the eyes look glossy and alive — it’s the smallest detail with the biggest effect.
Eyelashes and brows: Using thin black embroidery thread (or a single strand separated from your main yarn), embroider soft lashes along the upper lash line and two gentle brow arches at row 11 of the head. Keep them delicate — fine lines read as sweetness.
Mouth sculpting: Insert a long needle between rows 23 and 24 of the head and pull gently to sculpt a subtle mouth indent. Then embroider the mouth in pink yarn between rows 20 and 21 — a small, soft curved line. Less is more here.
Nose: With skin-tone yarn, embroider a tiny nose between rows 17 and 18 — just a few stitches, barely there.
🩷 Chloe’s Detail Tip: The freckles are what make this doll feel alive. Using coral or orange yarn, embroider three small stitches on each cheek between rows 17–18 and 18–19. Keep them scattered and asymmetric — real freckles aren’t perfectly placed. Then dust soft pink blush or dry pastel over the freckles. The way the color blends over those tiny stitches creates the most beautiful soft cheek effect. I could stare at it for an embarrassing amount of time.
Color variation ideas: She looks magical in a dusty lavender dress with golden hair and pearl-white shoes. She’s equally dreamy in blush pink with chestnut hair and sage green accents. The Craft Yarn Council’s weight guide is helpful if you want to explore different DK-weight cotton options in new colorways.
Chloe’s Final Look
I’ve made a lot of amigurumi — tiny ones, squishy ones, ones with giant heads — but there is something about a fully finished doll amigurumi that stops me every single time. The flower buns, the tiny apron ties trailing at her sides, the blush sitting softly over her freckles, those 12mm eyes catching the light just so. She feels like a tiny spring afternoon in crocheted form. Make her in a soft lavender dress and set her on a shelf. She will absolutely be looked at every single time someone walks past. 🩷
What yarn is best for this doll amigurumi?
A DK or Light Worsted (weight 3) cotton yarn is ideal. It helps achieve the fine detail and firm stitches required for a beautiful doll amigurumi finish.
How long does it take to crochet this doll?
This is an intermediate-level project that takes approximately 12 to 18 hours to complete, largely due to the beautiful, hand-finished embroidered details.
What size safety eyes do I need for this pattern?
This pattern uses 12mm glossy black safety eyes. This slightly larger size gives the doll her signature wide, dreamy, and expressive look.