Minion Dave Amigurumi — Free Crochet Minion Pattern
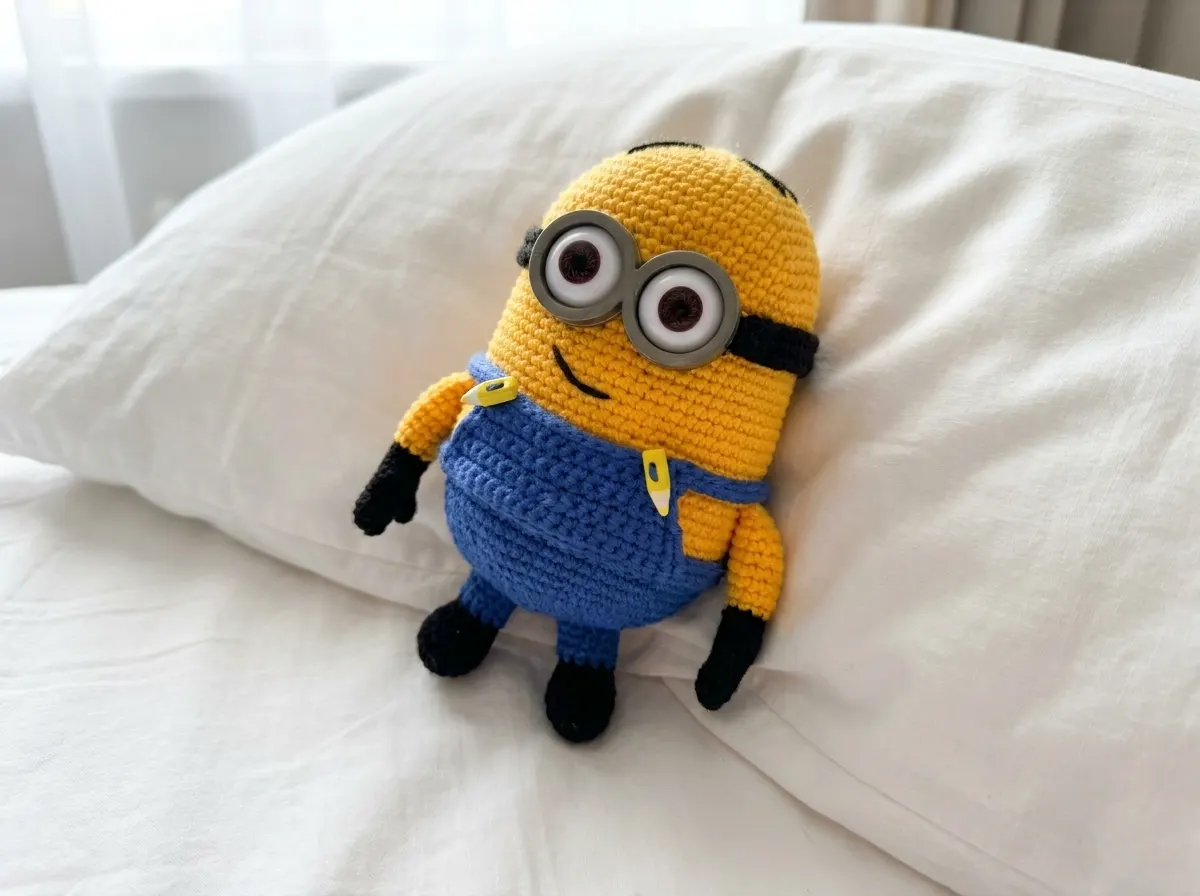
This crochet minion free pattern is one I’ve been itching to add to AmiLoops for a long time. Dave’s round body, tiny denim overalls, and three-fingered hands are unmistakable, and working him in DK cotton on a 1.75mm hook gives you that crisp, dense fabric that makes every detail pop. I tested every round of this pattern myself. The counts are accurate. Let’s get started.
📋 Pattern Quick Stats
- Difficulty: Intermediate
- Finished Size: 6.7 in (17 cm)
- Hook Size: 1.75mm (approx. US B/1)
- Yarn Weight: DK / Light Worsted (3)
- Techniques: magic ring, invisible decrease, BLO, color changes, joining fingers into hand
- Estimated Time: 6–9 hours
Materials for Your Crochet Minion Free Pattern
The original pattern calls for YarnArt Jeans, a popular DK cotton-acrylic blend widely used in amigurumi for its smooth surface and clean stitch definition. Any DK / Light Worsted (3) yarn in the same fiber family will substitute well. If you adjust hook size or yarn weight, expect the finished size to change accordingly.
- Yellow yarn — DK / Light Worsted (3). Used for the head, body, and upper arm section. Paintbox Simply DK (Daffodil Yellow) is a solid US alternative.
- Blue yarn — DK / Light Worsted (3). Used for the overalls and upper leg section. Paintbox Simply DK (Cornflower Blue) works well.
- Black yarn — DK / Light Worsted (3), small amount. Used for the shoes (lower leg), goggle headband, and embroidery.
- Light / off-white DK yarn — small amount. Used for fingers and lower hand section. The original uses Pekhorka “Lace” color 02; any comparable smooth DK in off-white works.
- Hook: 1.75mm (approx. US B/1)
- 1 large safety eye — Dave is a one-eyed minion. An 18mm or 20mm safety eye fits the scale well. Install before closing the head. If this toy is for a child under 3, embroider the eye instead.
- 2 small buttons — for the front of the overalls
- Polyester fiberfill stuffing — Poly-Fil by Fairfield or similar. Available at Joann, Michaels, or Hobby Lobby.
- Tapestry needle
- Stitch marker
This project uses yarn classified as DK / Light Worsted (3) on the Craft Yarn Council yarn weight system — a versatile weight that gives sharp stitch definition at tight gauges, which is exactly what you want for a piece this detailed.
Abbreviations
| Abbreviation | Meaning |
|---|---|
| mr | magic ring (adjustable loop start) |
| ch | chain |
| sc | single crochet |
| inc | increase — 2 sc worked into the same stitch |
| dec | decrease — see note below; use invisible decrease throughout |
| sl st | slip stitch |
| BLO | back loop only — work into the back loop of the stitch only |
⚠️ On “dec” in this pattern: Wherever the instructions say dec, I always work an invisible decrease instead of a standard sc2tog. The difference is visible — the invisible decrease leaves a clean, tight surface with no gap. The standard decrease creates a small hole that shows right through on snug amigurumi fabric. See the technique note below for a refresher.
Special Techniques for This Free Crochet Minion Pattern
Dave is a satisfying intermediate project, but there are a few techniques worth reviewing before you cast on. Knowing what’s coming makes the whole thing move faster.
Magic Ring (MR): The head and body, the fingers, and the hands all begin with a magic ring. It’s the cleanest possible start for a 3D piece — no hole at the center, no loose tail to weave. If it’s new to you, our step-by-step magic ring tutorial walks through it carefully.
Invisible Decrease: The head closure alone runs from 66 stitches down to 8 across 9 rows of decreases. That’s a lot of dec rows, and every one of them will look better with an invisible decrease. Insert your hook through the front loops only of the next two stitches simultaneously, then complete as a single crochet. Our invisible decrease tutorial has photos that make it click immediately.
Back Loop Only (BLO): Two rows in this pattern are worked in BLO — Row 40 of the head/body and Row 7 of each leg. In both cases, the unworked front loops are intentional: they become the attachment ridge for the overalls and the shorts cuff. These rows are structural. Work them carefully and place a stitch marker on the first stitch so you can find those loops easily during assembly.
Joining Fingers into Hands: Dave has three fingers per hand, and each hand is built by crocheting three separate fingers and then joining them together into a single working round at Row 6. This is the trickiest construction step in the whole pattern. Align all three fingers carefully side by side before you begin — 9 stitches per finger, 27 total — and work across them in sequence. If the join feels sloppy on the first hand, frog it. The second hand will be cleaner.
Stuffing: Dave’s body is 51 rows of fairly dense construction. I start adding stuffing around Row 25 and continue adding gradually as I decrease toward the close. Waiting until the end is harder and leads to uneven lumps. For a detailed walkthrough, our guide to stuffing amigurumi without lumps covers everything.
Safety Eyes and Toy Safety: The safety eye goes in between Rows 19 and 20, before the body begins to close. Push the washer on firmly — once the body is stuffed and shut, it cannot be removed safely. If this free crochet minion pattern is being made as a gift for a very young child, consult the toy safety standards at the U.S. Consumer Product Safety Commission and consider embroidering the eye instead.
Free Crochet Minion Pattern — Step-by-Step Instructions
Dave is worked from the top of his head down through his body, with all separate pieces — hands, legs, overalls, and goggle headband — made independently and assembled at the end. Work in continuous rounds unless a row ends with “turn.”
Part 1: Head and Body (×1)
Yarn: Yellow (main), switching to Blue at Row 39
Start: Magic ring
Row 1: 6 sc in mr [yellow] (6)
Row 2: 6 inc (12)
Row 3: (1 sc, inc) × 6 (18)
Row 4: 1 sc, inc, (2 sc, inc) × 5, 1 sc (24)
Row 5: (3 sc, inc) × 6 (30)
Row 6: 2 sc, inc, (4 sc, inc) × 5, 2 sc (36)
Row 7: (5 sc, inc) × 6 (42)
Row 8: 3 sc, inc, (6 sc, inc) × 5, 3 sc (48)
Row 9: (15 sc, inc) × 3 (51)
Row 10: (16 sc, inc) × 3 (54)
Row 11: (17 sc, inc) × 3 (57)
Row 12: (18 sc, inc) × 3 (60)
Row 13: (19 sc, inc) × 3 (63)
Row 14: (20 sc, inc) × 3 (66)
Rows 15–38: 66 sc (24 rows, no increases) (66)
💡 Emma’s Tip: Insert your safety eye between Rows 19 and 20, centered on the front of the face. Press the washer on firmly before you continue. Start stuffing the body gradually around Row 25 — don’t wait until the end. By the time you hit the decrease rows, the fill should already be in place and just need a final top-up before closing.
Row 39: 66 sc [switch to blue] (66)
Row 40: 66 sc in BLO (66)
Rows 41–42: 66 sc (no increases) (66)
Row 43: (9 sc, dec) × 6 (60)
Row 44: (5 sc, dec) × 8, 5 sc (53)
Row 45: 5 sc, dec, (6 sc, dec) × 5, 6 sc (47)
Row 46: (5 sc, dec) × 6, 5 sc (41)
Row 47: (5 sc, dec) × 5, 4 sc, dec (35)
Row 48: (4 sc, dec) × 5, 3 sc, dec (29)
Row 49: (2 sc, dec) × 7, 1 sc (22)
Row 50: (1 sc, dec) × 7, 1 sc (15)
Row 51: dec × 7, 1 sc (8)
Finishing: Draw the closing thread through the remaining 8 loops and pull tight to seal. Using the unworked front loops from Row 40, work a round of sc all the way around the base — this forms the bottom edge of the shorts.
💡 Emma’s Tip: The BLO row at Row 40 is doing two jobs: it creates a clean color-transition ridge at the waistline, and it leaves a full set of unworked loops to attach the overalls panels to later. I mark the first stitch of Row 40 with a stitch marker as soon as I finish it so I don’t have to hunt for those loops during assembly.
Part 2: Front of Overalls (×1)
Yarn: Blue
Start: Count 9 sc from the beginning of the shorts edge row to find your starting stitch. This piece is worked in rows (back and forth), not rounds.
Row 1: 18 sc, turn (18)
Row 2: 18 sc, turn (18)
Row 3: 8 sc, dec, 8 sc, turn (17)
Row 4: 7 sc, dec, 8 sc, turn (16)
Row 5: dec, 12 sc, dec (14)
Row 6: 13 sc, turn (13)
Row 7: 13 sc, turn (13)
Finishing: Work sl st all around the panel edge for a clean border. Fasten off.
Part 3: Back of Overalls (×1)
Yarn: Blue
Start: Count 14 sc from the front panel to find your starting stitch.
Row 1: 20 sc, turn (20)
Rows 2–7: 20 sc (6 rows) (20)
Finishing: Work sl st all around the panel edge. Fasten off.
Part 4: Straps (×2)
Yarn: Blue
Start: Chain
Row 1: Chain to desired length, then work sc back along the chain (as needed)
Finishing: Leave a long yarn tail for sewing. Hold each strap against the assembled overalls before cutting to check the length — the straps cross from the back panel over the shoulders to the front, so err on the side of slightly longer.
Part 5: Fingers (×6 — make three per hand)
Yarn: Light / off-white DK (Pekhorka “Lace” color 02 or similar)
Start: Magic ring
Row 1: 6 sc in mr (6)
Row 2: (1 sc, inc) × 3 (9)
Rows 3–5: 9 sc (3 rows, no increases) (9)
Finishing: Stuff each finger lightly. Do not cut yarn on the third finger of each set of three — leave it attached to join directly into the hand.
Part 6: Hands (×2)
Yarn: Light / off-white DK, switching to Yellow at Row 13
Start: Join three completed fingers together into one working round
Row 6: 27 sc (crocheting across all three joined fingers) [black] (27)
Row 7: 1 sc, dec, (2 sc, dec) × 6 (20)
Row 8: 1 sc, dec, 8 sc, dec, 7 sc (18)
Row 9: (1 sc, dec) × 6 (12)
Rows 10–12: 12 sc (3 rows, no increases) (12)
Rows 13–20: 12 sc (8 rows) [switch to yellow] (12)
💡 Emma’s Tip: The finger join at Row 6 is the single trickiest moment in this entire pattern. Hold all three fingers flat and side by side — 9 stitches each — and work 9 sc across the open top of each one in sequence for a total of 27 stitches. The first hand will feel awkward. The second one goes much more smoothly. If the join looks loose or uneven on your first attempt, frog it. This is one of those details that makes all the difference in the finished piece.
Finishing: Stuff the arm firmly from the shoulder down. Fold the open top flat and work 5 sc across to close. Fasten off and leave a long yarn tail for sewing to the body.
Part 7: Legs (×2)
Yarn: Black (shoe), switching to Blue at Row 7
Start: Chain 7 + 1 turning chain
Row 1: In second ch from hook — 3 sc in one st, 5 sc, 3 sc in one st, 5 sc [black] (16)
Row 2: 9 sc, inc, 6 sc (17)
Row 3: 17 sc in BLO (17)
Row 4: 5 sc, 4 dec, 4 sc (13)
Row 5: 3 sc, 4 dec, 2 sc (9)
Row 6: 9 sc (no increases) (9)
Row 7: 9 sc in BLO [switch to blue] (9)
Row 8: (2 sc, inc) × 3 (12)
Rows 9–10: 12 sc (2 rows, no increases) (12)
💡 Emma’s Tip: The BLO row at Row 3 defines the top edge of the shoe, and the BLO row at Row 7 creates the cuff edge for the shorts — the same principle as Row 40 on the body. After completing each leg, pick up those unworked loops from Row 7 and work a round of sc around them. That’s what gives the shorts cuffs their clean, finished look.
Finishing: Using the remaining unworked loops from Row 7, work sc around to form the shorts cuff. Stuff lightly. Fasten off and leave a yarn tail for sewing.
Part 8: Goggles Headband (×1)
Yarn: Black
Start: Chain 55 + 1 turning chain
Row 1: In second ch from hook — inc, 54 sc, inc, 54 sc, sl st (113)
Finishing: Fasten off and leave a long yarn tail for sewing. The headband wraps around the head to frame the goggle — hold it against the finished head before cutting to confirm the fit.
Assembly
This is where the whole thing comes together — or doesn’t, if you rush it. Lay all pieces out next to the body before you sew anything and check the proportions. Our guide to sewing amigurumi parts together covers every pinning and joining technique you’ll need for a piece this complex.
- Attach the overalls: Using the unworked front loops from Row 40 of the body, sew the front and back overalls panels into position along the waistband ridge. The BLO edge from Row 40 should sit cleanly at the waistline.
- Attach the straps: Sew the two blue straps from the back panel, crossing up and over the shoulders to attach at the top of the front panel. Sew the two buttons on top of the strap ends on the front — this is purely decorative, but it’s an essential part of Dave’s look.
- Attach the goggle headband: Position the black headband on the head so it frames the safety eye symmetrically. Sew firmly in place. Refer to reference photos for exact placement — the headband sits centered around the eye, not up on the forehead.
- Attach the arms: Position both arms at the upper sides of the body, approximately at Rows 36–37. Pin both in place and check that they sit at the same height on each side before you sew either one. This is one of those details that makes all the difference.
- Attach the legs: Sew the legs to the base of the body, evenly spaced on either side of center. The shorts cuff should align with the lower edge of the overalls.
Finishing and Details
Three embellishments that take Dave from “complete” to “unmistakable”:
- Hair: Using black yarn and a tapestry needle, embroider 6 to 8 short upright loops across the top of the head. Minion hair is thin and spiky — pull each strand through, knot it at the base, and trim to a consistent height. About half an inch looks right at this scale.
- Mouth: Embroider a simple curved smile in black yarn across the lower front of the face, approximately 3 rows below the safety eye. A slightly off-center curve gives Dave his signature cheerful, slightly dopey expression.
- Buttons: Sew both small buttons to the center of the front overalls panel, evenly spaced below the top edge. This is the final detail before weaving in ends.
For a clean final finish on a piece with this many parts, our tips on fastening off and weaving in ends are worth a quick read — with 8 separate pieces, every yarn tail counts.
Emma’s Note
Dave is one of those projects where the construction is genuinely clever — the BLO waistband trick, the finger-join technique, the shorts cuffs built directly from the leg rows. I’ve made a lot of amigurumi, and I appreciate a pattern that uses structure to solve assembly problems rather than just sewing everything on and hoping for the best. The finger join at Row 6 will feel awkward the first time — it did for me too — but give yourself permission to frog it if the first hand doesn’t look right. The second one always goes better. If you loved this crochet minion free pattern, our free Baby Yoda amigurumi pattern has the same satisfying chunky-character energy, and our free Stitch amigurumi pattern is another fan favorite worth adding to your queue. Happy hooking. 🧶
What yarn is best for this crochet minion free pattern?
The pattern recommends YarnArt Jeans or any comparable DK / Light Worsted (3) cotton-acrylic blend yarn for its crisp stitch definition and smooth texture.
What size safety eye do I need for Minion Dave amigurumi?
Since Dave is a one-eyed minion, a single large 18mm or 20mm safety eye fits the scale of this 6.7-inch toy perfectly.
Is this free minion crochet pattern suitable for beginners?
This pattern is rated as intermediate because it requires specific techniques such as color changes, working in back loops only (BLO), and joining multiple fingers into a single hand.