The Tiniest Little Bloom That Will Absolutely Steal Your Heart
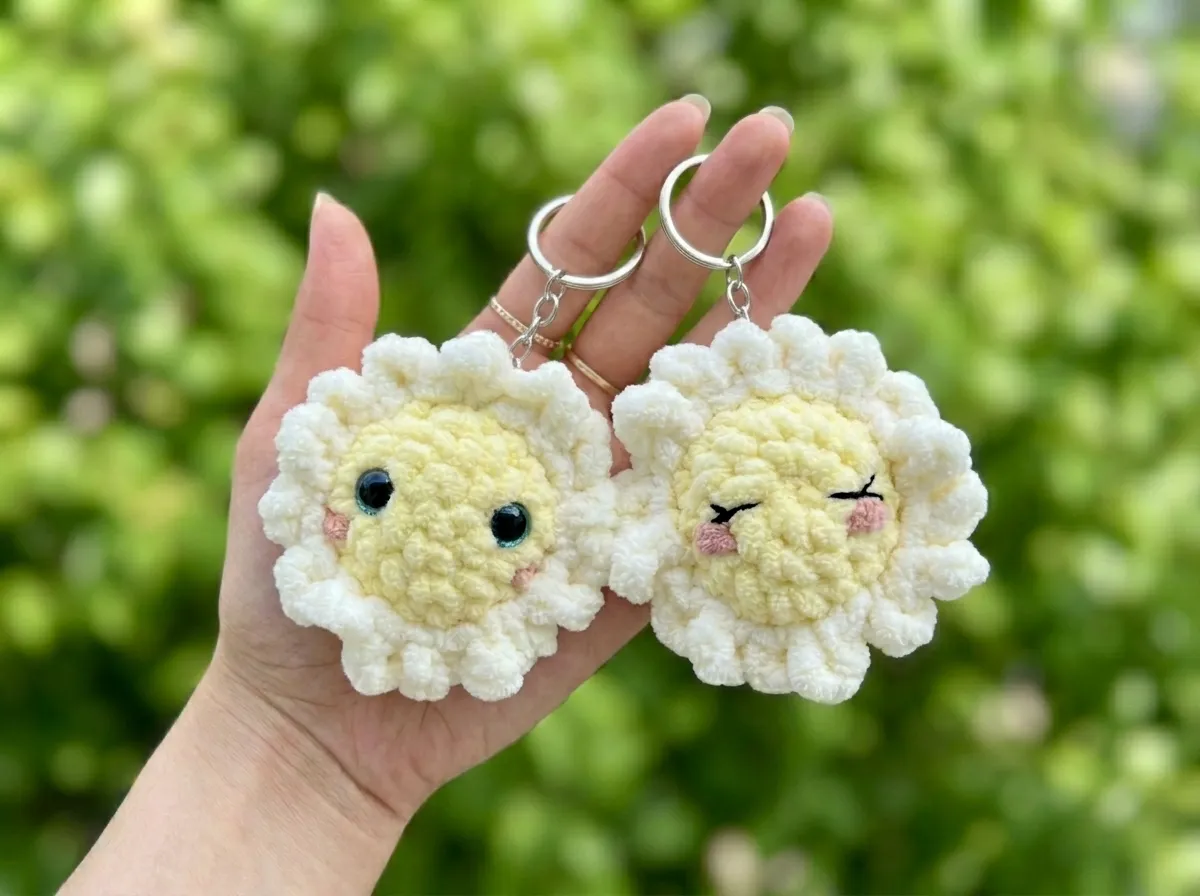
This free crochet flower keychain pattern makes the most precious little bloom — a softly rounded center with glossy safety eyes peeking out from between the petals, surrounded by a ring of delicate looped petals in whatever pastel color makes your heart skip. It fits right in your palm, clips onto your bag, and has that squeezable roundness that makes you want to hold it forever. I may have squealed just a little when I finished this one. Let me show you everything.
🩷 Pattern Highlights
- Cuteness Rating: 🩷🩷🩷🩷🩷
- Finished Size: approx. 2 in (5 cm) across
- Difficulty: Beginner
- Hook Size: 2.5mm (approx. US C/2)
- Yarn Palette: soft buttercream center + blush pink petals, or mint green + cream, or lavender + white — truly any pastel combo works beautifully
- Key Detail: glossy safety eyes set between rounds, giving the flower a sweet kawaii face
- Estimated Time: 1–2 hours
What You’ll Need for This Crochet Flower Keychain
One of my favorite things about this pattern is how little yarn it takes — this is the perfect scrap-friendly project if you’ve been eyeing those tiny leftover balls of fingering cotton. Here’s everything you’ll want to gather before you begin:
- Yarn — Center: a small amount of fingering weight (CYCA 1) yarn in your chosen center color — soft buttercream, pale yellow, or warm ivory are my personal favorites for that kawaii flower look
- Yarn — Petals: a small amount of fingering weight yarn in a coordinating petal color — blush pink, mint, lavender, or cloud white all look so dreamy
- Hook: 2.5mm (approx. US C/2) — this size keeps the stitches tight and neat so no stuffing peeks through
- Safety Eyes: one pair of 6mm glossy black safety eyes — 6mm is the sweet spot for a piece this size; any larger and the face loses that tiny kawaii proportion
- Keychain Hardware: one lobster clasp keychain ring (available at any craft store or on Amazon)
- Tapestry Needle: for weaving in ends and closing the center
- Stitch Marker: to track the beginning of each round
- Scissors
- Optional: a tiny amount of pink embroidery floss for embroidered blush cheeks (highly, highly recommended — more on this in the finishing section!)
For the safety eyes specifically, if you’d like guidance on exactly how to position and lock them in before closing, our safety eyes tutorial walks through the whole process so your placement is perfect every single time.
Abbreviations Used in This Crochet Flower Keychain Pattern
| Abbreviation | Full Term |
|---|---|
| sc | single crochet |
| mr | magic ring |
| inc | increase (2 sc in the same stitch) |
| inv dec | invisible decrease — insert hook through front loops only of next 2 stitches simultaneously, yarn over, pull through, yarn over, pull through 2 loops |
| ch | chain |
| sl st | slip stitch |
| BLO | back loop only |
| FLO | front loop only |
🩷 A note on decreases: Throughout this pattern, all decreases are worked as invisible decreases (inv dec). This method — worked through the front loops only — closes the shape cleanly with no visible gap. It’s the only decrease method I use for amigurumi, and once you try it, you’ll understand why. If you’d like to practice before you start, our invisible decrease tutorial has you covered.
Before You Begin — A Few Details Worth Loving
This pattern is tiny — and tiny means every small decision shows up in the finished piece. Here are the three things I think about before I even pick up my hook.
The Eyes Come In Early
Safety eyes get inserted between rows 2 and 3 of the center — before the piece closes up. This sounds early, but it’s intentional. The center will have 12 stitches at that point and you’ll have a clear, open disc to work with. Place them with space to spare from the center, symmetrically on either side of the stitch marker line. Hold the piece under a bright lamp and check from directly in front before you press those washers in. Once they click, that’s it — so take the extra thirty seconds. You’ll be so glad you did.
The BLO Row Is Your Petal Foundation
Row 5 is worked in BLO — back loops only. This isn’t just a texture choice; it leaves the front loops of that row free, which is exactly where you’ll attach the petals later. Those unworked front loops become your petal anchor points. It’s such a clever little construction detail and I love it every time.
The Magic Ring Close
The pattern notes ask you to pull the starting yarn tail through row 1 and tighten it gently to flatten the center without creating a dimple. This gives the center that perfectly smooth, slightly flattened disc shape — like a little button. Don’t skip this step; it’s what gives the flower that clean, polished look. If you want a refresher on working a magic ring before you start, our magic ring tutorial covers every step.
The Pattern
Center (×1)
Use your center color yarn. Start with a magic ring.
Row 1: 6 sc in mr (6)
Row 2: 6 inc (12)
🩷 Eyes go in now! Before you continue, insert your 6mm safety eyes between rows 2 and 3. Position them symmetrically on either side — roughly 3–4 stitches apart. Hold the piece up, look at it straight-on, and adjust until they feel perfectly even. Press the washers in firmly from the back.
Row 3: (sc, inc) × 6 (18)
Row 4: 18 sc (18)
Row 5: 18 sc in BLO (18)
🩷 Those front loops you just left free in row 5? They’re your petals waiting to happen. So satisfying knowing what’s coming next.
Row 6: (sc, inv dec) × 6 (12)
Row 7: 6 inv dec (6)
Fasten off, leaving a long tail. Using your tapestry needle, weave the tail through the front loops of the remaining 6 stitches and pull to close. Secure and weave in the end.
🩷 Shaping the center: Once closed, thread the starting yarn tail onto your tapestry needle, pull it gently through the center of row 1, and tighten very slightly — just enough to flatten the disc without creating a dimple. You’re aiming for a smooth, slightly flattened button shape. That little adjustment makes such a visible difference in the finished look.
Petals
Switch to your petal color yarn. Attach yarn to any stitch in the front loops of row 5 (the loops you left free in BLO).
Working across all 18 free front loops:
Petal round: *4 ch, sl st in the same stitch, sl st in next stitch* — repeat from * to * all the way around until all 18 front loops have been worked. (18 petals)
Each petal is formed by the 4-chain loop that folds back and gets anchored by a sl st into the same stitch. The sl st into the next stitch carries you forward to make the next one. By the time you’ve worked all 18 front loops, you’ll have a full ring of little looped petals framing the center.
🩷 The moment the petals start fanning out around the center is the best part of this whole pattern. It goes from a plain little disc to a real flower in about thirty seconds. I love it so much every time.
Fasten off and weave in all ends securely.
Assembly
- Shape the center first. Before anything else, complete the yarn tail shaping step described in the pattern notes — pulling the starting tail through row 1 and tightening gently. Do this while the piece is still fresh and easy to handle.
- Check the eyes. Give your flower a good look straight-on in good lighting. The eyes should sit evenly — same height, same distance from center. If anything feels slightly off, now is the time to notice it (and accept it with love, because handmade is handmade and it’s still precious).
- Attach the keychain ring. Thread your tapestry needle with a small length of yarn in your center color and stitch the lobster clasp keychain ring securely to the back of the flower — looping through the ring several times and knotting firmly. Weave the yarn tail into the body of the center so it disappears completely.
- Weave in all remaining ends with your tapestry needle, threading through several stitches in different directions so nothing works loose over time.
Making It Extra Cute — The Finishing Details
Okay, this is my favorite part. The pattern gives you a sweet little flower — but the finishing details are what take it from cute to completely irresistible. Here’s exactly what I do every time.
Embroidered Blush Cheeks
This is non-negotiable for me. Thread a tapestry needle with a short length of soft pink embroidery floss (one or two strands — you want it delicate, not bold). Below each safety eye, make two or three tiny satin stitches in a small oval or crescent shape. The placement should feel like the flower is blushing — slightly below and just outside each eye. When you’re done, pull the thread tail gently to the back and secure it. Those two tiny pink ovals will completely transform the expression. It goes from “nice flower” to “flower that is so happy to be on your keychain.”
Eye Placement — My Personal Approach
I always place my safety eyes when the piece is still unfinished and easy to adjust. For this flower, I hold the flat center disc between my fingers, find the visual midpoint, and place both eyes at the same row — between rows 2 and 3 — roughly 3 stitches apart. Then I hold it under my desk lamp, look at it from directly in front, and tilt it slightly left and right to check the symmetry from multiple angles. If something feels off even a tiny bit, I adjust before pressing the washer. Once that washer clicks in, there’s no going back — so I give myself that extra thirty seconds of peace of mind every single time.
Color Variation Ideas
This little flower looks stunning in so many combinations. A few palettes I’m currently obsessed with:
- Buttercream + Blush Pink: warm, classic, Valentine’s-adjacent — the most traditional kawaii flower look
- Mint + Cloud White: fresh and delicate, so pretty for spring
- Lavender + Pale Yellow: unexpected but so, so sweet together
- Coral + Cream: a little warmer and sunnier — perfect for a summer bag
- White + Soft Lilac: elegant and dreamy, especially in a mercerized cotton that gives the petals a little sheen
Make a few in different colorways and put them on a single keyring together — a little bouquet keychain. I’m not saying I’ve done this. I’m saying I absolutely have done this.
A Little Gift Idea
These are so fast to make that they are genuinely the best last-minute gift. Drop one into a small organza bag or tie it onto a gift box with ribbon. The person who receives it will hold it and immediately want to know how it was made. And then you get to say you made it yourself. 🩷
Chloe’s Final Look
I’ve been holding this finished little flower for an embarrassingly long time and I have zero regrets. The way the looped petals fan out around the center, the glossy eyes catching the light, those tiny pink blush marks — it’s such a complete little face. It looks like it’s genuinely happy to exist. Try making a set in three coordinating pastel colorways and clipping them all onto the same bag — a soft pink, a mint green, and a lavender, all lined up. People will stop you to ask about them and I promise you will feel so proud. 🩷
What size hook do I need for this crochet flower keychain?
You will need a 2.5mm (approx. US C/2) crochet hook. This specific size ensures your stitches remain tight and neat so no stuffing peeks through.
How long does it take to crochet this flower keychain?
It takes approximately 1 to 2 hours to complete, making it a perfect quick scrap-friendly project or last-minute handmade gift.
What yarn weight is best for this pattern?
This pattern is optimized for fingering weight (CYCA 1) cotton yarn, which perfectly preserves the tiny kawaii proportions of the flower.