Free Spider-Man Crochet Pattern — Amigurumi with Web Detail
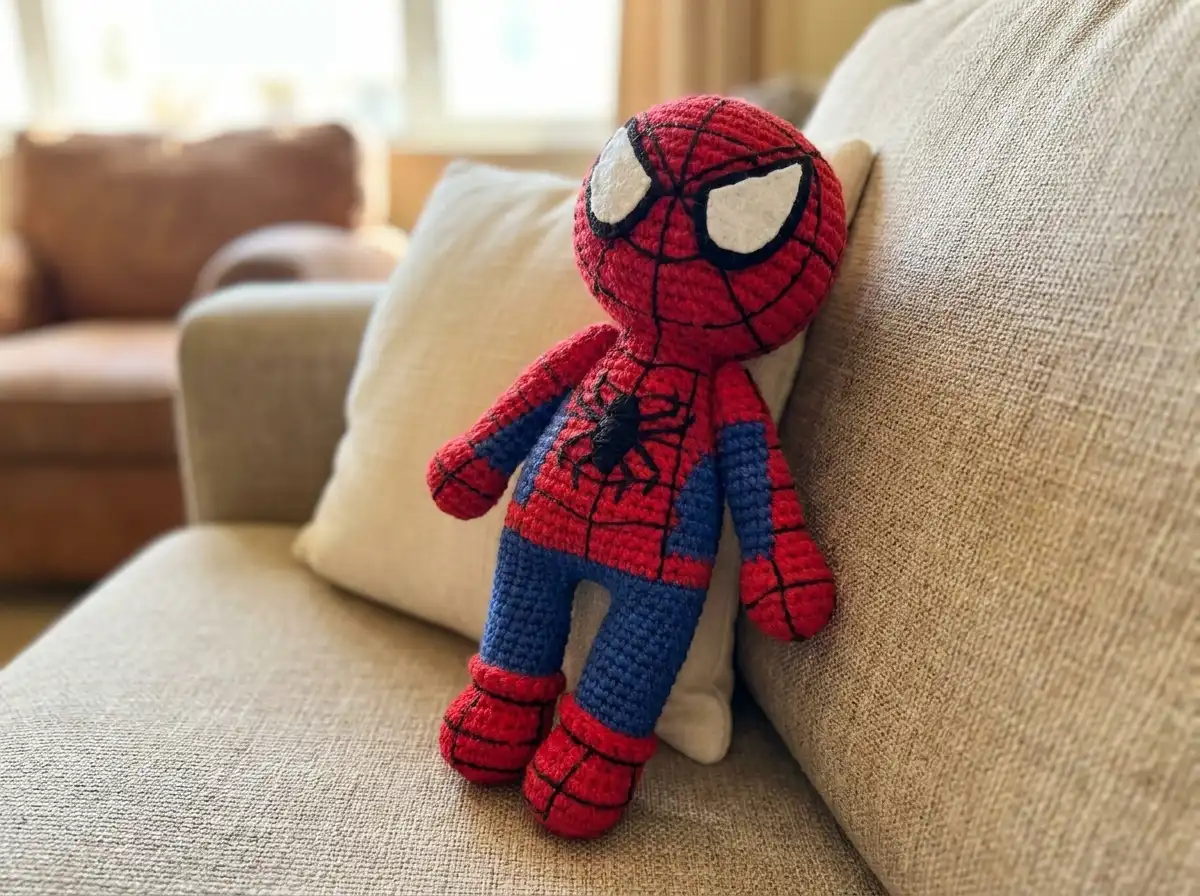
This spiderman crochet pattern free has been sitting in my queue for months, and I’m so glad I finally sat down to write it up properly. The color work on the body is intricate — we’re talking deliberate stripe shaping and side paneling — and I want to make sure every round makes complete sense before you hook a single stitch.This is an advanced project, but if you work through it methodically, the result is genuinely impressive. Let’s get into it.
📋 Pattern Quick Stats
- Difficulty: Advanced
- Finished Size: Approximately 7–8 in (18–20 cm) with recommended yarn and hook
- Hook Size: 1.75mm (no US letter equivalent — see materials note)
- Yarn Weight: DK / Light Worsted (3)
- Techniques: magic ring, invisible decrease, color changes, BLO, FLO, double crochet, leg joining, embroidery
- Estimated Time: 10–15 hours
Materials for This Free Spider-Man Crochet Pattern
- Red DK yarn — YarnArt Jeans #26, or US alternative: Paintbox Simply DK or Lion Brand 24/7 Cotton in red (DK/Light Worsted, weight 3)
- Blue DK yarn — YarnArt Jeans #47, or US alternative: Paintbox Simply DK or Lion Brand 24/7 Cotton in blue (DK/Light Worsted, weight 3)
- Black DK yarn — YarnArt Jeans #53, or US alternative: Paintbox Simply DK or Lion Brand 24/7 Cotton in black (DK/Light Worsted, weight 3) — small amount for embroidery reference color
- Hook: 1.75mm (no US letter equivalent)
- Polyester fiberfill (polyfill) for stuffing
- Stitch markers
- Tapestry needle
- Felt or foam sheet — black and white, for the eyes
- Thin black thread — for web embroidery (you can also split a strand of your black DK yarn and use the inner ply)
- Scissors
- Hot glue gun (optional — for attaching eyes)
💡 Emma’s Note on Hook Size: 1.75mm is smaller than any standard US lettered hook. This is intentional — it creates the dense, tight fabric this pattern needs, especially in the leg shaping and color-work sections. If you have a slightly looser natural tension, stay at 1.75mm. If your tension is already tight (like mine), check your gauge after the first leg and adjust if needed. These US DK alternatives work beautifully at this hook size for amigurumi — the fabric will feel almost woven, which is exactly what you want.
DK / Light Worsted yarn falls under weight category 3 on the Craft Yarn Council yarn weight system — a helpful reference if you’re shopping for substitutes and comparing labels.
Abbreviations Used in This Spider-Man Crochet Pattern
| Abbreviation | Meaning |
|---|---|
| sc | single crochet |
| dc | double crochet |
| inc | increase (2 sc in the same stitch) |
| inv dec | invisible decrease (insert hook through front loops only of next 2 stitches simultaneously) |
| ch | chain |
| sl st | slip stitch |
| mr | magic ring |
| BLO | back loop only |
| FLO | front loop only |
| st(s) | stitch(es) |
| FO | fasten off |
⚠️ On decreases: All decreases in this pattern use the invisible decrease (inv dec) method — insert your hook through the front loops only of the next two stitches simultaneously. This is AmiLoops standard for amigurumi. The sc2tog method creates a visible gap and is not used here.
Special Techniques for This Free Spider-Man Crochet Pattern
Before you cast on, I’d recommend getting familiar with a few key techniques that show up throughout this pattern. If any of these are new to you, work through them before starting — this isn’t a project to troubleshoot mid-row.
- Magic Ring — Used for the arms. If you haven’t worked one before, our step-by-step magic ring tutorial walks you through it start to finish.
- Invisible Decrease — Used extensively in the body and head shaping. It’s what keeps the color sections looking clean and tight. Read through our complete invisible decrease tutorial if you’re not already comfortable with it.
- Color Changes — The body of this pattern involves working in multiple colors per round, carrying or cutting yarn as you go. Our seamless color change guide covers everything you need for clean transitions.
- BLO and FLO Rows — Row 10 of the legs is worked in BLO. The FLO of that same row is then used afterward to work a decorative double crochet trim in red. Take it slow the first time you encounter this — it’s a clever technique once you see it in action.
- Leg Joining — After completing both legs separately, you join them with a chain bridge to begin the body as one continuous piece. This is explained step by step in the body section below.
Free Spider-Man Crochet Pattern Instructions
Legs (×2) — Red and Blue
Make two. The legs are worked flat at the base, then closed into a tube as the shaping continues. The color transition from red to blue happens at Row 10.
Starting Method: Chain 5
Row 1: Starting from the 2nd ch from hook: inc, 2 sc, 4 sc in 1 st, 2 sc, inc (12)
Row 2: inc, 4 sc, 2 inc, 4 sc, inc (16)
Row 3: 1 sc, inc, 5 sc, inc, 1 sc, inc, 5 sc, inc (20)
Row 4: 2 sc, inc, 6 sc, inc, 2 sc, inc, 6 sc, inc (24)
Rows 5–6: 24 sc (24)
Row 7: 7 sc, 5 inv dec, 7 sc (19)
Row 8: 6 sc, 3 inv dec, 7 sc (16)
Row 9: 16 sc (16)
Row 10: [blue] BLO 16 sc (16)
Rows 11–18: 16 sc (16)
💡 Emma’s Tip: After Row 6, work +1 sc forward before beginning Row 7. This small shift keeps the shaping centered on the foot. Don’t skip it — your decrease rows will land correctly only if you make this adjustment.
💡 Red Cuff Detail: After completing Row 18, go back to the FLO of Row 10 and work 16 dc in red into those unworked front loops. This creates the folded red cuff at the top of the blue leg section. It’s one of those small details that really finishes the look. Work it before joining the legs.
⚠️ Do not fasten off after Row 18. Leave the yarn attached on the second leg — you’ll continue directly into the body join.
Body and Head (×1) — Blue and Red
The body is worked by joining both legs, then working in continuous rounds upward. Color shaping on the torso is detailed and intentional — follow the color notes exactly per round. The head expands from the same continuous piece starting at Row 42.
Starting Method: Joining legs with 3 ch
💡 How to Join the Legs: With your working yarn attached at the end of the second leg (Row 18), chain 3. Sl st into the first leg to connect. You’ll now work Row 19 across both legs and the chain bridges, creating a total of 38 stitches. Place a stitch marker at the beginning of this round.
Row 19: 16 sc across first leg, 3 sc across the chain, 16 sc across second leg, 3 sc across the chain (38)
Row 20: 16 sc, inc, 1 sc, inc, 16 sc, inc, 1 sc, inc (42)
Rows 21–22: 42 sc (42)
Rows 23–24: 42 sc [red] (42)
Rows 25–26: 4 sc [red], 10 sc [blue], 11 sc [red], 10 sc [blue], 7 sc [red] (42)
Row 27: 4 sc [red], 3 sc, inv dec, 5 sc [blue], 11 sc [red], 4 sc, inv dec, 4 sc [blue], 7 sc [red] (40)
Row 28: 4 sc [red], 3 sc, inv dec, 5 sc [blue], 10 sc [red], 3 sc, inv dec, 5 sc [blue], 6 sc [red] (38)
Row 29: 4 sc [red], 9 sc [blue], 10 sc [red], 9 sc [blue], 6 sc [red] (38)
Row 30: 4 sc [red], 3 sc, inv dec, 4 sc [blue], 10 sc [red], 3 sc, inv dec, 4 sc [blue], 6 sc [red] (36)
Row 31: 4 sc [red], 8 sc [blue], 10 sc [red], 8 sc [blue], 6 sc [red] (36)
Row 32: 4 sc [red], 3 sc, inv dec, 3 sc [blue], 10 sc [red], 3 sc, inv dec, 3 sc [blue], 6 sc [red] (34)
Row 33: 5 sc [red], 5 sc [blue], 12 sc [red], 5 sc [blue], 7 sc [red] (34)
Row 34: 6 sc [red], inv dec, 1 sc [blue], 14 sc [red], 1 sc, inv dec [blue], 8 sc [red] (32)
Row 35: 6 sc, inv dec, 14 sc, inv dec, 8 sc (30)
💡 Emma’s Tip: From Row 35 onward, work entirely in red. The blue side panels taper to nothing at this point. Cut your blue yarn cleanly and weave in those ends before continuing — it keeps the inside of the body tidy and makes stuffing much easier later.
Row 36: 30 sc (30)
Row 37: 6 sc, inv dec, 13 sc, inv dec, 7 sc (28)
Row 38: 6 sc, inv dec, 12 sc, inv dec, 6 sc (26)
Row 39: 5 sc, inv dec, 11 sc, inv dec, 6 sc (24)
Row 40: (2 sc, inv dec) × 6 (18)
Row 41: 18 sc (18)
💡 Stuff the body now. Before you begin the head expansion at Row 42, stuff the body firmly and evenly. Once the head starts expanding, you won’t have clean access to the waist area. Use your tapestry needle handle or a blunt pencil to push the stuffing down into the legs as well. Our guide on how to stuff amigurumi without lumps covers the technique if you need a refresher.
Row 42: 18 inc (36)
Row 43: (5 sc, inc) × 6 (42)
Row 44: (6 sc, inc) × 6 (48)
Row 45: (7 sc, inc) × 6 (54)
Row 46: (8 sc, inc) × 6 (60)
Rows 47–55: 60 sc (60)
Row 56: (8 sc, inv dec) × 6 (54)
Row 57: (7 sc, inv dec) × 6 (48)
Row 58: (6 sc, inv dec) × 6 (42)
Row 59: (5 sc, inv dec) × 6 (36)
Row 60: (4 sc, inv dec) × 6 (30)
Row 61: (3 sc, inv dec) × 6 (24)
Row 62: (2 sc, inv dec) × 6 (18)
Row 63: (1 sc, inv dec) × 6 (12)
💡 Emma’s Tip: Before Row 63, stuff the head fully. Add more stuffing than you think you need — the head will compress slightly as you close it down. Attach the safety eyes (or prepare the felt eyes for placement) before Row 62, while you still have clear access to the inside of the head.
Row 64: 6 inv dec (6)
Fasten off, leaving a long tail. Close the remaining opening by threading the tail through the front loops of each remaining stitch and pulling tight. Weave in the end.
Arms (×2) — Red and Blue
Make two. Arms begin at the hand (worked in the round from a magic ring) and taper before the color-work section, which represents the blue stripe running along the arm.
Starting Method: Magic ring
Row 1: 6 sc in mr (6)
Row 2: 6 inc (12)
Row 3: (1 sc, inc) × 6 (18)
Rows 4–5: 18 sc (18)
Row 6: (4 sc, inv dec) × 3 (15)
Row 7: (3 sc, inv dec) × 3 (12)
Rows 8–17: 3 sc [red], 6 sc [blue], 3 sc [red] (12)
Rows 18–21: 12 sc [red] (12)
Row 22: 6 inv dec (6)
💡 Emma’s Tip: The blue stripe on the arms runs for 10 consecutive rows (8–17). Keep your color carries neat on the inside — or cut and rejoin for each row if you prefer cleaner fabric. From Row 18 onward, work entirely in red. Lightly stuff the arms before closing Row 22 — just enough to hold shape without making them stiff.
Fasten off each arm, leaving a long sewing tail.
Assembly
- Legs to Body: The legs are already incorporated into the body — they connect at Row 19 during the pattern. No additional sewing is needed for the legs.
- Arms to Body: Position each arm on either side of the body at approximately Row 30–32, aligning the top of the arm with the shoulder area. Pin in place before sewing. Use the long tail and a tapestry needle to sew through several stitches on both the arm and the body, working around the full attachment circle at least twice for security. Our guide to sewing amigurumi parts together covers secure attachment in detail.
- Eyes: Attach the felt eyes using hot glue or a few small whipstitches, centered on the head between approximately Rows 50–53. See the finishing section below for how to construct them.
Finishing Details — Eyes and Web Embroidery
Eyes
Cut four felt pieces total: 2 black (larger, outer shape) and 2 white (smaller, inner lens shape). If drawing the mask eye shape freehand is difficult, trace a reference from a printed template. Whipstitch around the edges of each piece with matching thread to prevent fraying. Sew or glue the white piece centered onto the black piece. Attach the finished eye units to the head using hot glue or small invisible stitches.
Web Embroidery
Using thin black thread — or a single ply carefully pulled from your black DK yarn — embroider the web pattern across the head and upper body. Work the radiating lines first, then connect them with curved crossing lines to create the classic web grid. Take your time with this step; consistent spacing makes a significant difference in the finished result.
Spider Emblem
Embroider a small spider shape on the chest using the same black thread. Keep it simple — a small oval body with four lines extending from each side as legs reads clearly at this scale.
💡 Emma’s Tip: I do the embroidery after everything is assembled and all ends are woven in. It’s much easier to judge placement and proportions once the figure is complete and standing. Don’t rush this last stage — the embroidery is what takes this from a basic amigurumi to something that genuinely looks like the character.
Emma’s Note
This free Spider-Man crochet pattern is genuinely one of the more technically involved patterns on this site — the body color work alone requires real focus and consistent stitch counting. I checked every count in that torso section, and they all add up, but you’ll want to use stitch markers religiously through Rows 25–34. If your blue panels start looking uneven, frog back to the last clean row. It’s worth it. The finished piece, embroidery and all, is worth every careful stitch. Happy hooking. 🧶
If you enjoyed this pattern, you might also like our free Batman amigurumi pattern or the chunky Baby Yoda crochet pattern — both are in the same character family and make a great set.
What is the best yarn for this Spider-Man amigurumi?
We recommend using DK or Light Worsted (weight 3) yarn like YarnArt Jeans or Lion Brand 24/7 Cotton for the best structural results.
Can a beginner make this Spider-Man crochet pattern?
This is an advanced project due to the complex color changes in the torso and the small hook size used for tight tension.
What size hook is needed for this pattern?
You should use a 1.75mm hook to create a dense fabric that prevents stuffing from showing through the stitches.