Free Crochet Demogorgon Pattern — Amigurumi Step by Step
This crochet Demogorgon free pattern is one of the most technically rewarding builds on AmiLoops — integrated legs with individual toes, a shaped body and head worked in one continuous piece, and that unmistakable five-petal mouth assembly that makes this creature instantly recognizable. Every round is counted and every stitch count adds up. The mouth construction is the real challenge here, and I’ll walk you through it step by step so nothing catches you off guard.
📋 Pattern Quick Stats
- Difficulty: Intermediate–Advanced
- Finished Size: Approx. 4–5 in (10–13 cm) tall — varies by tension
- Hook Size: 2.5mm (approx. US C/2)
- Yarn Weight: DK / Light Worsted (3) — microplush or microvelour recommended
- Techniques: magic ring, invisible decrease, BLO/FLO, color changes, turned rows (hdc, dc)
- Estimated Time: 6–10 hours
Materials for Your Crochet Demogorgon Free Pattern
- Main color yarn: DK / Light Worsted (3) — microplush or microvelour gives the best texture result. US alternatives include Drops Muskat, Paintbox Simply DK Cotton, or any cotton-acrylic DK blend. Estimate 80–100 yds for the full body, legs, and arms.
- Black yarn: Small amount — same weight as main color. Used only for the mouth base center.
- Red yarn: Small amount — same weight. Used for the inner mouth petals.
- Thin white yarn: Just a few yards, for embroidering teeth details onto the mouth petals.
- Hook: 2.5mm (approx. US C/2)
- Polyfill stuffing: Poly-Fil or similar polyester fiberfill — widely available at Joann, Michaels, or Hobby Lobby.
- Tapestry needle: For sewing parts together and weaving in ends.
- Stitch marker: Non-negotiable for tracking round beginnings in continuous rounds.
- Scissors
This pattern uses yarn classified as DK / Light Worsted (3) according to the Craft Yarn Council yarn weight system. Microplush and microvelour fibers give the finished Demogorgon an organic, slightly textured surface that suits the character well — but any well-plied DK-weight acrylic or cotton-acrylic will work fine.
💡 Emma’s Tip: I always work with a 2.5mm hook for amigurumi, and with DK yarn that produces deliberately tight, dense fabric. For this particular pattern, that density actually works in your favor — the Demogorgon reads better as a solid, firm piece rather than something squishy. If you’re newer to tight tension, a US D/3 (3.25mm) hook with the same yarn will give you a slightly more comfortable fabric while still keeping your stitches clean and closed.
Abbreviations Used in This Pattern
| Abbreviation | Meaning |
|---|---|
| sc | single crochet |
| hdc | half double crochet |
| dc | double crochet |
| inc | increase — 2 sc worked into the same stitch |
| inv dec | invisible decrease — insert hook through front loops only of next 2 stitches simultaneously, yarn over, pull through, yarn over, pull through 2 loops |
| dc dec | double crochet decrease — worked the same way as an invisible decrease, using dc instead of sc |
| sl st | slip stitch |
| ch | chain |
| mr | magic ring |
| BLO | back loop only |
| FLO | front loop only |
| FO | fasten off |
| st(s) | stitch(es) |
Techniques in This Crochet Demogorgon Free Pattern
Before you start, I want to walk through the key techniques in this pattern — especially the mouth construction, which operates differently from any other part of the build. Taking five minutes here will save you a lot of confusion later.
- Magic ring: All three parts begin with a magic ring. If you’ve never used one or want a refresher, our step-by-step magic ring tutorial covers it thoroughly.
- Invisible decrease: This is the only decrease method I use for amigurumi, and it’s the only one I’ll call for in this pattern. It inserts through the front loops only of two stitches simultaneously — no visible gap, no loose fabric. Our invisible decrease tutorial explains exactly why it produces cleaner closures than sc2tog and how to do it consistently.
- BLO and FLO: The mouth assembly uses both back loop only and front loop only working to create two separate surfaces from a single set of base stitches. This is what gives the Demogorgon’s mouth its layered, three-dimensional quality. Pay close attention to which loops you’re working into at each stage — it’s specifically called out in the pattern.
- Turned rows for the petals: The mouth petals are worked back and forth in turning rows, not in the round. You’ll chain and turn at the end of each row, and the rhythm will feel completely different from the rest of the pattern. Don’t be surprised — it’s intentional and it’s what creates those tapered petal shapes.
- Color changes: Three colors appear across the mouth section (main color, black, and red). If you want seamless transitions, our color change tutorial is worth reviewing before you reach that section.
💡 Emma’s Tip: I’d recommend completing the legs, body, and arms first and setting them aside before starting the mouth. The mouth assembly is detailed enough that it deserves its own focused session — trying to do it all in one sitting while you’re already tired from the body will lead to mistakes in the petal rows.
Free Crochet Demogorgon Pattern — Step-by-Step Instructions
This pattern has three separate parts: the legs-body-head (one continuous piece), the arms (worked identically, make two), and the mouth (the most complex section). Complete them in the order listed below.
Part 1: Legs, Body, and Head (One Piece)
Yarn color: Main color
Make: 1
Starting method: Magic ring
The legs are each worked separately, then joined at Row 14 to begin the body. The toes and fingers throughout this pattern are built directly into the round — they protrude naturally from the leg as chain-and-return structures, and the stitch counts given refer to the main leg stitches, not the length of the toe protrusions.
— FIRST LEG —
Row 1: 6 sc in mr (6)
Row 2: 2 inc, (sc, 3 ch, 2 sc along ch, sc in same st as first sc) × 4 (12)
💡 Emma’s Tip: Row 2 creates four toe protrusions from the base of the leg. Each (sc, 3 ch, 2 sc along ch, sc in same st) sequence forms one toe — the chain-3 creates the length and the return stitches define the shape. Keep your chains loose enough to give each toe some dimension. The stitch count of (12) refers to the main ring stitches only.
⚠️ Important Note: Rows 3 and 4 are not present in the source for this part. Based on the stitch count (12 at Row 2, then a decrease round at Row 5), these are almost certainly two plain sc rounds. Before proceeding to Row 5, work 2 rounds of 12 sc and verify your count is correct. I always check this kind of gap against the actual piece before moving forward — it’s not worth risking a miscount twenty rows later.
Row 5: (4 sc, inv dec) × 2 (10)
Rows 6–13: 10 sc (8 rounds) (10)
At the end of Row 13, work 1 additional sc. Do not fasten off. Place a stitch marker and set aside.
— SECOND LEG —
Repeat Rows 1–13 exactly as for the first leg. At the end of Row 13, work 6 additional sc instead of 1, then chain 2 and join to the first leg to begin working across both.
— BODY (both legs joined) —
Row 14: 10 sc along first leg, 2 sc along ch, 10 sc along second leg, 2 sc along ch (24)
Rows 15–20: 24 sc (6 rounds) (24)
Row 21: (4 sc, inv dec) × 4 (20)
Row 22: 20 sc (20)
Row 23: (3 sc, inv dec) × 4 (16)
Rows 24–25: 16 sc (2 rounds) (16)
Row 26: (2 sc, inv dec) × 4 (12)
Rows 27–28: 12 sc (2 rounds) (12)
💡 Emma’s Tip: Start stuffing the body firmly after Row 26, while the opening is still wide enough to work with. If you wait until the head shaping is complete, getting stuffing evenly distributed through the narrow neck is genuinely difficult. Our guide to stuffing amigurumi without lumps covers the technique in detail — the short version is to add stuffing in small handfuls and press it into shape as you go.
— HEAD —
Row 29: (1 sc, inc) × 6 (18)
Row 30: (2 sc, inc) × 6 (24)
Row 31: (3 sc, inc) × 6 (30)
Row 32: 2 sc, inc, (4 sc, inc) × 5, 2 sc (36)
Row 33: (5 sc, inc) × 6 (42)
Rows 34–41: 42 sc (8 rounds) (42)
Row 42: (5 sc, inv dec) × 6 (36)
Row 43: 2 sc, inv dec, (4 sc, inv dec) × 5, 2 sc (30)
Row 44: (3 sc, inv dec) × 6 (24)
Row 45: (2 sc, inv dec) × 6 (18)
Row 46: (1 sc, inv dec) × 6 (12)
Row 47: 6 inv dec (6)
Finishing: Stuff the head firmly before closing. The head should hold its round shape and feel solid. Close the opening, FO, cut yarn, weave in ends.
Part 2: Arms (Make 2)
Yarn color: Main color
Starting method: Magic ring
The arms follow the same structural logic as the legs — finger protrusions are built directly into Row 2 as chain-and-return sequences. Three fingers per arm, worked before the tube closes and narrows into the upper arm.
Row 1: 5 sc in mr (5)
Row 2: inc, (sc, 3 ch, 2 sc along ch, sc in same st) × 3, inc (10)
Rows 3–4: 10 sc (2 rounds) (10)
Row 5: (3 sc, inv dec) × 2 (8)
Rows 6–13: 8 sc (8 rounds) (8)
Finishing: Work 2 additional sc. Fold the arm flat and work 4 sc through both layers simultaneously to close the top edge. Leave a long yarn tail for sewing to the body. Do not stuff the arms.
Part 3: Mouth
Yarn colors: Black, Red, Main color
Starting method: Magic ring (in black for the inner piece)
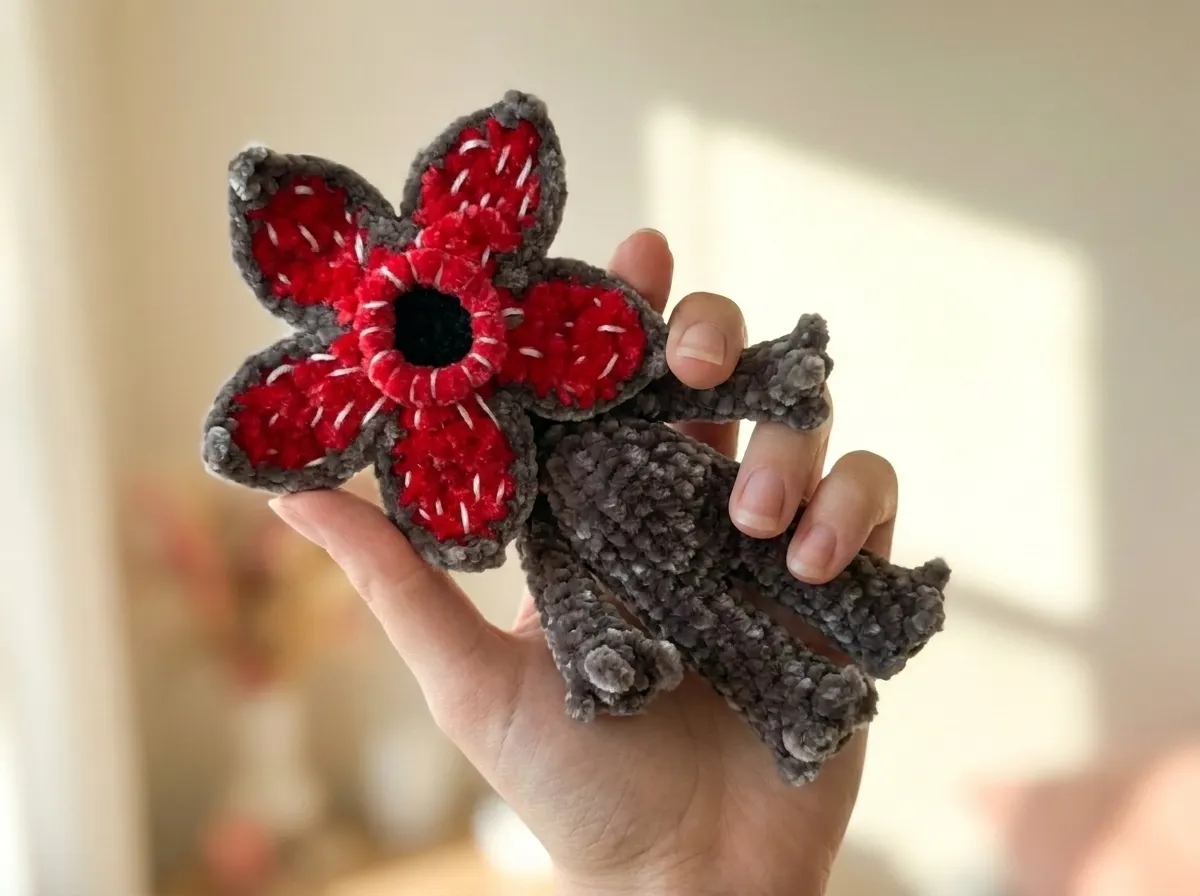
The mouth is built from two separate circles — one in red (the inner piece, with a black center) and one in main color (the outer piece). Each circle has five petals worked as turned rows along the outer edge. Once both are complete, they’re placed together and joined at the perimeter. This is the most involved section of the pattern, and it’s worth reading through the full mouth instructions before you pick up your hook.
MOUTH BASE — work once for the inner/red piece, once for the outer/main color piece:
Inner piece: begin in black. Outer piece: work all rounds in main color, and note the difference in Row 4 below.
Row 1: 6 sc in mr [black — inner piece only; use main color for outer piece] (6)
Row 2: 6 inc (12)
Row 3: (1 sc, inc) × 6 (18)
Row 4:
- Inner/red piece: (2 sc, inc) × 6 through FLO only (24)
- Outer/main color piece: (2 sc, inc) × 6 through both loops as normal (24)
Row 5 (inner/red piece only): Attach red yarn and work into the BLO of Row 4: (2 sc, inc) × 6 (24)
💡 Emma’s Tip: The FLO/BLO split in the inner piece is deliberate — Row 4 FLO leaves the back loops available for Row 5, which creates two separate surfaces from the same base round. This is what gives the mouth its layered depth. The outer piece doesn’t need this split because its petals are worked directly from the Row 4 edge using both loops. Don’t swap these or the assembly won’t sit correctly.
PETALS — work 5 petals per circle, in turning rows along the Row 4 edge:
For the inner/red piece, work the petals from the red (Row 5) surface. For the outer/main color piece, work from the Row 4 edge. When moving from one petal to the next, skip 1 stitch to the left of the previous petal along the Row 4 edge before beginning the next one.
Petal Row 1: 4 hdc, ch 2, turn (4)
Petal Row 2: 2 hdc in one st, 2 dc, 2 hdc in one st, ch 2, turn (6)
Petal Row 3: 2 hdc, 2 dc, 2 hdc, ch 1, turn (6)
Petal Row 4: 2 hdc, dc dec, 2 hdc, ch 1, turn (5)
Petal Row 5: inv dec, dc, inv dec, ch 1, turn (3)
Petal Row 6: inv dec over 3 sts, ch 1 (1)
Repeat all 6 petal rows for each of the remaining 4 petals. Both the inner and outer circles will have 5 petals each when complete.
💡 Emma’s Tip: I always take a breath before the petal rows. The transition from continuous rounds to back-and-forth turning rows can feel abrupt, and the first petal will likely feel awkward. That’s normal. Get Petal 1 right — check the shape, make sure the taper is clean — and the remaining four will go much more smoothly. If one petal looks off, it’s not much work to frog back to the Row 4 edge and redo it.
JOINING THE TWO MOUTH PIECES:
Place the inner/red piece and the outer/main color piece together with right sides facing outward — both visible surfaces should face you. Work sc around the entire perimeter to join the two circles. At the highest point (tip) of each petal, work into one stitch: 2 sc, ch 2, sc in that chain, sc in the same base stitch as the first sc. This creates a small pointed tip at each petal peak.
Assembly
- Arms: Pin each arm to the side of the body, positioned between Rows 27 and 28 of the body. Both arms should be at the same height and angled slightly downward. Sew securely using the long yarn tail and a tapestry needle, working all the way around the join point. Our guide to sewing amigurumi parts together walks through how to get a flat, stable join.
- Mouth: Center the completed mouth assembly on the front of the head. This is the focal point of the entire piece, so placement matters more here than anywhere else. I always count rows from the top of the head to find the center point, mark it with a stitch marker, and then pin the mouth before I sew a single stitch. Step back, look at it from a distance, adjust if needed. Once it’s right, sew it down firmly around the entire perimeter.
💡 Emma’s Tip: The mouth is proportionally large relative to the head — that’s correct and intentional for the Demogorgon’s silhouette. Don’t be alarmed when you first hold it up to position. Trust the placement guide above and pin before committing. A well-centered mouth is what makes this piece immediately recognizable.
Finishing Details
Using thin white yarn and a tapestry needle, embroider small stitches across the red portion of each petal to suggest teeth. Short, slightly uneven stitches actually read more naturally here than perfectly even ones — a few stitches per petal is all you need. There’s no fixed placement for these; work them where they look right to you.
Weave in all ends carefully and trim close. With a piece this compact, any tail left loose will eventually work its way to the outside. Take the extra two minutes to finish cleanly — it’s one of those details that makes all the difference.
If you enjoy building pop culture amigurumi characters, you might also like our free Stitch amigurumi pattern or our Baby Yoda amigurumi pattern — both are detailed builds with similarly satisfying assembly stages.
Emma’s Note
I’ve checked this pattern twice and every stitch count adds up — but the mouth petals will still test your patience the first time through, and that’s fine. What I’ve found is that if you work the first petal slowly and get the taper right, the remaining four follow naturally. The FLO/BLO split in the inner circle sounds more complicated than it is once you’re actually doing it. And if your petal rows are sitting unevenly, frog back to the Row 4 edge and start again — it’s not much work and the result is worth it. This little creature has some real personality once it’s assembled. Happy hooking. 🧶
What yarn is best for this crochet demogorgon free pattern?
Microplush or microvelour in DK weight is recommended to give the creature its organic, textured look.
Is this Demogorgon pattern suitable for beginners?
This is an intermediate to advanced pattern due to the complex petal mouth assembly and integrated toe structures.
How tall is the finished crochet Demogorgon?
Using a 2.5mm hook and DK yarn, the finished piece stands approximately 4–5 inches (10–13 cm) tall.