Free Baby Yoda Amigurumi Pattern — Easy Chunky Chenille One-Evening Project
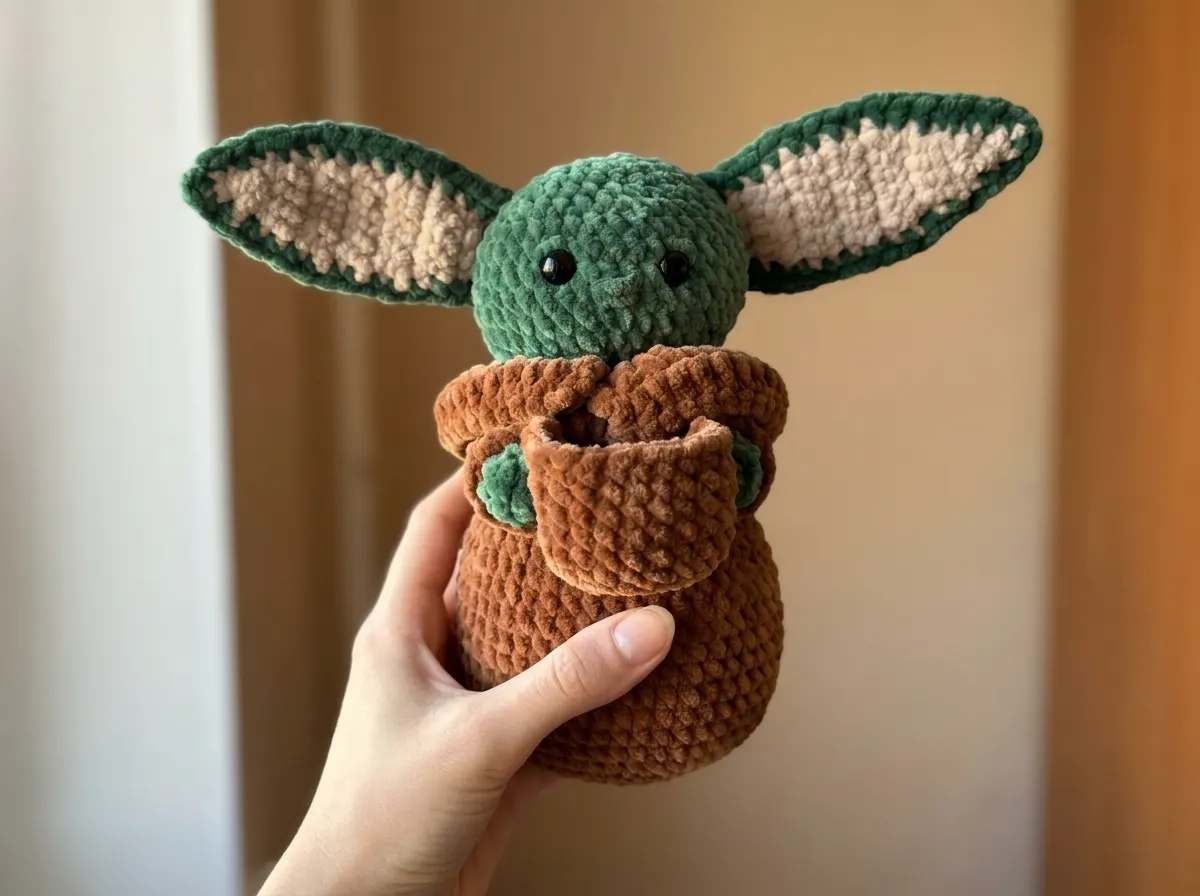
This Baby Yoda amigurumi is honestly one of the most satisfying projects I’ve ever made. Big ears, tiny cup, that little robe — it’s all there, and it’s way more beginner-friendly than it looks. The whole thing is worked in bulky chenille yarn, so it works up fast and feels incredibly squishy. Ready? Let’s go.
🧶 Why You’ll Love This Pattern
- ⭐ Difficulty: EASY–INTERMEDIATE
- ⏱️ Time: 3–5 hours — one long evening or a cozy weekend morning
- 🪡 Sewing: Minimal — arms attach with the thread method (no real sewing!), just the ears and tiny cup need a few stitches
- 🧵 Yarn: Bulky chenille — that thick, velvety stuff that makes everything look expensive
- 💰 Yarn needed: About 2/3 skein brown + 1/2 skein green + a tiny bit of beige
Materials for Your Baby Yoda Amigurumi
- Brown chenille yarn (Bulky 5) — approximately 2/3 skein. US alternatives: Bernat Baby Velvet, Premier Parfait. Available at Joann, Michaels, or Hobby Lobby.
- Green chenille yarn (Bulky 5) — approximately 1/2 skein. Same brand alternatives as above.
- Beige chenille yarn (Bulky 5) — just a small amount for the inner ears. A leftover scrap works perfectly.
- DK/Light Worsted yarn in brown (Weight 3) — a small length for attaching the arms using the thread method. US alternatives: Drops Muskat, Paintbox Cotton DK. This is a thinner yarn than the main yarn — it’s what lets you “sew” the arms on invisibly.
- 12–14mm safety eyes — two of them. This size looks perfect on a chunky amigurumi head.
- Crochet hook — for bulky chenille, a 5.0mm–5.5mm (US H/8–I/9) is a good starting point. Go tighter if your stitches look too open.
- Tapestry needle — for weaving in ends and the minimal sewing needed
- Polyester fiberfill stuffing — Poly-Fil by Fairfield works great and is available at any US craft store
- Stitch marker — non-negotiable! You need to track where your rounds start.
This yarn is a Bulky (5) weight — the thick, cozy kind that makes amigurumi work up so fast it almost feels like cheating.
Substitution note: Any bulky chenille or velvet yarn will work here. The chenille texture hides stitch gaps beautifully, which is great news for beginners.
Abbreviations Used in This Baby Yoda Amigurumi Pattern
| Abbreviation | What It Means |
|---|---|
| mr | Magic ring — an adjustable loop start that closes completely. No hole in the center! |
| sc | Single crochet — insert hook, yarn over, pull through, yarn over, pull through both loops |
| inc | Increase — work 2 single crochets into the same stitch. This is how the piece gets wider. |
| dec | Invisible decrease — insert hook through the front loops only of the next 2 stitches at once, yarn over, pull through, yarn over, pull through 2 loops. Cleaner than the standard method! |
| dc | Double crochet — yarn over, insert hook, pull through, yarn over, pull through 2 loops, yarn over, pull through remaining 2 loops |
| sl st | Slip stitch — insert hook, yarn over, pull through loop and stitch in one motion. Used to join rounds. |
| ch | Chain — yarn over, pull through loop |
| BLO | Back loop only — work into only the back loop of a stitch. Creates a ridge line. |
| FLO | Front loop only — work into only the front loop of a stitch |
| dec-dc / dc-inc | A double crochet increase — 2 double crochets worked into the same stitch |
Beginner Tips Before You Start
The magic ring is your best friend here. Every round piece — the body, head, arms, and cup — starts with one. It sounds fancy but it’s really just a loop you can tighten up. Never made one before? Our amigurumi magic ring tutorial walks you through it step by step. It’ll take you maybe five minutes to get the hang of it, and then you’ll use it forever.
Put in your safety eyes before you close the head. Seriously — once that stuffing is in, the eyes are not going in. The instructions remind you at the right moment, but this is worth flagging up front. Not sure how they work? Check out our safety eyes guide — it covers sizing, placement, and how to lock them in properly.
The collar uses double crochet — don’t panic. The body and head are all single crochet, which is wonderfully easy. The collar adds dc stitches to create that robe effect, but it’s just a few rows. If you’ve only ever done sc, take it slow on the collar rows. You’ve got this.
The Baby Yoda Amigurumi Pattern
Body (Make 1 — Brown)
The Baby Yoda amigurumi body starts with a magic ring in brown chenille yarn.
Row 1: 8 sc in mr (8)
Row 2: 8 inc (16)
Row 3: (1 sc, 1 inc) × 8 (24)
Row 4: (2 sc, 1 inc) × 8 (32)
Row 5: (3 sc, 1 inc) × 8 (40)
Row 6: (4 sc, 1 inc) × 8 (48)
Row 7: 48 sc in BLO (48)
Rows 8–17: 48 sc (10 rows) (48)
Row 18: (6 sc, 1 dec) × 6 (42)
Rows 19–20: 42 sc (2 rows) (42)
Row 21: (5 sc, 1 dec) × 6 (36)
Row 22: 36 sc (36)
Row 23: (4 sc, 1 dec) × 6 (30)
Row 24: 30 sc (30)
Row 25: (3 sc, 1 dec) × 6 (24)
Row 26: 24 sc (24)
Stuffing note: Before you leave Row 26, pack the body with stuffing. Squeeze it in there! A well-stuffed body holds its shape much better. Our stuffing guide has tips on how to get the right firmness without over- or under-doing it.
Do not cut yarn — you’re going to continue directly into the collar.
🎉 Body done! That big round base is the hardest part — and you just knocked it out. Everything from here is smaller and quicker. You’re doing great.
Collar (Make 1 — Brown, worked from Body)
The collar is worked directly from Row 26 of the body — you don’t cut the yarn. Row 27 is worked into the front loops only (FLO) of Row 26. The head will be worked into the back loops of the same row separately.
This section uses double crochet (dc) and turning rows. The turning chain counts as 1 dc.
Row 27: (1 dc, 1 dc-inc) × 12 in FLO (36)
Row 28: (2 dc, 1 dc-inc) × 12 (48)
Row 29: 48 dc, ch (48)
Cut yarn and weave in ends.
Head (Make 1 — Green, worked from Body)
Go back to Row 26 of the body. Join your green yarn and work into the back loops only (BLO) of that row — the front loops are already used up by the collar.
Row 27: 24 sc in BLO (24)
Row 28: (3 sc, 1 inc) × 6 (30)
Row 29: (4 sc, 1 inc) × 6 (36)
Row 30: (5 sc, 1 inc) × 6 (42)
Rows 31–35: 42 sc (5 rows) (42)
Row 36: (5 sc, 1 dec) × 6 (36)
Row 37: (4 sc, 1 dec) × 6 (30)
Row 38: (3 sc, 1 dec) × 6 (24)
Row 39: (2 sc, 1 dec) × 6 (18)
Row 40: (1 sc, 1 dec) × 6 (12)
Row 41: 6 dec (6)
Safety eyes: Install them between Rows 33 and 34, with 6 stitches between the eyes. Do this before you close up — once the opening is too small, the eyes can’t go in. Stuff the head firmly before closing.
Cut yarn, close the opening, and weave in ends.
✨ Look at that face. Okay, I’m not crying, you’re crying. The head is done and it already looks like him. The rest is just details — keep going!
Arms (Make 2 — Green + Brown)
Start with green yarn and a magic ring.
Row 1: 4 sc in mr (4)
Row 2: 4 inc (8)
Row 3: 8 sc — work with both green and brown simultaneously in this row: catch the brown yarn with your hook and pull it through alongside the green loops. This traps the brown yarn inside so it’s ready for the next row. (8)
Rows 4–13: 8 sc in brown (10 rows) (8)
Row 14: 4 dec (4)
Cut yarn, close the opening, weave in ends. Make two.
Assembly note: Arms are attached to the body using the thread attachment method with the DK brown yarn — you thread it through the arm and body to create a joint without traditional sewing. This means no messy mattress stitch, no pins, no frustration. Honestly my favorite technique.
Ears (Make 4 flat pieces: 2 beige + 2 green — join into 2 completed ears)
The ears are worked flat in turning rows, not in rounds.
Row 1: 6 ch
Rows 2–3: 5 sc, ch
Row 4: 1 inc, 3 sc, 1 inc, 1 ch (7)
Rows 5–10: 7 sc, 1 ch (6 rows) (7)
Row 11: 1 dec, 3 sc, 1 dec, 1 ch (5)
Row 12: 5 sc, 1 ch (5)
Row 13: 1 dec, 1 sc, 1 dec, 1 ch (3)
Row 14: 1 dec, 1 sc, 1 ch (2)
Row 15: 1 dec, 1 ch (1)
Make this shape twice in beige and twice in green.
Joining the ears: On the beige pieces, cut yarn and weave in ends. On the green pieces, do not cut yarn. Place one green piece and one beige piece together with wrong sides facing, and use the remaining green yarn to single crochet around the edge — this joins them into one ear with a green outside and a beige inside. Repeat for the second ear.
Cup (Make 1 — Brown)
Start with brown yarn and a magic ring. In Row 1, crochet over the yarn tail as you work — this hides it so you don’t need to weave it in later.
Row 1: 8 sc in mr (8)
Row 2: 8 inc (16)
Row 3: (1 sc, 1 inc) × 8 (24)
Row 4: 24 sc in BLO (24)
Rows 5–9: 24 sc (5 rows) (24)
Make a slip stitch to finish. Then create the handle: chain 10, attach the yarn to the bottom of the cup; skip 8 stitches along the side; attach yarn to the top edge and chain 10, then reattach at the bottom. This forms the little loop handle. Cut yarn and weave in ends.
Assembly — Almost There!
Here’s the honest truth about assembling your Baby Yoda amigurumi: it’s minimal. The arms use the thread method (which barely counts as sewing), and you’ve just got a couple of quick placements left.
- Ears: Sew the completed ears onto the sides of the head. Pin them first to check placement — they sit wide and low for that classic look. A few stitches each is all you need.
- Arms: Attach using the thread method with your DK brown yarn. Thread it through the arm, then through the body at your desired position, then back through. Pull gently to snug the arm against the body. Tie off. No mattress stitch required. 🙌
- Cup: Tuck the arm/hand into the cup opening or attach the cup to the hand with a few stitches. Either way, it’s just a couple of passes with your tapestry needle.
- Optional details: Embroider a tiny nose and simple eyelids with brown yarn. Totally optional — he looks great without them too.
You Did It! 🧶
You just made a Baby Yoda amigurumi in chunky chenille, and honestly? He’s ridiculously cute. If this was your first amigurumi, stop and appreciate what you just built — a multi-part toy with a robe collar, jointed arms, and those iconic ears. That’s not nothing. If it was your fiftieth, I hope it felt as cozy as it looks. Share your Baby Yoda amigurumi in the comments — I want to see every version!
What yarn is best for a Baby Yoda amigurumi?
Bulky chenille yarn (weight 5) is ideal — it’s soft, hides stitch gaps beautifully, and creates that squishy, velvety finish. Bernat Baby Velvet and Premier Parfait are great US options available at Joann or Michaels.
How long does it take to crochet a Baby Yoda amigurumi?
With bulky chenille yarn and a 5mm hook, this pattern typically takes 3–5 hours — perfect for one long evening or a relaxed weekend morning.
Can beginners make this Baby Yoda amigurumi pattern?
Yes, with a little crochet experience. The body and head use only single crochet in the round, and the collar adds just a few rows of double crochet. If you’re comfortable with a magic ring and crocheting in rounds, you’re ready to go.