Free Crochet Flounder Pattern — Squishy Chenille Fish with Striped Fins
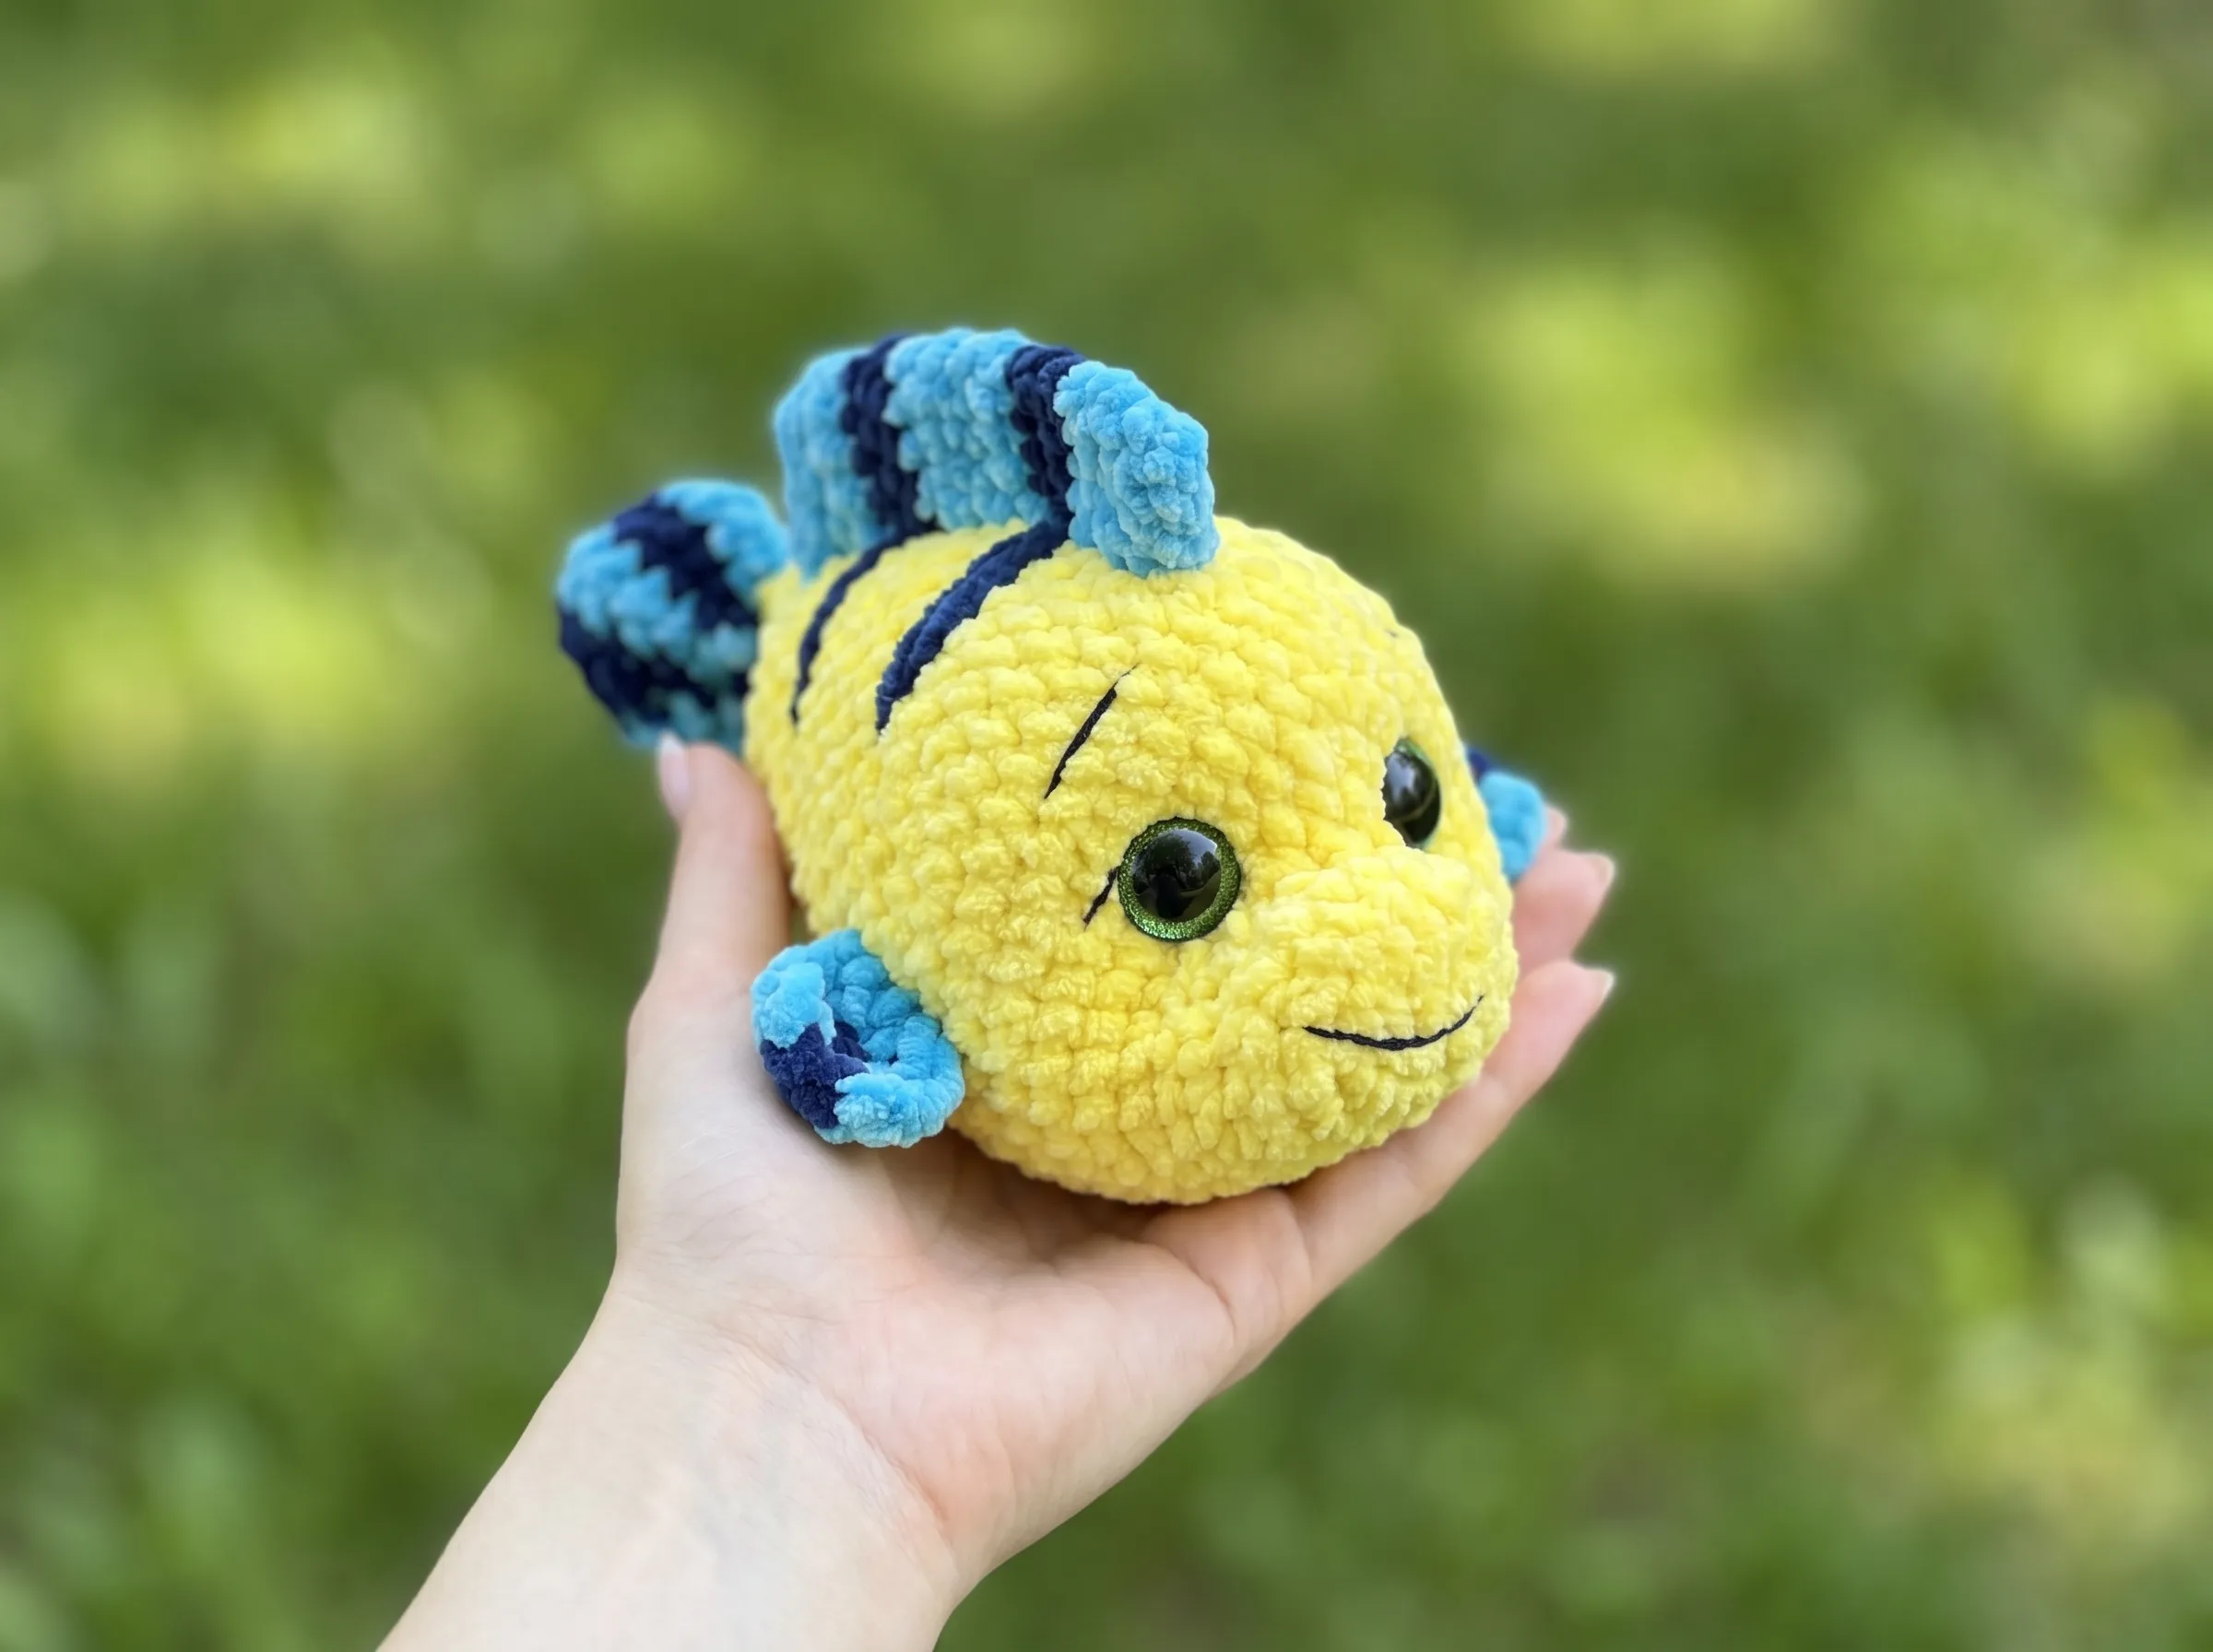
This crochet flounder free pattern makes the most melting little fish — a plump yellow chenille body, softly striped fins in light blue and blue, and the most enormous glossy green eyes you have ever seen on a creature this small. The crochet flounder free pattern is worked in continuous rounds for that perfectly seamless roundness, then finished with accordion-pleated fins and hand-embroidered details that honestly make the whole thing. It fits right in your palm. Let me show you everything.
🩷 Pattern Highlights
- Cuteness Rating: 🩷🩷🩷🩷🩷
- Finished Size: 7.9 in (20 cm)
- Difficulty: Beginner / Intermediate
- Hook Size: F/5 (3.75 mm)
- Yarn Palette: buttery yellow, soft light blue, cool blue
- Key Detail: accordion-pleated striped fins, cinched velvet cheeks, and 18mm glossy green safety eyes
- Estimated Time: 3–5 hours
Materials for Your Crochet Flounder Free Pattern
The chenille yarn is everything here — it gives this little fish that irresistible velvety softness that makes you want to hold it forever. Any Bulky (5) chenille in these shades will work beautifully.
- Bulky (5) chenille yarn — buttery yellow (main color, approx. half a skein): Wolans Bunny Baby shade #14, or US alternatives: Premier Parfait, Bernat Baby Velvet
- Bulky (5) chenille yarn — soft light blue (fins and tail): Wolans Bunny Baby shade #12, or same US alternatives in light blue
- Bulky (5) chenille yarn — cool blue (fins and tail stripes): Wolans Bunny Baby shade #17, or same US alternatives in blue
- Black embroidery thread or cotton yarn (thin, 2 strands for face embroidery): “Iris” brand black, or any fine black cotton thread
- White thread (for cinching the cheeks): GALACES 0.55 white, or any sturdy thin white thread — about 8 in (20 cm)
- Hook: F/5 (3.75 mm)
- Safety eyes: 18mm green — these are the statement feature of this fish! The larger size makes the expression look wide-eyed and wonderstruck
- Polyfill stuffing (Poly-Fil by Fairfield, available at Joann, Michaels, or Hobby Lobby)
- Tapestry needle (also called a yarn needle or darning needle)
- Stitch marker
🩷 Chloe’s Detail Tip: The 18mm green safety eyes are a big part of what makes this fish look alive and full of personality — don’t substitute smaller ones. That wide-eyed, slightly surprised expression is everything. If you can find eyes with a light iris ring around the pupil, even better.
Check these abbreviations before starting your crochet flounder free pattern
| Abbreviation | Meaning |
|---|---|
| mr | magic ring |
| sc | single crochet |
| inc | increase (2 sc in same stitch) |
| inv dec | invisible decrease (insert hook through front loops only of next 2 stitches simultaneously) |
| ch | chain |
| sl st | slip stitch |
| ( ) | total stitch count at end of round |
| [ ] | yarn color for that row |
Before You Begin
A few things that will make this little fish turn out extra special — because the details really are what take it from cute to completely irresistible.
Work in continuous rounds for the body. No joining, no seam — just a smooth spiral that gives the body that perfectly seamless look. Keep your stitch marker in the first stitch of each new round so you always know where you are. If you want a refresher on why this technique works so beautifully for amigurumi, our continuous rounds tutorial explains it all.
Install the safety eyes in Row 8 — before you stuff. This is one of those steps you absolutely cannot come back to, so take your time. The pattern specifies 8 stitches between the inner posts of the eyes. Hold the piece under good lighting and check from directly in front before pressing the washers in. If you haven’t worked with safety eyes before, our safety eyes tutorial walks you through positioning and securing them so they come out perfectly symmetrical every time.
The accordion-pleated fins are easier than they look. Each fin and tail piece is worked as a flat rectangle, then folded back and forth like a tiny accordion and cinched through one edge to create that gathered, ruffled look. It’s one of those magical finishing moments — you fold, you pull, and suddenly you have the most adorable little fin. Don’t rush that step.
The color changes in the fins happen every 2 rows. For smooth, clean stripes in chenille, our color change tutorial has the exact method that keeps those stripe edges crisp and tidy.
Pattern
Body (× 1)
Yarn: buttery yellow chenille | Start: magic ring | Worked in continuous rounds
Row 1: 6 sc in mr (6)
Row 2: 6 inc (12)
Row 3: (1 sc, inc) × 6 (18)
Rows 4–5: 18 sc, no change (2 rows) (18)
Row 6: 12 inc, 6 sc (30)
Row 7: 30 sc, no change (30)
Row 8: (1 sc, inc) × 12, 6 sc (42)
🩷 Safety Eyes Go In Now — Row 8! This is the moment. Before you work another row, insert your 18mm green safety eyes. The distance between the inner posts is 8 stitches. Pull the piece gently over your hand to see the shape forming — this is where the nose and face are coming together. Check the eye placement from directly in front, then press the washers firmly in place.
Rows 9–15: 42 sc, no change (7 rows) (42)
The body is filling out now — that satisfying round barrel shape is starting to appear. This is when it starts to look like a real little fish.
Row 16: (5 sc, inv dec) × 6 (36)
Rows 17–18: 36 sc, no change (2 rows) (36)
Row 19: (4 sc, inv dec) × 6 (30)
Rows 20–21: 30 sc, no change (2 rows) (30)
Row 22: (3 sc, inv dec) × 6 (24)
Rows 23–24: 24 sc, no change (2 rows) (24)
Row 25: (2 sc, inv dec) × 6 (18)
Row 26: 18 sc, no change (18)
Row 27: (1 sc, inv dec) × 6 (12)
🩷 Stuffing Note: Begin stuffing the body from the nose end as you work the decrease rows — adding a little at a time gives you much more control over the shape. You want it firmly filled but still gently squeezable. Our stuffing tutorial has all the tips for getting that perfect squishy firmness without any lumps.
Closing: After Row 27, fold the piece in half so the two edges align. Work 6 sc through both layers to close the tail end. This creates that lovely flat tail-end silhouette.
Small Fins (× 2)
Yarn: soft light blue + cool blue, alternating stripes | Start: chain of 5 ch | Worked in turned flat rows
At the end of each row, ch 1 for the turning chain before turning your work.
Row 1: 4 sc starting from the 2nd ch from hook [light blue] (4)
Row 2: 4 sc, no change [light blue] (4)
Rows 3–4: 4 sc, no change (2 rows) [blue] (4)
Rows 5–6: 4 sc, no change (2 rows) [light blue] (4)
Finishing the small fins: Cut yarn and leave a long tail. Fold the fin accordion-style — back and forth in pleats — then thread the yarn tail through one folded edge. Pull tight to cinch the pleats together and tie off. You now have the sweetest little ruffled fin. Make two.
Tail (× 1)
Yarn: soft light blue + cool blue, alternating stripes | Start: chain of 6 ch | Worked in turned flat rows
At the end of each row, ch 1 for the turning chain before turning your work.
Row 1: 5 sc starting from the 2nd ch from hook [light blue] (5)
Row 2: 5 sc, no change [light blue] (5)
Rows 3–4: 5 sc, no change (2 rows) [blue] (5)
Rows 5–6: 5 sc, no change (2 rows) [light blue] (5)
Rows 7–8: 5 sc, no change (2 rows) [blue] (5)
Rows 9–10: 5 sc, no change (2 rows) [light blue] (5)
Finishing the tail: Cut yarn and leave a long tail. Fold the tail accordion-style just like the small fins, then thread the yarn tail through one folded edge and cinch tightly. The tail is slightly wider and longer than the small fins — that contrast in scale is so charming once everything is assembled.
Large Fin (× 1)
Yarn: soft light blue + cool blue, longer stripe sequence | Start: chain of 5 ch | Worked in turned flat rows
At the end of each row, ch 1 for the turning chain before turning your work.
Row 1: 4 sc starting from the 2nd ch from hook [light blue] (4)
Rows 2–4: 4 sc, no change (3 rows) [light blue] (4)
Rows 5–6: 4 sc, no change (2 rows) [blue] (4)
Rows 7–10: 4 sc, no change (4 rows) [light blue] (4)
Rows 11–12: 4 sc, no change (2 rows) [blue] (4)
Rows 13–16: 4 sc, no change (4 rows) [light blue] (4)
Finishing the large fin: Cut yarn and leave a long tail for sewing. The large fin is not accordion-folded — it’s sewn flat along the center of the fish’s back like a dorsal fin. Set it aside for assembly.
🩷 Chloe’s Detail Tip: The large fin has a slightly different stripe rhythm from the small fins — slightly wider light blue sections. Once it’s sewn along the back, those stripes create this gorgeous repeating pattern that ties the whole fish together. It’s such a small thing and it makes such a big difference.
Follow these steps to complete your crochet flounder free pattern assembly
- Cinch the cheeks first. Using a single strand of sturdy white thread (approximately 8 in / 20 cm), create the cheek definition. Points 1 and 6 are located in Row 6 from the magic ring. Insert the needle at point 1, bring it out at point 2. Insert at point 3, bring out at point 4. Insert at point 5, bring out at point 6. Tie threads 1 and 6 together and pull gently to cinch. Use your hook to redistribute the stuffing evenly through the cheeks so they puff out symmetrically. This is the step that gives the fish that round, precious face.
- Attach the small fins. Position one small fin on each side of the body — the cinched (gathered) end faces the body. Sew them on securely using your tapestry needle and matching yarn. Check that they sit at the same height on both sides before finishing the knot.
- Attach the tail. Sew the cinched end of the accordion tail to the closed back end of the body. The wider, ruffled part fans out behind.
- Sew the large fin along the back. Starting approximately 6 stitches below where the large fin begins, stitch the fin flat along the center back of the body. Take your time spacing the stitches evenly so it sits straight.
For more guidance on getting parts positioned and stitched perfectly, our sewing amigurumi parts tutorial has all the tips for neat, invisible joins.
Making Your Crochet Flounder Free Pattern Extra Cute — The Finishing Details
Okay. This is the section I live for. The fish is assembled, it’s stuffed, the fins are on — and now we make it irresistible.
Embroider the Face
Using 2 strands of black embroidery thread (or black “Iris” cotton thread) held together, embroider:
- Eyelashes: A few short straight stitches fanning out from the upper edge of each safety eye. Keep them delicate — three to four lashes per eye, gently curved outward. The 18mm eyes are already dramatic; the lashes just soften them.
- Eyebrows: A short curved stitch arched above each eye. Position them slightly raised in the center to give the fish that sweet, slightly surprised expression.
- Mouth: A small curved stitch below the eyes — a gentle upward arc for a smile. Keep it subtle. The eyes do most of the emotional work here; the mouth just confirms it.
🩷 Chloe’s Detail Tip: For the eyebrows, try making one slightly higher than the other — just barely. It gives the fish this endearing quizzical expression, like it’s perpetually delighted and slightly surprised by everything. It’s the difference between cute and completely unforgettable.
Embroider the Body Stripes
Using 2 strands of blue yarn held together, embroider a series of stripes across the sides of the body. Start 6 stitches below where the large fin is attached and work downward. These stripes echo the color in the fins and tie the whole color story together — suddenly the fish looks intentional and coordinated instead of just assembled.
Keep the stripes gentle and slightly wavy rather than perfectly straight — chenille yarn naturally softens any line you embroider into it, and that soft irregularity makes it look hand-crafted in the most charming way.
The Cheeks
The cinching already created the cheek shape, but if you want to add a touch more color, a few very light pink straight stitches embroidered in a small circle on each cheek gives that classic kawaii blush. Use a single strand of soft pink embroidery thread and keep the stitches small and close together. It’s optional — but once you try it, you’ll do it on every single piece you make.
Color Variation Ideas
This crochet flounder free pattern works beautifully in other color combinations too. Try:
- Pastel dream version: soft blush pink body with lavender and mint fins
- Ocean at dusk: coral body with navy and periwinkle fins
- Rainbow fish: white body with multicolor stripe fins — use a different color for each stripe pair
Chloe’s Final Look
I’ve been staring at this finished little fish for an embarrassing amount of time and I have zero regrets. The way those 18mm green eyes catch the light, the softness of the yellow chenille, those accordion fins fanning out in their little light-and-dark stripes — it is genuinely one of the most satisfying finishes I’ve had. Make a little shoal of three in different colors and arrange them on a shelf in a gentle curve. You won’t be able to stop smiling every time you walk past them. 🩷
I hope you enjoyed making this crochet flounder free pattern!
What is the best yarn for this crochet flounder pattern?
Bulky (5) chenille or velvet yarn is recommended to achieve the “squishy” texture and 20cm size specified in the pattern.
What size safety eyes are used for this flounder amigurumi?
This pattern uses 18mm green safety eyes, which are essential for giving the fish its signature wide-eyed, wonderstruck expression.
Is this pattern suitable for beginners?
Yes, it is beginner-friendly as it uses basic stitches like single crochet and increases, though the accordion folding of the fins adds a light intermediate detail.