Pufferfish Crochet Pattern — Free Amigurumi Fish with Spike Needles
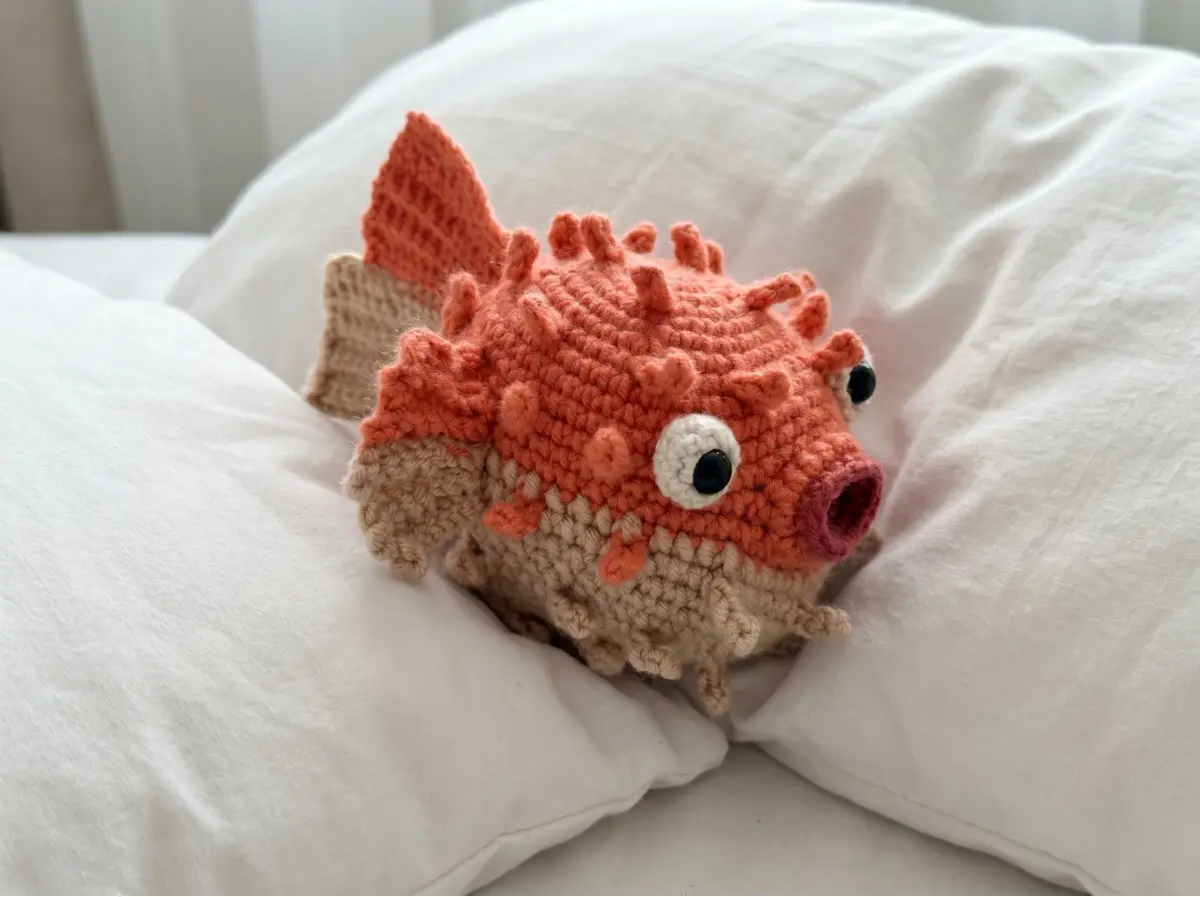
This pufferfish crochet pattern is one of the most structurally interesting amigurumi designs I’ve worked with — a round, spiky body with a gaping mouth, floppy fins, and layers of crochet needles that fan out in alternating rows like a real puffer in full defense mode. I tested every row of this, and every stitch count adds up. It’s intermediate in difficulty, mostly because of those needle rows and the mouth opening construction. Take your time, and you’ll love the result.
📋 Pattern Quick Stats
- Difficulty: Intermediate
- Finished Size: Approx. 5–6 in (12–15 cm) depending on yarn and tension
- Hook Size: 2.5mm (approx. US C/2) recommended; adjust to your yarn weight
- Yarn Weight: Fingering / Sport (1–2) for defined stitches and tight fabric
- Techniques: magic ring, invisible decrease, BLO, color changes, chain needle construction, mouth opening
- Estimated Time: 5–8 hours
Materials for This Pufferfish Crochet Pattern
- Main color yarn — fingering or sport weight acrylic or cotton blend; approx. 80–100 yds for the body
- Contrasting color yarn (for needles and color change sections) — small amount, same weight as main color
- White yarn — small amount, same weight, for the eye pieces
- Burgundy or accent color yarn — small amount, same weight, for the inside of the mouth
- Hook: 2.5mm (approx. US C/2) — or match to your yarn’s recommended hook
- Safety eyes: 7–12mm (two)
- Polyester fiberfill stuffing (Poly-Fil by Fairfield works well; available at Joann, Michaels, or Hobby Lobby)
- Tapestry needle for assembly and weaving ends
- Stitch marker — non-negotiable for tracking your rounds
- Scissors
💡 Emma’s Tip: I like to use a smooth mercerized cotton or a firm acrylic for this one — the needle spikes read much more clearly with tight, dense fabric. A fuzzy yarn will hide all that beautiful texture. If you’re unsure what yarn weight works for amigurumi, our guide to the best yarn for amigurumi walks you through the options.
Abbreviations Used in This Pufferfish Crochet Pattern
| Abbreviation | Meaning |
|---|---|
| mr | magic ring |
| sc | single crochet |
| ch | chain |
| sl st | slip stitch |
| inc | increase — 2 sc worked into the same stitch |
| dec | invisible decrease — insert hook through front loops only of next 2 stitches simultaneously |
| BLO | back loop only |
| FO | fasten off |
| sts | stitches |
Special Techniques for This Pufferfish Crochet Pattern
Before you start, I want to flag the techniques that make this fish distinctive. The needle spikes are created directly within the body rows by working chain loops off individual stitches — this is what gives the pufferfish its signature spiky silhouette. It looks complex at first, but once you’ve done the first row of needles, the rhythm clicks quickly.
Here’s what you’ll use:
- Magic ring: Every main part starts with a magic ring. If this is new to you, our step-by-step magic ring tutorial covers it completely.
- Invisible decrease: Always my preferred method — no gaps, no exposed stuffing. For a refresher, see our invisible decrease tutorial.
- BLO (back loop only): Used throughout the tail and fins to create the layered, flat texture of the fish’s appendages.
- Chain needle construction: On designated rows, you’ll chain 4 off a stitch, then work 3 sc back along that chain starting from the second ch from hook — this forms one spike needle. These are worked every 4 stitches across the needle rows.
- Color changes: The pattern uses two colors for a two-tone effect across the body and accessories. Do not cut the first color at the change point — carry it into the fabric and fasten off only after the needle row is complete.
- Mouth opening: Row 12 creates a gap using a chain bridge over 6 skipped stitches. This is how the fish gets its open mouth. The inside mouth piece is crocheted separately and assembled at the end.
💡 Emma’s Tip: The needle rows are the most time-intensive part of this pattern. Give yourself an uninterrupted stretch of time for Rows 12–14 in particular, when the mouth opening and the fourth needle row happen simultaneously. Rushing it is how mistakes happen.
Pufferfish Crochet Pattern — Full Instructions
Part 1: Body (×1)
Yarn color: Main color
Starting method: 6 sc in magic ring
Row 1: 6 inc (12)
Row 2: (1 sc, inc) × 6 (18)
📌 Needle Row Note — Row 2 (First needle row): At this row, work the first set of spike needles. Every 4 stitches, work a chain-4 needle: ch 4, then starting from the second ch from hook, work 3 sc back along the chain. This creates one spike needle. Then continue with the regular row instructions. Row 3 is crocheted only into the body stitches — do not work into the needles themselves.
Row 3: (2 sc, inc) × 6 — work into body stitches only, skipping over needle bases (24)
Row 4: (3 sc, inc) × 6 (30)
Row 5: (4 sc, inc) × 6 (36)
📌 Needle Row Note — Row 6 (Second needle row): Work the same chain-4 needle construction every 4 stitches across this row, same as Row 2.
Row 6: (5 sc, inc) × 6, with needles every 4 sts as described above (42)
Row 7: (6 sc, inc) × 6 (48)
Row 8: (7 sc, inc) × 6 (54)
Row 9: 54 sc (54)
📌 Needle Row Note — Row 10 (Third needle row): This row places needles only in two sections, leaving a gap in the middle where the safety eyes will go. Work 5 needles (every 4 sts), skip 18 sts for the eye zone, then work 5 more needles (every 4 sts) across the remaining stitches. Mark the 18-stitch eye zone with a stitch marker before you start this row.
Row 10: 54 sc, with needles placed as described above (eye zone skipped) (54)
Row 11: 54 sc (54)
📌 Mouth Opening — Row 12: Locate the midpoint between the needle positions from Row 10. This is where the mouth will sit. Count to find the center, and adjust your starting position if needed so the mouth gap falls cleanly between needle rows. To create the mouth opening: crochet 24 sc, chain 8 (skipping 6 stitches from the previous row), then crochet 24 sc to end. This chain bridge forms the top of the mouth.
Row 12: 24 sc, ch 8 (skip 6 sts), 24 sc (56)
Row 13: 56 sc (56)
📌 Needle Row Note — Row 14 (Fourth needle row — color change): This is the color transition row. Do NOT cut the main color yarn. Instead, carry it by crocheting over it into the fabric. Work the needles with the first color. Stagger the needle positions in a checkerboard pattern relative to Row 10 — needles should fall between the positions of the previous needle rows, not directly above them. Needles in the mouth area may be crocheted in the new color. After completing the row, cut and fasten off the first color. Continue the body in the second color from this point forward.
Row 14: (3 sc, 1 sc with chain-4 needle) × 14, staggered needle placement, color change as described (56)
Row 15: 24 sc, dec, 4 sc, dec, 24 sc (54)
Rows 16–17: 54 sc (2 rows) (54)
📌 Needle Row Note — Row 18 (Fifth needle row): Work a needle every 4 stitches across the full row.
Row 18: 54 sc, with needles every 4 sts (54)
Rows 19–20: 54 sc (2 rows) (54)
Row 21: (7 sc, dec) × 6 (48)
📌 Needle Row Note — Row 22 (Sixth needle row): Work a needle every 4 stitches across the full row.
Row 22: (6 sc, dec) × 6, with needles every 4 sts (42)
Row 23: (5 sc, dec) × 6 (36)
Row 24: (4 sc, dec) × 6 (30)
Row 25: (3 sc, dec) × 6 (24)
📌 Needle Row Note — Row 26 (Seventh needle row): Work a needle every 4 stitches across the full row.
Row 26: (2 sc, dec) × 6, with needles every 4 sts (18)
💡 Emma’s Tip: Start stuffing firmly before Row 21 — once the decreases pick up speed, getting stuffing in evenly becomes a real challenge. A dense, firm body is what makes this fish look right. Our guide to stuffing amigurumi without lumps has everything you need if this is a new skill.
Row 27: (1 sc, dec) × 6 (12)
Row 28: 6 dec (6)
Cut yarn, leaving a long tail. Using your tapestry needle, thread through the 6 remaining stitches and pull tight to close. Fasten off and weave in end.
📌 Mouth Trim: Using the first (main) color, crochet 2 rows of 16 sc around the mouth opening. This trims and reinforces the edge, giving it that clean, round fish-mouth look.
Part 2: Tail (×1)
Yarn color: Main color, then second color after Row 9
Starting method: Chain 12, turn work
📌 Important: All turning rows in the tail are crocheted in BLO (back loop only). This creates the layered, flat fish-tail texture.
Row 1: Starting from the second ch from hook, 11 sl st, ch 1, turn (11)
Row 2: 5 sl st, 6 sc, ch 1, turn (11)
Row 3: 6 sc, 5 sl st, ch 1, turn (11)
Rows 4–7: Repeat Rows 2–3 twice more (2 full repeats) (11)
Rows 8–9: 11 sl st, ch 1, turn — 2 rows (11)
📌 Color change: Change to the second color before Row 10.
Row 10: 5 sl st, ch 6, turn (11)
Row 11: 11 sl st, ch 1, turn (11)
Rows 12–17: Repeat Rows 2–3 three more times (3 full repeats) (11)
Cut yarn, leaving a long tail for sewing. Fasten off.
Part 3: Side Fins (×2)
Yarn color: Main color, then second color after Row 5
Starting method: Chain 8, turn work
📌 Important: All turning rows in the fins are crocheted in BLO. Color change before Row 6.
Row 1: Starting from the second ch from hook, 7 sl st, ch 1, turn (7)
Row 2: 3 sl st, 4 sc, ch 1, turn (7)
Row 3: 4 sc, 3 sl st, ch 1, turn (7)
Rows 4–5: Repeat Rows 2–3 once (7)
📌 Color change: Change to the second color before Row 6.
Rows 6–9: Repeat Rows 2–3 twice more (7)
Rows 10–11: 7 sl st, ch 1, turn — 2 rows (7)
Cut yarn, leaving a long tail for sewing. Fasten off. Make two fins total.
Part 4: Eyes (×2)
Yarn color: White
Starting method: 5 sc in magic ring
Row 1: 5 inc (10)
Row 2: 10 sc (10)
Row 3: 5 sc, sl st (6 active sts — piece tapers to a point)
Cut yarn, leaving a long tail for sewing. Fasten off. Make two eye pieces.
Part 5: Inside Mouth (×1)
Yarn color: Accent color (burgundy or your choice)
Starting method: 5 sc in magic ring
Row 1: 5 inc (10)
Row 2: (1 sc, inc) × 5 (15)
Rows 3–13: 15 sc (11 rows) (15)
📌 Note: The inside mouth piece is intentionally tubular — it forms a pocket inside the fish’s mouth. You can crochet more or fewer rows here depending on how deep you want the mouth cavity to be. Some makers use this as a little surprise pocket for small toys or treats (for children old enough that small parts are safe). Do not cut the yarn — the piece connects to the body during assembly.
Assembly
- Install the safety eyes into the white eye pieces before attaching anything. Push the safety eye shank through the center of each eye piece, then secure the washer on the back side. The eye pieces should be installed and locked before they’re sewn onto the body.
- Position the eye pieces in the 18-stitch zone you left open in Row 10. Pin them in place and check the positioning from multiple angles before sewing. Sew securely through the body fabric with your tapestry needle and matching yarn.
- Attach the tail centered at the back of the body, aligning it with the seam line. Sew through multiple rows for a secure hold.
- Attach the two side fins, one on each side of the body, roughly even with the eye zone. Pin both fins before sewing to confirm symmetry.
- Stuff the body firmly if you haven’t already. The fish should feel solid and round — don’t skimp on the filling, or the needle spikes won’t stand up properly.
- Assemble the mouth: Hold the inside mouth piece (do not cut yarn) against the mouth opening from the inside. Using the accent color yarn, work single crochet along the mouth edge, joining the inside and outside layers together as you go. This seals the mouth pocket cleanly.
💡 Emma’s Tip: I pin every single piece before I sew anything. Yes, it takes an extra few minutes. But nothing is worse than sewing a fin in the wrong position on a stuffed and closed amigurumi. Our guide to sewing amigurumi parts together covers placement and technique in detail if this step trips you up.
Finishing Your Pufferfish Crochet Pattern
- Weave in all yarn ends securely, especially at the needle bases — these can loosen with handling if not secured well.
- If you haven’t used safety eyes, embroider the pupils in dark yarn using a satin stitch over the center of each white eye piece.
- Give the needle spikes a gentle tug and reshape them — they tend to flatten during assembly. A quick reshape by hand restores the puffed, spiky silhouette.
- The mouth trim (2 rows of 16 sc in main color around the opening) should be the last step before final shaping. This gives the mouth a neat, rounded edge.
⚠️ Safety note: If this fish is intended for a child under 3, replace safety eyes with embroidered eyes. The U.S. Consumer Product Safety Commission (CPSC) advises that small parts — including safety eye hardware — are a choking hazard for young children.
Emma’s Note
This pufferfish crochet pattern is one of those projects that looks intimidating on the page but really finds its rhythm fast — once you’ve crocheted your first needle, the next fourteen come naturally. What I love most about this design is how the alternating checkerboard needle placement in Row 14 reads once the fish is stuffed and finished: genuinely textured, genuinely puffed. If your tension is tight the way mine is, those spikes will stand right up. Take your time on the mouth assembly — it’s the one step where patience really shows in the finished piece. Happy hooking. 🧶
What yarn is best for this pufferfish crochet pattern?
A smooth fingering or sport weight acrylic or mercerized cotton works best — the tight, dense fabric makes the chain-spike needles stand out clearly. Avoid fuzzy or textured yarns, which will hide the spiky silhouette.
How long does it take to crochet this pufferfish amigurumi?
Most makers complete this pattern in 5–8 hours. The needle rows — especially Rows 12–14 where the mouth opening and fourth needle row happen together — are the most time-intensive sections.
Is this pufferfish pattern suitable for beginners?
This pattern is rated intermediate. Beginners who are comfortable with magic rings, invisible decreases, and color changes can attempt it, but the chain-spike needle construction and mouth opening technique require careful attention.