Free Red Panda Crochet Pattern — Squishy Chenille Plush with Jointed Limbs
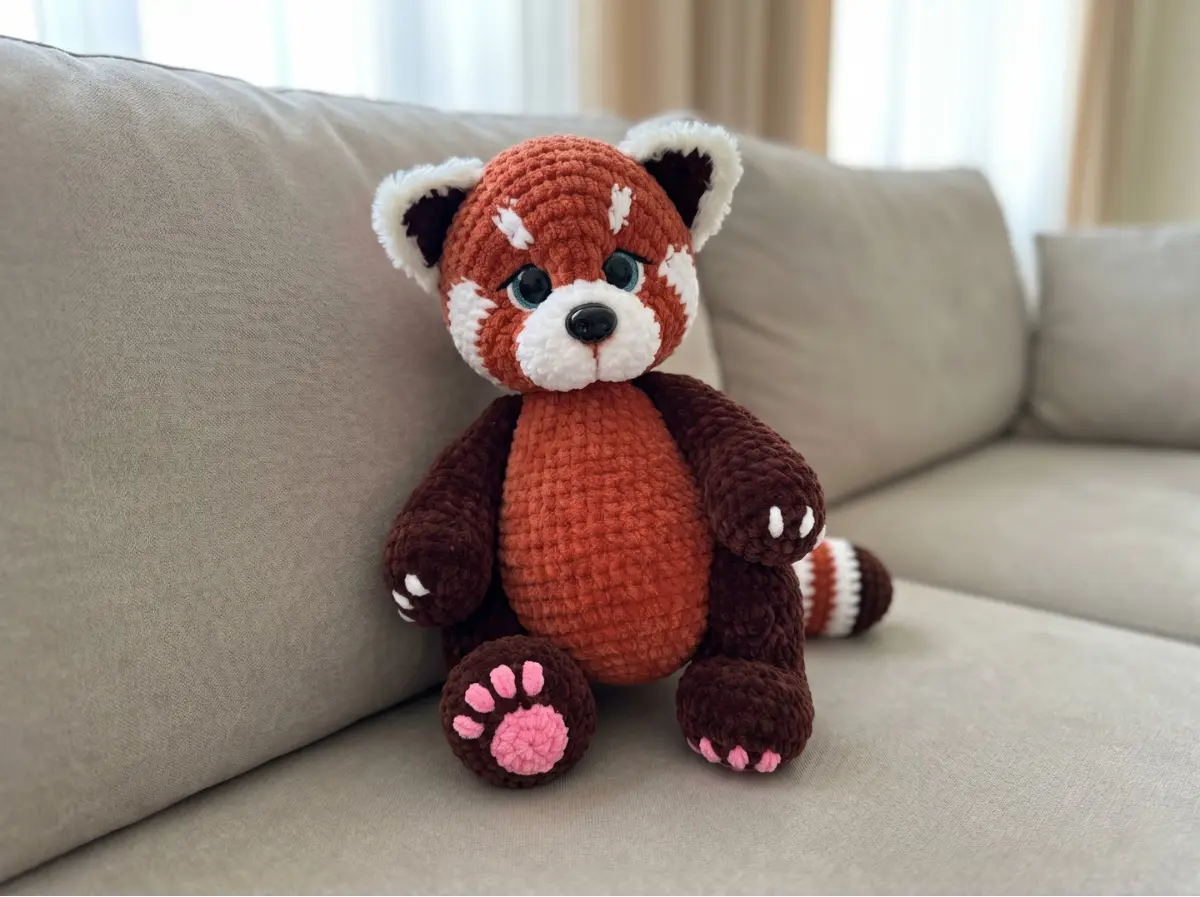
This free red panda crochet pattern is a stash-busting project for anyone sitting on leftover bulky chenille — and if you’ve been doing amigurumi for more than a few months, you almost certainly are. The whole thing works up in terracotta, dark brown, and white chenille yarn, plus a tiny bit of black DK for the eye details. The jointed limbs are optional but genuinely worth it: the poseable arms and legs make this one of those pieces that looks like it cost four times what it did. Grab your bulky hook and whatever chunky scraps you’ve been hoarding. This one pays off.
🧶 What You’ll Need From Your Stash
- 💰 Yarn Needed: ~200 yds total (terracotta chenille ~110 yds, dark brown chenille ~70 yds, white chenille ~20 yds, plus small amounts of pink, black DK, and white fuzzy/faux fur yarn for finishing)
- 🎨 Colors: terracotta (main), dark brown, white, pink (scraps for paw pads), black DK weight (for eye embroidery), white fuzzy/faux fur yarn (for ear edging)
- 🪝 Hook: E/4 (3.5 mm)
- ⏱️ Time: 8–12 hours (including assembly)
- 📏 Finished Size: Approximately 10–12 in (25–30 cm) seated, depending on yarn and tension
- 💡 Difficulty: Intermediate–Advanced (jointed assembly requires cotter pins and disks)
- 🎁 Great For: display piece, handmade gift, craft fair centerpiece
Materials for Your Red Panda Crochet Project
The yarn list looks long, but most of these are tiny amounts you might already have in your stash. Here’s what you’re actually working with:
- Terracotta chenille yarn — Bulky (5) weight, approximately 110 yards. US alternatives: Premier Parfait, Bernat Baby Velvet. This is your main color and takes the majority of the yardage.
- Dark brown chenille yarn — Bulky (5) weight, approximately 70 yards. Same brands work — Premier Parfait and Bernat Baby Velvet both come in rich dark browns.
- White chenille yarn — Bulky (5) weight, approximately 20 yards. A small leftover ball is plenty.
- Pink yarn — Any weight, scraps only. Used for sewing the paw pad embroidery. If you have pink thread or even a pink DK scrap, that works.
- Black DK/Light Worsted yarn — A few yards, used double-stranded for embroidering the eye arrows. US alternatives: Drops Muskat, Paintbox Cotton DK.
- White fuzzy or faux fur yarn — A small amount for edging the ears. Check your local craft store for novelty fur yarn; even a short leftover from another project works here.
- Hook: E/4 (3.5 mm)
- 18 mm sparkle safety eyes (×2)
- 20×15 mm safety nose (×1)
- Polyester fiberfill (stuffing) — Poly-Fil by Fairfield, available at Joann, Michaels, or Hobby Lobby
- Tapestry needle (large eye, for sewing and needle sculpting)
- Stitch markers
- Scissors
- For jointed version: 4× cotter pins + 4× 50 mm disks (for legs), 1× cotter pin + 2× 45 mm disks (for head)
- Cotter pin tool or round-nose pliers
- Optional: terracotta dry pastel chalk and fine synthetic brush (for shading the muzzle bridge)
🧶 Scrap Check: The white chenille, pink scraps, and black DK are genuinely tiny amounts — we’re talking 5–10 yards each at most. Before buying anything, dig through your scrap bin. There’s a very good chance you already have all three sitting in there from something else.
Red Panda Crochet Pattern — Abbreviations
| Abbreviation | Meaning |
|---|---|
| mr | magic ring |
| ch | chain |
| sc | single crochet |
| hdc | half double crochet |
| dc | double crochet |
| sl st | slip stitch |
| inc | increase (2 sc in same stitch) |
| dec | invisible decrease (through front loops only) |
| hdc-inc | 2 hdc in same stitch |
| FLO | front loops only |
| FO | fasten off |
| (…)×n | repeat instructions in parentheses n times |
| +1 | extra sc at end of row (shift stitch) |
Smart Crafter Tips for This Red Panda Crochet Pattern
Chenille yarn and stitch counts: Bulky chenille has a way of hiding your stitches. Place a stitch marker at the beginning of every round — non-negotiable for this pattern. If you lose your place in the head rows (which have color changes every few stitches), those multi-color rows will eat your afternoon. Count before you continue.
Two versions, one pattern: This red panda crochet pattern includes a jointed version (cotter pins and disks for poseable limbs) and a crocheted-in alternative where the legs stitch directly into the body. The crocheted-in version is faster and requires no hardware — great if you want to skip the jointing tools. The main pattern rows are identical for both options through Row 11 of the legs; they only diverge from Row 12 onward.
First time working a magic ring? Our magic ring tutorial walks through it step by step — it’s the fastest two minutes you’ll spend before starting a project like this.
When you get to the invisible decrease rows on the head and body, technique matters. Our invisible decrease guide shows exactly how to keep those closures clean — especially important with chenille, which can look sloppy if you use the standard sc2tog method.
For the multi-color rows in the head and tail, carry your unused yarn loosely inside the piece rather than cutting and rejoining constantly. With bulky chenille, every end you weave in is a small headache — minimize them where you can. When a color section is only 2–3 rows before you return to it, carry it. When you’re done with a color entirely, then cut and weave in.
The Pattern
Legs (×2) — Dark Brown Chenille
Starting method: 7 ch
Row 1: 7 ch, starting from 2nd ch from hook — inc, 4 sc, 4 sc in 1 st, 4 sc, inc (16)
Row 2: inc, 1 sc, inc, 3 sc, inc, 3 sc, inc, 1 sc, inc, 1 sc, inc, 3 sc, inc, 3 sc, inc, 1 sc (24)
Row 3: (3 sc, inc)×6 (30)
Rows 4–6: 3 rows of 30 sc (30)
Row 7: 6 sc, (1 sc, dec)×6, 6 sc (24)
Row 8: 6 sc, 6 dec, 6 sc (18)
Rows 9–10: 2 rows of 18 sc (18)
Row 11: 6 sc, 6 inc, 6 sc (24)
💡 Assembly note: Increases are exactly in the center front. Stuff the bottom of the leg before continuing.
Rows 12–17: 6 rows of 24 sc (24)
💡 Jointed version: Select a 50 mm disk. Fold the leg in half and insert the disk into it. Insert the cotter pin into the disk and place both inside the leg. The cotter pin sits between rows 14 and 15, exactly in the center side of the leg.
Row 18: (1 sc, dec)×8 (16)
💡 Stuff the leg firmly before closing.
Row 19: 8 dec (8)
Finishing: Cut yarn leaving a small tail. Add more stuffing to the top of the leg. Using a tapestry needle, close the opening through FLO only. Crochet the second leg the same way, inserting the cotter pin on the opposite side.
Leg Pads (×2) — Pink Yarn
Starting method: mr
Row 1: 6 sc in mr (6)
Row 2: 6 inc (12)
Finishing: Sl st, cut yarn leaving a tail for sewing. Set aside.
Crocheted-In Legs (Alternative) — Dark Brown Chenille
Use this version if you prefer to skip cotter pins. Starting method: 7 ch
Rows 1–11: Crochet according to the main leg pattern above (same rows, same counts)
💡 Begin stuffing the leg from this point.
Rows 12–14: 3 rows of 24 sc (24)
Row 15: 8 sc, (1 sc, dec)×3, 7 sc (21)
Row 16: 6 sc, (1 sc, dec)×3, 6 sc (18)
Row 17: (dec, 4 sc)×3 (15)
Row 18: (dec, 3 sc)×3 (12)
💡 Leave approximately 3–4 rows at the top of the leg unstuffed. Align your stitch marker if needed.
Finishing: Fold the top of the leg in half and crochet 6 sc through both sides. Cut yarn. Crochet the second leg the same way.
Arms (×2) — Dark Brown Chenille
Starting method: mr
Row 1: 6 sc in mr (6)
Row 2: 6 inc (12)
Row 3: (1 sc, inc)×6 (18)
Row 4: (5 sc, inc)×3 (21)
Rows 5–6: 2 rows of 21 sc (21)
Row 7: 7 sc, 7 sl st, 7 sc (21)
Row 8: 14 sc, dec, 2 sc, dec, 1 sc (19)
Row 9: 1 sc, dec, 2 sc, dec, 12 sc (17)
Row 10: dec, 15 sc (16)
Row 11: 16 sc (16)
Rows 12–13: 2 rows of 5 sc, 6 sl st, 5 sc (16)
💡 Begin stuffing the arm from here.
Row 14: 13 sc, dec, 1 sc (15)
Row 15: 1 sc, dec, 12 sc (14)
Rows 16–17: 2 rows of 14 sc (14)
Row 18: (dec, 5 sc)×2 (12)
Row 19: 12 sc (12)
Finishing: Crochet approximately 3 more sc to reach the side of the arm. Fold the arm in half and crochet 6 sc through both sides. Crochet the second arm the same way.
Tail (×1) — Dark Brown / White / Terracotta (striped)
Starting method: mr
Row 1: 8 sc in mr [dark brown] (8)
Row 2: 8 inc [dark brown] (16)
Row 3: (1 sc, inc)×8 [dark brown] (24)
Rows 4–5: 2 rows of 24 sc [dark brown] (24)
💡 In the last dark brown stitch of Row 5, change yarn to white.
Rows 6–7: 2 rows of 24 sc [white] (24)
Rows 8–9: 2 rows of 24 sc [terracotta] (24)
Rows 10–11: 2 rows of 24 sc [white] (24)
Row 12: 24 sc [terracotta] (24)
Row 13: (dec, 2 sc)×2, dec, 3 sc, 8 sl st, 3 sc [terracotta] (21)
Row 14: 21 sc [white] (21)
Row 15: 10 sc, 8 sl st, 3 sc [white] (21)
Row 16: (dec, 2 sc)×2, dec, 11 sc [terracotta] (18)
Row 17: 8 sc, 7 sl st, 3 sc [terracotta] (18)
Row 18: 18 sc [white] (18)
Row 19: (2 sc, dec)×2, 8 sc, dec [white] (15)
💡 Change yarn to terracotta. Cut white yarn and fasten off.
Rows 20–21: 2 rows of 15 sc [terracotta] (15)
Row 22: (dec, 3 sc)×3 [terracotta] (12)
Row 23: 12 sc [terracotta] (12)
Finishing: Crochet approximately 3 extra sc. Fold the tail in half and crochet 6 sc through both sides. FO and cut yarn.
🧶 Scrap Check: The tail’s stripe sections (white and terracotta segments) use very small amounts of each color — roughly 5–8 yards per stripe pair. If you’ve got tiny white and terracotta leftovers from other projects, this is the perfect place to use them up.
Body (×1) — Terracotta Chenille
Starting method: mr
Row 1: 6 sc in mr (6)
Row 2: 6 inc (12)
Row 3: (1 sc, inc)×6 (18)
Row 4: (inc, 2 sc)×6 (24)
Row 5: (3 sc, inc)×6 (30)
Row 6: 2 sc, inc, (4 sc, inc)×5, 2 sc (36)
Row 7: (5 sc, inc)×6 (42)
Row 8: 3 sc, inc, (6 sc, inc)×5, 3 sc (48)
Rows 9–10: 2 rows of 48 sc (48)
💡 Tail attachment begins here. Place a stitch marker where you want the tail to attach — the next two rows crochet the tail base directly into the body. Three stitches before and three stitches after the marker is where the joins happen.
Row 11: 45 sc, crochet 3 sc together with the tail (48)
Row 12: crochet 3 sc together with the tail, 45 sc (48)
Rows 13–14: 2 rows of 48 sc (48)
💡 Jointed version — leg attachment: Insert the cotter pins from the legs between rows 8 and 9 of the body. Position each at a distance of 12 sc from the marker in each direction (counting along Row 9). On the belly, the distance from cotter pin to cotter pin is 24 sc. From inside the body, place 50 mm disks onto the cotter pins and twist the ends with pliers.
Row 15: 39 sc, (dec, 1 sc)×3 (45)
Row 16: (dec, 1 sc)×3, 36 sc (42)
Rows 17–19: 3 rows of 42 sc (42)
Row 20: (dec, 5 sc)×6 (36)
Rows 21–23: 3 rows of 36 sc (36)
Row 24: 2 sc, dec, (4 sc, dec)×5, 2 sc (30)
💡 Arm attachment comes next.
Row 25: 5 sc, 6 sc together with the left arm, 8 sc, 6 sc together with the right arm, 5 sc (30)
Row 26: 30 sc (30)
Row 27: (dec, 3 sc)×6 (24)
💡 Stuff the body firmly now, shaping a rounded belly and bottom. Stuff the neck area well too.
Row 28: 24 sc (24)
💡 Jointed version — head joint: Insert the cotter pin into a 45 mm disk and place both into the neck opening before continuing.
Row 29: (1 sc, dec)×8 (16)
💡 Add more stuffing to the neck at this stage. Stand the disk on its edge and add stuffing underneath it.
Row 30: 8 dec (8)
Finishing: Before closing the opening completely, move the cotter pin one row lower so the disk sits at a diagonal. Using a tapestry needle, close through FLO only. FO, cut yarn and weave ends inside the toy.
Body with Crocheted-In Legs (Alternative) — Terracotta Chenille
Use only if making the non-jointed version.
Rows 1–8: Crochet according to the main body pattern above
Row 9: 48 sc (48)
Row 10: 9 sc, crochet 6 sc together with the left leg, 18 sc, crochet 6 sc together with the right leg, 9 sc (48)
Rows 11–30: Continue according to the main body pattern above
Finishing: Same as the main body.
Head (×1) — White then Terracotta Chenille
Starting method: mr — begins in white, transitions to terracotta
Row 1: 6 sc in mr [white] (6)
Row 2: 6 inc [white] (12)
Row 3: (1 sc, inc)×6 [white] (18)
Row 4: 3 sc, 3 inc, 6 sc, 3 inc, 3 sc [white] (24)
Row 5: 24 sc [white] (24)
💡 In the last stitch of Row 5, change yarn to terracotta.
Row 6: 9 sc, 6 hdc-inc, 9 sc [terracotta] (30)
Row 7: 4 sc, 3 hdc-inc, 2 sc, (inc, 1 sc)×6, 2 sc, 3 hdc-inc, 4 sc [terracotta] (42)
Row 8: 4 sc, (1 sc, inc)×3, 3 sc, (inc, 2 sc)×5, inc, 3 sc, (inc, 1 sc)×3, 4 sc [terracotta] (54)
Row 9: 15 sc [white], 6 sc [terracotta], 2 sc [white], 8 sc [terracotta], 2 sc [white], 6 sc [terracotta], 15 sc [white] (54)
Row 10: 16 sc [white], 5 sc [terracotta], 2 sc [white], 8 sc [terracotta], 2 sc [white], 5 sc [terracotta], 16 sc [white] (54)
Row 11: 15 sc [white], 24 sc [terracotta], 15 sc [white] (54)
💡 Eyes and nose go in now — before you close the head. Insert 18 mm eyes between rows 7 and 8. Insert the 20×15 mm nose between rows 2 and 3 of the muzzle (the white section). Our safety eyes guide has a clear walkthrough if this is your first time working with this size. Change yarn to terracotta and cut the white yarn.
Rows 12–17: 6 rows of 54 sc [terracotta] (54)
Row 18: (dec, 7 sc)×6 [terracotta] (48)
Row 19: 3 sc, dec, (6 sc, dec)×5, 3 sc [terracotta] (42)
Row 20: (dec, 5 sc)×6 [terracotta] (36)
Row 21: 2 sc, dec, (4 sc, dec)×5, 2 sc [terracotta] (30)
💡 Jointed version — attach head to body here. Insert the cotter pin from the body between rows 12 and 13 of the head, exactly in the center bottom. Place the second 45 mm disk onto the cotter pin from inside the head and twist. Begin stuffing the head.
Row 22: (dec, 3 sc)×6 [terracotta] (24)
Row 23: 1 sc, dec, (2 sc, dec)×5, 1 sc [terracotta] (18)
💡 Add more stuffing before closing further.
Row 24: (dec, 1 sc)×6 [terracotta] (12)
Row 25: 6 dec [terracotta] (6)
Finishing: Stuff head again. Cut yarn leaving a small tail. Close through FLO using a tapestry needle. FO, cut yarn and weave ends inside.
Ears (×2) — Dark Brown + Terracotta (flat, turning rows)
Starting method: 2 ch. Crochet 2 identical pieces — one in dark brown, one in terracotta. Worked flat in turning rows.
Row 1: 2 ch, 2 sc in 2nd ch from hook; +ch, turn (2)
Row 2: 2 inc; +ch, turn (4)
Row 3: (1 sc, inc)×2; +ch, turn (6)
Row 4: (2 sc, inc)×2; +ch, turn (8)
Row 5: (3 sc, inc)×2; +ch (10)
💡 Cut the yarn on the dark brown piece. Do not cut on the terracotta piece.
Finishing: Turn the terracotta piece and place the dark brown piece on top of it. Using the remaining terracotta yarn, crochet 10 sc through both pieces along the bottom edge only. Cut yarn leaving a tail for sewing. Edge the top of the ear with your white fuzzy/faux fur yarn — crochet 3 sc in one stitch at each corner of the ear. FO and weave all ends inside the ear.
Assembly
- Sew the pink leg pads onto the bottom of each foot.
- Attach the legs to the body. Insert cotter pins from legs between rows 8 and 9 of the body. Position each leg 12 sc from the center marker in each direction along Row 9. The distance between cotter pins across the belly measures 24 sc. Place 50 mm disks onto the pins from inside and twist the ends with pliers.
- Attach the head. Insert the cotter pin from the body between rows 12 and 13 of the head, exactly at the center bottom. Place the 45 mm disk onto the pin from inside the head and twist securely.
- Sew the finished ears onto rows 15–17 of the head, with a gap of 10 sc between them. Sew each ear on in a slight semicircle for natural placement.
Decoration Details
The finishing steps are what make this red panda crochet project look elevated rather than just complete. Take your time here.
- Paw pads: Using pink yarn (or thread), embroider 4 small toe pads on each foot — 5–6 stitches per pad.
- Claws: Using white yarn, embroider 4 claws on each arm — approximately 3 stitches per claw.
- Needle sculpting the face: Under the muzzle, between rows 8 and 9, mark 3 central points spaced 2 sc apart. Insert needle into point #1, bring out at the outer corner of the right eye. Insert into the inner corner of the right eye, bring out at point #2. Repeat. Mirror for the left eye using point #3, outer corner, inner corner, point #2. Also needle sculpt under the nose and along the bridge.
- Muzzle shading (optional): Tint the bridge under the nose with terracotta dry pastel chalk using a fine synthetic brush. This adds subtle depth that photographs beautifully.
- Eye whites: Embroider the whites of the eyes using a fine white plush yarn. Secure with a small dot of crystal fabric glue.
- Eye arrows: Embroider the decorative markings around the eyes using black DK yarn worked double-stranded. These are the signature marking of a red panda’s face — worth doing carefully.
💡 Stretch It Further — Make It a Set: The striped tail and terracotta colorway make this red panda incredibly recognizable. If you have enough leftover chenille, consider making a second, smaller version using a 2.5mm (approx. US C/2) hook and fingering-weight yarn — same pattern, about 40% smaller. Pair them together as a display set or a mother-and-baby gift. You could also use this project as a way to finish off three or four smaller chenille balls from different projects. The multi-color tail especially rewards mixing slightly different white and brown scraps — the variation in texture actually looks intentional and charming.
Mia’s Take
Five yarn colors, one hook, a handful of cotter pins, and a little patience on those face details — that’s the full list. This red panda crochet pattern is one of those projects where the needle sculpting and eye embroidery at the end do more work than anything else; don’t rush that part. If you made the jointed version, move those arms and legs around once everything is assembled — it’s satisfying every single time. Make a second one in a slightly different terracotta shade if you have the scraps. They look brilliant displayed together. 🧶
For more on yarn weight categories and how bulky chenille behaves, the Craft Yarn Council’s yarn weight system is a reliable reference — especially useful when substituting brands.
What yarn is best for this red panda amigurumi?
Bulky weight (size 5) chenille yarn in terracotta, dark brown, and white works best, such as Premier Parfait or Bernat Baby Velvet.
How long does it take to crochet this red panda?
It takes approximately 8 to 12 hours to complete, depending on your crocheting speed and whether you choose the jointed limb assembly.
Do I have to use cotter pins for the legs?
No, the pattern includes an alternative set of instructions to crochet the legs directly into the body if you prefer a seamless, hardware-free finish.