Free Crochet Darth Vader Pattern — The Dark Lord in Plush, Cape and All
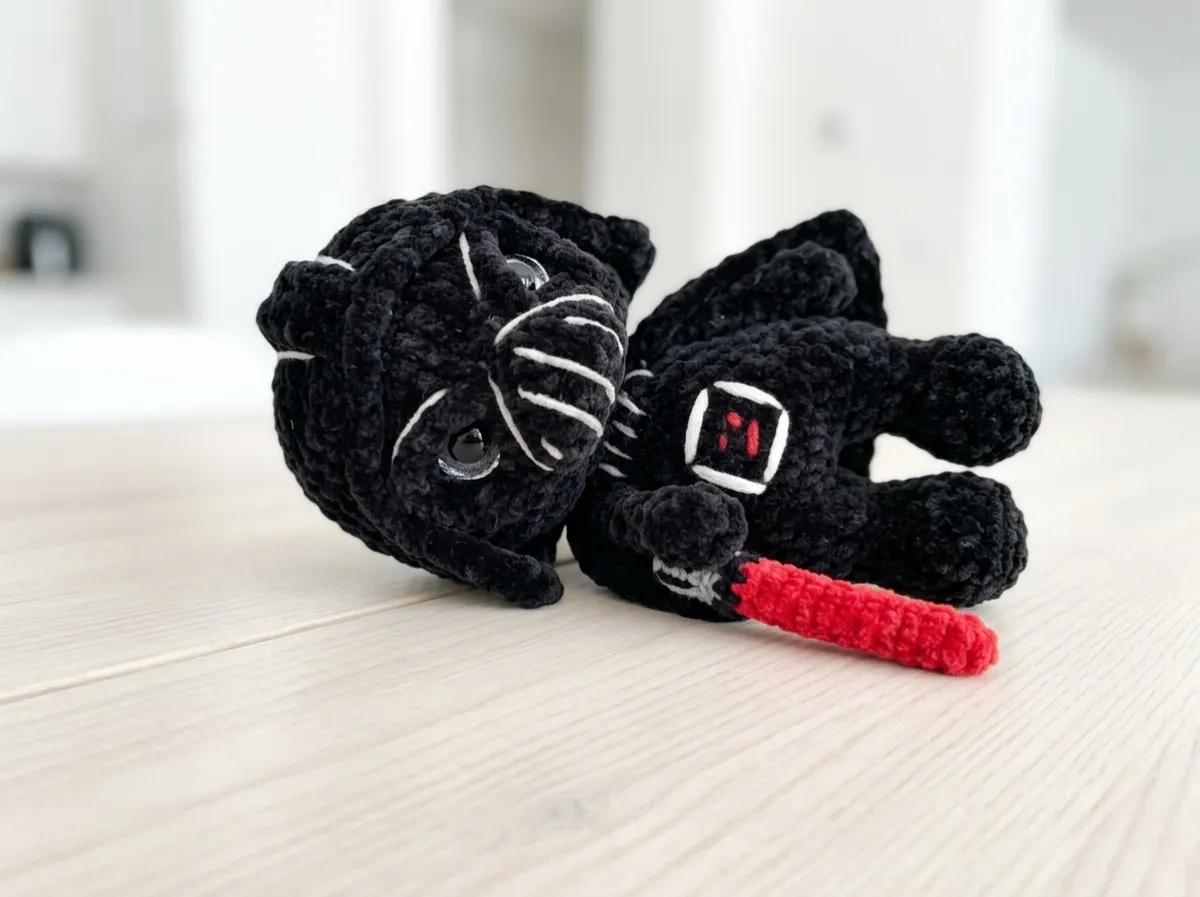
This free crochet Darth Vader pattern brings to life the most iconic villain in the galaxy — a compact, fully-dressed Dark Lord standing just under 8 inches tall, complete with a removable-style cape and sculpted helmet. Something about seeing him rendered in soft black plush makes him feel less terrifying and more… quietly dignified. I named mine Vex before the helmet was even finished. He sits on my desk now, lightsaber in hand, looking like he’s about to deliver very important news. If you’ve been searching for a crochet Darth Vader pattern worth your time, this is the one.
📖 Meet Vex
- 🌟 Personality: commanding, brooding, quietly dramatic
- 🎨 Color Palette: deep void black with flashes of crimson and storm gray
- 📏 Size: 7.5–7.9 in (19–20 cm)
- 🪝 Hook: G/6 (4.0 mm)
- ⏱️ Time: 12–18 hours
- ✨ Signature Detail: sculpted helmet with a center ridge piece, embroidered chest panel, and a red plush lightsaber
- 💡 Difficulty: Intermediate
What You’ll Need to Make This Crochet Darth Vader
Yarn
- Black plush / chenille yarn — Bulky (5): approximately 105g. The soft chenille gives the finished piece a velvety, almost cinematic quality — like he’s been rendered in shadow. US alternatives: Premier Parfait, Bernat Baby Velvet.
- Black DK yarn — DK/Light Worsted (3): small amount for decoration. US alternatives: Drops Muskat, Paintbox Cotton DK.
- Red DK yarn — DK/Light Worsted (3): small amount for the chest panel embroidery and lightsaber.
- Gray DK yarn — DK/Light Worsted (3): small amount for chest panel embroidery and helmet detail.
- White DK yarn — DK/Light Worsted (3): small amount for chest panel embroidery.
- White bulky chenille yarn — Bulky (5): small amount for eye decoration. US alternative: Bernat Baby Velvet in white.
Tools & Other Materials
- G/6 (4.0 mm) crochet hook
- 16mm safety eyes — black hemispheres or trapezoid shape
- Polyester fiberfill stuffing (Poly-Fil by Fairfield, available at Joann, Michaels, or Hobby Lobby)
- Strong thread for eye sculpting
- Tapestry needle
- Pins
- Scissors
- Stitch markers
- A canapé skewer (for the lightsaber core)
- Small amount of red plush yarn to wrap the skewer
The matte chenille absorbs light the way a good villain should — every stitch disappears into the surface, and what you’re left with is shape and presence. It’s the right yarn for this character.
Abbreviations Used in This Crochet Darth Vader Pattern
| Abbreviation | Meaning |
|---|---|
| mr | magic ring |
| ch | chain |
| sc | single crochet |
| hdc | half double crochet |
| hdc-inc | 2 half double crochets in the same stitch |
| sl st | slip stitch |
| inc | increase — 2 sc in the same stitch |
| dec | invisible decrease — insert hook through front loops only of next 2 stitches simultaneously, yarn over, pull through, yarn over, pull through 2 loops |
| 3 sc in 1 st | 3 single crochets worked into one stitch |
| 4 sc in 1 st | 4 single crochets worked into one stitch |
| BLO | back loop only |
| FLO | front loop only |
| both loops | crochet through both loops of the stitch |
| shift stitch | an extra stitch crocheted to adjust the position of the round start marker |
| (number) | total stitch count at the end of the row |
Before You Begin — A Few Notes on Bringing Vex to Life
This pattern is built around one long, continuous piece that travels from the feet all the way up through the torso and into the head — the arms and cape are crocheted separately and then worked directly into the body as you go. It’s an elegant construction once you understand the logic of it, and the result is a figure with real structural integrity. Read through the full pattern once before you begin. It will save you from surprises.
On the invisible decrease: Throughout this pattern, all decreases are worked as invisible decreases — inserting the hook through the front loops only of two stitches simultaneously. This is the standard AmiLoops method, and it’s especially important here because the dense chenille yarn would make any gap more visible. Our guide to the invisible decrease walks through the technique clearly if you need a refresher before you start.
On the magic ring: Several parts of this pattern — the arms, helmet, and mask — begin with a magic ring. Every character begins here, with that adjustable loop pulled tight to close the center. If the magic ring is new to you, our magic ring tutorial covers it step by step.
On the safety eyes: The 16mm eyes install between rows 29 and 30 of the body section, before you close the head. They must go in before stuffing is complete. If this piece is intended for a young child, please review toy safety guidelines at the U.S. Consumer Product Safety Commission (CPSC) before using safety eyes — embroidered eyes are a safer alternative for babies and toddlers. Our safety eyes tutorial covers the installation process in detail.
✨ Sophie’s Note: The shift stitch appears several times throughout this pattern — it’s simply an extra stitch crocheted to reposition the start of your round. Don’t let it intimidate you. Think of it as quietly redirecting the story. The pattern will tell you exactly when to use one.
Pattern Instructions
Arms (×2)
Yarn: black plush chenille
Starting method: magic ring
Row 1: 6 sc in mr (6)
Row 2: (inc, 2 sc) × 2 (8)
Row 3: 4 sc, 4 sl st (8)
Row 4: 1 sc, dec, 5 sc (7)
Row 5: 2 sc, dec, 3 sc (6)
Rows 6–9: 4 rows of 6 sc (6)
Finishing: Do not stuff the arms. Fold the piece in half so that the 4 sl st from row 3 are on the inside (the part that will face the body). Crochet 3 sc through both layers to close. Fasten off and cut the yarn. The arms will be worked directly into the body at row 20.
Cape (×1)
Yarn: black plush chenille
Starting method: foundation chain, worked in turning rows
Row 1: Ch 16; starting from the 3rd ch from the hook, crochet 14 hdc; ch 2, turn (14)
Row 2: 1 hdc, hdc-inc, 10 hdc, hdc-inc, 1 hdc; ch 2, turn (16)
Row 3: 3 hdc, hdc-inc, (2 hdc, hdc-inc) × 3, 3 hdc; ch 2, turn (20)
Row 4: 20 hdc; ch 2, turn (20)
Row 5: 4 hdc, hdc-inc, 3 hdc, hdc-inc, 2 hdc, hdc-inc, 3 hdc, hdc-inc, 4 hdc; ch 2, turn (24)
Row 6: 24 hdc; ch 2, turn (24)
Row 7: (3 hdc, hdc-inc) × 2, (2 hdc, hdc-inc) × 3, 3 hdc, hdc-inc, 3 hdc; ch 2, turn (30)
Row 8: 30 hdc (30)
✨ Sophie’s Note: After row 8, ch 1 and immediately work the border: 13 sc along one side edge, 14 sc along the top of the cape, 13 sc along the second side edge — making a ch in each corner when you turn. Fasten off, cut the yarn, and weave in the ends. The cape will be attached to the body at row 21.
Respirator Mask (×1)
Yarn: black plush chenille
Starting method: magic ring
Row 1: 6 sc in mr (6)
Row 2: (3 sc in 1 st, 1 sc) × 3 (12)
Row 3: 1 sc, 3 sc in 1 st, (3 sc, 3 sc in 1 st) × 2, 2 sc (18)
Row 4: BLO: 18 sl st (18)
Finishing: Fasten off, leaving a long tail for sewing. Using gray DK yarn, embroider vertical stripes across the face of the mask. Set aside — it attaches during assembly.
Legs — Body — Head (×1)
Yarn: black plush chenille
Starting method: foundation chain
Make the first leg, fasten off. Make the second leg — do not fasten off. Join the legs in row 11.
Row 1: Ch 4; starting from the 2nd ch from the hook: inc, 1 sc, 4 sc in 1 st, 2 sc (9)
Row 2: 2 inc, 1 sc, 4 inc, 1 sc, inc (16)
Row 3: BLO: 16 sc (16)
Rows 4–5: 2 rows of 16 sc (16)
Row 6: 5 sc, 4 dec, 3 sc (12)
Row 7: 5 sc, 2 dec, 3 sc (10)
✨ Sophie’s Note (Rows 6–7): The decreases in these two rows should sit precisely at the center front of the leg — this is what shapes the foot correctly. Use a shift stitch if needed to align them.
Row 8: 10 sc (10)
Row 9: 2 sc, (inc, 1 sc) × 4 (14)
Row 10: 14 sc (14)
✨ Sophie’s Note (Row 10): Fasten off and cut the yarn on the first leg. Continue crocheting on the second leg — do not fasten off the second leg after row 10.
Row 11: 6 sc; ch 1; on the first leg, count backwards 2 sc from the marker, then beginning from the 3rd sc, crochet 14 sc along the first leg; 1 sc in the junction between the leg and the ch 1; inc along the ch 1; 1 sc in the junction between the ch 1 and the second leg; 14 sc along the second leg; inc along the ch 1. Place a marker here — this is now Row 1 of the body section. Stuff the lower portion of the legs. (34)
Rows 12–13: 2 rows of 34 sc (34)
Row 14: 4 sc, dec, 5 sc, dec, 9 sc, dec, 5 sc, dec, 3 sc (30)
Row 15: 30 sc (30)
Row 16: (4 sc, dec) × 5 (25)
Row 17: 25 sc (25)
Row 18: (3 sc, dec) × 5 (20)
Row 19: 20 sc (20)
Row 20: 3 sc, dec, 3 sc with the first arm crocheted in, dec, 3 sc, dec, 3 sc with the second arm crocheted in, dec (16)
✨ Sophie’s Note (Row 20): When attaching the arms, orient them so that the 4 sl st from row 3 face the body (inside position). Take your time here — arm placement defines the whole silhouette. Use a shift stitch if needed to keep them symmetrical.
Row 21: 11 sc; then crochet 14 sc of the body together with the top edge of the cape; 9 sc (16)
✨ Sophie’s Note (Row 21): The cape stitches are worked together with existing body stitches — the stitch count remains 16, it does not increase. At the end of the row, shift your marker. Stuff the legs and partially stuff the body before continuing.
The body is done. The cape falls from the shoulders. Now the head begins.
Row 22: 16 inc (32)
Row 23: 4 sc, 3 sc in 1 st, 6 sc, 3 sc in 1 st, 8 sc, 3 sc in 1 st, 6 sc, 3 sc in 1 st, 4 sc (40)
✨ Sophie’s Note (Row 23): Make sure the four 3-sc-in-1-st increases are evenly distributed at the four corners of the head — this is what gives it the helmet’s flat, angular profile. Pause and look at it straight on after this row. You can already see the shape of the face starting to form.
Rows 24–31: 8 rows of 40 sc (40)
✨ Sophie’s Note (Row 31): At the end of row 31, you may crochet 1–2 shift stitches to realign the marker to the center back of the head.
Row 32: 5 sc, dec, 6 sc, dec, 10 sc, dec, 6 sc, dec, 5 sc (36)
Row 33: 5 sc, dec, 4 sc, dec, 10 sc, dec, 4 sc, dec, 5 sc (32)
✨ Sophie’s Note (Row 33): Install the 16mm safety eyes now — between rows 29 and 30, spaced 8–9 stitches apart. They must go in before the opening closes. Our tutorial on attaching safety eyes covers the locking mechanism in detail.
Row 34: (6 sc, dec) × 4 (28)
Row 35: (5 sc, dec) × 4 (24)
✨ Sophie’s Note (Row 35): Finish stuffing the body and head before the opening becomes too small to work through comfortably.
Row 36: (2 sc, dec) × 6 (18)
Row 37: Work 10–11 dec regardless of marker placement, until the opening is closed (10–11)
Finishing: Fasten off, leaving a long tail for closing the opening. Close fully, weave in ends.
Helmet (×1)
Yarn: black plush chenille
Starting method: magic ring
Row 1: 8 sc in mr (8)
Row 2: 8 inc (16)
Row 3: (2 inc, 2 sc) × 4 (24)
Row 4: 1 sc, 2 inc, (4 sc, 2 inc) × 3, 3 sc (32)
Row 5: 2 sc, 2 inc, (6 sc, 2 inc) × 3, 4 sc (40)
Row 6: 3 sc, 2 inc, (8 sc, 2 inc) × 3, 5 sc (48)
Row 7: BLO: 48 sl st (48)
Rows 8–10: 3 rows of 48 sc (48)
✨ Sophie’s Note (Row 10): Try the helmet on the head before continuing. It should slip over easily but not hang loosely. If it feels too tight, you may need to go up a hook size for the helmet only.
Row 11: 17 sc; ch 1, turn (17)
Row 12: 34 sc; ch 1, turn (34)
✨ Sophie’s Note: From row 11 onward, you are working in turning rows — this is not a full round. The helmet transitions from a domed cap into the face-framing front panel.
Rows 13–17: 5 rows of 34 sc; ch 1, turn after each row (34)
✨ Sophie’s Note (Row 17): Try the helmet on again. It should reach the toy’s shoulders. If it falls short, add the required number of straight rows of 34 sc before continuing.
Finishing: Without cutting the yarn, work sl st around the entire edge of the helmet to create a clean border. Fasten off, cut, and weave in ends.
Central Helmet Ridge (×1)
Yarn: black plush chenille
Starting method: foundation chain, worked in turning rows
Row 1: Ch 3; starting from the 2nd ch from the hook: 2 sc; ch 1, turn (2)
Rows 2 onward: 2 sc; ch 1, turn — repeat until the strip is long enough to run from the front of the helmet down to the 7th row on the back of the head. Approximately 17 rows were needed, but try it on your helmet to confirm.
Finishing: Work sl st around the entire edge of the strip as a border. Fasten off, leaving a long tail for sewing. Secure the ridge to the center of the helmet with pins, then sew into place.
Assembly — Where the Pieces Become a Whole
- Eye sculpting: Using strong thread and a needle, perform a small eye sculpting to give the face more definition. Insert the needle into point 1, travel to point 2, then point 3, return to point 4. Insert again into point 1, travel to point 5, then point 6, return to point 4. Pull the thread gently to create slight indentation, fasten securely, and weave in the ends.
- Eye decoration: Using white bulky chenille yarn, add a small decorative highlight around each eye.
- Respirator mask: Position the mask centered below the eyes and sew into place with the tapestry needle. The BLO slip stitch border of row 4 creates a natural raised edge that sits cleanly against the face.
- Helmet: Place the helmet over the head, aligning the front panel with the face. The helmet can remain removable, or be sewn down to the head for permanence — your choice. A removable helmet makes for a more interactive piece.
- Central ridge: With the helmet placed on the head, position the ridge strip running from the front peak of the helmet to the 7th row at the back. Pin in place, check the alignment, and sew down along both edges.
✨ Sophie’s Note: Spend time on the eye placement and sculpting before doing anything else. Move the safety eyes slightly — just one row up or down — and the entire expression changes. Higher eyes read as more sinister. Lower, and there’s something almost melancholy about the face. That’s not a mistake. That’s character. Our guide to sewing and assembling amigurumi has advice on positioning and pinning before you commit.
Decoration — The Details That Define Him
This is where the character becomes unmistakable.
- Chest panel: Using red, gray, and white DK yarn, embroider the control panel pattern onto the chest. The original uses a combination of small rectangles and lines — sketch the layout lightly with pins before committing to thread.
- Neck and mask outlines: Using gray DK yarn, embroider a subtle outline around the eyes and the edge of the mask. A few gray stitches along the sides of the central helmet ridge add definition to the dome shape.
- Evil eye option: If you want a more intense expression, work a two-row outline around the eyes: along the marked points, crochet 13 sc; ch 1, turn; 13 sl st. Fasten off, weave in. This creates a recessed shadow effect that reads as notably more dramatic.
- The lightsaber: Wrap a canapé skewer in red plush yarn, securing both ends. This is technically the simplest step in the entire project, and somehow it makes the whole thing click into place. Once he’s holding it, he’s not yarn anymore.
Meet Vex
He’s standing on my shelf right now — cape hanging perfectly straight, one hand at his side, the other holding a lightsaber the length of my thumb. I made the helmet removable, which I don’t regret at all. There’s something quietly funny about a velvet Darth Vader whose helmet lifts off to reveal a face with embroidered eyes and a carefully sculpted expression underneath. The chest panel took me an embarrassing amount of time, and I have no regrets about that either. Name yours. Give him a spot somewhere he can survey the room. He’s earned it. 🧶
If you love making pop culture characters in crochet, our free crochet Batman pattern has the same dark, dramatic energy — another iconic figure rendered in soft plush. And if you want something on the cuter end of the galaxy, our Baby Yoda amigurumi pattern is an easy, chunky chenille make that works up beautifully in an afternoon.
What yarn is best for this crochet Darth Vader amigurumi?
A bulky (weight 5) black plush or chenille yarn is ideal for the main body to give him a velvety finish, paired with small amounts of DK yarn for the detailed embroidery.
How long does it take to crochet this Darth Vader?
This intermediate-level pattern typically takes between 12 to 18 hours to complete, depending on your crochet speed and experience with amigurumi assembly.
Can beginners make this Darth Vader pattern?
This pattern is rated Intermediate due to the continuous body construction, eye sculpting, and detailed embroidery. Beginners looking for a challenge should take it slow and follow the tutorials provided.