Free Hello Kitty Amigurumi Pattern — Tiny Bow Kitten with Overalls
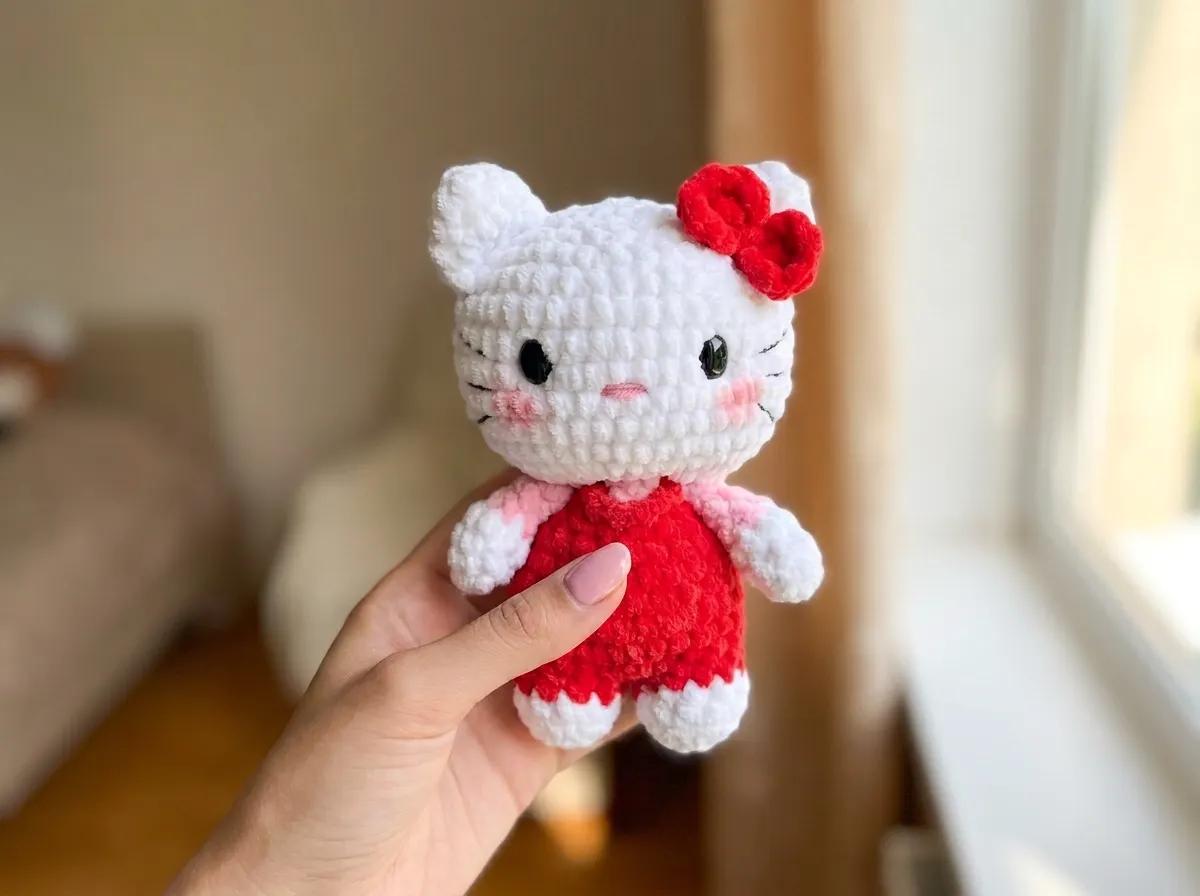
This free hello kitty amigurumi pattern makes the most heart-melting little kitten you’ve ever seen — a tiny white cat in color-blocked overalls and a sweater, finished with a perfectly positioned bow near one little ear. This hello kitty amigurumi stands about 5 inches tall, has glossy black safety eyes, embroidered whiskers, and that soft pink nose that ties the whole face together. The color combinations are so good: classic red on white, or cool blue on white — both are completely irresistible. She’s ready to be made. Let’s go.
🩷 Pattern Highlights
- Cuteness Rating: 🩷🩷🩷🩷🩷
- Finished Size: approx. 5 in (12.5 cm) tall
- Difficulty: Intermediate
- Hook Size: 2.5mm (approx. US C/2)
- Yarn Palette: soft white, poppy red or powder blue (sweater + overalls + bow), blush pink (embroidery only)
- Key Detail: color-blocked sweater and overalls, embroidered whiskers, and a tiny bow near one ear
- Estimated Time: 5–7 hours per kitten
Materials for Your Hello Kitty Amigurumi
- Yarn — Body: Soft white fingering weight cotton or DK acrylic, approx. 40–50 yds
- Yarn — Sweater: Poppy red or powder blue, approx. 15 yds
- Yarn — Overalls: Poppy red or powder blue (matching or contrasting sweater), approx. 20 yds
- Yarn — Nose embroidery: Small amount of blush pink — just a yard or two
- Yarn — Bow: Poppy red or powder blue to match the outfit, approx. 5 yds
- Crochet hook: 2.5mm (approx. US C/2) for fingering weight; or 3.5mm (US E/4) for DK weight
- Safety eyes: Two 9mm black safety eyes
- Polyfill stuffing: Polyester fiberfill — enough to give the head a softly oval shape
- Stitch markers: At least 2 — one for tracking rounds, one for marking center back
- Tapestry needle: For sewing parts and weaving in ends
- Scissors
🩷 Chloe’s Color Tip: If you’re planning to make both colorways (and you will want to — they’re so cute side by side), buy enough white yarn for both kittens before you start. The red and blue pair together on a shelf is everything.
Abbreviations Used in This Hello Kitty Amigurumi Pattern
| Abbreviation | Meaning |
|---|---|
| sc | single crochet |
| inc | increase — 2 sc worked into the same stitch |
| dec | invisible decrease — insert hook through front loops only of next 2 stitches simultaneously, yarn over, pull through, yarn over, pull through 2 loops |
| mr | magic ring |
| FLO | front loop only |
| ch | chain |
| dc | double crochet |
| sl st | slip stitch — insert hook, yarn over, pull through loop and stitch in one motion |
| shift st | shift stitch — a repositioning stitch used to move your working position without adding height |
| X sc together | gather stitch — insert hook through X consecutive stitches and draw yarn through all loops at once, closing them into 1 stitch |
The invisible decrease (listed here simply as dec) is the only decrease method in this pattern. It gives a clean, gap-free closure — essential for small, detailed amigurumi like this kitten. If it’s new to you, our invisible decrease tutorial walks through every step.
Before You Begin Your Hello Kitty Amigurumi
This pattern is intermediate-level for one main reason: the legs, body, and head are all worked as one continuous piece. You start at the feet, work straight up through the torso, and keep going right into the head — no cutting the main strand except at color change points. Once you see the little dressed kitten taking shape in your hands, it’s incredibly satisfying. Just read through Rows 13–16 before you get there so the transitions don’t surprise you mid-round.
🩷 Tip 1 — Mark center back before Row 6: The moment you join the two legs to start the body, place a stitch marker at the exact center back. The tail attaches here in Rows 9–10, and the whole sweater-front layout depends on this anchor point. Mark it and leave it.
🩷 Tip 2 — Read ahead through Rows 13–16: The color shift from overalls to sweater at Row 14 and the arm integration at Row 15 create the fully dressed look. Read through both rows before you reach them so the color changes and attachment points feel natural, not rushed.
🩷 Tip 3 — The safety eyes go in before you close the head: Install the 9mm safety eyes between Rows 22 and 23 of the main piece, with 6 sc visible between them. Hold the piece under a bright lamp and check from directly in front before pressing the washers. Once they click, they’re permanent. Our safety eyes tutorial covers everything you need for a symmetrical result.
Every part in this pattern starts with a magic ring. If it’s new to you, our magic ring tutorial makes it completely approachable — it’s quicker to learn than it looks, and it closes more cleanly than any other start method.
Hello Kitty Amigurumi Pattern Instructions
Arms (Make 2)
Yarn: Body color (white) for Rows 1–4, sweater color from Row 5
Start: magic ring
Row 1: 6 sc in mr (6)
Row 2: (2 sc, inc) × 2 (8)
Rows 3–4: 8 sc — work 2 rows even (8)
Row 5: (2 sc, dec) × 2 — switch to sweater color (6)
Row 6: 6 sc (6)
Row 7: 3 sc together (2)
Do not stuff the arms. After Row 7, cut yarn and close the 2 remaining stitches with a tapestry needle. Leave a yarn tail for attachment in Row 15 of the main piece.
🩷 The color shift at Row 5 creates a tiny sleeve cuff detail — that precise little line where white body meets the sweater color. Such a small thing and it makes such a difference to the polished look of the finished kitten.
Tail (Make 1)
Yarn: Body color (white)
Start: magic ring
Row 1: 4 sc in mr (4)
Row 2: 4 inc (8)
Rows 3–4: 8 sc — work 2 rows even (8)
Row 5: 4 sc together (2)
Do not stuff the tail. After Row 5, cut yarn and close the 2 remaining stitches with a tapestry needle. Leave a long yarn tail for attaching during body construction in Rows 9–10 of the main piece.
Ears (Make 2)
Yarn: Body color (white)
Start: magic ring
Row 1: 6 sc in mr (6)
Row 2: (1 sc, inc) × 3 (9)
Row 3: (2 sc, inc) × 3 (12)
Row 4: 12 sc (12)
Row 5: 6 sc together (2)
After Row 5, cut yarn leaving a long tail for sewing. Close the 2 remaining stitches and use the tail to sew each ear to the head after assembly.
🩷 The ear shape that forms here — slightly pointed at the top, gently flat at the base — is so perfectly cat. It’s my favorite individual piece in this whole pattern to hold up and look at before sewing it on.
Bow (Make 1)
Yarn: Bow color (red or blue, matching the outfit)
Start: magic ring
Row 1: (3 ch + 4 dc + 3 ch + sl st) × 2 in mr
This bow is worked entirely in one round directly into the magic ring, creating two petal loops. Pull the magic ring tight to shape the bow once both loops are complete. Leave a long yarn tail for sewing to the head.
Legs + Body + Head (Make 1 — Worked Continuously)
Yarn: Body color (white), switching to overalls color at Row 5, incorporating sweater color at Rows 14–15, then back to body color (white) from Row 16 onward for the head
Start: Make 2 legs separately through Row 5. Cut yarn on the first leg; do not cut on the second.
Work both legs identically through Row 5:
Row 1: 6 sc in mr — body color (white) (6)
Row 2: 6 inc (12)
Row 3: FLO 12 sc (12)
Row 4: 12 sc (12)
Row 5: 12 sc — switch to overalls color (12)
Cut yarn on the first leg. Keep yarn attached on the second leg and continue to join:
Row 6: Joining row — work 12 sc across the second leg, then 12 sc across the first leg (24)
🩷 Important: As soon as Row 6 is complete, place a stitch marker at the exact center back of the joined piece. The tail attaches here and the sweater layout depends on this point. Mark it and leave it in place through the torso.
Row 7: (3 sc, inc) × 6 (30)
Row 8: 30 sc (30)
Row 9: 29 sc, 1 sc with tail (30)
Attach the tail at center back during this row, using the attachment stitch to secure it in place.
Row 10: 3 sc with tail, dec, (3 sc, dec) × 5 (24)
Rows 11–12: 24 sc — work 2 rows even (24)
Row 13: (2 sc, dec) × 6 (18)
Begin the sweater neckline. The sweater section should be centered at the front of the piece.
Row 14: 10 sc overalls color, 3 sc sweater color, 5 sc overalls color (18)
Row 15: 6 sc overalls color, 3 sc with arm (overalls color), 1 sc overalls color, 3 sc sweater color, 1 sc overalls color, 3 sc with arm (overalls color), 1 sc overalls color (18)
🩷 Row 15 is the moment the arms click into place — one at each side, worked right into the torso stitches. This is the row where the kitten suddenly looks like she has a little silhouette. Take it slowly and keep your color sections aligned with the front-center marker.
After Row 15, work 3 shift stitches to end at the center back, then work the border between the sweater and overalls sections with sl st before beginning the head.
Row 16: FLO 18 inc — switch to body color (white) (36)
Working Row 16 in FLO creates a clean visual line between the dressed body and the head. This is where the shape blooms open — so satisfying to watch.
Row 17: (5 sc, inc) × 6 (42)
Row 18: (6 sc, inc) × 6 (48)
Rows 19–24: 48 sc — work 6 rows even (48)
Install the 9mm safety eyes between Rows 22 and 23, with 6 sc visible between them. See the assembly section below for placement guidance. Install the eyes before you continue closing the head.
Row 25: (6 sc, dec) × 6 (42)
Row 26: (5 sc, dec) × 6 (36)
Row 27: (4 sc, dec) × 6 (30)
Row 28: (3 sc, dec) × 6 (24)
Row 29: (2 sc, dec) × 6 (18)
Row 30: (1 sc, dec) × 6 (12)
Row 31: 6 dec (6)
Stuff the head as you close, shaping it into a softly oval form — it reads more naturally as a kitten’s face than a perfect sphere. Close the remaining 6 stitches with a tapestry needle.
Assembly
- Legs are joined during Row 6 of the main piece. No additional sewing needed.
- Tail is attached during Rows 9–10. It should sit precisely at the center back marker.
- Arms are integrated during Row 15, one on each side of the body at the sweater line.
- Safety eyes — install between Rows 22 and 23, with 6 sc between them. Hold the piece under a bright lamp and check alignment from directly in front before pressing the washers. Once they click, the placement is permanent.
- Ears — sew one ear to each side of the head, aligning the ear base with approximately Rows 17–18 of the head section (Rows 2–3 above where the head begins at Row 16). Check from the front for symmetry before securing.
- Bow — sew the finished bow next to one ear using the yarn tail and a few invisible stitches. For the red colorway, the bow sits near the right ear; for the blue colorway, near the left ear.
- Stuffing — the head is stuffed to a soft oval shape. The arms and tail remain unstuffed as noted in their respective sections.
Making It Extra Cute — Finishing Details
This is where the kitten stops being a lovely crocheted shape and becomes herself. Please do not rush this section. These details are the whole point.
The Nose
Thread blush pink yarn onto your tapestry needle and embroider a small, clean horizontal stitch right at the center front of the face, 1–2 rows below the safety eyes. One stitch is all you need. Keep it short — the scale of this detail matters enormously. Too wide and it looks clownish; just right and it’s the most precious little detail on the whole piece.
The Whiskers
Using a single strand of dark embroidery thread or very fine dark yarn, embroider 3 lines on each side of the face, fanning gently outward from either side of the nose area. Keep them soft and fine — whiskers that are too thick or too rigid look harsh on a sweet face like this. This is the detail that makes everyone lean in for a closer look and immediately say “cat.”
The Cheeks
I always add embroidered pink cheeks and I am not stopping. Use blush pink yarn and work 2–3 small loose stitches in a soft cluster on each side of the face, just below and slightly outside the safety eyes. The goal is a rosy circle — present but gentle, like a blush rather than painted dots. Hold the finished piece at arm’s length after and check the effect. When the proportion is right, you’ll feel it immediately.
Eye Symmetry — The Most Important Thirty Seconds
Before you press those washers in: count 6 sc between the eyes horizontally, then count the rows above each eye to confirm they’re equal vertically. Hold the piece at eye level from directly in front. Hold it under a lamp. Hold it at arm’s length. All three distances. If one eye looks even a fraction higher than the other, you will notice it every single time from now on. Take the time. She deserves it.
🩷 Chloe’s Detail Tip: Before you snap the safety eye washers in, hold the piece under a bright lamp and check from directly in front. Count the sc between the eyes AND the rows above each eye to the top of the head — both measurements should match on both sides. Once those washers click, there’s no going back, so take the extra thirty seconds to be sure.
The Bow
Pull the magic ring on your finished bow nice and tight so the two loops are evenly matched and stay crisp. When you sew it near the ear, tilt it just a few degrees rather than leaving it perfectly horizontal — that tiny tilt makes the bow feel lively and deliberate rather than flat. Secure it well so it holds its position.
Color Variations
The red and blue versions are iconic, but this kitten is equally gorgeous in soft mint green overalls with a cream sweater, or dusty lavender with a pale yellow bow. The white body works beautifully with any pastel. If you’re making a matching pair as a gift, try color-coordinated sets — red and pink together, or sky blue and soft mint.
For yarn substitution ideas, the Craft Yarn Council yarn weight system is the best reference for confirming that any substitute you pick matches the original weight and gives you the same stitch definition and finished size.
Love this kawaii style? Our free koala amigurumi pattern has the same palm-sized charm with rosy cheeks and that round, squishy shape — and our sweet little amigurumi bunny pairs beautifully with this kitten in any pastel display.
Chloe’s Final Look
I have been holding this finished kitten for an embarrassingly long time and I have zero regrets. The tiny color-blocked outfit, the whiskers fanning out from that blush pink nose, the bow sitting just so near one little ear, those glossy eyes catching the light from every angle — she is one of those pieces you finish and just stare at for a while. Make the red version and the blue version and line them up on a shelf facing each other. Or tuck one into a friend’s birthday bag. Or let her quietly watch you work from the corner of your desk. She’s exactly that kind of special. 🩷
How long does it take to crochet this hello kitty amigurumi?
It typically takes between 5 to 7 hours to complete one kitten, depending on your speed and experience with intermediate techniques.
Can beginners make this hello kitty amigurumi pattern?
This pattern is rated as intermediate because the legs, body, and head are worked in one continuous piece, but confident beginners can follow it with our tutorials.
What size safety eyes are best for this kitten?
We recommend 9mm black safety eyes to achieve the classic look, placed between rows 22 and 23 of the head.