The Most Magical Little Crochet Elf You’ll Ever Make
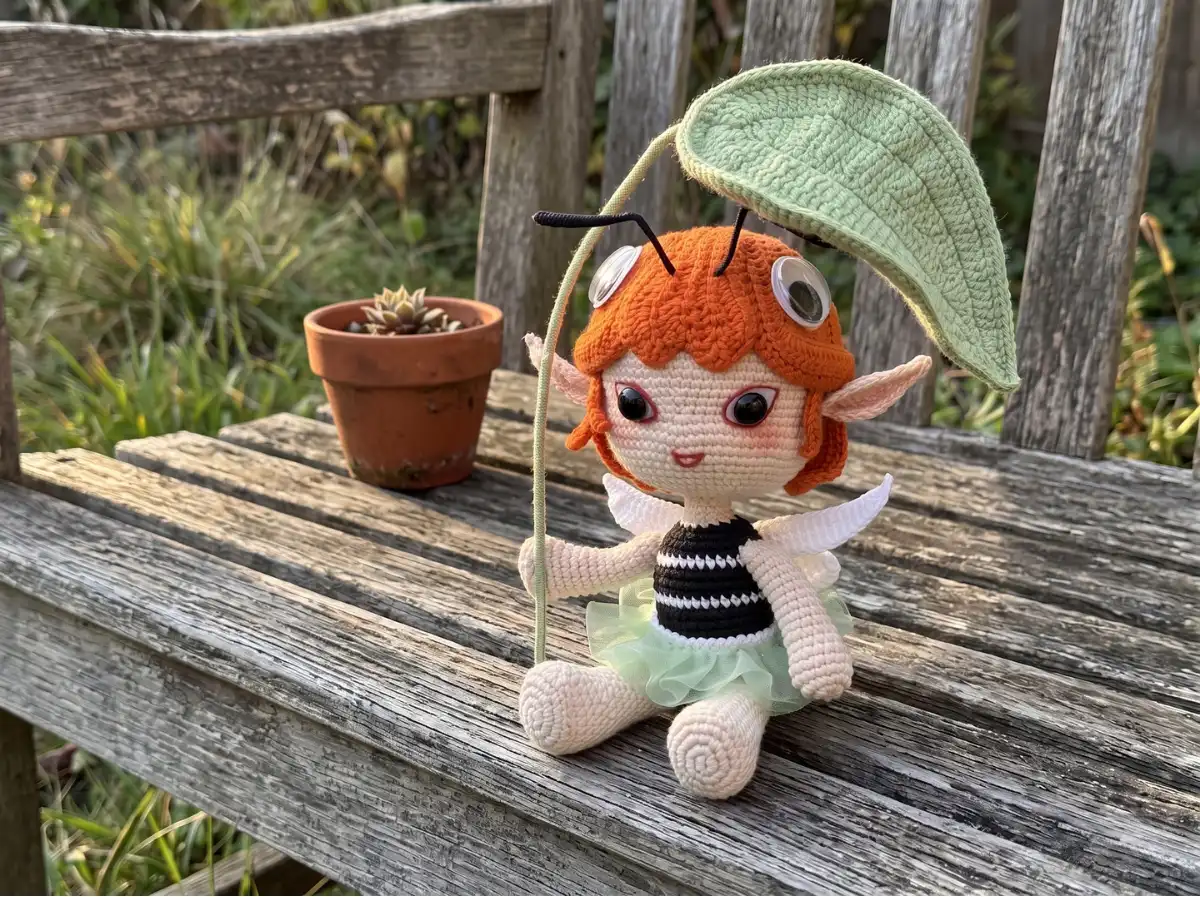
This free crochet elf pattern creates the most enchanting tiny doll — a winged fairy creature with a full head of wavy flowing hair, delicate crocheted wings, a leaf umbrella she carries in one hand, and the sweetest round face you’ve ever seen on an amigurumi. She stands 5.5 in tall (not counting her whimsical antenna) and has that perfect combination of whimsy and detail that makes you want to make an entire woodland collection around her. Every little part — from her structured ears to her layered hair strands to her gathered tulle skirt — adds up to something that feels genuinely special. Let’s bring her to life together.
🩷 Pattern Highlights
- Cuteness Rating: 🩷🩷🩷🩷🩷
- Finished Size: 5.5 in (15 cm) — not including antennae
- Difficulty: Intermediate — Advanced
- Hook Size: Not specified in source (see Materials note below)
- Yarn Palette: Soft skin tone, white (wings), ginger or orange (hair), plus accent colors for clothing — think pastel bee stripes, lilac, or blush pink
- Key Detail: Layered crocheted hair with 17 individual strands, wire-framed pointed ears, and four crocheted wings
- Estimated Time: 8–15 hours (multiple complex parts)
What You’ll Need for This Crochet Elf
- Yarn (skin tone): A soft, smooth fingering or DK weight in your chosen skin color — something warm like a peachy cream or soft almond reads beautifully for the head, arms, and legs
- Yarn (hair): A coordinating color for the hair — ginger orange, auburn, or golden blonde gives the most storybook-fairy effect; the original uses a warm ginger
- Yarn (wings): White in a slightly thinner weight than the body yarn — smooth and luminous is the goal; the delicate wing shape deserves something that holds fine detail
- Yarn (clothing / body stripes): Colors of your choice for the body and underwear; the original design features a black-and-white bee stripe on the body — but a soft lavender-and-cream or mint-and-white would be equally dreamy
- Yarn (leaves): A fresh, slightly muted green — sage or moss rather than bright lime keeps it looking organic
- Thin wire: For the pointed ears and leg frame — floral wire works well; make sure it has no sharp exposed ends after shaping
- Plastic or cardboard sole inserts: Cut to fit the bottom of each foot for stable standing
- Safety eyes: Sized to match your yarn weight — for fingering weight, 6mm eyes give a sweet, delicate expression; for DK weight, 9mm will bring more personality
- Polyester fiberfill (Poly-Fil): For head, body, arms, and legs
- Tulle ribbon or tulle fabric: For the gathered skirt layer worn over the underwear
- Tapestry needle, scissors, stitch markers
- Pink embroidery floss: For embroidered cheeks — non-negotiable 🩷
🩷 Chloe’s Detail Tip — Hook Size: The original source pattern doesn’t specify a hook size, which is unusual for a piece this detailed. Based on the stitch counts and finished size of 5.5 in, I’d estimate a 2.5mm–3.0mm hook with fingering-to-sport weight yarn, or a 3.5mm–4.0mm hook with DK weight. Crochet a small test swatch and aim for tight, dense stitches so the stuffing doesn’t show through — that’s always the goal with amigurumi. If you already have a hook size that gives you tight, clean single crochet in your chosen yarn, go with that.
Yarn weight matters more than you might think for a project this intricate. The wing sections use a variety of stitch heights (sl st, sc, hdc, dc, tr) to create natural shaping, and a smooth yarn with good stitch definition will let all that detail shine. For more on choosing the right yarn for amigurumi work, the Craft Yarn Council yarn weight system is a wonderful reference — it covers everything from lace weight through bulky with recommended hook ranges for each.
Abbreviations Used in This Crochet Elf Pattern
| Abbreviation | Meaning |
|---|---|
| ch | chain |
| mr | magic ring |
| sc | single crochet |
| inc | increase (2 sc in same stitch) |
| dec | invisible decrease (inv dec — through front loops only of 2 stitches) |
| hdc | half double crochet |
| hdc-inc | half double crochet increase (2 hdc in same stitch) |
| hdc-dec | half double crochet decrease |
| dc | double crochet |
| dc-inc | double crochet increase (2 dc in same stitch) |
| dc-dec | double crochet decrease |
| tr | treble crochet |
| tr-inc | treble crochet increase (2 tr in same stitch) |
| sl st | slip stitch |
🩷 Chloe’s Detail Tip — Decreases: Wherever the pattern says “dec,” use the invisible decrease (inv dec): insert your hook through the front loops only of the next two stitches at the same time, yarn over, pull through, yarn over, pull through both loops. This keeps the surface of the elf’s head and body smooth and seamless — no gaps, no holes, just that perfect rounded surface. Our invisible decrease tutorial walks you through it step by step if you’d like a refresher.
Before You Begin Your Crochet Elf
This crochet elf is worked in continuous rounds (no joining, no turning) for all the 3D parts — head, arms, legs, and body. The hips section transitions into some turning rows before returning to rounds, and the hair, wings, leaves, and underwear are all flat pieces worked separately. If you’re newer to working continuously in spirals, our guide to continuous rounds explains exactly what that means and how to track your rounds with a stitch marker.
The construction order matters a lot here: legs are made first, then hips are worked as a joining section that flows directly into the body, and finally the head, arms, and accessories are sewn on. Read through the full pattern before you start so the flow makes sense — this one rewards a little pre-reading.
🩷 Chloe’s Detail Tip — Wire Safety: The ears and legs in this pattern use thin wire for structure. Before inserting wire, bend any cut ends over with pliers so there are no sharp points. The wire in the ears gives them that magical pointed fairy shape, and the leg wire helps the little elf stand up properly — but safety first, always, especially if this doll is going to be handled by little ones.
Crochet Elf Pattern — Part by Part
Head (×1) — Skin Color
Starting method: magic ring. Work in continuous rounds.
Row 1: 6 sc in mr (6)
Row 2: 6 inc (12)
Row 3: (1 sc, 1 inc)*6 (18)
Row 4: (1 sc, 1 inc, 1 sc)*6 (24)
Row 5: (3 sc, 1 inc)*6 (30)
Row 6: (2 sc, 1 inc, 2 sc)*6 (36)
Row 7: (5 sc, 1 inc)*6 (42)
Row 8: (3 sc, 1 inc, 3 sc)*6 (48)
Row 9: (7 sc, 1 inc)*6 (54)
Row 10: (4 sc, 1 inc, 4 sc)*6 (60)
Row 11: 60 sc (60)
Row 12: 17 sc, 1 inc, (5 sc, 1 inc)*4, 18 sc (65)
Rows 13–20: 65 sc (65)
By now the head should have that lovely full, round shape — the sweet cheeks that give this little elf her charm are starting to form. Take a moment to appreciate how much of the magic is already here.
Row 21: 17 sc, 1 dec, (5 sc, 1 dec)*4, 18 sc (60)
Row 22: 60 sc (60)
Row 23: 19 sc, 1 dec, 8 sc, 1 dec, 8 sc, 1 dec, 19 sc (57)
Row 24: 19 sc, 1 inc, 8 sc, 1 inc, 8 sc, 1 inc, 19 sc (60)
Row 25: 17 sc, 1 inc, (5 sc, 1 inc)*4, 18 sc (65)
Rows 26–27: 65 sc (65)
Row 28: 15 sc, (1 dec, 5 sc)*5, 15 sc (60)
Row 29: 60 sc (60)
Row 30: (4 sc, 1 dec, 4 sc)*6 (54)
Row 31: (7 sc, 1 dec)*6 (48)
Row 32: (3 sc, 1 dec, 3 sc)*6 (42)
Row 33: (5 sc, 1 dec)*6 (36)
Row 34: (2 sc, 1 dec, 2 sc)*6 (30)
Row 35: (3 sc, 1 dec)*6 (24)
Row 36: (1 sc, 1 dec, 1 sc)*6 (18)
Row 37: (1 sc, 1 dec)*6 (12)
Row 38: (2 sc, 1 dec)*3 (9)
Stuff the head as you go, adding fiberfill gradually to maintain a smooth, rounded shape. Close and fasten off, leaving a long tail for attaching to the body.
🩷 Chloe’s Detail Tip — Safety Eye Placement: Install the safety eyes before you close the head completely. For this elf, the eyes sit on the hair base rather than directly on the skin — but mark your placement on the head first so you know where the hair will sit and where the eyes should peek through. Hold the piece under a bright lamp and check from straight on before snapping those washers in. Once they click, they’re permanent — so take that extra thirty seconds. Our safety eyes tutorial has every detail on positioning and securing them perfectly.
Arms (×2) — Skin Color
Starting method: ch 5. Make 2.
Row 1: from 2nd ch from hook: 3 sc, 3 sc in one stitch, 2 sc, 1 inc (10)
Row 2: 1 inc, 2 sc, 3 inc, 2 sc, 2 inc (16)
Row 3: 16 sc (16)
Row 4: 4 sc, 3 hdc-dec, 6 sc (13)
Rows 5–6: 13 sc (13)
Row 7: 5 sc, 1 dec, 6 sc (12)
Row 8: 12 sc (12)
Row 9: 5 sc, 1 dec, 5 sc (11)
Rows 10–14: 11 sc (11)
Row 15: Working in turning rows: from 3rd stitch, 7 sc (7)
Row 16: from 2nd stitch, 5 sc (5)
Row 17: Around the edge: 11 sc around the entire perimeter (11)
Leave a long tail for sewing. Rows 15–16 are turning rows; Row 17 works all the way around the perimeter of the piece to neaten the top opening.
Legs (×2) — Skin Color
Starting method: ch 6. Make 2. Note: Do NOT cut yarn on the second leg — you’ll continue directly into the hips.
Row 1: from 2nd ch from hook: 4 sc, 3 sc in one stitch, 3 sc, 1 inc (12)
Row 2: (1 inc, 1 sc)*2, 3 inc, (1 sc, 1 inc)*2, 1 inc (20)
Row 3: 6 sc, 1 hdc, 4 hdc-inc, 1 hdc, 8 sc (24)
Row 4: 6 sc, 5 hdc-dec, 8 sc (19)
Rows 5–7: 19 sc (19)
Row 8: 5 sc, 1 dec, 3 sc, 1 dec, 7 sc (17)
Row 9: 17 sc (17)
Row 10: 4 sc, 1 dec, 3 sc, 1 dec, 6 sc (15)
Row 11: 1 dec, 2 sc, 1 inc, 3 sc, 1 inc, 2 sc, 1 dec, 2 sc (15)
Row 12: 1 inc, 11 sc, 1 inc, 2 sc (17)
Row 13: 7 sc, 1 inc, 9 sc (18)
Rows 14–15: 18 sc (18)
Before finishing each leg: insert a plastic or cardboard sole piece into the foot for stability, then insert wire through the leg (fold wire ends so no sharp tips are exposed), and stuff lightly. Cut yarn on the first leg. Do not cut yarn on the second leg — continue directly to the hips section.
Hips (Leg Joining Section) — Skin Color
Starting method: continuation from the second leg. This section joins both legs and begins shaping the lower body.
Row 1: 4 sc on the 2nd leg (continuing from where the yarn was not cut), ch 2, join to the 4th stitch of the first leg and work 18 sc, 2 sc along the chain, 14 sc along the second leg (40)
Row 2: Crochet 11 stitches, then work in turning rows: ch 1, 1 sc, (1 hdc, hdc-inc)*4, 1 hdc, hdc-dec, (1 hdc, hdc-inc)*4, 1 hdc, 1 sc, sl st (31)
Row 3: Turning row: ch 1, turn, skip 1 stitch, sl st, 1 sc, 25 hdc, 1 sc, sl st (29)
Row 4: Turning row: ch 1, turn, skip 2 stitches, sl st, 1 sc, 21 hdc, 1 sc, sl st (25)
Row 5: Turning row: ch 1, turn, skip 2 stitches, sl st, 1 sc, 1 hdc, hdc-dec, 2 hdc, hdc-dec, 3 hdc, hdc-dec, 2 hdc, hdc-dec, 1 hdc, 1 sc (16)
Row 6: Turning row: ch 1, turn, skip 1 stitch, sl st, 1 sc, 2 hdc, hdc-dec, 3 hdc, hdc-dec, 2 hdc, 1 sc, sl st (13)
After Row 6, a rounded convex shape — the bottom — forms at the back. From Row 7 onward, work in the round.
Row 7: Around the edge: 6 sc, 6 sc, 2 dec, 6 sc, 6 sc, 13 sc (39)
Row 8: 4 sc, (1 dec, 1 sc)*3, (1 sc, 1 dec)*3, 17 sc (33)
Row 9: 33 sc (33)
Body — Skin Color + Color Changes
Starting method: continuation from the hips. The original pattern features a striped black-and-white bee-style body. Change colors as desired — alternate every 2 rows for stripes, or choose a single accent color for a solid-colored top. Refer to your chosen color scheme.
Row 1: Make 4 increases across the middle of the belly (37)
Row 2: 37 sc (37)
Row 3: 8 sc, 1 dec, 16 sc, 1 dec, 7 sc, 1 dec (34)
Row 4: 1 dec, 30 sc, 1 dec (32)
Row 5: 32 sc (32)
Row 6: 1 inc, 5 sc, 1 dec, 16 sc, 1 dec, 5 sc, 1 inc (32)
Rows 7–9: 32 sc (32)
Row 10: 6 sc, 1 dec, 16 sc, 1 dec, 6 sc (30)
Row 11: 5 sc, 1 dec, 16 sc, 1 dec, 5 sc (28)
Row 12: 5 sc, 1 dec, 14 sc, 1 dec, 5 sc (26)
Row 13: 6 dec, 2 sl st, 6 dec (14)
Row 14: 3 sc, 1 dec, 4 sc, 1 dec, 3 sc (12)
Row 15: (2 sc, 1 dec)*3 (9)
Rows 16–17: 9 sc (9)
Fasten off, leaving a long tail. This narrow neck opening (9 stitches) will connect to the head (also 9 stitches at Row 38).
Wings — White Yarn
Four wings total: one large right, one large left, one small right, one small left. Each is a flat single-row piece worked from a starting chain. The combination of stitch heights (sl st through tr) is what creates the natural wing curve — work slowly and don’t pull too tight.
Large Right Wing
Starting method: ch 18
Row 1: from 2nd ch from hook: 16 sc, (sc, ch 3, from 2nd ch sl st, sc, sc), 3 hdc, 1 dc, 2 dc-inc, 4 hdc, 2 sc, 4 sl st
Large Left Wing
Starting method: ch 18
Row 1: from 2nd ch from hook: 4 sl st, 2 sc, 4 hdc, 2 dc-inc, 1 dc, 3 hdc, (sc, ch 3, from 2nd ch sl st, sc, sc), 16 sc
Small Right Wing
Starting method: ch 13
Row 1: from 2nd ch from hook: 2 sl st, 2 sc, 3 hdc, 1 dc, 2 dc-inc, 1 hdc, (1 hdc, ch 2, sl st, ch 2, 1 hdc), 6 hdc, 5 sc
Small Left Wing
Starting method: ch 13
Row 1: from 2nd ch from hook: 5 sc, 6 hdc, (1 hdc, ch 2, sl st, ch 2, 1 hdc), 1 hdc, 2 dc-inc, 1 dc, 3 hdc, 2 sc, 1 sl st
Block the wings lightly if needed — a little steam or a spritz of water and pinning flat while drying helps them hold their shape beautifully. The delicate pointed tips are the detail that makes these wings feel genuinely fairy-like.
Ears (×2) — Skin Color
Starting method: ch 8. Insert thin wire before beginning Row 2.
Row 1: from 2nd ch from hook: 2 sc, 3 hdc, 1 sc, 3 sc in one stitch, 1 sc, 3 hdc, 1 sc, 1 inc (16)
Row 2: 2 sc, 3 hdc, 2 sc, ch 5, from 2nd ch: 2 sc, 1 hdc, 1 dc, skip 1 stitch, 2 sc, 3 hdc, 2 sc, 1 inc
The wire inserted in Row 2 is what gives the ears their signature pointed elf shape — you can bend and position the tip after sewing them onto the head.
Hair (×2 pieces, in 2 different colors) — Hair Color
Starting method: magic ring for the base disc. Each hair piece starts with a 3-row base, then individual strands are worked from the base stitches. Make 2 in different coordinating colors (e.g., ginger + auburn, or gold + copper) and layer them for dimension.
Base Row 1: 6 sc in mr (6)
Base Row 2: 6 inc (12)
Base Row 3: (1 sc, 1 inc)*6 (18)
After the base is complete, work the following individual strands extending outward from the base. Each strand is worked separately from a stitch on the outer edge of the base.
Strand 1: ch 30, from 2nd ch: 1 sc, 1 hdc, 25 dc, 1 hdc, 1 sc, turn, 29 sl st, ch 1, turn, skip 1 stitch, 28 sc, sl st
Strands 2–3: ch 31, from 2nd ch: 1 sc, 1 hdc, 26 dc, 1 hdc, 1 sc, turn, 30 sl st, ch 1, turn, skip 1 stitch, 29 sc, sl st
Strands 4–6: ch 32, from 2nd ch: 1 sc, 1 hdc, 27 dc, 1 hdc, 1 sc, turn, 31 sl st, ch 1, skip 1 stitch, 30 sc, sl st
Strands 7–8: ch 31, from 2nd ch: 1 sc, 1 hdc, 26 dc, 1 hdc, 1 sc, turn, 30 sl st, ch 1, skip 1 stitch, 29 sc, sl st
Strand 9: ch 30, from 2nd ch: 1 sc, 1 hdc, 25 dc, 1 hdc, 1 sc, turn, 29 sl st, ch 1, skip 1 stitch, 28 sc, sl st
Strand 10: ch 27, from 2nd ch: 3 sc, 3 hdc, 18 dc, 1 hdc, 1 sc, sl st
Strand 11: ch 16, from 2nd ch: 1 sc, 1 hdc, 11 dc, 1 hdc, 1 sc, turn, 15 sl st, ch 1, turn, skip 1 stitch, 14 sc, sl st
Strand 12: ch 32, from 2nd ch: 1 sc, 1 hdc, 13 dc, (dc-inc, 1 dc)*3, 8 dc, 1 hdc, 1 sc, turn, 34 sl st, ch 1, turn, skip 1 stitch, 33 sc, sl st
Strand 13: ch 22, from 4th ch: 1 dc, 3 dc together, dc-dec, 3 dc, 10 hdc, turn, 16 sl st, ch 3, turn, from 4th ch: 1 dc, 2 dc-dec, 4 hdc, 7 sc, sl st, turn, 14 sl st, ch 3, turn, from 4th ch: 1 dc, 2 dc-inc, 4 hdc, 7 sc, turn, 17 sl st, ch 3, turn, from 5th ch: 1 dc, 3 dc in one stitch, dc-inc, 3 dc, 10 hdc, sl st
Strand 14: ch 35, from 2nd ch: 1 sc, 1 hdc, 13 hdc, (dc-dec, 1 dc)*3, 8 dc, 1 hdc, 1 sc, turn, 31 sl st, ch 1, turn, skip 1 stitch, 30 sc, sl st
Strand 15: ch 16, from 2nd ch: 1 sc, 1 hdc, 11 dc, 1 hdc, 1 sc, turn, 15 sl st, ch 1, skip 1 stitch, 14 sc, sl st
Strand 16: ch 27, from 2nd ch: 3 sc, 3 hdc, 18 dc, 1 hdc, 1 sc, sl st
Strand 17 (temple strand): ch 7, from 2nd ch: 5 sc, (4 hdc in one stitch), 4 sc
Underwear — Accent Color
Starting method: worked in turning rows, ch 5.
Row 1: from 3rd ch: 3 hdc (3)
Row 2: Turn, 3 sl st, ch 3, turn, from 3rd ch: 1 hdc, 2 hdc, hdc-inc
Row 3: Turn, 6 sl st, ch 1, turn, from 2nd ch: inc, 4 hdc, inc
Row 4: Turn, 8 sl st, ch 2, turn, from 2nd ch: inc, 7 hdc, inc
Row 5: Turn, 11 sl st, ch 1, turn, from 2nd ch: inc, 9 hdc, inc
Row 6: Turn, 13 sl st, ch 2, turn, from 2nd ch: inc, 11 hdc, 2 sc
Row 7: Turn, 15 sl st, ch 1, turn, from 2nd ch: inc, 12 hdc, 2 sc
Rows 8–9: Turn, 16 sl st, ch 1, turn, from 2nd ch: 2 sc, 12 hdc, 2 sc
Row 10: Turn, 16 sl st, ch 1, turn, from 3rd ch: 2 sc, 11 hdc, 2 sc
Row 11: Turn, 15 sl st, ch 1, turn, from 3rd ch: 2 sc, 10 hdc, dec
Row 12: Turn, 13 sl st, ch 1, turn, from 3rd ch: 2 sc, 8 hdc, dec
Row 13: Turn, 10 sl st, skip 1 stitch, ch 1, turn, from 3rd ch: 2 sc, 5 hdc, dec
Row 14: Turn, 7 sl st, skip 1 stitch, ch 2, turn, from 4th ch: 4 hdc, hdc-dec
Row 15: Turn, 4 sl st, skip 1 stitch, ch 2, turn, from 4th ch: hdc, hdc-dec
Row 16: Turn, 3 sl st, ch 2, turn, from 3rd ch: hdc, 2 hdc
Row 17: Turn, 4 sl st, ch 2, turn, from 3rd ch: hdc, 3 hdc
Row 18: Turn, 5 sl st, ch 2, turn, from 3rd ch: hdc, 2 hdc, hdc-dec
Row 19: Turn, 5 sl st, ch 2, turn, from 3rd ch: hdc, 4 hdc
Row 20: Turn, 6 sl st, ch 2, turn, from 4th ch: 5 hdc
Row 21: Turn, 5 sl st, ch 1, turn, from 3rd ch: 3 hdc, hdc-inc
Row 22: Turn, 4 sl st, skip 1 stitch, ch 1, turn, from 2nd ch: 3 hdc, hdc-inc
Row 23: Turn, 5 sl st, ch 1, turn, from 3rd ch: 4 hdc
Sew the piece into underwear shape and work an edging stitch around the entire perimeter.
Leaf Umbrella — Green Yarn
Starting method: ch 31. This piece is worked flat in one row per pass with increasing complexity and picot details. Take your time — the layered texture is what makes this leaf look so lifelike.
Row 1: from 2nd ch from hook: 2 sc, 2 hdc, 13 dc, 6 hdc, 6 sc, (sc, picot of ch 3, sc), 6 sc, 6 hdc, 13 dc, 2 hdc, 1 sc, inc
Row 2: ch 2, hdc-inc, dc-inc, 2 dc, (tr-inc, 2 tr)*4, dc-inc, 3 dc, 4 hdc, 5 sc, (sc, picot of ch 3, sc), 5 sc, 4 hdc, 3 dc, dc-inc, (2 tr, tr-inc)*4, 2 dc, dc-inc, hdc-inc, hdc, inc
Row 3: (ch 3, dc), (3 tr, tr-inc)*4, 2 tr, dc, dc-inc, 3 dc, dc-inc, dc, 6 hdc, 6 sc, (sc, picot of ch 3, sc), 6 sc, 6 hdc, dc, dc-inc, 3 dc, dc-inc, dc, 2 tr, (tr-inc, 3 tr)*4, dc-inc, 2 dc
Row 4: 2 sc, 15 hdc, 29 sc, (sc, picot, sc), 29 sc, 17 hdc, 2 sl st
A wire stem can be added before assembly to make the leaf poseable — wrap the wire with a tiny bit of green yarn if you’d like it to blend in beautifully.
Assembly — Putting Your Crochet Elf Together
- Legs → Hips → Body: These three sections are worked continuously — the legs become the hips which become the body, all in one unbroken piece. No sewing required for these joins.
- Head: Sew the head to the body neck opening, matching the 9 stitches at Row 38 of the head to the 9 stitches at the top of the body (Rows 16–17). Align the center fronts before sewing — take your time getting the face pointing straight forward.
- Arms (×2): Sew symmetrically to the sides of the body at Rows 13–14. Pin both in place before sewing either one so you can check the positioning from the front.
- Ears (×2): Sew to the sides of the head at Rows 10–13, pointing outward and slightly upward. The wire inside allows you to bend the tip to the perfect angle after sewing — this is where the elf magic really shows.
- Hair (×2 pieces): Sew the disc base of each hair piece to the crown of the head, layering both color pieces on top of each other. Tack the temple strand (Strand 17) down at the face side for a natural hairline effect.
- Safety eyes + antennae: The safety eyes mount through the hair base at the front. Wire antennae are inserted through the hair into the top of the head — secure them well and add a tiny yarn or bead tip at the end for that perfect fairy-antenna look.
- Large wings (×2): Sew to the upper back of the body at Rows 7–10, one on each side. Angle them upward slightly.
- Small wings (×2): Sew just below the large wings at Rows 10–13. Together the four wings create a beautiful layered dragonfly-fairy silhouette.
- Underwear: Fit at the waist (Hips Row 9 / Body Row 1) and tack at the waistband.
- Tulle skirt: Gather tulle ribbon or tulle fabric and tack over the underwear at the waist. The floatiness of the tulle against the structured crocheted body is one of the most charming details of the whole piece.
- Leaf umbrella: Attach the wire stem, place in one hand, and tack gently to secure. Position the leaf at a slight angle for a natural carrying pose.
🩷 Chloe’s Detail Tip — Symmetry Check: Before you sew anything permanently, lay all the parts out on a flat surface and look at the whole composition. Check that the arms are at the same height, the ears are the same distance from center, and the wings are mirrored. A five-minute check before sewing saves so much heartache. Our guide to sewing amigurumi parts has every tip you need for clean, invisible joins.
Making Your Crochet Elf Extra Cute — The Finishing Details
This is the section I live for. The crochet elf is already charming at this point — but the finishing is what transforms her from “really nice” to “I can’t stop looking at this.”
Embroidered pink cheeks: Thread a tapestry needle with soft pink embroidery floss. Using a simple satin stitch, embroider two small oval or circular blush patches on the cheeks — just below and slightly to the outside of where the eyes sit. Keep the stitches close together for a smooth, filled look. The cheeks should be big enough to see clearly but not so big they take over the face. When in doubt, go a tiny bit smaller — you can always add another pass of stitches, but you can’t take them out without leaving marks.
Eye symmetry: Since the safety eyes sit on the hair base rather than directly on the skin, take extra care when positioning them. Mark with pins first, then step back and look at the face from a normal viewing distance (not right up close). If something looks off from arm’s length, trust that instinct and adjust. The eyes are the first thing anyone notices.
Antenna tips: Add a tiny bead, a French knot in contrasting yarn, or a small crocheted ball to the tip of each wire antenna. Even the tiniest detail at the top catches the eye and completes the fairy silhouette.
Wing blocking: If your wings have curled at all during making, pin them flat on a blocking mat, spritz lightly with water, and leave to dry overnight. Blocked wings lie beautifully flat and hold their delicate pointed shape.
Color variations to try: The original bee-stripe colorway is wonderfully playful, but this elf would be equally gorgeous in soft lavender stripes with a cream body, or a dusty rose and sage combination for an autumn woodland fairy. The leaf umbrella in a golden yellow instead of green would give her a whole different personality. The hair works beautifully in silvery grey for a winter fairy, or deep copper for a forest spirit feel.
Chloe’s Final Look
I genuinely cannot get over how much is going on with this tiny elf — the layered hair with all those individual strands, the four translucent-looking white wings, the little leaf she’s carrying like an umbrella — and somehow it all comes together into something that feels completely cohesive and magical. She’s the kind of piece that makes people stop and pick her up to look more closely. Put her on a shelf where the light can catch those glossy eyes and the wings, and watch her steal the whole room. I may be making a whole fairy village. Don’t try to stop me. 🩷
What yarn is best for this crochet elf amigurumi?
A smooth fingering or DK weight yarn is ideal. It provides excellent stitch definition which is crucial for the delicate wings and complex layered hair.
How long does it take to crochet this elf?
Because of the multiple complex parts, including 17 hair strands and four wings, this advanced project typically takes between 8 and 15 hours to complete.
Do I need wire to make this crochet elf?
Yes, thin wire is highly recommended to give the elf’s ears their signature pointed shape and to provide structural stability in the legs so the doll can stand.