Free Spider Porfiriyich Amigurumi Pattern — A Scrap-Bin Project With Eight Legs
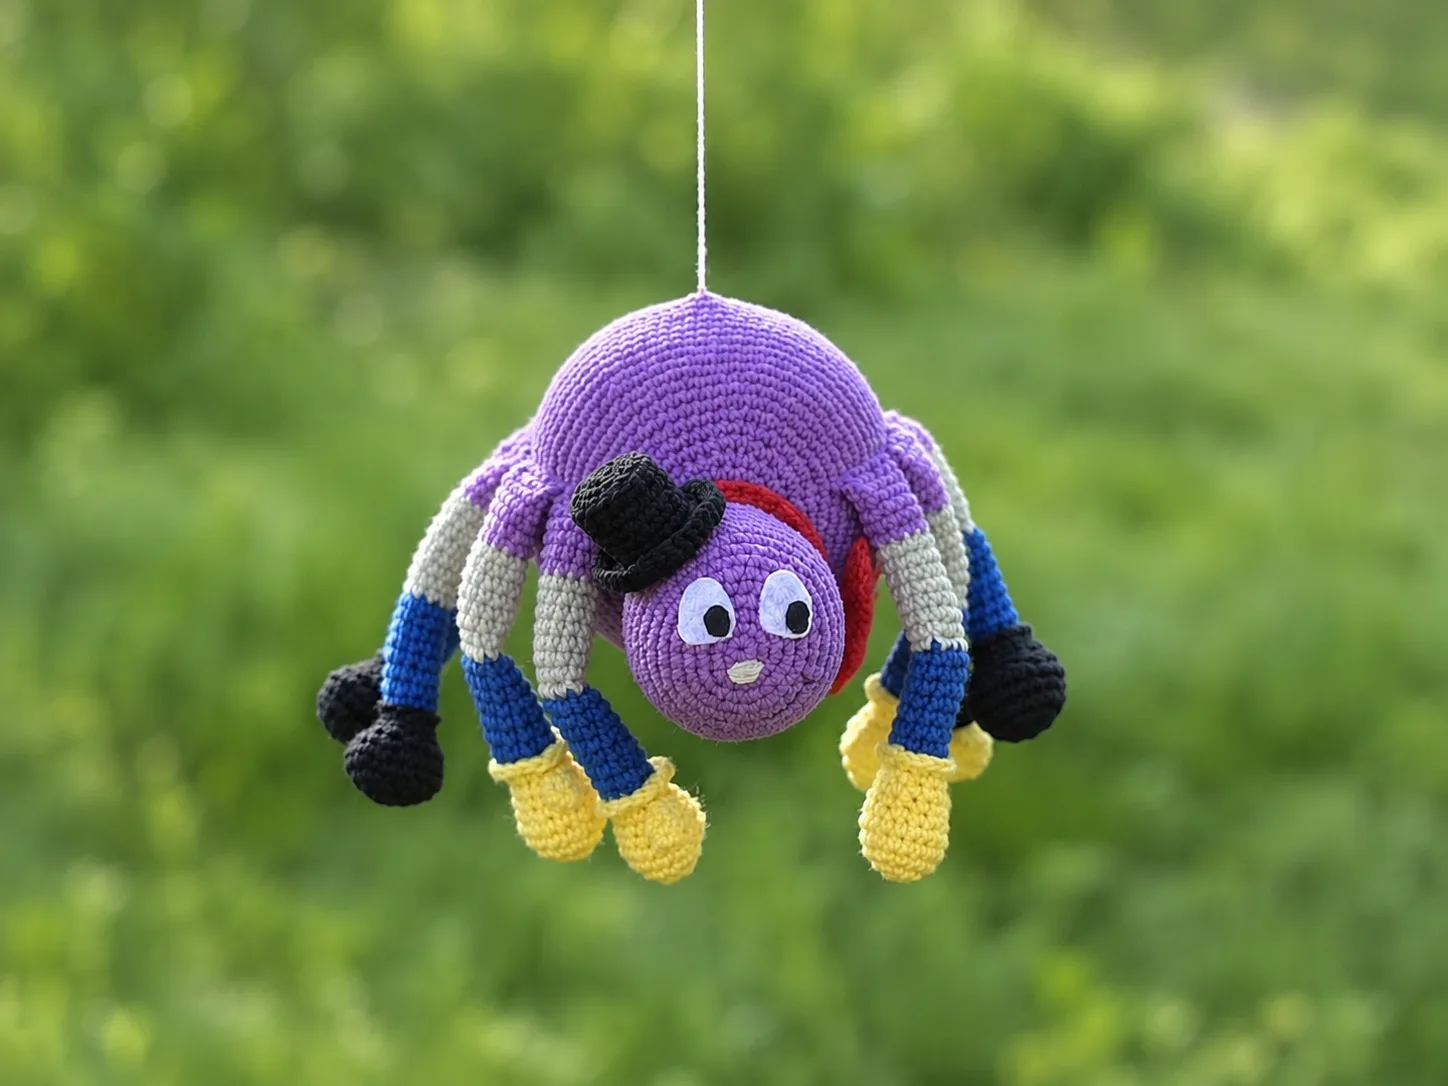
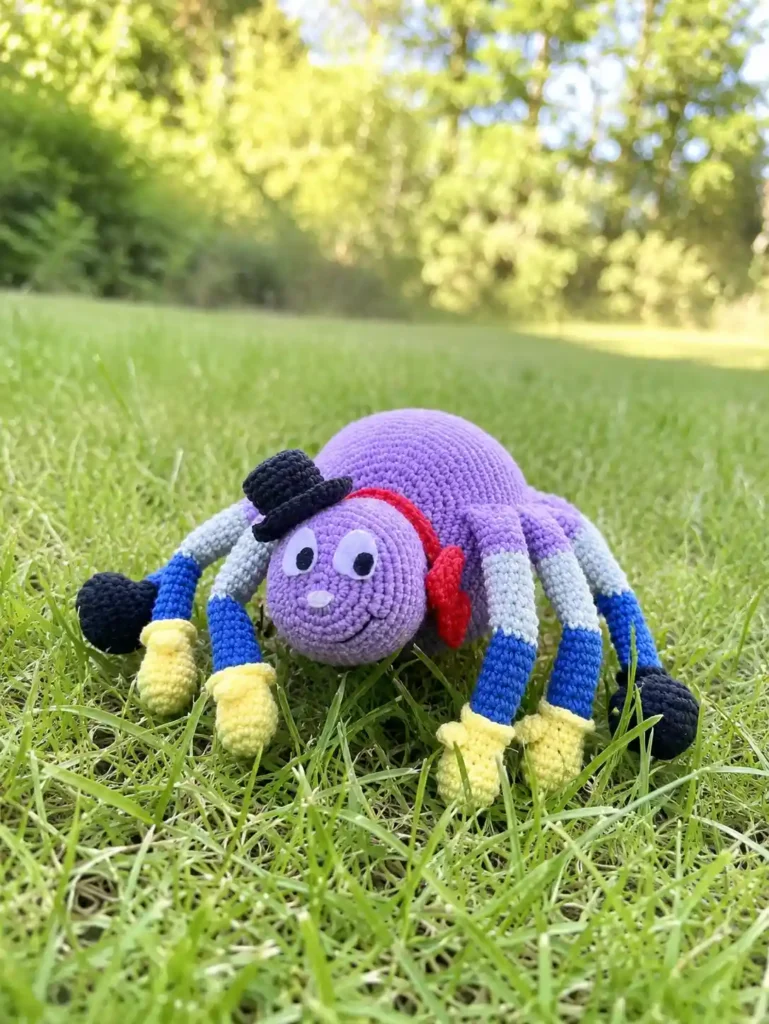
This free spider Porfiriyich amigurumi pattern is a proper stash project — eight legs, color-blocked in three shades apiece, a tiny felt-eyed face, and a top hat, all built from odds and ends of DK-weight cotton. It’s not a quick one; budget a few evenings for it. But every single piece only needs a little yarn, so raid your scrap basket before you buy anything new.
🧶 What You’ll Need
- 💰 Yarn Needed: a small amount of each color — the original pattern doesn’t give yardage, but nothing here is a big piece, so leftover balls will cover it (see note below)
- 🎨 Colors: purple (body, head, upper legs), blue and gray (middle leg segments), yellow (mittens and fingers), black (hat and shoes), red (bow tie) — or similar DK-weight scraps from your stash
- 🪝 Hook: Steel 4 (2.0 mm)
- ⏱️ Time: several sessions — eight legs plus a head, body, hat, and bow tie add up
- 📏 Finished Size: not specified in the original pattern
- 💡 Difficulty: Intermediate
- 🎁 Great For: shelf display, a quirky handmade gift, or a fun stash-clearing multi-session project
Materials for This Spider Porfiriyich Amigurumi Pattern
You probably already have everything you need for this one, especially if your stash leans toward cotton DK weight. Here’s what goes into it:
- Yarn: DK / Light Worsted (3) weight cotton, in six colors — purple, blue, gray, yellow, black, and red. The original pattern was written for YarnArt Jeans; any similar DK-weight cotton works, including Drops Muskat or Paintbox Cotton DK. Since none of these pieces are large, this is a great place to use up small leftover balls rather than buying full skeins.
- Hook: Steel 4 (2.0mm) — this is a fine steel hook size with no clean US letter equivalent, so go by the millimeter measurement.
- White and black felt for the eyes.
- A small stiff circle (cardboard or a scrap of clear plastic) to support the base of the hat.
- Clear craft glue for attaching the felt eyes.
- Toy stuffing and a tapestry needle for sewing all the pieces together.
- Matching sewing thread, optional, for stitching through the leg color-changes to create slight bends at the “knees.”
Abbreviations Used in This Spider Porfiriyich Amigurumi Pattern
| Abbreviation | Meaning |
|---|---|
| mr | magic ring |
| sc | single crochet |
| inc | increase (2 sc in the same stitch) |
| inv dec | invisible decrease |
| ch | chain |
| sl st | slip stitch |
| BLO | back loop only |
| FLO | front loop only |
| FO | fasten off |
| ( ) × X | repeat the instructions in parentheses X times |
Smart Crafter Tips
Never made a magic ring? Our magic ring tutorial walks through it step by step — every single part of this spider starts with one, so it’s worth getting comfortable with before you dive in.
This pattern uses invisible decreases throughout for every shaping row (written as “dec” in the original, converted here to the cleaner method). If you haven’t used this technique yet, our invisible decrease guide covers exactly how to work it so your decreases stay hidden instead of leaving little gaps.
With eight legs, a head, a hat, and a bow tie all sewn onto one small body, this is one of the more assembly-heavy patterns on the site. Our guide to sewing amigurumi parts together has tricks for keeping seams tight and pieces symmetrical — worth a skim before you start attaching legs.
🧶 Scrap Check: Each leg only uses a handful of yarn per color, since the color blocks are just a few rows tall. If you’ve got small leftover balls of blue, gray, or purple sitting around, this is exactly the kind of project that clears them out.
Spider Porfiriyich Amigurumi Pattern — Full Instructions
Part 1: Body (×1) — purple
Start with a magic ring.
Row 1: 6 sc in mr (6)
Row 2: 6 inc (12)
Row 3: (1 sc, inc) × 6 (18)
Row 4: 1 sc, inc, (2 sc, inc) × 5, 1 sc (24)
Row 5: (3 sc, inc) × 6 (30)
Row 6: 2 sc, inc, (4 sc, inc) × 5, 2 sc (36)
Row 7: (5 sc, inc) × 6 (42)
Row 8: 3 sc, inc, (6 sc, inc) × 5, 3 sc (48)
Row 9: (7 sc, inc) × 6 (54)
Row 10: 4 sc, inc, (8 sc, inc) × 5, 4 sc (60)
Row 11: (9 sc, inc) × 6 (66)
Row 12: 5 sc, inc, (10 sc, inc) × 5, 5 sc (72)
Row 13: (11 sc, inc) × 6 (78)
Row 14: 6 sc, inc, (12 sc, inc) × 5, 6 sc (84)
Rows 15–28: sc even (84)
Row 29: 6 sc, inv dec, (12 sc, inv dec) × 5, 6 sc (78)
Row 30: (11 sc, inv dec) × 6 (72)
Row 31: 5 sc, inv dec, (10 sc, inv dec) × 5, 5 sc (66)
Row 32: (9 sc, inv dec) × 6 (60)
Row 33: 4 sc, inv dec, (8 sc, inv dec) × 5, 4 sc (54)
Row 34: (7 sc, inv dec) × 6 (48)
Row 35: 3 sc, inv dec, (6 sc, inv dec) × 5, 3 sc (42)
Row 36: (5 sc, inv dec) × 6 (36)
Row 37: 2 sc, inv dec, (4 sc, inv dec) × 5, 2 sc (30)
Row 38: (3 sc, inv dec) × 6 (24)
Row 39: 1 sc, inv dec, (2 sc, inv dec) × 5, 1 sc (18)
Row 40: (1 sc, inv dec) × 6 (12)
Cut the yarn, leaving a long tail to close the opening. Stuff the body firmly. Working through the back loops only (BLO), sew the opening closed by weaving through each remaining stitch and pulling tight. FO and weave in the end.
Part 2: Head (×1) — purple
Start with a magic ring.
Row 1: 6 sc in mr (6)
Row 2: 6 inc (12)
Row 3: (1 sc, inc) × 6 (18)
Row 4: 1 sc, inc, (2 sc, inc) × 5, 1 sc (24)
Row 5: (3 sc, inc) × 6 (30)
Row 6: 2 sc, inc, (4 sc, inc) × 5, 2 sc (36)
Row 7: (5 sc, inc) × 6 (42)
Row 8: 3 sc, inc, (6 sc, inc) × 5, 3 sc (48)
Rows 9–16: sc even (48)
Row 17: 3 sc, inv dec, (6 sc, inv dec) × 5, 3 sc (42)
Row 18: sl st, 7 sc, sl st — this is a partial row, worked over just a section of the round, to begin shaping the lower face (9 sts worked)
Cut the yarn and weave in the end on the wrong side. Reattach yarn at the beginning of Row 18 and work a second partial row: sl st, 5 sc, sl st. This second pass helps the lower part of the head sit neatly against the body once assembled.
Cut the yarn, leaving a long tail for sewing. Stuff the head firmly. Sew the head in place so the top of the head meets the closed opening of the body, and the lower, shaped edge (from Row 18) attaches between Rows 31 and 32 of the body.
Part 3: Shoe-Leg (×4)
Start with a chain of 7.
Row 1 (black): starting in the 2nd chain from hook, 5 sc, 3 sc in the last chain, 4 sc along the other side of the chain, 2 sc in the last chain (14)
Row 2 (black): inc, 4 sc, (inc) × 3, 4 sc, (inc) × 2 (20)
Row 3 (black): 1 sc, inc, 4 sc, (1 sc, inc) × 3, 4 sc, (1 sc, inc) × 2 (26)
Row 4 (black): 26 sc, worked in BLO (26)
Row 5 (black): sc even (26)
Row 6 (black): 6 sc, 6 inv dec, 8 sc (20)
Row 7 (black): 3 sc, 6 inv dec, 5 sc (14)
Row 8 (black): 5 sc, inv dec, 5 sc, inv dec (12)
Row 9 (black): 12 sc, worked in BLO (12)
Rows 10–16 (blue): sc even (12)
Rows 17–22 (gray): sc even (12)
Rows 23–26 (purple): sc even (12)
Row 27 (purple): fold the tube in half and work 6 sc through both layers together to close the top (6)
Stuff the leg lightly, focusing mainly on the shoe section — the upper leg can stay soft. If you’d like the legs to bend slightly at the color changes, stitch through those transition points with matching thread once assembly is underway. Leave a long tail for sewing the leg to the body.
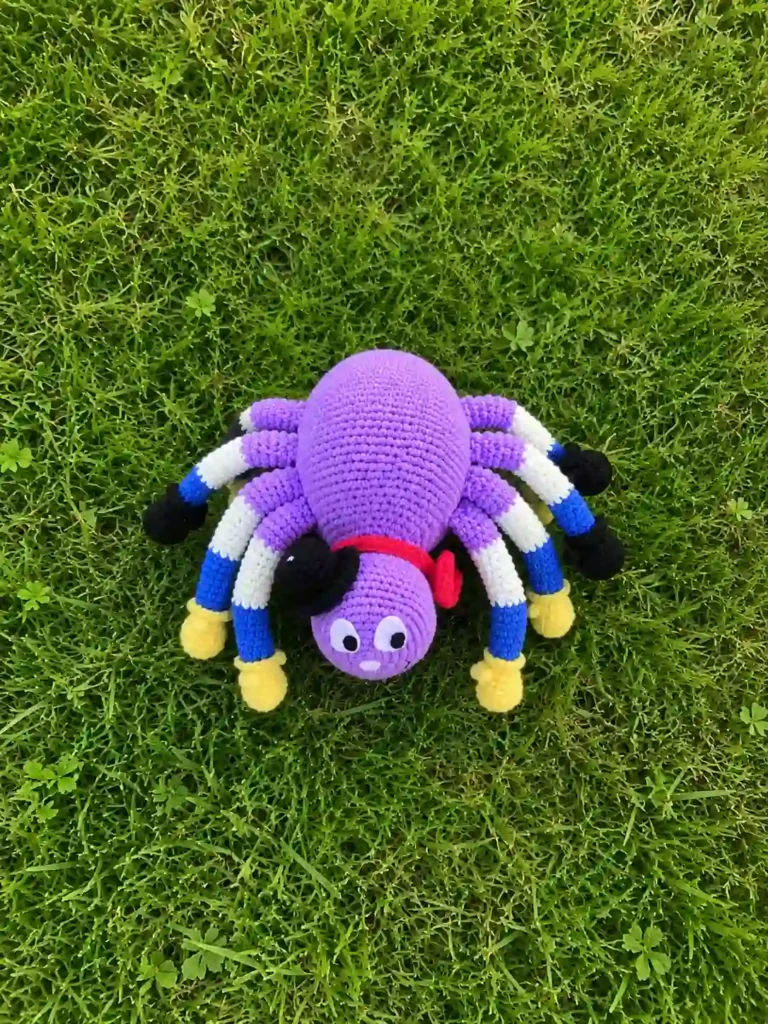
Part 4: Mitten-Leg (×4)
Start with a magic ring.
Row 1 (yellow): 6 sc in mr (6)
Row 2 (yellow): 6 inc (12)
Row 3 (yellow): (1 sc, inc) × 6 (18)
Rows 4–6 (yellow): sc even (18)
Row 7 (yellow): (1 sc, inv dec) × 6 (12)
Rows 8–9 (yellow): sc even (12)
Row 10 (yellow): 12 sc, worked in BLO — drop the yellow to the front and pick up blue to continue (12)
Rows 11–16 (blue): sc even (12)
Rows 17–22 (gray): sc even (12)
Rows 23–26 (purple): sc even (12)
Row 27 (purple): fold the tube in half and work 6 sc through both layers together (6)
Row 10 Edging (yellow, worked once the leg tube is complete): using the leftover yellow tail, work into the front loops only (FLO) of Row 10: (1 sc, inc) × 6 (18)
This edging round is worked after the rest of the leg is finished — it uses the front loops of Row 10 that were left open when you switched to BLO, and creates the little ruffled cuff at the top of the mitten. Stuff the leg lightly. FO and weave in the end of the mitten edging yarn, and leave a long purple tail for sewing the leg to the body.
Part 5: Finger (×4) — yellow
Start with a magic ring.
Row 1: 6 sc in mr (6)
Rows 2–3: sc even (6)
FO, leaving a tail for sewing. Sew one finger to the side of each of the 4 mittens, at Row 8.
Part 6: Hat (×1) — black
Start with a magic ring.
Row 1: 6 sc in mr (6)
Row 2: 6 inc (12)
Row 3: (1 sc, inc) × 6 (18)
Row 4: 18 sc, worked in BLO (18)
Rows 5–9: sc even (18)
Row 10: (2 sc, inc) × 6 (24)
Row 11: (3 sc, inc) × 6 (30)
Row 12: (4 sc, inc) × 6 (36)
FO, leaving a long tail for sewing. Cut a small circle from cardboard or a scrap of clear plastic to match the diameter of the hat’s base (Rows 1–3). Slip the circle inside the hat, add a small bit of stuffing above it for shape, and sew the hat to the top of the head.
Part 7: Bow Tie (2 pieces) — red
Start with a chain of 10.
Row 1: starting in the 2nd chain from hook, 9 sc (9)
Rows 2–3: 9 sc, ch 1, turn (9)
Edging: hold the 2 pieces wrong sides together and work sc around the entire perimeter, working 2 sc into each of the 4 corner stitches (28)
Weave in the short ends. Leave one long yarn tail for wrapping the piece during assembly.
Part 8: Bow Tie Ring (×1) — red
Start with a chain of 36.
Row 1: work 1 sc in each chain across, then join into a ring with a sl st (36)
Leave a long tail for attaching the bow tie. Wrap the long tail from the bow tie piece around the center of the ring several times, pulling snugly to cinch the bow shape. FO, securing it to the 36-sc ring.
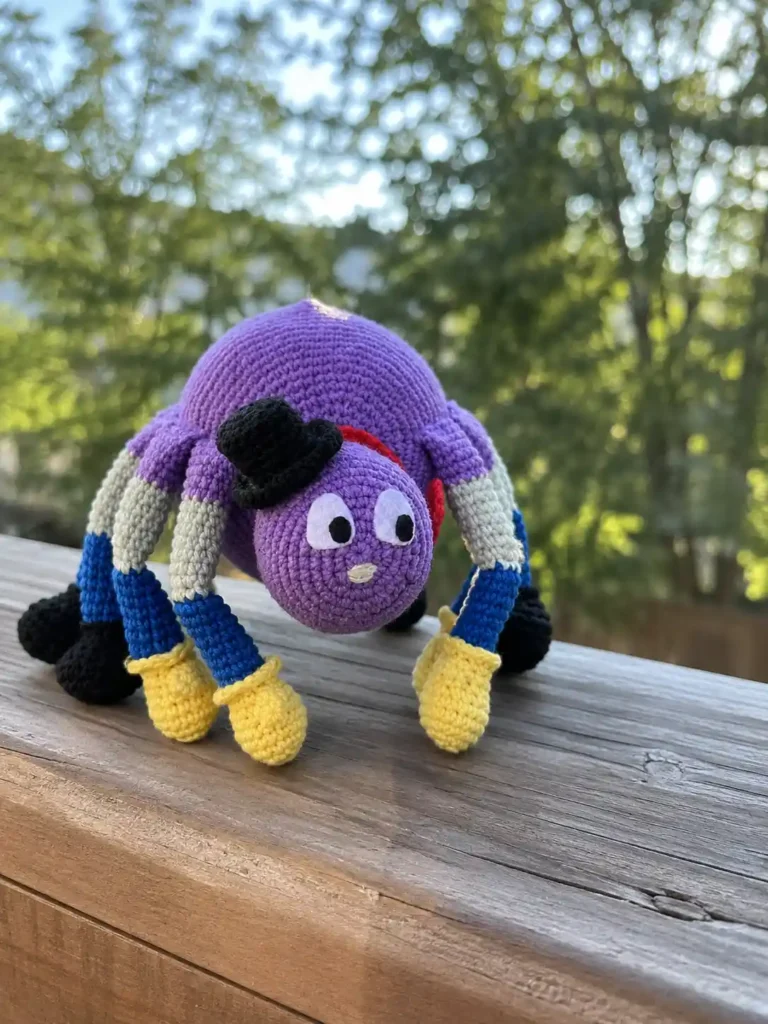
Assembly
- Finish the body: make sure it’s stuffed firmly, then pull the BLO opening closed with a needle and weave in the tail.
- Attach the head: position it on the front of the body. Sew the top of the head near the body’s closed opening, and sew the shaped lower edge (from Row 18’s partial rows) between Rows 31 and 32 of the body.
- Prep the legs: confirm all 8 legs are lightly stuffed and closed at the top with the 6-sc fold. Sew a yellow finger to each mitten-leg at Row 8. If you want bent “knees,” stitch through the color-transition points with matching thread now.
- Attach the legs: sew all 8 legs radially around the sides of the body — the 4 mitten-legs toward the front, and the 4 shoe-legs toward the back.
- Attach the hat: with the supportive circle and stuffing tucked inside, sew the hat securely to the top of the head.
- Add the bow tie: slip the red ring over the spider’s head and settle the cinched bow at the front of the neck.
Decoration
Cut two ovals from white felt for the eye whites and two smaller circles from black felt for the pupils. Glue the pupils onto the whites, then glue the finished eyes to the front of the head. Using a light-colored thread, embroider a small horizontal nose centered just below the eyes. With dark thread, add a wide, friendly smile beneath it. Give the hat, legs, and bow tie a final adjustment — your spider is ready.
💡 Stretch It Further: Swap the six colors for whatever’s left in your scrap bin — a spider like this doesn’t need to match anything, and mismatched, slightly wrong-together colors actually suit the character. Try a whole family of them in different palettes, or make just the legs and mitten-hands in leftover sock yarn scraps for a smaller, faster version without the full body and hat. A cluster of two or three on a shelf reads a lot more intentional than one lone spider.
Mia’s Take
This one’s a project in the true sense — eight legs, two-tone color changes, a hat with its own internal support, a bow tie that has to be wrapped and cinched just right. None of it is hard on its own, but it adds up, so don’t expect a one-sitting make. What I like about it is that every piece is small enough to come from scraps, so even with six colors involved, you’re not committing a full skein to any of them. Clear an evening (or three), and you’ll end up with something genuinely unlike anything else on your shelf.
FAQ
What yarn is best for the Spider Porfiriyich amigurumi pattern?
DK / Light Worsted (3) weight cotton yarn, such as YarnArt Jeans, Drops Muskat, or Paintbox Cotton DK, works best. Since all pieces are small, this pattern is perfect for using up leftover scrap yarn.
How long does it take to crochet Spider Porfiriyich?
This project requires several sessions or evenings to complete. While individual pieces like the legs and hat are small and crochet quickly, making eight legs plus full assembly adds up in total time.
Can beginners make this spider amigurumi pattern?
This pattern is rated at an intermediate difficulty level. While the basic crochet stitches are straightforward, the project involves multi-part assembly, color changes, and invisible decreases.