Free Goose Amigurumi Pattern — Squishy Chenille Plush
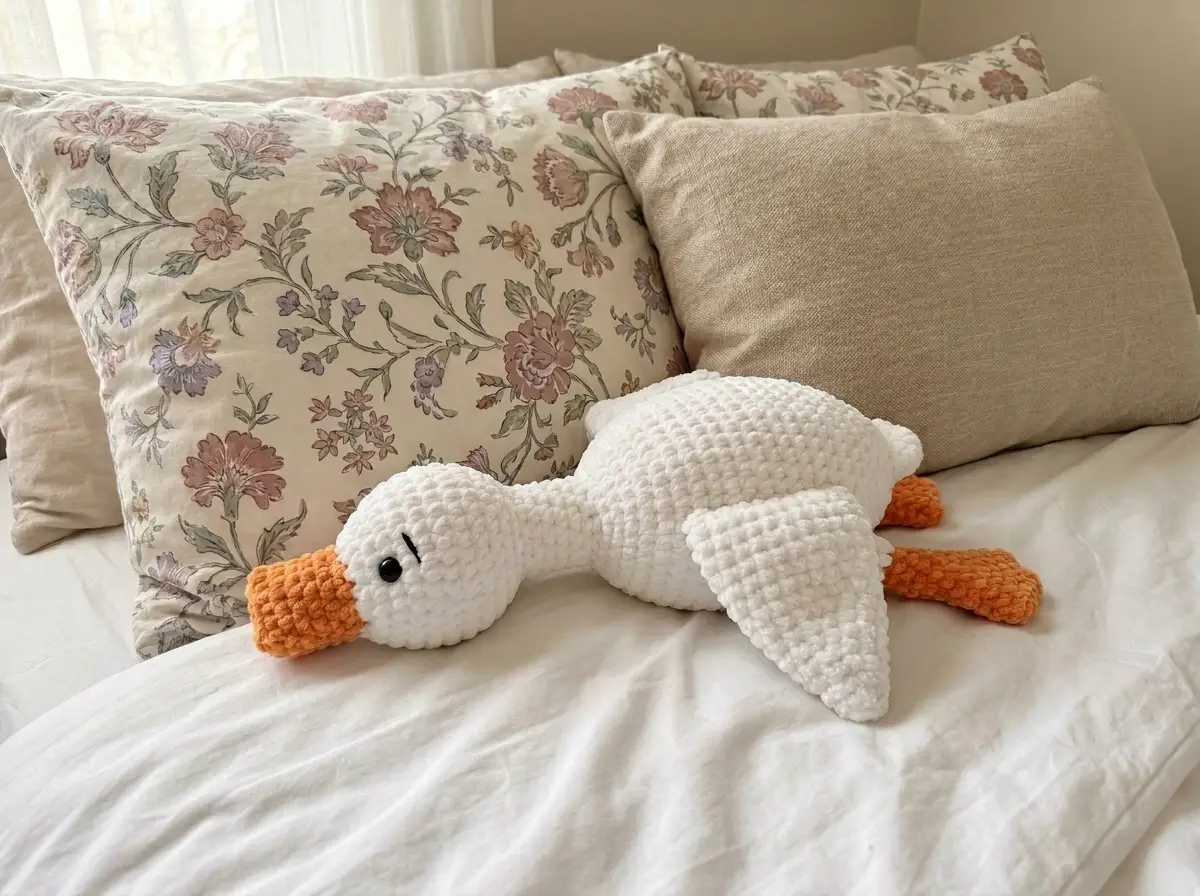
This free goose amigurumi pattern is built for chenille yarn — and if you’ve got a nearly-finished skein sitting around, this is exactly where it goes. The whole bird takes about 120 yards total, finishes at 13 inches tall, and works up in a single beginner afternoon. The beak and legs use about 20 yards of contrast color — a scrap piece handles that easily. Let’s go.
🧶 What You’ll Need From Your Stash
- 💰 Yarn Needed: ~120 yards total (main color ~100 yds, contrast color ~20 yds)
- 🎨 Colors: white or off-white (main), yellow or orange (contrast) — or any two colors from your stash
- 🪝 Hook: G/6 (4.0 mm)
- ⏱️ Time: 4–6 hours
- 📏 Finished Size: ~13 in (33 cm) tall
- 💡 Difficulty: Beginner
- 🎁 Great For: gifts, nursery decor, spring displays, Easter baskets, baby showers
Materials for Your Goose Amigurumi
This pattern runs on Bulky (5) weight chenille — the thick, squishy kind that gives amigurumi that plush-toy finish. No specific brand is required. Any bulky velvet or chenille yarn in your stash works here, as long as both colors are the same weight.
- Main color yarn (Bulky/5 chenille): approximately 100 yards — white, cream, or off-white. Bernat Baby Velvet (Bulky), Premier Parfait Chunky, or any similar velvet/chenille yarn works well.
- Contrast color yarn (Bulky/5 chenille): approximately 20 yards — yellow, orange, or golden. This covers the beak and both feet. A partial leftover skein is ideal.
- Hook: G/6 (4.0 mm)
- 10 mm safety eyes: 1 pair
- Polyfill stuffing
- Stitch marker
- Tapestry needle
- Hot glue for securing safety eyes (optional, recommended for added hold)
- Cotton embroidery floss, 4 strands for optional nostril and eyebrow detail
🧶 Scrap Check: The contrast color covers the beak (Rows 1–5 of the main piece) plus the webbed foot section on both legs — about 20 yards total. If you’ve got a leftover bit of yellow or orange chenille from any previous project, that’s almost certainly enough. No need to open a new skein.
Abbreviations Used in This Goose Amigurumi Pattern
| Abbreviation | Meaning |
|---|---|
| mr | Magic ring. Alternative: ch 2, work stitches into 2nd ch from hook. |
| sc | Single crochet |
| inc | Increase — 2 sc worked into the same stitch |
| dec | Invisible decrease — insert hook through front loops only of next 2 stitches simultaneously, yarn over, pull through, yarn over, pull through 2 loops. Keeps edges clean with no visible gap. |
| ch | Chain |
| sl st | Slip stitch |
Smart Crafter Tips Before You Start
Always use the invisible decrease. Wherever the pattern says “dec,” work it as an invisible decrease — through the front loops only of the next two stitches. It takes about two extra seconds and the result is noticeably cleaner, especially around the neck and base of the body. If it’s new to you, our invisible decrease tutorial walks through it step by step.
The beak, head, and body are one continuous piece. You start at the beak tip in contrast color, work through the head shaping, and the body follows in the same piece after a color change at Row 5. No sewing a head onto a body later — that seam doesn’t exist. If you haven’t done a mid-piece color change before, our color change tutorial covers the cleanest way to handle it.
Install your safety eyes before the head closes. Eyes go between Rows 8 and 9, with 7 stitches between them. Do this before you continue past Row 13 — once the head decreases start, getting back inside gets difficult. Our safety eye guide covers placement and how to lock the washers so they hold.
Chenille forgives minor tension inconsistency. The velvet texture hides small gaps and uneven stitches better than cotton or acrylic. That said, stay consistent on the decrease rows — the neck section (Rows 18–22) is narrow and benefits from steady tension.
Free Goose Amigurumi Pattern
Work in continuous rounds unless otherwise stated. Place a stitch marker at the beginning of each round to track your position.
Wings — Make 2
Yarn: Main color | Starting method: magic ring
Row 1: 6 sc in mr (6)
Row 2: 6 sc (6)
Row 3: (1 sc, inc) *3 (9)
Row 4: 1 sc, inc, (2 sc, inc) *2, 1 sc (12)
Row 5: (3 sc, inc) *3 (15)
Row 6: 2 sc, inc, (4 sc, inc) *2, 2 sc (18)
Row 7: 18 sc (18)
Row 8: (5 sc, inc) *3 (21)
Rows 9–10: 21 sc (21)
Row 11: 3 sc, inc, (6 sc, inc) *2, 3 sc (24)
Rows 12–15: 24 sc (24)
Finishing: Fold the wing flat in half and sc through both layers — 12 sc total. Do not stuff. Leave a tail of approximately 8 in (20 cm) for sewing.
🧶 Scrap Check: Each wing uses roughly 15–18 yards of main color. Set aside about 35 yards for both wings before starting the body piece — that way you won’t run short mid-project.
Legs — Make 2
Yarn: Start in contrast color, switch to main color after Row 11 | Starting method: ch 9
Row 1: inc in 2nd ch from hook, 6 sc, 3 sc in one st, 7 sc (18)
Rows 2–3: 18 sc (18)
Row 4: (dec, 7 sc) *2 (16)
Row 5: (dec, 6 sc) *2 (14)
Row 6: (dec, 5 sc) *2 (12)
Row 7: (dec, 4 sc) *2 (10)
Rows 8–11: 10 sc (10)
Switch to main color yarn after Row 11.
Rows 12–13: 10 sc (10)
Finishing: Fold the leg flat in half and sc through both layers — 5 sc total. Do not stuff. Do not cut yarn. Leave a tail of approximately 8 in (20 cm) for sewing.
🧶 Scrap Check: Rows 1–11 of each leg use contrast color — about 8–10 yards per leg, or 18–20 yards total for the pair. A partial skein of yellow or orange chenille covers both feet with yardage left over.
Beak–Head–Body — Make 1
Yarn: Contrast color for Rows 1–5 (beak), switch to main color after Row 5 | Starting method: ch 4
This is the heart of your goose amigurumi — beak, head, neck, and full body all worked as one continuous piece. The color change at Row 5 is the only join you need to manage.
— BEAK (contrast color) —
Row 1: inc in 2nd ch from hook, sc, 3 sc in one st, 2 sc (8)
Row 2: (inc, 3 sc) *2 (10)
Rows 3–5: 10 sc (10)
Switch to main color yarn after Row 5.
— HEAD (main color) —
Row 6: inc *10 (20)
Row 7: 6 sc, inc, 8 sc, inc, 4 sc (22)
Row 8: 6 sc, inc, 4 sc, inc, 6 sc, inc, 3 sc (25)
Row 9: 25 sc (25)
Row 10: (7 sc, inc) *2, 8 sc, inc (28)
Rows 11–13: 28 sc (28)
Now is the time. Install your 10 mm safety eyes between Rows 8 and 9, placing them 7 stitches apart, before the head begins to close. Once you pass Row 14, you won’t be able to get back in cleanly.
Row 14: (5 sc, dec) *4 (24)
Row 15: 2 sc, dec, (4 sc, dec) *3, 2 sc (20)
Row 16: 1 sc, dec, (2 sc, dec) *4, 1 sc (15)
Row 17: (3 sc, dec) *3 (12)
Rows 18–22: 12 sc (12)
Rows 18–22 form the neck — five straight rounds at 12 stitches. Keep tension even here. Stuff the head firmly before the opening gets any smaller.
— BODY (main color) —
Row 23: inc *12 (24)
Row 24: (3 sc, inc) *6 (30)
Row 25: 2 sc, inc, (4 sc, inc) *5, 2 sc (36)
Row 26: (5 sc, inc) *6 (42)
Rows 27–39: 42 sc (42)
Rows 27–39 are 13 straight rounds at 42 stitches — this is the main body and where most of your main color yarn goes. Continue stuffing gradually as you work down. Don’t wait until the end; getting an even fill through a small closing is harder than it sounds.
Row 40: (5 sc, dec) *6 (36)
Row 41: 36 sc (36)
Row 42: 2 sc, dec, (4 sc, dec) *5, 2 sc (30)
Row 43: 30 sc (30)
Row 44: (3 sc, dec) *6 (24)
Rows 45–46: 24 sc (24)
Row 47: 1 sc, dec, (2 sc, dec) *5, 1 sc (18)
Row 48: (1 sc, dec) *6 (12)
Rows 49–51: 12 sc (12)
Row 52: 6 dec (6)
Finish stuffing the body firmly before the opening closes. Fasten off, leaving a short tail. Thread through the remaining 6 stitches with a tapestry needle and pull tight to close.
Assembly
- Wings: Sew both wings to the sides of the body between Rows 28 and 39, leaving 14 stitches between them.
- Legs: Sew both legs to the underside of the body between Rows 41 and 42, leaving 4 stitches between them.
- Eyes: Secure with hot glue for extra hold. Eyes sit between Rows 8 and 9, with 7 stitches of space between them.
Face Shaping (Optional but Recommended)
This tightening technique gives the face more dimension and pulls the beak into shape — worth the extra five minutes.
- Thread a tapestry needle with main color yarn.
- Insert the needle at the center of the beak, at the color change point between Rows 5–6.
- Bring the needle out at the lower corner of the right eye. Insert at the upper corner of the right eye.
- Bring the needle out at the upper corner of the left eye. Insert at the lower corner of the left eye.
- Bring the needle out at the starting point.
- Pull tight and secure with a knot.
Face Embroidery (Optional)
Use 4 strands of cotton embroidery floss to add nostrils on the beak and small eyebrows above the eyes. Small detail, but it reads well from a distance and it’s the kind of thing that makes a handmade piece look finished rather than just complete.
💡 Stretch It Further: One goose is sweet. Three in different colorways — classic white with orange feet, a gray goose with yellow feet, a pastel version in soft lavender — become a set. The pattern is exactly the same each time; the only variable is your main color. Bundle them in a small kraft box with tissue paper and you’ve got a handmade gift set that costs under $10 in yarn. Hard to beat that.
This goose also works well as a baby shower gift — the chenille texture is genuinely soft, the 13-inch size is substantial, and it takes one afternoon to finish. If you want to build a bird theme, our free penguin amigurumi pattern pairs nicely with this one and uses the same yarn weight.
Got leftover main color after the goose? If you’ve got 35–40 yards of contrast remaining from the feet and beak, our free cow crochet amigurumi is another stash-friendly chenille build — the spots are a perfect place to use up small contrast pieces.
Mia’s Take
About 120 yards total — most of it from one skein — and a scrap 20 yards for the beak and feet. One-piece construction on the body means no sewing a head onto a torso at the end, which is a genuine time saver. Chenille makes the finish look more polished than the effort requires. Make it in white and it’s a classic; make it in gray or pastel and it’s a little unexpected. Either way, you’re using up yarn that would have sat in the stash indefinitely and ending up with something 13 inches tall and genuinely giftable. That’s the whole point. 🧶
What yarn is best for this goose amigurumi?
Bulky (weight 5) velvet or chenille yarn is highly recommended. It hides small gaps easily and gives the amigurumi a soft, plush-toy finish.
How long does it take to crochet this goose?
This is a beginner-friendly pattern that takes approximately 4 to 6 hours to complete, making it a perfect single-afternoon project.
Can beginners make this goose amigurumi pattern?
Yes! The pattern requires only basic stitches (single crochet, increase, invisible decrease) and features a seamless head-to-body design that minimizes complicated sewing.