Boo the Bat Amigurumi — Free Crochet Halloween Pattern
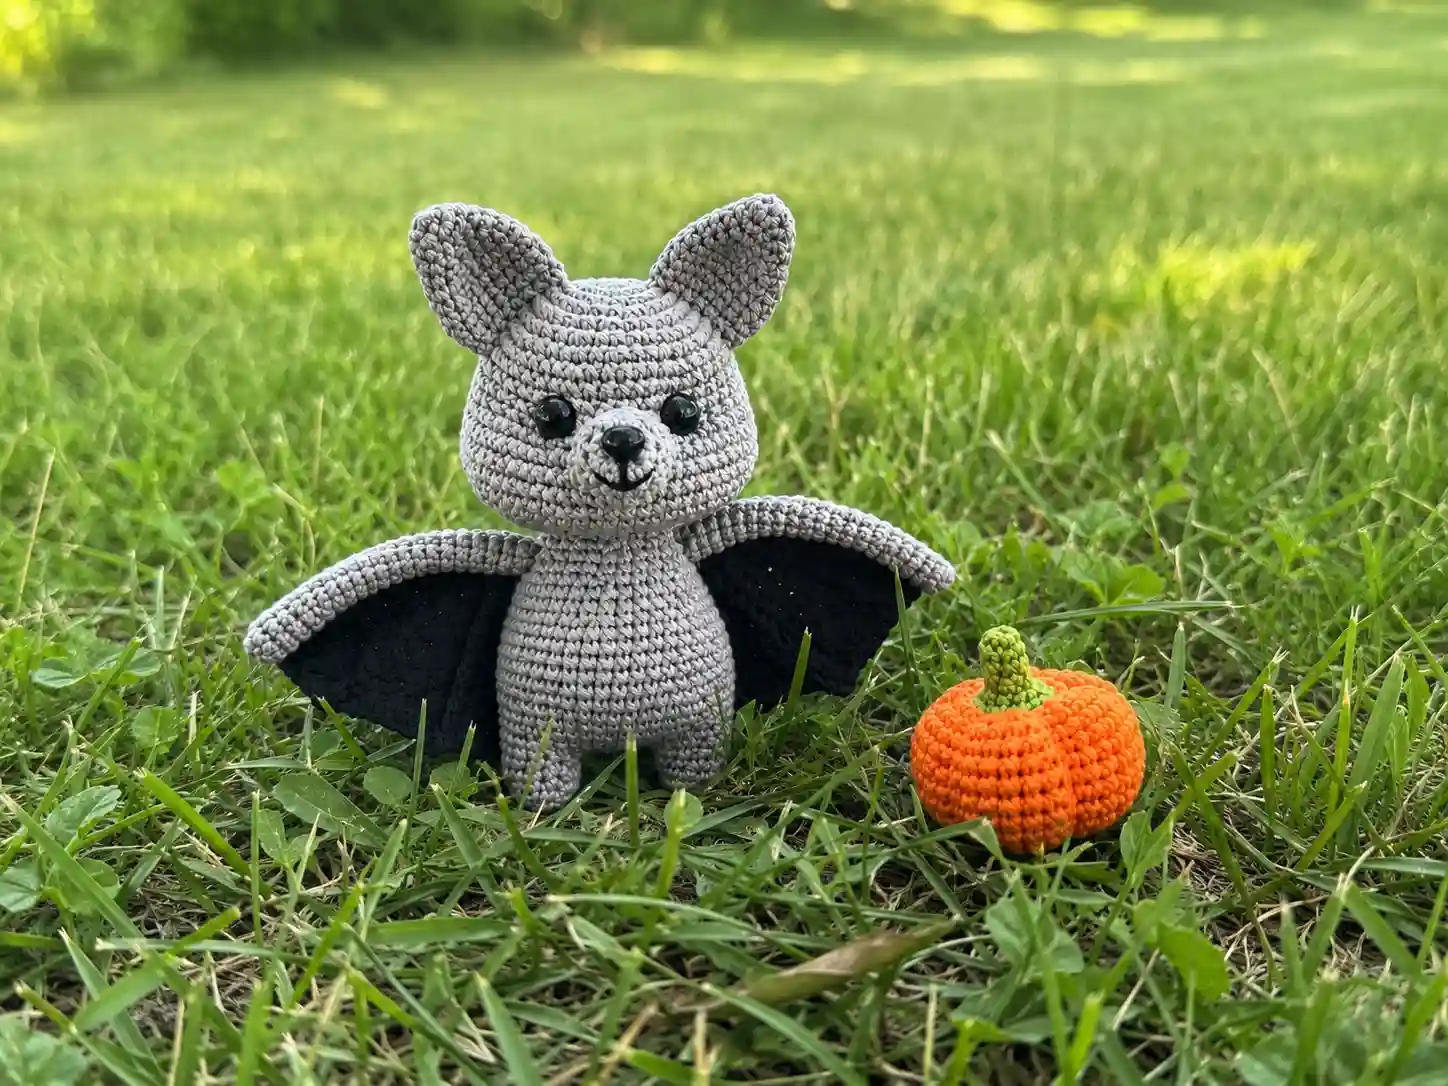
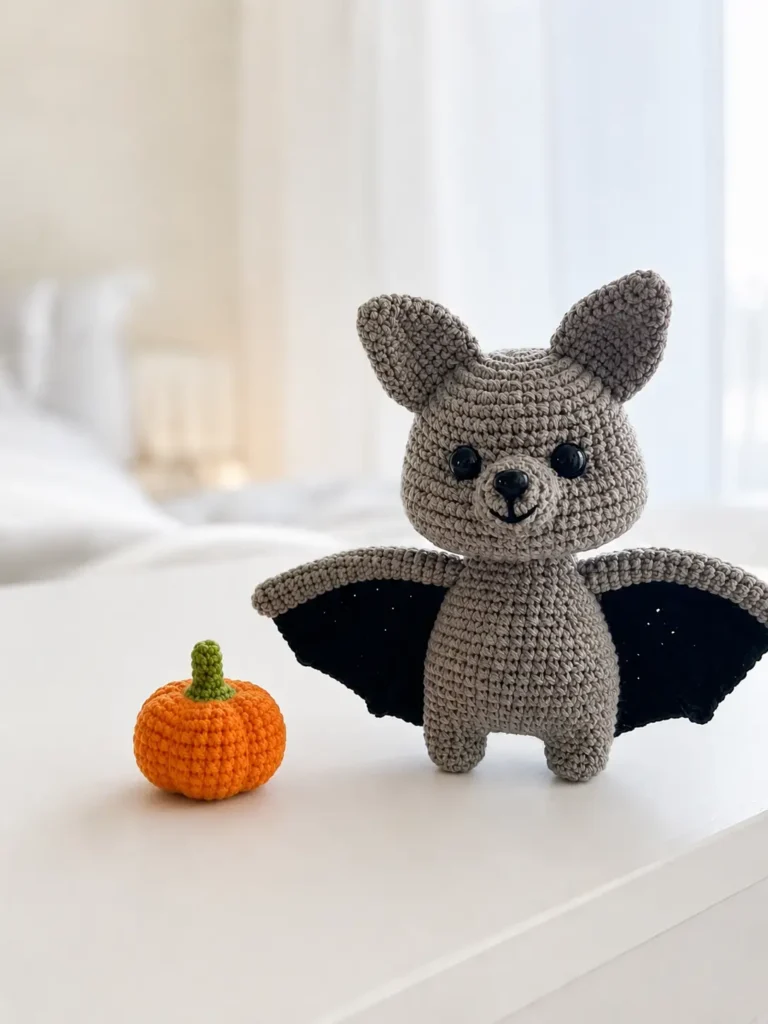
This Boo the Bat amigurumi free pattern came together over one of my favorite spooky-season weekends — she’s got wire-braced wings that actually hold their shape, a soft round muzzle, and a little ribbed pumpkin she carries everywhere. I designed her with clean shaping and tight, dense fabric so no stuffing peeks through the seams. Every round below is counted and checked twice. Grab your hook and let’s get started.
📋 Pattern Quick Stats
- Difficulty: Advanced (estimated — not stated in source)
- Finished Size: 6 in (15 cm)
- Hook Size: 2.0mm steel hook (no direct US letter equivalent) for the bat; 1.75mm hook (no US letter equivalent) for the pumpkin
- Yarn Weight: Sport (2) / DK–Light Worsted (3)
- Techniques: magic ring, invisible decrease, wire armature, sewing multiple pieces, surface embroidery
- Estimated Time: 6-9 hours (estimated)
Materials for This Boo the Bat Amigurumi Free Pattern
Here’s everything you’ll need to bring Boo to life, gray fur and all:
- Gray and black yarn — cotton-acrylic blend, Sport (2) or DK/Light Worsted (3) weight. If you can’t find the exact brand from the original pattern, I like Drops Muskat, Paintbox Cotton DK, or Lion Brand 24/7 Cotton as easy substitutes.
- Orange and green yarn for the pumpkin, same weight category
- 2.0mm steel hook for the bat pieces (this is a fine steel hook size — it doesn’t have a direct US letter equivalent, so go by the millimeter measurement)
- 1.75mm hook for the pumpkin (also no US letter equivalent — another fine steel size)
- 10mm safety eyes
- 10×7mm safety nose
- Wire, for shaping the wings and arms
- Polyester stuffing
- Scissors and a tapestry needle
This pattern falls into the Sport (2) to DK/Light Worsted (3) range on the Craft Yarn Council yarn weight system, so any cotton-blend yarn in that category will substitute well.
⚠️ A quick safety note: Boo’s wings and arms are shaped with wire instead of stuffing, which gives them that lovely open, poseable look — but it also means she isn’t suitable as a toy for young children. I’d treat this one as a display piece or a gift for an older crafting friend. For more on toy safety guidelines, the U.S. Consumer Product Safety Commission has good general reference material.
Abbreviations Used in This Bat Amigurumi Pattern
| Abbreviation | Meaning |
|---|---|
| sc | single crochet |
| inc | increase |
| inv dec | invisible decrease |
| mr | magic ring |
| ch | chain |
| sl st | slip stitch |
| FO | fasten off |
Special Techniques for This Boo the Bat Amigurumi
Every piece of Boo starts with a magic ring, so if that’s new to you, take a look at our step-by-step magic ring tutorial before you start the head.
I always use the invisible decrease instead of a standard sc2tog on projects like this one — it keeps the shaping smooth with no visible gap. If you haven’t tried it yet, our invisible decrease tutorial walks through it clearly.
Since Boo has so many separate pieces — head, muzzle, ears, arms, wings, and a pumpkin — clean sewing really matters here. Our guide to sewing amigurumi parts together is worth a read before assembly.
Finally, because this pattern uses safety eyes, check out our tutorial on attaching safety eyes safely if you haven’t installed them before.
Boo the Bat Amigurumi Free Pattern
Head
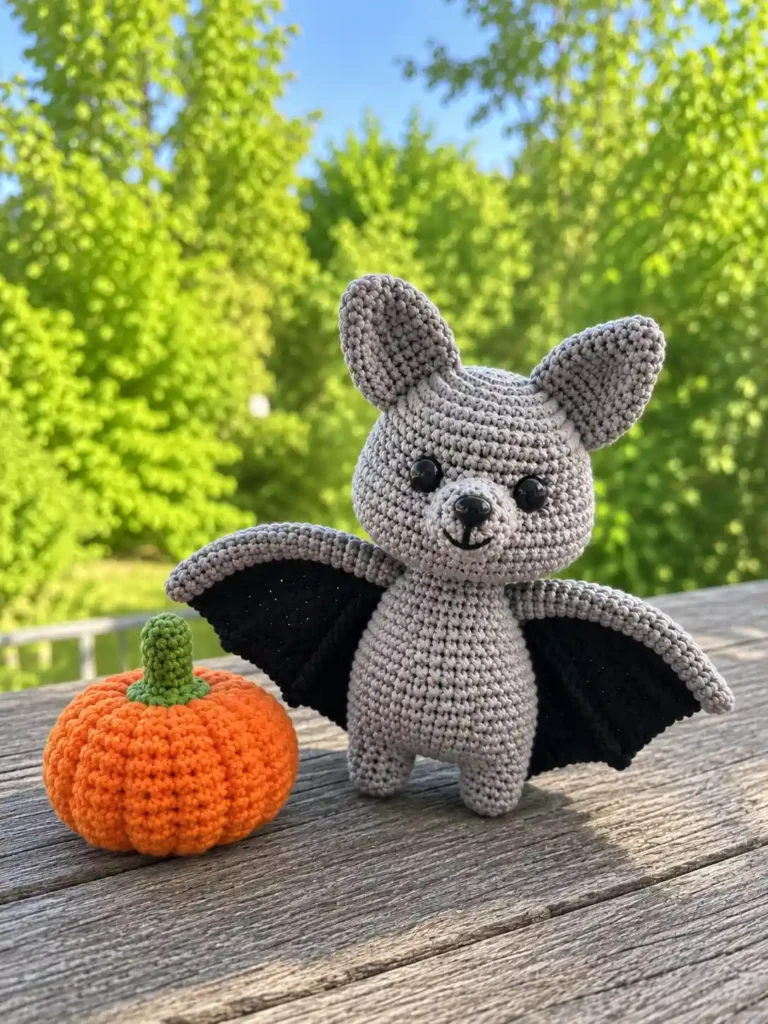
Yarn: gray Starting method: magic ring Makes: 1
Row 1: 6 sc in mr (6)
Row 2: 6 inc (12)
Row 3: 1 sc, inc (18)
Row 4: 2 sc, inc (24)
Row 5: 3 sc, inc (30)
Row 6: 4 sc, inc (36)
Row 7: 5 sc, inc (42)
Row 8: 6 sc, inc (48)
Rows 9-12: 48 sc (4 rows) (48)
Row 13: 14 sc, 6 inc, 8 sc, 6 inc, 14 sc (60)
Rows 14-18: 60 sc (5 rows) (60)
Row 19: 14 sc, 6 inv dec, 8 sc, 6 inv dec, 14 sc (48)
Row 20: 6 sc, inv dec (42)
Row 21: 5 sc, inv dec (36)
Row 22: 4 sc, inv dec (30)
Row 23: 3 sc, inv dec (24)
💡 Emma’s Tip: Insert the safety eyes between Rows 11 and 12, with 9 stitches between the two holes. Get this placement right before you keep crocheting — it’s much harder to adjust once the head is closed up.
Finishing: Cut the yarn, stuff the head firmly, and sculpt gentle indentations around the eyes for a more expressive face.
Muzzle
Yarn: gray Starting method: magic ring Makes: 1
Row 1: 6 sc in mr (6)
Row 2: 6 inc (12)
Row 3: 12 sc (12)
Row 4: 1 sc, inc (18)
Finishing: Leave a 6 in (15 cm) tail. Insert the safety nose, embroider the mouth and teeth, add a little stuffing, and sew the muzzle to the head.
Ears (make 2)
Yarn: gray Starting method: magic ring
Row 1: 6 sc in mr (6)
Row 2: 1 sc, inc ×3 times (9)
Row 3: 2 sc, inc ×3 times (12)
Row 4: 12 sc (12)
Row 5: 2 sc, inc ×4 times (16)
Row 6: 3 sc, inc ×4 times (20)
Rows 7-10: 20 sc (4 rows) (20)
Row 11: 3 sc, inv dec ×4 times (16)
Row 12: 16 sc (16)
Finishing: Leave an 8 in (20 cm) tail. Sew the ears symmetrically on either side of the muzzle — take your time lining them up before you commit to the stitches.
Legs (make 2)
Yarn: gray Starting method: magic ring
Row 1: 6 sc in mr (6)
Row 2: 6 inc (12)
Rows 3-4: 12 sc (2 rows) (12)
💡 Emma’s Tip: Crochet the second leg exactly the same way, but don’t cut the yarn at the end — you’ll flow straight into the body from there.
Body
Yarn: gray Starting method: chain from the second leg
Row 5: Ch 6 and join with a sl st to the second leg. Work 12 sc along that leg, then 6 sc along one side of the chain, then continue onto the first leg and work 12 sc, then 6 sc along the other side of the chain (36)
Row 6: 12 sc, 1 sc, inc ×3 times, 12 sc, 1 sc, inc ×3 times (42)
Rows 7-16: 42 sc (10 rows) (42)
Row 17: 5 sc, inv dec (36)
Rows 18-19: 36 sc (2 rows) (36)
Row 20: 4 sc, inv dec (30)
Rows 21-22: 30 sc (2 rows) (30)
Row 23: 3 sc, inv dec (24)
Rows 24-25: 24 sc (2 rows) (24)
Finishing: Leave an 8-10 in (20-25 cm) tail for sewing the head on. Stuff the body firmly as you close it up.
Arms (make 2)
Yarn: gray Starting method: magic ring
Row 1: 6 sc in mr (6)
Row 2: 1 sc, inc ×3 times (9)
Rows 3-5: 9 sc (3 rows) (9)
Row 6: inv dec, 7 sc (8)
Rows 7-20: 8 sc (14 rows) (8)
💡 Emma’s Tip: Insert wire instead of stuffing in the arms. This is what lets you pose Boo’s arms once she’s finished, but again — that wire means she’s a display piece, not a hand-me-down toy.
Finishing: Leave a 6 in (15 cm) tail and sew each arm to the body.
Wings (make 2, from 3 triangles each)
Yarn: black Starting method: chain, worked flat in turning rows
Foundation: Ch 7. Starting in the 2nd ch from hook, work in turning rows (6)
Row 1: 6 sc, ch 1 (6)
Row 2: 6 sc, ch 1 (6)
Row 3: 2 sc, inv dec, 2 sc, ch 1 (5)
Row 4: 5 sc, ch 1 (5)
Row 5: 2 sc, inv dec, 1 sc, ch 1 (4)
Row 6: 4 sc, ch 1 (4)
Row 7: 1 sc, inv dec, 1 sc, ch 1 (3)
Row 8: 3 sc, ch 1 (3)
Row 9: inv dec, 1 sc, ch 1 (2)
Row 10: 2 sc, ch 1 (2)
Row 11: inv dec (1)
💡 Emma’s Tip: Make 3 of these triangles for each wing. Join them together by working 11 sc across the three pieces, then work sc around the entire perimeter of the joined wing, weaving in tails as you go rather than leaving them for later. When you reach the top point of the wing, work (1 sc, ch 3, 1 sc) into the same stitch for that little peaked rib detail.
Finishing: Sew one long side of each wing to an arm, and the other side to the body.
Pumpkin
Yarn: orange Starting method: magic ring
Row 1: 6 sc in mr (6)
Row 2: 6 inc (12)
Row 3: 1 sc, inc (18)
Row 4: 2 sc, inc (24)
Row 5: 3 sc, inc (30)
Row 6: 4 sc, inc (36)
Row 7: 5 sc, inc (42)
Rows 8-14: 42 sc (7 rows) (42)
Row 15: 5 sc, inv dec (36)
Row 16: 4 sc, inv dec (30)
Row 17: 3 sc, inv dec (24)
Row 18: 2 sc, inv dec (18)
Row 19: 1 sc, inv dec (12)
Row 20: 6 inv dec (6)
💡 Emma’s Tip: Don’t stuff the pumpkin too tightly — you want a little give for the rib-sculpting step. Leave a tail of about 10 in (25 cm), close the opening with a wide-eye needle, then run that same tail straight through the center from bottom to top, wrapping it around the outside to divide the sphere into 6 ribs. Hold the yarn in place with your finger as you pull each wrap snug.
Finishing: Fasten off, cut the yarn, and weave the ends in inside the piece.
Stem
Yarn: green Starting method: magic ring
Row 1: 7 sc in mr (7)
Rows 2-6: 7 sc (5 rows) (7)
Row 7: 7 inc (14)
Row 8: 7 sc (7)
💡 Emma’s Tip: Split your yarn plies in half with a thin needle before sewing this piece on — it makes the stitches nearly invisible against the pumpkin.
Finishing: Stuff the stem lightly, leave an 8 in (20 cm) tail, and sew it to the top of the pumpkin.
Assembly — Putting Boo the Bat Amigurumi Together
- Insert the safety nose into the muzzle, add a little stuffing, and sew it to the head.
- Sew the ears symmetrically on either side of the muzzle using the leftover 8 in (20 cm) tail.
- Form the body base by chaining 6 in Row 5 and joining with a sl st to the second leg, working around both legs and the chain as described above.
- Insert wire instead of stuffing into the arms, then sew each arm to the body using the leftover 6 in (15 cm) tail.
- Join the 3 wing triangles per side with 11 sc, work sc around the perimeter, and add the (1 sc, ch 3, 1 sc) detail at the top point. Sew one side of each wing to an arm and the other side to the body.
- Sew the head to the body using the leftover 8-10 in (20-25 cm) tail.
- Stuff the base of the stem and sew it to the pumpkin using the leftover 8 in (20 cm) tail.
Finishing & Details
Eyes: Insert the 10mm safety eyes between Rows 11 and 12 of the head, spacing them 9 stitches apart.
Eye sculpting: Once the head is stuffed, sculpt gentle indentations around each eye for definition.
Nose and mouth: Insert the 10×7mm safety nose into the muzzle, then embroider the mouth and a little row of teeth.
Pumpkin ribs: After closing the pumpkin with the leftover 10 in (25 cm) tail, wrap the yarn around the outside to create 6 sculpted ribs, as described in the pumpkin section above.
Emma’s Note
Boo took me longer than most of my patterns, mostly because of those three-triangle wings — but the first time I got them joined and posed just right, I knew she was worth every fiddly minute. If your tension runs tight like mine, the wire will hold its shape beautifully once the wings and arms are sewn on. Take your time with the pumpkin ribs; rushing that step is the one thing that can flatten the whole effect. Happy hooking, and happy haunting. 🧶🎃
FAQ
REPLACE WITH QUESTION 1
A cotton or cotton-acrylic blend yarn in Sport (2) or DK/Light Worsted (3) weight works best. Recommended brands include Drops Muskat, Paintbox Cotton DK, or Lion Brand 24/7 Cotton to achieve a tight, clean stitch definition so stuffing doesn’t show through.
How long does it take to crochet this bat amigurumi?
This advanced amigurumi pattern takes approximately 6 to 9 hours to complete, depending on your crochet speed and experience with sewing multiple small pieces and working with wire armatures.
Is this bat amigurumi pattern suitable for young children?
No, Boo the Bat is recommended as a decorative display piece or a gift for teens and adults. Because the wings and arms use craft wire armature for poseability instead of stuffing, it is not safe as a toy for young children.