Free Guardian Angel Amigurumi Pattern — Wings & Tiny Halo
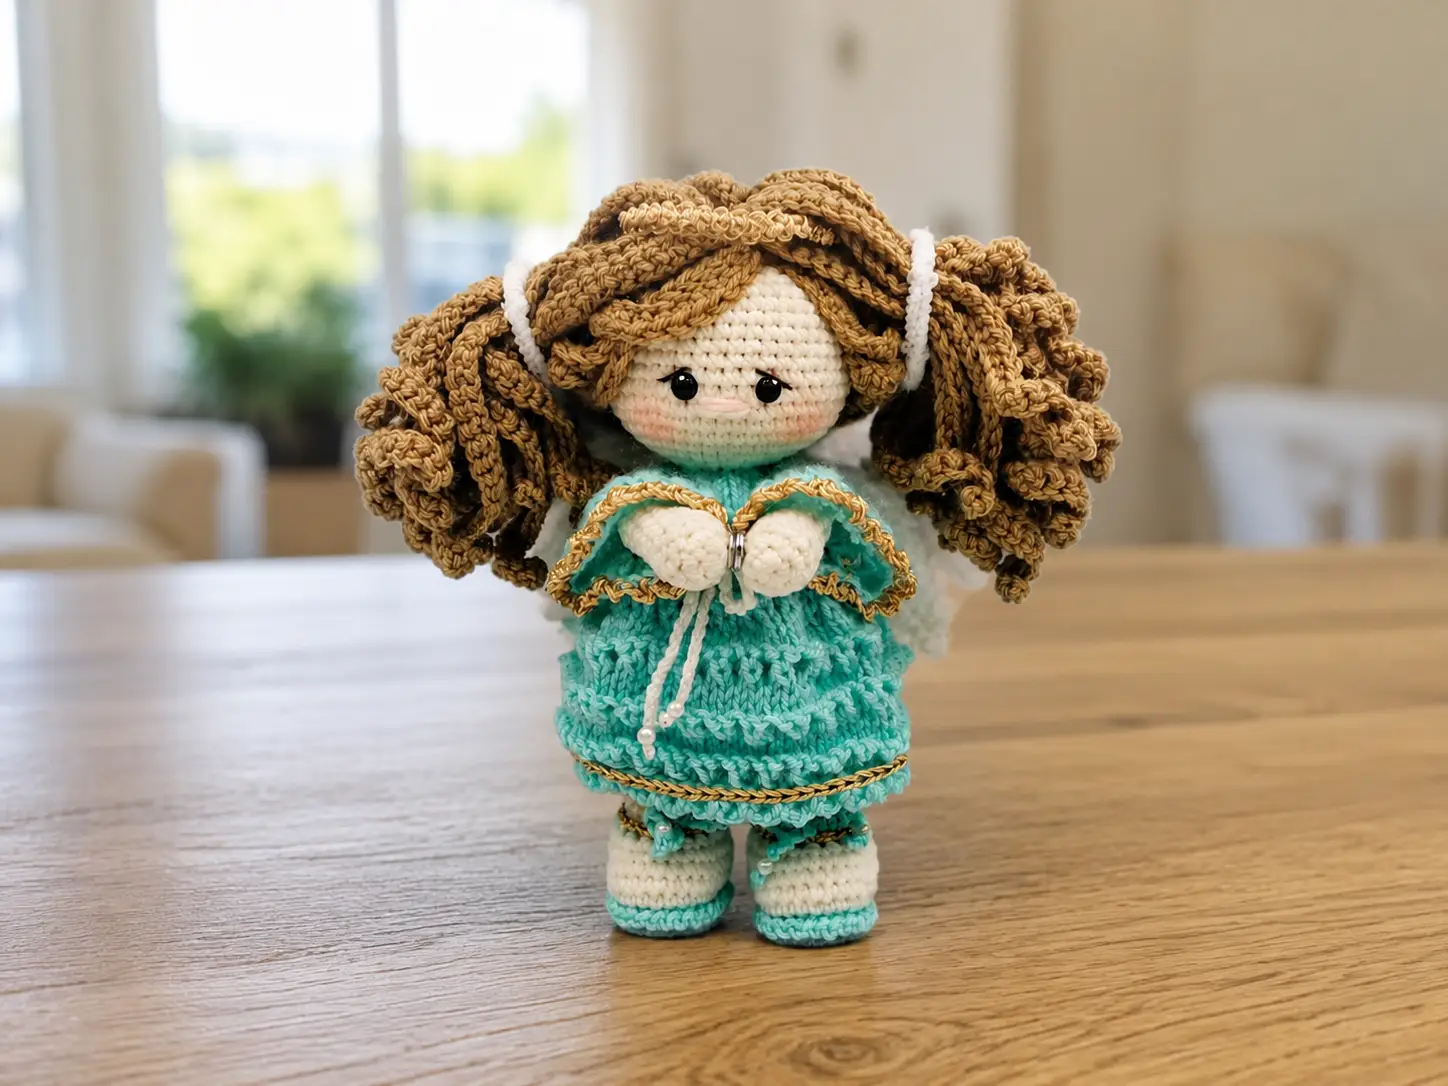
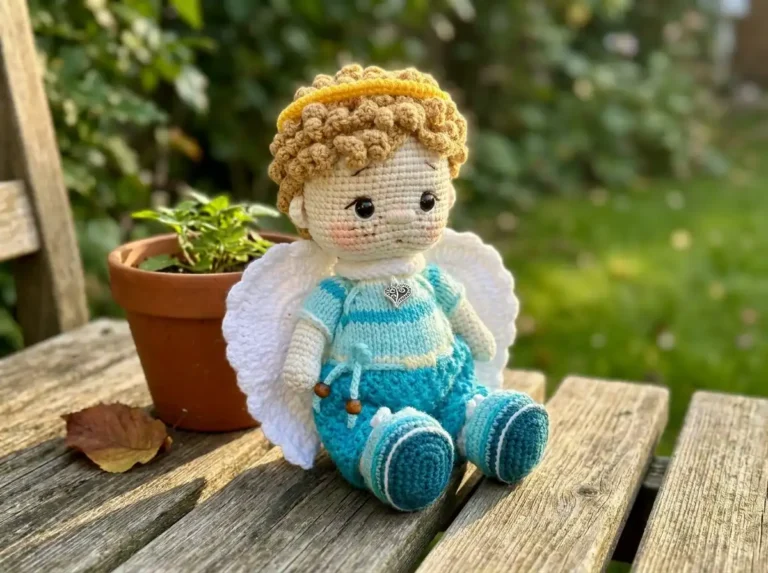
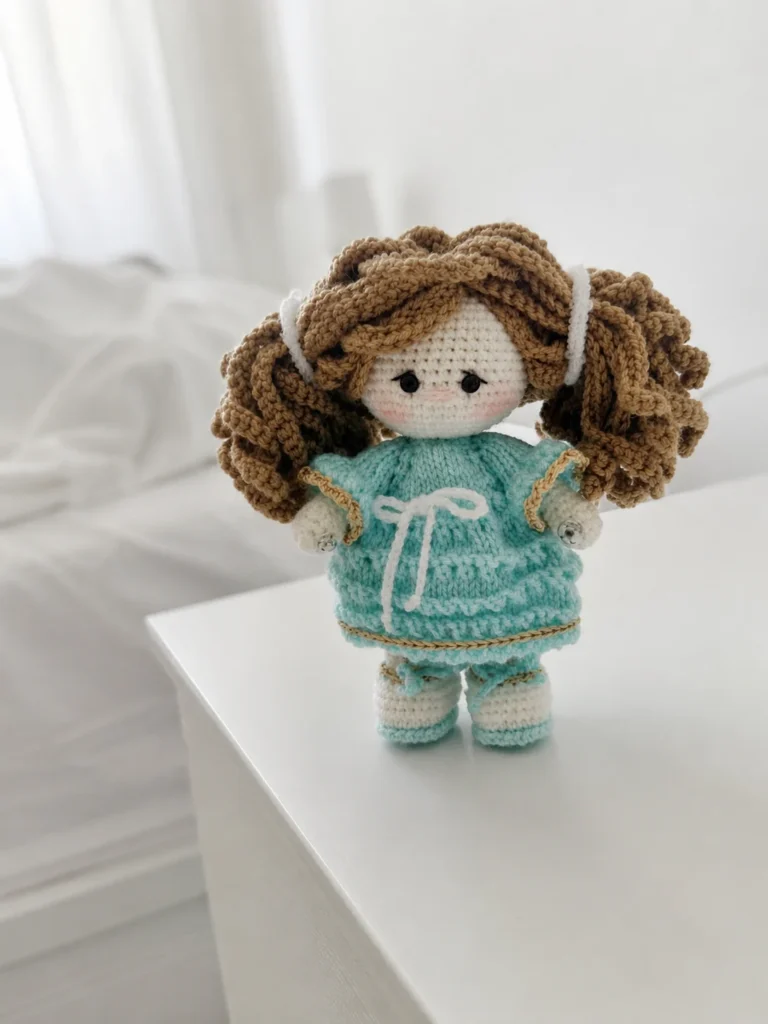
This guardian angel amigurumi free pattern brings to life a small, watchful figure with folded wings, a wisp of dark beige hair, and hands pressed together like she’s caught mid-thought. I named mine Halina before her wig was even sewn on — something about the tilt of her head made it feel wrong to call her anything else. If you’ve been waiting for a project that rewards patience with real personality, start here.
📖 Meet Halina
- 🌟 Personality: quiet, watchful, gentle
- 🎨 Color Palette: soft denim blue body, iceberg-white dress and shoes, dark beige wig, snow-white wings edged in cloud-soft trim, threaded through with silver metallic floss
- 📏 Size: 6 in
- 🪝 Hook: 1.9mm (no US letter equivalent), plus US 000 (1.5mm) knitting needles for the dress
- ⏱️ Time: 14-18 hours
- ✨ Signature Detail: a hand-knit dress with a lace-eyelet hem and a tiny embroidery-floss halo
- 💡 Difficulty: Advanced
What You’ll Need to Make Your Own Guardian Angel Amigurumi
Halina asks for two different crafts working side by side — a crochet body and a knit dress — so the materials list is a little longer than usual. Take your time gathering everything before you start; there’s something satisfying about laying it all out first, like setting a table before a meal.
- Body: YarnArt Jeans, color 03 (or a US alternative such as Drops Muskat or Paintbox Cotton DK) — DK / Light Worsted (3), a soft denim blue
- Wig: a novelty textured yarn in dark beige, DK / Light Worsted (3) weight — check your local yarn shop for a similar fluffy or bouclé-style yarn
- Dress and shoes: a novelty yarn in iceberg blue-white, DK / Light Worsted (3) weight, plus a small amount in plain white for shoe accents
- Wings: a smooth white DK / Light Worsted (3) cotton (or a US alternative such as Drops Safran or Paintbox Cotton DK) — the matte finish keeps the wings looking soft rather than shiny
- Wing edging: a fluffy or textured white yarn for the trim — this is what gives the wings their cloud-like edge
- Metallic embroidery floss — one skein, used for the halo and for delicate stitched accents on the shoes and dress
- Hook: 1.9mm (no US letter equivalent) for all crochet parts
- Knitting needles: US 000 (1.5mm) for the dress and sleeves
- Polyester fiberfill stuffing
- Sewing needle
- 5 small buttons (for the dress) + 1 button (for attaching the wings)
- A handful of small beads (for the shoe and dress ties)
✨ Sophie’s Note — a word on the small parts: Halina uses buttons, threaded beads, and a snap fastener, all of which are lovely details but genuine choking hazards for small children. If she’s headed for a nursery shelf rather than an adult collector’s shelf, consider embroidering the button and bead details instead, or reviewing the CPSC’s toy safety guidance before you finish her.
Abbreviations for This Guardian Angel Amigurumi Pattern
| Abbreviation | Meaning |
|---|---|
| mr | magic ring |
| ch | chain |
| st(s) | stitch(es) |
| sc | single crochet |
| inc | increase (2 sc in one stitch) |
| inv dec | invisible decrease |
| sl st | slip stitch |
| FO | fasten off |
| BLO | back loop only |
| FLO | front loop only |
| k | knit |
| p | purl |
| yo | yarn over |
| k2tog | knit 2 together |
Before the Story Begins — Technique Notes
Halina starts the way every one of my characters does: with a magic ring. It’s such a small, quiet beginning for something that ends up with this much personality — a closed loop, and then suddenly a leg, an arm, a whole small person taking shape from it.
Every decrease in the crochet parts of this pattern has been worked as an invisible decrease rather than the standard sc2tog the original pattern called for. The stitch counts are unchanged throughout — this is purely a substitution in method, done to keep Halina’s shaping smooth instead of gapped, especially around her face and the delicate wing edges.
And because there’s a lot of stuffing ahead — legs, body, head, arms, all of it — it’s worth reading through our stuffing guide before you begin, especially the part about adding it gradually. Halina’s proportions depend on it; too much too fast in the body and she loses that slightly delicate look that suits her.
One more thing before you start: this pattern asks you to set the hook down partway through and pick up a pair of knitting needles for the dress. If it’s been a while since you’ve knit anything, don’t rush that section. The eyelet pattern looks intricate, but it’s really just a small rhythm repeated — yarn over, knit, yarn over — and it becomes easy to read once you’ve done a row or two.
Guardian Angel Amigurumi Pattern — Legs, Body, and Head
All parts are crocheted in a spiral through both loops unless otherwise stated. Yarn: soft denim blue body color, held throughout.
Legs (make 1, worked as a pair joined at the top)
Starting method: Ch 7
Row 1: starting from the second ch from hook, inc, 4 sc, 4 sc in the last ch, along the other side of the ch 4 sc, inc (16)
Row 2: 2 inc, 4 sc, 4 inc, 4 sc, 2 inc (24)
Row 3: BLO 24 sc (24)
Row 4: 24 sc (24)
Row 5: 8 sc, 4 inv dec, 8 sc (20)
Row 6: 6 sc, 4 inv dec, 6 sc (16)
Row 7: 6 sc, 2 inv dec, 6 sc (14)
Rows 8-17: 14 sc (14)
✨ Sophie’s Note: Stuff each leg after rows 7 and 17. Crochet the second leg the same way, but don’t cut the yarn this time — you’ll use it to join the two legs into the body directly.
✨ Sophie’s Note — the join, corrected: The original instructions bring the two legs together with a chain of 4 and continue straight into the body, but the stitch count that produces doesn’t line up with the first body round as written. Rather than quietly fix it, here’s exactly what changed: joining the legs (14 sts + 4 ch-sts + 14 sts) gives you 32 stitches to start the body — not the 36 the source pattern assumed. I recalculated Body Row 1 below so the increase distribution starts from the real 32-stitch count and still lands correctly on 39, matching every row after it exactly. Nothing past Row 1 needed to change.
To join: place the legs straight side by side, ch 4, attach to the second leg, 14 sc along the leg, 4 sc along the ch, 14 sc along the other leg (32). Continue directly into the body — numbering starts fresh from Row 1 below.
Body
Row 1: (4 sc, inc)*4, (3 sc, inc)*3 (39)
Rows 2-6: 39 sc (39)
Row 7: (11 sc, inv dec)*3 (36)
Row 8: 36 sc (36)
Row 9: (10 sc, inv dec)*3 (33)
Row 10: 33 sc (33)
Row 11: (9 sc, inv dec)*3 (30)
Row 12: 30 sc (30)
Row 13: (8 sc, inv dec)*3 (27)
Row 14: 27 sc (27)
Row 15: (7 sc, inv dec)*3 (24)
Row 16: 24 sc (24)
Row 17: (4 sc, inv dec)*4 (20)
Row 18: (2 sc, inv dec)*5 (15)
Row 19: (3 sc, inv dec)*3 (12)
Rows 20-21: 12 sc (12)
✨ Sophie’s Note: Keep feeding in stuffing as you go here — don’t wait until the body’s closed off. This is the part where she starts to have a shape you can hold in one hand, and it’s worth pausing to notice it.
Head
Row 22: 12 inc (24)
Row 23: (3 sc, inc)*6 (30)
Row 24: 2 sc, inc, (4 sc, inc)*5, 2 sc (36)
Row 25: (5 sc, inc)*6 (42)
Row 26: 3 sc, inc, (6 sc, inc)*5, 3 sc (48)
Rows 27-36: 48 sc (48)
Row 37: 3 sc, inv dec, (6 sc, inv dec)*5, 3 sc (42)
Row 38: (5 sc, inv dec)*6 (36)
Row 39: 2 sc, inv dec, (4 sc, inv dec)*5, 2 sc (30)
Row 40: (3 sc, inv dec)*6 (24)
✨ Sophie’s Note: Add the last of the stuffing after this row, while there’s still an opening big enough to work through comfortably. Once the head starts closing in, it’s much harder to adjust.
Row 41: 1 sc, inv dec, (2 sc, inv dec)*5, 1 sc (18)
Row 42: (1 sc, inv dec)*6 (12)
Row 43: 6 inv dec (6)
Finish with a sl st, close the opening, FO, and weave in the tail.
Arms (make 2)
Starting method: 6 sc in mr
Row 1: 6 sc in mr (6)
Row 2: 6 inc (12)
Rows 3-5: 12 sc (12)
Row 6: (4 sc, inv dec)*2 (10)
Rows 7-18: 10 sc (10)
Row 19: (1 sc, inv dec)*3, 1 sc (7)
Stuff after rows 6 and 18. Finish with a sl st, close the opening, FO.
The Wig
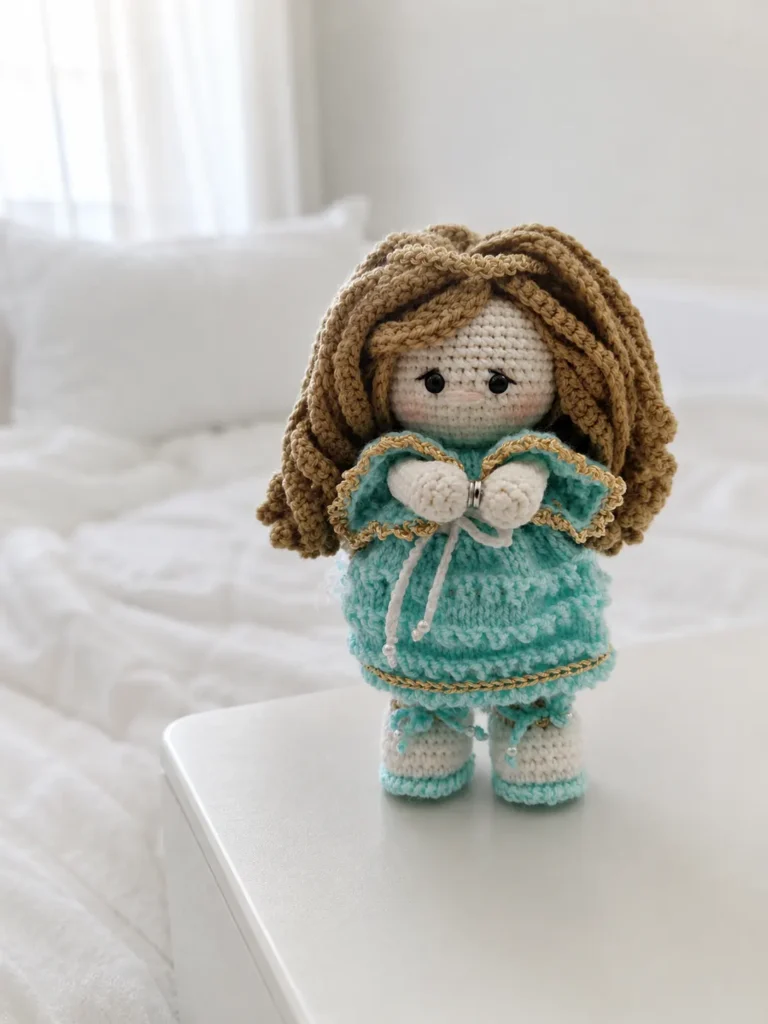
This is the part I find genuinely soothing — building hair one strand at a time, then arranging it until it falls the way you imagined it. Halina’s wig is crocheted as a small cap, and the “hair” itself is made of long chained loops, worked round after round until the whole crown is covered.
Starting method: mr, in dark beige
Row 1: 6 sc in mr (6)
Row 2: BLO 6 inc (12)
Row 3: (1 sc, inc)*6 (18)
Row 4: 1 sc, inc, (2 sc, inc)*5, 1 sc (24)
Row 5: (ch 35, from the second ch from hook 34 sl st, sl st in the next st) repeated to the end of the round (24 strands)
✨ Sophie’s Note: After Row 5, turn and crochet the next round in the opposite direction, working FLO: sl st, ch 35, 34 sl st back down the chain, sl st into the next stitch — repeat around, but this time skip a stitch between each strand so they land staggered against the first row, not stacked directly on top. For the very last round near the crown, go back to placing a strand in every stitch, so the coverage is denser right at the part line. FO when the crown is fully covered.
The Dress
This is the one part of Halina that doesn’t come from a hook at all — it comes from two knitting needles, and it’s worth slowing down for. The eyelet panels catch the light in a way crochet doesn’t quite manage, which is exactly why I left this section as knitting rather than trying to translate it into stitches it was never meant to be.
Cast on 22 sts (20 + 2 edge sts) on US 000 (1.5mm) needles, in iceberg blue-white. The first and last two stitches form the button band and are knit in every row; edge stitches aren’t counted separately below — slip the first stitch, purl the last.
Row 1: 20 k (20)
Row 2: 2 k, 16 p, yo, k2tog (buttonhole) (20)
Row 3: 2 k, 1 k, yo, k, yo, 3 k, yo, k, yo, 4 k, yo, k, yo, 3 k, yo, k, yo, 1 k, 2 k (28)
Row 4: 2 k, 24 p, 2 k (28)
Row 5: 2 k, 2 k, yo, k, yo, 5 k, yo, k, yo, 6 k, yo, k, yo, 5 k, yo, k, yo, 2 k, 2 k (36)
Row 6: 2 k, 32 p, 2 k (36)
Row 7: 2 k, 3 k, yo, k, yo, 7 k, yo, k, yo, 8 k, yo, k, yo, 7 k, yo, k, yo, 3 k, 2 k (44)
Row 8: 2 k, 40 p, 2 k (44)
Row 9: 2 k, 4 k, yo, k, yo, 9 k, yo, k, yo, 10 k, yo, k, yo, 9 k, yo, k, yo, 4 k, 2 k (52)
Row 10: 2 k, 48 p, yo, k2tog (buttonhole) (52)
Row 11 (start): 2 k, 6 k, then set the remaining stitches aside and knit the sleeve separately (sleeve split)
Sleeve (make 2, worked inside Row 11 of the dress)
Row 1: 10 k, 1 p (edge stitch — edge stitches aren’t mentioned again after this) (11)
Row 2: 9 p (11)
Row 3: (1 k, then knit 3 stitches from 1: k, yo, k)*4, 1 k (19)
Row 4: 17 p (19)
Row 5: (1 k, yo)*16, 1 k (35)
Row 6: 33 p (35)
Row 7: (k2tog, yo)*16, 1 k (35)
Row 8: 33 k (35)
Bind off, but don’t cut the yarn. Fold the sleeve in half and sew it closed with your 1.9mm hook and matching yarn. Transfer the remaining loop back to your needle and pick the dress row 11 back up.
Continuing the Dress
Row 11 (cont.): 14 k, then knit the second sleeve the same way as the first, then finish the row: 6 k, 2 k (32)
Row 12: 2 k, 28 p, 2 k (32)
Row 13: 2 k, (1 k, yo)*28, 2 k (60)
Row 14: 2 k, 56 p, 2 k (60)
Rows 15-16: 2 k, 56 k, 2 k (60)
Row 17: 2 k, (k2tog, yo)*28, 2 k (60)
Row 18: 2 k, 56 p, yo, k2tog (buttonhole) (60)
Row 19: 2 k, 56 k, 2 k (60)
Row 20: 2 k, 56 p, 2 k (60)
Rows 21-22: 2 k, 56 k, 2 k (60)
Row 23: 2 k, (k2tog, yo)*28, 2 k (60)
Row 24: 2 k, 56 p, 2 k (60)
Row 25: 2 k, 56 k, 2 k (60)
Row 26: 2 k, 56 p, yo, k2tog (buttonhole) (60)
Rows 27-28: 2 k, 56 k, 2 k (60)
Row 29: 2 k, (k2tog, yo)*28, 2 k (60)
Row 30: 2 k, 56 p, 2 k (60)
Row 31: 2 k, 56 k, 2 k (60)
Row 32: 2 k, 56 p, 2 k (60)
Row 33: 2 k, 56 k, 2 k (60)
Row 34: 2 k, 56 k, yo, k2tog (buttonhole) (60)
Row 35: 2 k, (k2tog, yo)*28, 2 k (60)
Row 36: 2 k, 56 p, 2 k (60)
Bind off all stitches but don’t cut the yarn. Switch to your 1.9mm hook and crochet the hem FLO: (ch 3, skip 1 st, sl st) repeated to the end of the row, then FO. Attach the metallic embroidery floss to the bottom of each sleeve and repeat the same edging: (ch 3, skip 1 st, sl st) to the end, FO. Finally, attach the metallic floss to the remaining back loops along the hem (hold the dress with the hem facing you) and crochet one row of sl st all the way around. FO.
The Wings
Starting method: Ch 17, worked in turning rows, in white cotton
Row 1: from the second ch from hook, 11 sc, inc, 2 sc, inc, 1 sc, ch 1, turn (18)
Row 2: 18 sc, ch 1, turn (18)
Row 3: inc, 15 sc, ch 1, turn (17)
Row 4: inv dec, 15 sc, ch 1, turn (16)
Row 5: inc, 13 sc, ch 1, turn (15)
Row 6: inv dec, 13 sc, ch 1, turn (14)
Row 7: inv dec, 10 sc, ch 1, turn (11)
Row 8: inv dec, 9 sc, ch 1, turn (10)
Row 9: inv dec, 6 sc, ch 1, turn (7)
Row 10: inv dec, 5 sc, ch 1, turn (6)
Row 11: inv dec, 2 sc, inv dec (4)
Attach your fluffy white trim yarn and crochet a row of sc around the whole wing edge, working 3 sc into a single stitch at each pointed tip. FO. Crochet the second wing the same way, but work the edging round in the opposite direction so the two wings mirror each other rather than matching. Sew the two wings together at their base before setting them aside for assembly.
The Shoes (make 2)
Starting method: Ch 7, in iceberg blue-white
Row 1: starting from the second ch from hook, inc, 4 sc, 4 sc in the last ch, along the other side of the ch 4 sc, inc (16)
Row 2: 2 inc, 4 sc, 4 inc, 4 sc, 2 inc (24)
Row 3: (1 sc, inc)*2, 4 sc, (1 sc, inc)*4, 4 sc, (1 sc, inc)*2 (32)
Row 4: BLO 32 sc [switch to white] (32)
Rows 5-7: 32 sc [white] (32)
Row 8: 4 sc, 12 inv dec, 4 sc [white] (20)
FO, cut the yarn. Reattach the iceberg blue-white yarn to the FLO left behind in Row 4, at the back, and crochet around the sole: (ch, sl st) repeated to the end. FO. Attach the same yarn to the front of the shoe, at the center, leaving a 10 in tail (this becomes a tie), then crochet around the upper edge with sl st worked BLO. When you reach the start, cut a long tail again, bring it through to the right side, and chain a tie. Repeat at the other side. Thread a bead onto each tie end. Attach the metallic floss at the back of the shoe to the remaining loops and crochet one row of sl st, then FO. Repeat everything for the second shoe.
Outfit & Accessories
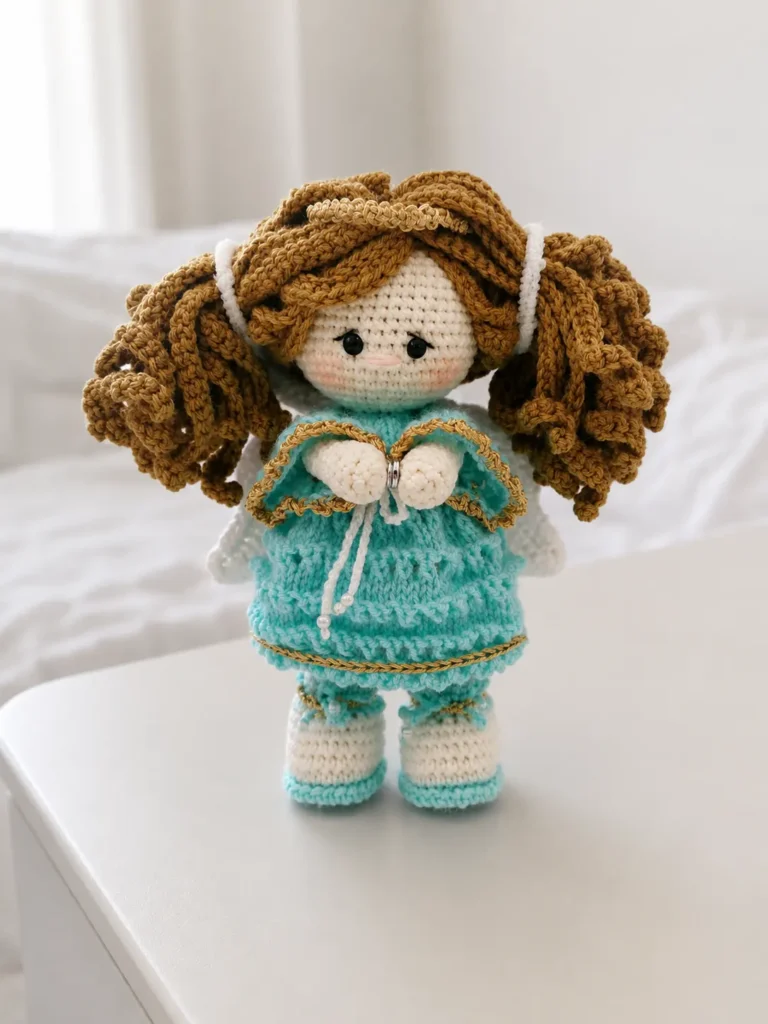
Halina’s whole outfit is what turns her from “a small crocheted person” into someone specific — the dress with its eyelet bodice, the paired shoes with their beaded ties, the wings that make it clear who she is even before you’ve seen her face. None of it is optional in the way an accessory sometimes is; it’s woven into the character.
The dress ties at the shoulders through a set of buttons and beads, which means the wings become removable in the same motion — thread the wing-tie through the button loop at Row 13 of the dress and she’s assembled; slide it free and she isn’t. If you’d rather she stay wingless some days and winged on others, this construction already lets you do that without any modification.
The halo is the smallest piece and somehow the one that finishes her. A short length of i-cord in metallic floss, joined into a circle and set just under the top layer of hair — it catches the light differently depending on how she’s angled on the shelf, which I did not expect and now love completely.
Assembly
- Attach the arms to the body with a thread or button joint, so they can move slightly at the shoulder.
- Sew the wig onto the head. Line up the crown of the wig with the center of the head and pin it in place before sewing. Arrange the first (bottom) row of hair strands where you’d like them and sew or glue them down, then arrange the second row in the gaps between the first, staggered rather than stacked, and secure the same way. Leave the very last strands near the crown unsewn, so the part has some natural movement.
- Crochet a chain of 100 ch. Thread it through a button, then thread the wings onto the same chain. Pass the whole tie through the buttonholes at Row 13 of the dress, thread a bead onto each end, and tie it off — this is what holds both the dress closure and the wings in place at once.
- Sew the 5 buttons onto the front of the dress, spaced along the button band.
- For the halo, take the metallic embroidery floss and crochet an i-cord about 5.5-6 in long. Join the ends into a circle and sew it into place on the head, tucked just under the top layer of hair strands.
- Sew a small snap fastener onto the inside of the arms so her hands rest together in front of her, palm to palm.
Meet Halina
Meet Halina. She sits with her hands folded in front of her, wings settled at her back, and that little wisp of a halo catching the light whenever it moves. There’s a stillness to her that I didn’t plan for — it just happened, somewhere around the moment I set the wings down and stepped back to look. That’s the strange part about finishing a piece like this: one day it’s stitches and stuffing, and then suddenly it’s someone, sitting quietly, waiting to be given a name. Give yours one. Put her somewhere calm — a windowsill, a nightstand, a shelf near where you fall asleep. She’s the kind of thing that suits quiet corners. 🧶
FAQ
How long does it take to crochet this guardian angel amigurumi?
This advanced pattern takes approximately 14 to 18 hours to complete due to the detailed crochet body and the hand-knit dress.
What yarn is best for this angel pattern?
We recommend a DK or Light Worsted (3) weight yarn. Use a soft cotton blend like YarnArt Jeans for the body, and smooth cotton for the wings to maintain a soft look.
Are there safety concerns if making this amigurumi for a child?
Yes, the pattern uses small buttons and beads which are potential choking hazards. If making this for a small child, we recommend embroidering the details instead.