Nemo Amigurumi Free Pattern — Easy Crochet Clownfish Plush
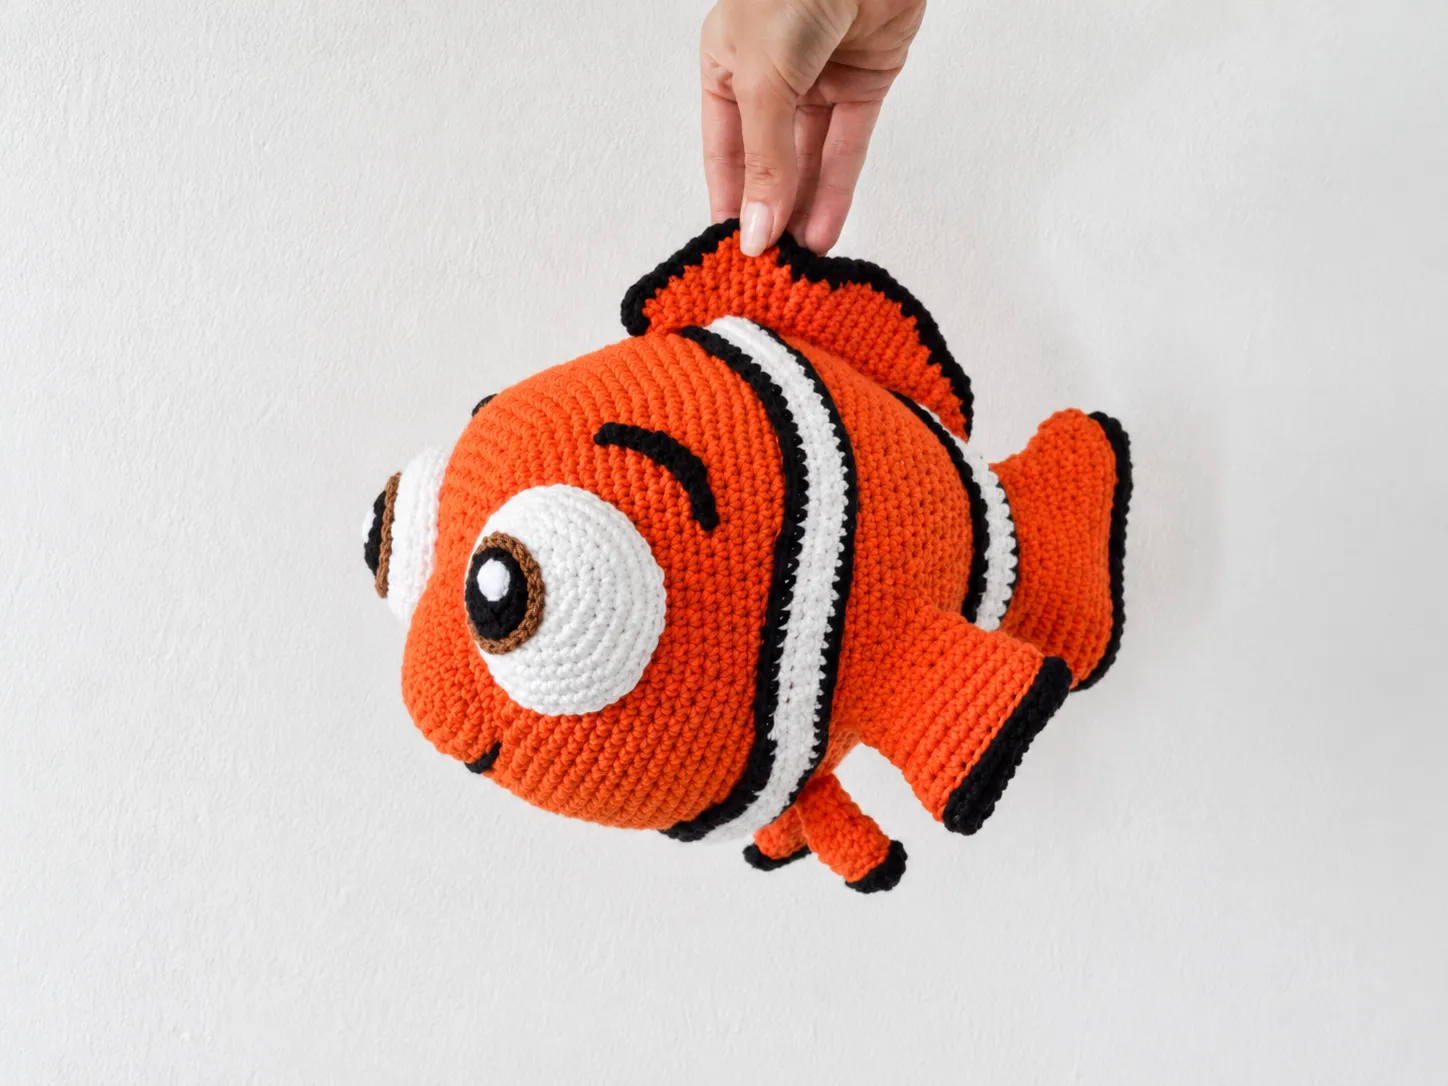
If you’ve been hunting for a nemo amigurumi free pattern that actually looks like everyone’s favorite little orange fish, stop scrolling — this is it. The whole fish in this nemo amigurumi free pattern is one big squishy piece made of nothing but single crochet, increases, and decreases. No scary stitches — just simple rounds, bold stripes, and a face full of personality. Grab your hook and let’s make a fish.
🧶 Why You’ll Love This Pattern
- ⭐ Difficulty: EASY — it’s just sc, inc, and dec. Honestly.
- ⏱️ Time: 8–10 hours — a cozy weekend project (he’s a BIG fish!)
- 🪡 Sewing: Standard — the fins and face details are sewn on. Stay with me, I’ll get you through it.
- 🧵 Yarn: Sport weight cotton blend — crisp stitches, bold colors
- 💰 Yarn needed: Roughly 2 skeins of orange, plus scraps of white, black, and brown
Here’s the thing — the finished fish is about 10.6 in tall and 7.9 in wide. That’s not a keychain. That’s a full-on huggable plush with serious couch presence. And the best part? Almost the entire thing is one continuous piece. You crochet a big satisfying ball of orange, add a tail and some fins, give him a face, and suddenly there’s a movie star sitting in your lap.
What You Need for This Nemo Amigurumi Free Pattern
- Yarn: A Sport (2) weight cotton blend (55% cotton, about 174 yds per 1.75 oz skein, 12 WPI) in four colors:
- Orange — the base color (this is most of your fish)
- White — stripes and eyes
- Black — stripe, outlines, tips of the fins and tail, eyebrows, pupils
- Brown — the iris
- Hook: 3.0mm (approx. US D/3)
- Stuffing: Cotton batting or polyester fiberfill — Poly-Fil works great, and it’s at Joann, Michaels, or Hobby Lobby
- Tools: Tapestry needle, sewing needle and thread, pins, scissors
Honestly? Don’t stress about finding the exact yarn. Any sport weight cotton blend will do the job — you can browse Ravelry to find one that’s easy to get near you. As long as your orange, white, black, and brown are all the same weight, your fish will turn out great. Don’t overthink it.
Abbreviations
| Abbreviation | What It Means |
|---|---|
| mr | magic ring — an adjustable loop that pulls closed so there’s no hole in the middle |
| ch | chain |
| sl st | slip stitch — used to join or finish an edge |
| sc | single crochet — the only real stitch you need for this whole fish |
| inc | increase — work 2 single crochets into the same stitch |
| dec | decrease — crochet 2 stitches together into 1 |
| inc*3 | increase (3 sets of 2 in 1) |
| dec*3 | decrease (3 sets of 2 into 1) |
| BLO | back loop only — work into just the back loop of each stitch |
When you see inc*2, inc*5, or inc*6, it’s the same idea — that many increases in a row. Same goes for dec*2. See? Not so scary.
Beginner Tips Before You Dive In
1. The magic ring sounds fancy, but it’s really just a loop. Almost every piece of this fish starts with one. If you’ve never made one, our magic ring tutorial walks you through it in under two minutes — then you’re set for life.
2. Use a stitch marker. Seriously. The body grows to 85 stitches per round, and you do NOT want to count that from scratch. Clip a marker into the first stitch of every round, move it up as you go, and thank yourself later.
3. The fins start black and switch to orange in the back loops. That BLO color change is what gives the fins their crisp black edge — it looks super polished and it’s genuinely easy. If color changes make you nervous, our guide to changing colors seamlessly has your back.
Nemo Amigurumi Free Pattern — Step-by-Step Instructions
Everything is worked in continuous rounds unless a row says otherwise. Copy the stitch counts at the end of each row — they’re your best friends for staying on track. You’ve got this.
Head / Body (make 1)
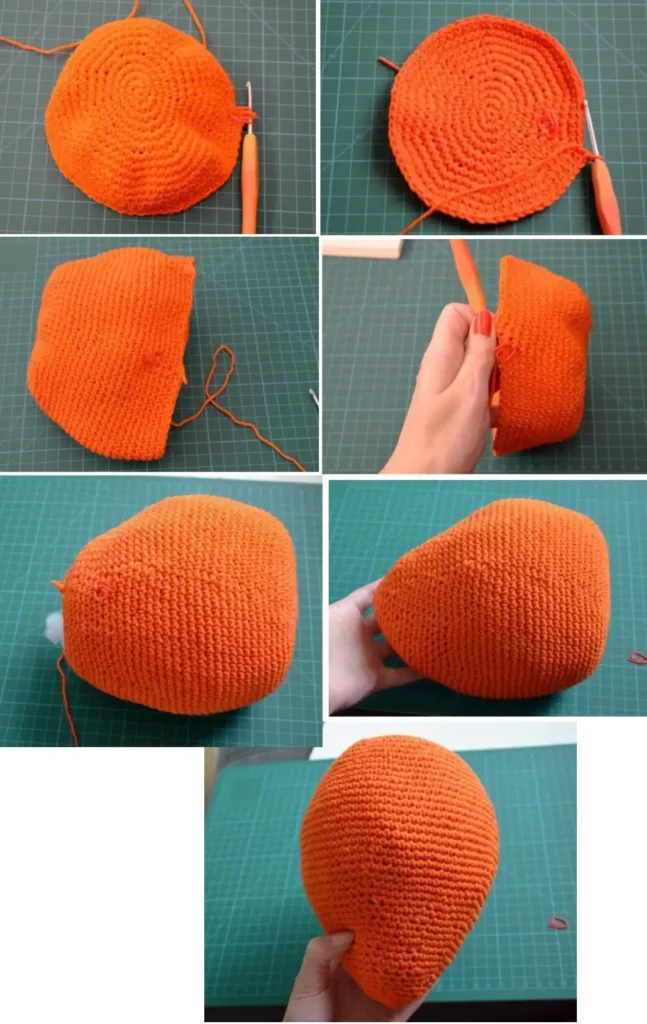
Color: orange · Start: magic ring
Row 1: 6 sc in mr (6)
Row 2: (3 sc in 1, inc, 3 sc) ×2 (18)
Row 3: sc, inc*3, 3 sc, inc*3, 2 sc (18)
Row 4: 3 sc, inc*3, 6 sc, inc*3, 3 sc (24)
Row 5: 5 sc, inc*3, 9 sc, inc*3, 4 sc (30)
Row 6: (2 sc, inc) ×10 (40)
Row 7: (3 sc, inc) ×10 (50)
Row 8: (4 sc, inc) ×10 (60)
Row 9: (5 sc, inc) ×10 (70)
Rows 10-14: 70 sc (5 rows) (70)
Row 15: (13 sc, inc) ×5 (75)
Row 16: 75 sc (75)
Row 17: (14 sc, inc) ×5 (80)
Rows 18-19: 80 sc (2 rows) (80)
Row 20: (15 sc, inc) ×5 (85)
Rows 21-25: 85 sc (5 rows) (85)
Row 26: (15 sc, dec) ×5 (80)
Row 27: 80 sc (80)
Row 28: (14 sc, dec) ×5 (75)
Row 29: 75 sc (75)
Row 30: (13 sc, dec) ×5 (70)
Row 31: 70 sc (70)
Row 32: (5 sc, dec) ×10 (60)
Row 33: 60 sc (60)
Row 34: (4 sc, dec) ×10 (50)
Rows 35-37: 50 sc (3 rows) (50)
Row 38: (3 sc, dec) ×10 (40)
Rows 39-40: 40 sc (40)
Row 41: (2 sc, dec) ×10 (30)
Row 42: 30 sc (30)
Row 43: (3 sc, dec) ×6 (24)
Row 44: 24 sc (24)
Row 45: (2 sc, dec) ×6 (18)
Row 46: 18 sc (18)
Row 47: (sc, dec) ×6 (12)
Row 48: 6 dec (6)
Row 49: Fasten off
🧸 Stuffing time: Stuff with filler after Row 42, then squeeze in a little more after Row 46. Pack it in firmer than feels polite — a well-stuffed fish holds his shape way better.
Finishing: Close the opening and finish.
🎉 You just finished the biggest piece! Honestly, that body is the whole marathon — everything from here on is small, fast, and fun. One evening of little pieces and you’re basically done. Keep going!
Pupil (make 2)
Color: black · Start: magic ring
Row 1: 5 sc in mr (5)
Row 2: inc*5 (10)
Row 3: (inc, sc) ×5 (15)
Finishing: sl st, finish.
Eye (make 2)
Color: white · Start: magic ring
Row 1: 6 sc in mr (6)
Row 2: inc*6 (12)
Row 3: (sc, inc) ×6 (18)
Row 4: (2 sc, inc) ×6 (24)
Row 5: (3 sc, inc) ×6 (30)
Row 6: (2 sc, inc) ×10 (40)
Row 7: 40 sc (40)
Row 8: 39 sc, sl st (40)
Finishing: Finish.
Iris (make 2)
Color: brown · Start: chain
Row 1: 21 ch (21)
Finishing: Finish.
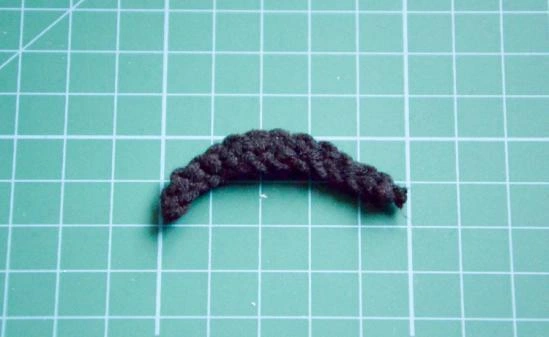
Eyebrow (make 2)
Color: black · Start: chain
Row 1: 13 ch (13)
Row 2: 4 sl st, 4 sc, 4 sl st (12)
Finishing: Finish.
Nose (make 1)
Color: orange · Start: magic ring
Row 1: 6 sc in mr (6)
Row 2: inc*6 (12)
Row 3: (2 sc, inc*2) X3 (24)
Row 4: 3 sc, inc*2, 4 sc, inc*2, 4 sc, inc*2, sc (24)
Row 5: 4 sc, inc*2, 6 sc, inc*2, 6 sc, inc*2, 2 sc (30)
Row 6: 5 sc, inc*2, 8 sc, inc*2, 8 sc, inc*2, 3 sc (36)
Row 7: 35 sc, sl st (36)
Finishing: Finish.
Mouth (make 1)
Color: black · Start: chain
Row 1: 12 ch (12)
Finishing: Finish.
🎉 Face pieces: done! See? That wasn’t so bad. Now for my favorite part — the tail and fins with those sharp black edges. This is where he really starts looking like a movie star.
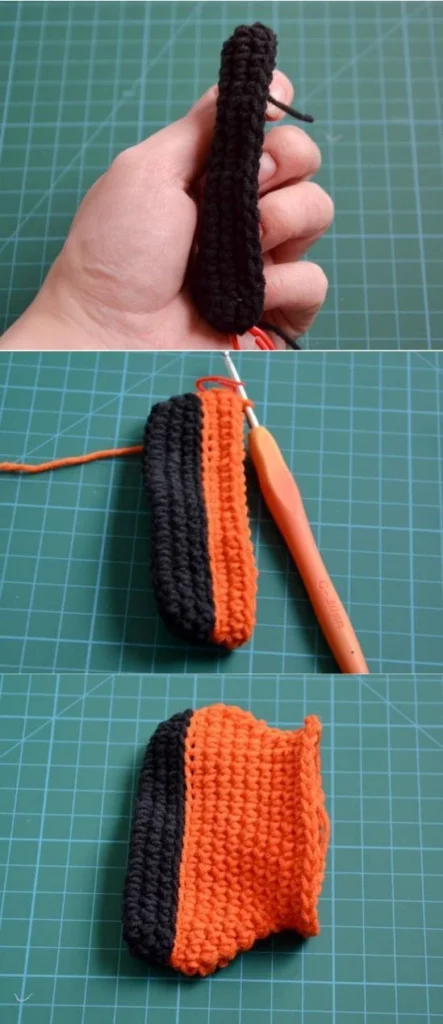
Tail (make 1)
Colors: black, then orange · Start: chain
Row 1: 20 ch (20)
Row 2: 19 sc on one side of chain and 19 sc on the other side (38)
Row 3: inc, 17 sc, inc*2, 17 sc, inc (42)
Row 4: 41 sc, sl st (42)
Row 5: 42 sc in BLO [orange] (42)
Row 6: 42 sc in BLO (42)
Row 7: 42 sc (42)
Row 8: dec, 17 sc, dec*2, 17 sc, dec (38)
Row 9: dec, 15 sc, dec*2, 15 sc, dec (34)
Row 10: dec, 13 sc, dec*2, 13 sc, dec (30)
Row 11: dec, 11 sc, dec*2, 11 sc, dec (26)
Rows 12-13: 26 sc (2 rows) (26)
Row 14: (inc, 3 sc, inc, 3 sc, inc, 3 sc, inc) ×2, sl st (36)
Finishing: Finish.
Middle Fin (make 1)
Colors: black, then orange · Start: chain
Row 1: 12 ch (12)
Row 2: 11 sc on one side of chain and 11 sc on the other side (22)
Row 3: 21 sc, sl st (22)
Row 4: 22 sc in BLO [orange] (22)
Row 5: 22 sc in BLO (22)
Row 6: sc, dec, 9 sc, dec, 8 sc (20)
Row 7: sc, dec, 8 sc, dec, 7 sc (18)
Row 8: dec, 7 sc, dec, 7 sc (16)
Row 9: 16 sc (16)
Row 10: dec, 6 sc, dec, 6 sc (14)
Row 11: (inc, 2 sc, inc, 2 sc, inc) ×2, sl st (23)
Finishing: Finish.
Large Fin (make 1)
Colors: black, then orange · Start: chain
Row 1: 15 ch (15)
Row 2: 14 sc on one side of chain and 14 sc on the other side (28)
Row 3: 27 sc, sl st (28)
Row 4: 28 sc in BLO [orange] (28)
Row 5: 28 sc in BLO (28)
Row 6: sc, dec, 12 sc, dec, 11 sc (26)
Row 7: dec, 11 sc, dec, 11 sc (24)
Row 8: dec, 10 sc, dec, 10 sc (22)
Row 9: dec, 9 sc, dec, 9 sc (20)
Row 10: 20 sc (20)
Row 11: dec, 8 sc, dec, 8 sc (18)
Row 12: dec, 7 sc, dec, 7 sc (16)
Row 13: (inc, 3 sc, inc, 2 sc, inc) ×2 (26)
Finishing: Finish.
Small Fin (make 2)
Colors: black, then orange · Start: chain
Row 1: 6 ch (6)
Row 2: 5 sc on one side of chain and 5 sc on the other side (10)
Row 3: 9 sc, sl st (10)
Row 4: 10 sc in BLO [orange] (10)
Row 5: 10 sc in BLO (10)
Finishing: Finish.
Assembly
Okay, real talk: this fish has a few pieces to sew on, and I’m the person who avoids sewing whenever humanly possible. But here’s the thing — every piece is flat and forgiving, and pins do most of the work for you. Pin everything before you sew a single stitch. Our guide to sewing amigurumi parts makes the whole process way less intimidating.
- Build the eyes first. Sew each black pupil onto a white eye, then frame it with the brown iris chain for that glossy cartoon-eye look.
- Pin the face. Place the eyes, eyebrows, nose, and mouth chain on the front of the body. Move them around until the expression makes you smile — then sew.
- Sew the dorsal fin on top of the body.
- Add the tail and side fins. Pin the tail at the back and the fins on the sides, check that everything looks balanced from the front, then stitch them on.
- Stripes: add the white stripes and black stripe details with your white and black yarn, using the classic clownfish look as your guide.
You Did It!
Look at that face. LOOK at it. You just crocheted a 10-inch clownfish, and if this was your first big amigurumi, you should be ridiculously proud of yourself. Every single round of that body was worth it. Tag us when you share him — I want to see every squishy orange version out there. 🧶
Still in a sea-creature mood? Keep the aquarium growing with our squishy flounder pattern or the pufferfish with spike needles — your fish needs friends.
FAQ
What yarn is best for this nemo amigurumi free pattern?
A sport (size 2) weight cotton blend yarn is ideal for crisp stitches and bold colors, though any similar weight yarn will work perfectly.
How long does it take to crochet this clownfish?
It takes approximately 8 to 10 hours to complete, making it a great cozy weekend crochet project.
Is this pattern suitable for beginners?
Yes! This pattern uses only simple single crochets, increases, and decreases, making it very beginner-friendly despite its large size.