Edelweiss Dragon Amigurumi Free Pattern
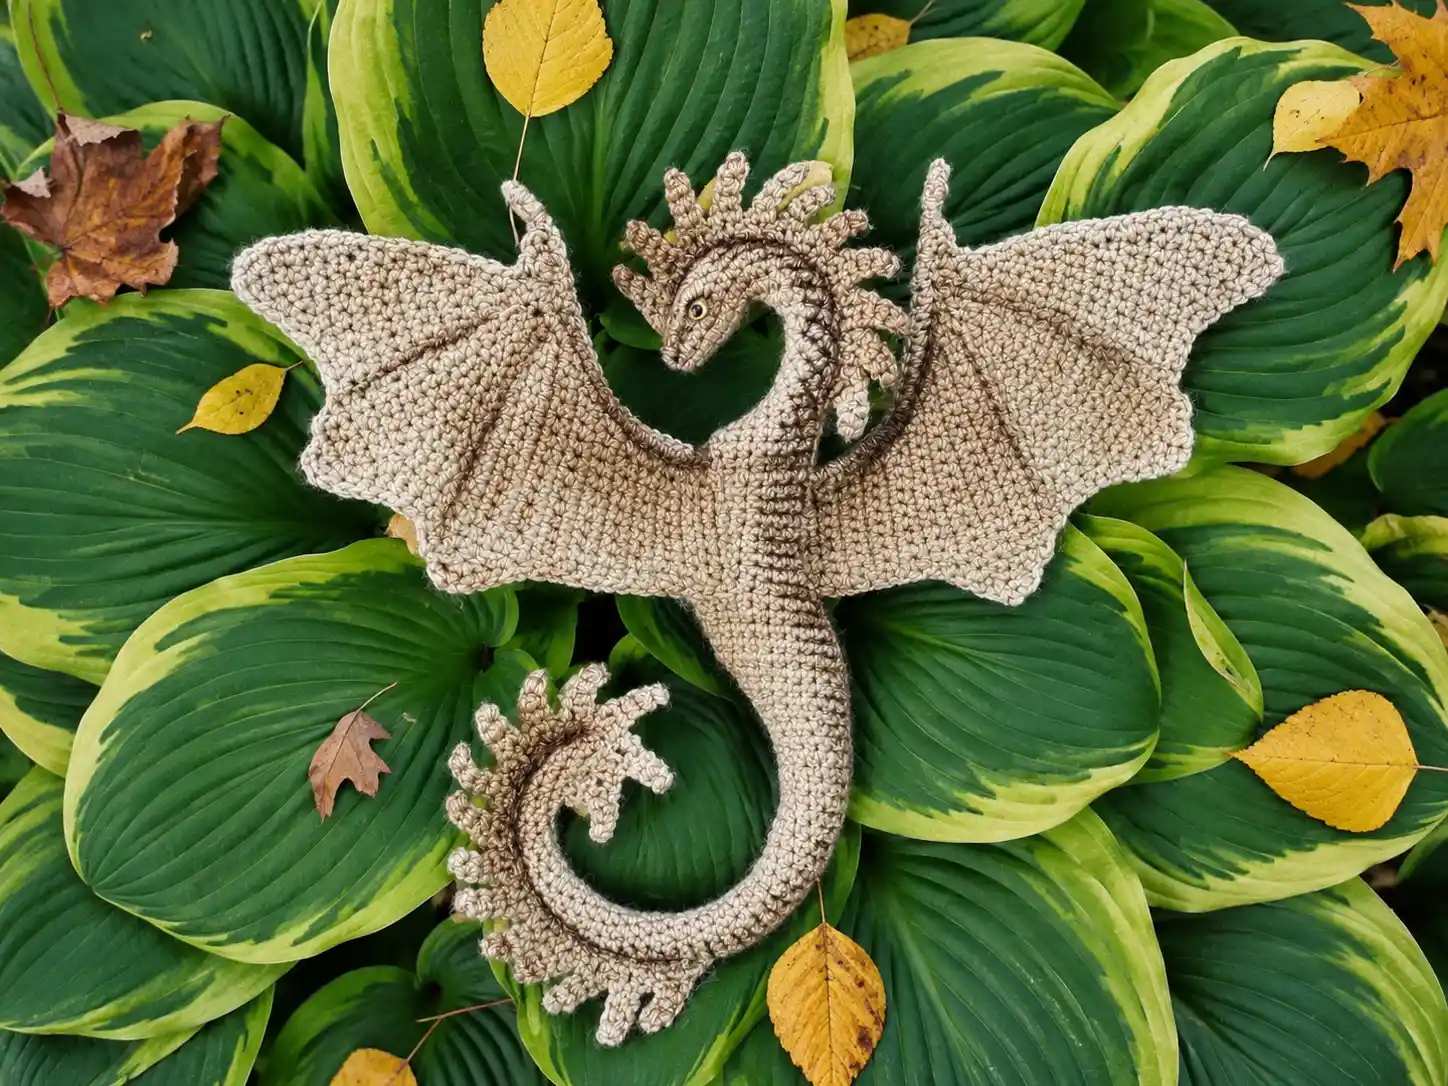
This edelweiss dragon amigurumi free pattern is one I keep coming back to when I want a project that actually asks something of me. She’s built on a wire armature with wings that fan out in real, poseable panels — not the flat kind that just get sewn flush to the body. I tested every shaping round on this one, and the curve of that long tail holds beautifully once you understand the marker trick. Set aside a quiet evening or two and let’s get into it.
📋 Pattern Quick Stats
- Difficulty: Advanced
- Finished Size: Not specified by the original designer — see editorial note below
- Hook Size: 1.5–1.75 mm (specialty steel/lace hook)
- Yarn Weight: Fingering (1), with a fine metallic lurex thread carried along
- Techniques: magic ring, invisible decrease, distributed shaping with stitch markers, wire armature, turning rows, surface embroidery
- Estimated Time: 10-14 hours
Materials for This Edelweiss Dragon Amigurumi Pattern
The original pattern calls for a Russian sparkle yarn that isn’t sold in the US, so here’s what I’d reach for instead:
- Yarn: A fingering-weight mercerized cotton or cotton-blend carried together with a fine metallic lurex thread. The original yardage is 160 m/50 g, which converts to roughly 175 yds per 1.75 oz skein — buy at least two skeins to be safe, since this pattern has a lot of surface area.
- Hook: 1.5–1.75 mm steel/lace hook. This is genuinely small — I like to keep a spare on hand because these hooks are easy to misplace.
- Copper armature wire, 2 mm cross-section (craft/floral wire in a comparable gauge works, available at Joann or Michaels).
- 6 mm half-round beads for the eyes, or 6 mm safety eyes with the locking posts snipped off for gluing.
- Strong gel glue or a hot glue gun.
- Polyester fiberfill for light stuffing.
- Two contrasting stitch markers — you’ll use one for the back and one for the belly, so pick colors you won’t mix up.
- Optional: watercolor pencils or watercolor paint, for tinting the scales and eyelids.
Your gauge on a hook this small will run tighter than most amigurumi — for a general sense of how fingering weight compares to the rest of the yarn family, the Craft Yarn Council yarn weight system is a good reference to keep bookmarked.
Abbreviations Used in This Dragon Amigurumi Pattern
| Abbreviation | Meaning |
|---|---|
| ch | chain |
| sl st | slip stitch |
| turning ch | turning chain |
| inc | increase (2 sc in same stitch) |
| inv dec | invisible decrease |
| sc | single crochet |
Special Techniques for This Edelweiss Dragon Amigurumi
If you’ve made a few amigurumi already, most of this will feel familiar, but a couple of things here are worth slowing down for.
The body starts, as almost everything I make does, with a magic ring. If that’s still new to you, our step-by-step magic ring tutorial walks through it slowly.
Every decrease in this pattern is worked as an invisible decrease rather than a standard sc2tog — that’s my house standard, and it’s what keeps this dragon’s spine and belly from showing gaps. If you haven’t used this method before, take a look at our invisible decrease tutorial before you start the body.
This pattern also uses a technique I don’t see often: distributed shaping. Instead of increasing or decreasing at a fixed point in the row, you place two contrasting stitch markers early on — one tracking the dragon’s back, one tracking her belly — right around the last increases of Row 4. From there, every shaping instruction tells you how many increases or decreases happen along each line, and you space the plain sc stitches around them however keeps the round even. It feels strange the first time, but the curve it produces is worth it. Take your time with this part; it’s the one place in the pattern where rushing will actually show in the finished shape.
After Row 21, you’ll insert a 35 cm length of the wire armature into the body before adding a light layer of stuffing — this is what lets the finished dragon hold a pose. Add stuffing gradually rather than all at once; our guide to stuffing amigurumi without lumps covers the technique.
Edelweiss Dragon Amigurumi Pattern — Body
Dragon Body (make 1)
Starting Method: magic ring
Row 1: 6 sc in mr (6)
Row 2: 1 sc, inc, 2 sc, inc, 1 sc (8)
Row 3: 2 sc, inc, 2 sc, inc, 2 sc (10)
Row 4: 2 sc, inc, 4 sc, inc, 2 sc (12)
💡 Emma’s Tip: This is the round where you place your two stitch markers. Look at where the two increases in this row landed — that’s your guide for the sides of the body. Mark one side for the back, the other for the belly, and use contrasting colors so you never lose track of which is which.
Rows 5-7: 12 sc (12)
Rows 8-10: 1 inv dec on the back, 1 inc on the belly, 9 sc (12)
Rows 11-14: 2 inv dec on the back, 2 inc on the belly, 6 sc (12)
Row 15: 2 inv dec on the back, 3 inc on the belly, 5 sc (13)
Row 16: 2 inv dec on the back, 3 inc on the belly, 6 sc (14)
Row 17: 2 inv dec on the back, 3 inc on the belly, 7 sc (15)
Row 18: 2 inv dec on the back, 3 inc on the belly, 8 sc (16)
Row 19: 2 inv dec on the back, 3 inc on the belly, 9 sc (17)
Row 20: 2 inv dec on the back, 3 inc on the belly, 10 sc (18)
Row 21: 2 inv dec on the back, 3 inc on the belly, 11 sc (19)
💡 Emma’s Tip: This is your moment to insert the wire. Cut a 35 cm length of the copper armature wire, bend both ends into small loops so nothing pokes through the fabric later, and feed it into the body now — it’s far easier before the piece narrows any further. Add a light layer of stuffing around it as you go; you don’t want this dragon dense, you want her flexible.
Row 22: 3 inc on the belly, 16 sc (22)
Rows 23-30: 22 sc (22)
Rows 31-39: 1 inv dec on the belly, 1 inc on the back, 19 sc (22)
Row 40: 3 inv dec on the belly, 16 sc (19)
Row 41: 3 inv dec on the belly, 13 sc (16)
Row 42: 3 inv dec on the belly, 10 sc (13)
Rows 43-46: 13 sc (13)
Row 47: 1 inv dec on the belly, 11 sc (12)
Rows 48-49: 12 sc (12)
💡 Emma’s Tip: From here down you’re shaping the tail, and the exact placement of each decrease in the round stops mattering — just avoid stacking them directly on top of the previous round’s decrease, or you’ll get a visible seam line running down the tail.
Row 50: 1 inv dec, 10 sc (11)
Rows 51-52: 11 sc (11)
Row 53: 1 inv dec, 9 sc (10)
Rows 54-56: 10 sc (10)
Row 57: 1 inv dec, 8 sc (9)
Rows 58-60: 9 sc (9)
Row 61: 1 inv dec, 7 sc (8)
Rows 62-72: 8 sc (8)
Row 73: 1 inv dec, 6 sc (7)
Rows 74-89: 7 sc (7)
Finishing: Continue with invisible decreases each round until the hole closes at the tip of the tail.
Head and Tail Crest (make 1)
Starting Method: chain foundation
Row 1: Chain 25. Work 6 sc along the chain. Chain 6, and starting from the 2nd loop from the hook, work 4 sc back along that little chain. Work 2 sc into the main chain, then chain 6 again and work 4 sc back along it the same way. Continue 2 sc into the main chain, then repeat the 6-chain picot all the way to the end of the foundation chain.
💡 Emma’s Tip: This one strip becomes both the head crest and the tail crest — you’re making it once and it serves double duty. Twenty-five chains gave a good length for the original design, but there’s nothing stopping you from adding a few extra chains if you’d like a longer crest running further down the spine.
Edelweiss Dragon Amigurumi Pattern — Wings (make 2)
Wings — Main Part
Starting Method: 8 ch + 2 turning ch, worked in turning rows
Rows 1-7: 8 sc (8)
Row 8: 1 inc, 7 sc (9)
Row 9: 8 sc, 1 inc (10)
Row 10: 1 inc, 9 sc (11)
Row 11: 10 sc, 1 inc (12)
Row 12: 1 inc, 11 sc (13)
Row 13: 12 sc, 1 inc (14)
Row 14: 1 inc, 13 sc (15)
Row 15: 14 sc, 1 inc (16)
Row 16: 1 inc, 15 sc (17)
Row 17: 16 sc, 1 inc (18)
💡 Emma’s Tip: Don’t forget the turning chain at the start of every row here — it’s easy to skip when you’re used to continuous amigurumi rounds. The piece only widens on one side, so keep an eye on which edge you’re increasing. Row 17 needs to end at the top point of the wing before you move on.
First Wing Wedge
Starting Method: continue from the top of the wing, working downward
Row 1: 2 ch, 1 sc, to the edge (1)
Row 2: To the edge, 1 inc (2)
Row 3: 2 sc, to the edge (2)
Row 4: To the edge, 2 inc (4)
Row 5: 4 sc, to the edge (4)
Row 6: To the edge, 1 sc, 1 inc, 1 sc, 1 inc (6)
Row 7: 6 sc, to the edge (6)
Row 8: To the edge, 2 sc, 1 inc, 3 sc (7)
Row 9: 7 sc, to the edge (7)
Row 10: To the edge, 3 sc, 1 inc, 3 sc (8)
Row 11: 8 sc, to the edge (8)
Row 12: To the edge, 8 sc (8)
Row 13: 4 sc, 1 inc, 3 sc, to the edge (9)
Row 14: To the edge, 9 sc (9)
Row 15: 9 sc, to the edge (9)
Row 16: To the edge, 9 sc (9)
Row 17: 9 sc, to the edge (9)
Row 18: To the edge, 9 sc (9)
💡 Emma’s Tip: “To the edge” means you’re anchoring into the already-finished main panel rather than turning with a chain — at the end of odd rows, attach into one of the 18 stitches along that panel’s edge, and at the start of even rows, attach into the edge instead of chaining up. It reads oddly the first time but becomes intuitive by row 6 or so.
Next Wing Wedge
Starting Method: 9 ch + 2 turning ch
Row 1: 9 sc, to the edge (9)
Row 2: To the edge, 9 sc (9)
Row 3: 1 inv dec, 7 sc, to the edge (8)
Row 4: To the edge, 8 sc (8)
Row 5: 8 sc, to the edge (8)
Row 6: To the edge, 6 sc, 1 inv dec (7)
Row 7: 7 sc, to the edge (7)
Row 8: To the edge, 7 sc (7)
Row 9: 1 inv dec, 5 sc, to the edge (6)
Row 10: To the edge, 6 sc (6)
Row 11: 1 inv dec, 4 sc, to the edge (5)
Row 12: To the edge, 3 sc, 1 inv dec (4)
Row 13: 1 inv dec, 2 sc, to the edge (3)
Row 14: To the edge, 3 sc (3)
Row 15: 3 sc, to the edge (3)
Row 16: To the edge, 1 sc, 1 inv dec (2)
Row 17: 2 sc, to the edge (2)
Row 18: To the edge, 1 inv dec (1)
💡 Emma’s Tip: This wedge works bottom to top instead of top to bottom, and now you’re attaching along the side of the first wedge at the level of every sc row rather than into a fixed 18-stitch edge. Go slowly on the first couple of rows until the rhythm clicks.
Wing Edging and Teeth — First Tooth
Starting Method: continue from the edge of the wing, without breaking the yarn
Row 1: 6 sc (6)
Row 2: 1 inv dec, 4 sc (5)
Row 3: 3 sc, 1 inv dec (4)
Row 4: 1 inv dec, 2 sc (3)
Row 5: 1 sc, 1 inv dec (2)
Row 6: 1 inv dec (1)
Without breaking the yarn, sc along the edge of the wing, moving downward. At the very bottom corner, work an increase to transition into the lower part of the wing.
Second Tooth
Starting Method: continue down along the edge of the tooth
Row 1: 6 sc (6)
Row 2: 1 inv dec, 2 sc, 1 inv dec (4)
Row 3: 2 inv dec (2)
Row 4: 1 inv dec (1)
💡 Emma’s Tip: Without breaking the yarn, sc along the edge of this tooth moving downward, then continue 9 sc along the lower part of the wing — 6 of those stitches belong to the second tooth. After you’ve worked 11 sc total, turn and begin the next tooth.
Third Tooth and Finishing Edging
Starting Method: continue down along the edge of the tooth
Row 1: 6 sc (6)
Row 2: 1 inv dec, 2 sc, 1 inv dec (4)
Row 3: 2 inv dec (2)
Row 4: 1 inv dec (1)
Move down again, working sc along the side of the tooth, then repeat the previous step: 9 sc, turn.
Finishing: Work sc along the entire remaining edge of the wing until you return to the starting point at the top. Then work two turning rows of 2 sc each, followed by a third row of 1 inv dec. Leave a long yarn tail for sewing.
Assembly of the Edelweiss Dragon Amigurumi
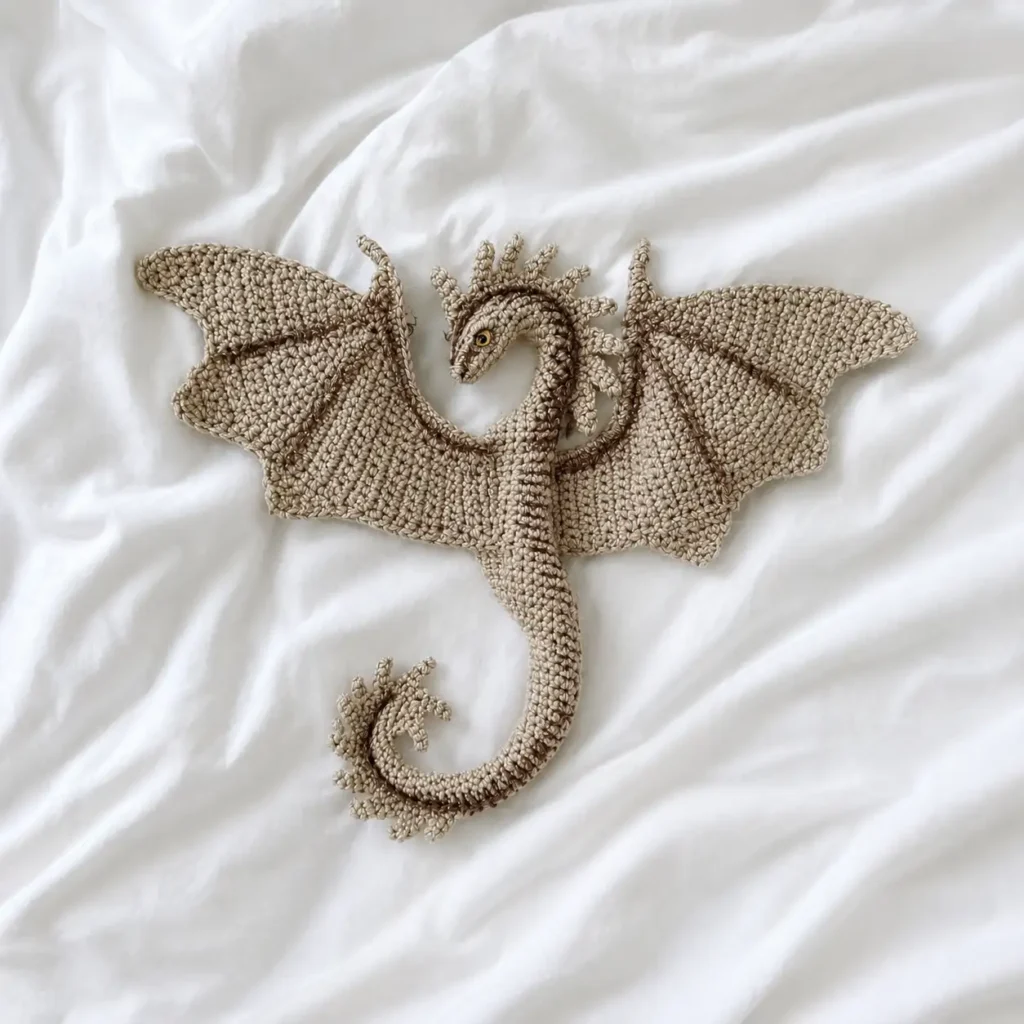
- Insert the wing wire into the body at a slight diagonal, matching the angle shown in the original reference photo.
- Sew the first wing on, then sew the second wing to the opposite side of the body at the same height, so the pair sits level.
- Attach the wings to the wire either by working very tight sc directly over it, or by sewing them on with a tapestry needle. Sewing over the wire twice adds density and fully hides it.
- Coat the exposed wire tip with strong gel glue, wrap it with thread to seal it, and bend the resulting point into a gentle “claw” curve.
- Pin the head and tail crest along the center of the dragon’s back, running from the head down to the tip of the tail, then sew it securely in place.
Finishing & Details
Glue the eyes in place using strong gel glue or a hot glue gun. Then embroider the eyelids: make 2-3 short stitches above each eye, and loosely wrap them together, catching just a little of the crocheted fabric underneath — keep the wrapping stitches loose rather than pulled tight. You can add a second wrapped row above the first, adding one more long stitch and catching the finished eyelid instead of the fabric this time. A lower eyelid can be added the same way, though it’s optional.
If you’d like, tint the inner edge of the eyelids with a colored pencil that matches (or black, if the eyes themselves are solid black), and add a touch of contrasting pencil under the eyelid and inside the nostril hollows for depth. A light, even tinting along the back can also give the impression of scales. If you’re using watercolors instead of pencil, work on a damp surface — wet the section you’re tinting with clean water first, then apply the paint; keep in mind the color will look more saturated wet than it will once it dries.
Emma’s Note
The distributed shaping on this body took me a couple of tries to get comfortable with, and I still double-check my markers every few rounds out of habit. What I love about the wire armature is that you can actually pose her — curled around a branch, wings half-open, whatever suits where she’ll live. If you enjoy the marker-based shaping here, our other dragon amigurumi pattern uses a similar approach and makes a nice companion piece once you’ve got the technique down. Take the wings slowly on your first pass — they look complicated on paper and make a lot more sense once you’re a few rows in. Happy hooking! 🧶
FAQ
What yarn is best for this edelweiss dragon amigurumi free pattern?
A fingering-weight mercerized cotton carried with a fine metallic lurex thread works best to replicate the beautiful shimmering scales of the original design.
Can beginners make this dragon pattern?
This is considered an advanced pattern because it uses distributed shaping, small hooks, turning rows, and a wire armature.
How do I make the dragon wings poseable?
The pattern uses 2 mm copper armature wire inserted into the body and attached directly to the crocheted wings, allowing you to bend and hold dynamic poses.