Free Crochet Classic Cartoon Mouse Pattern — Easy Amigurumi
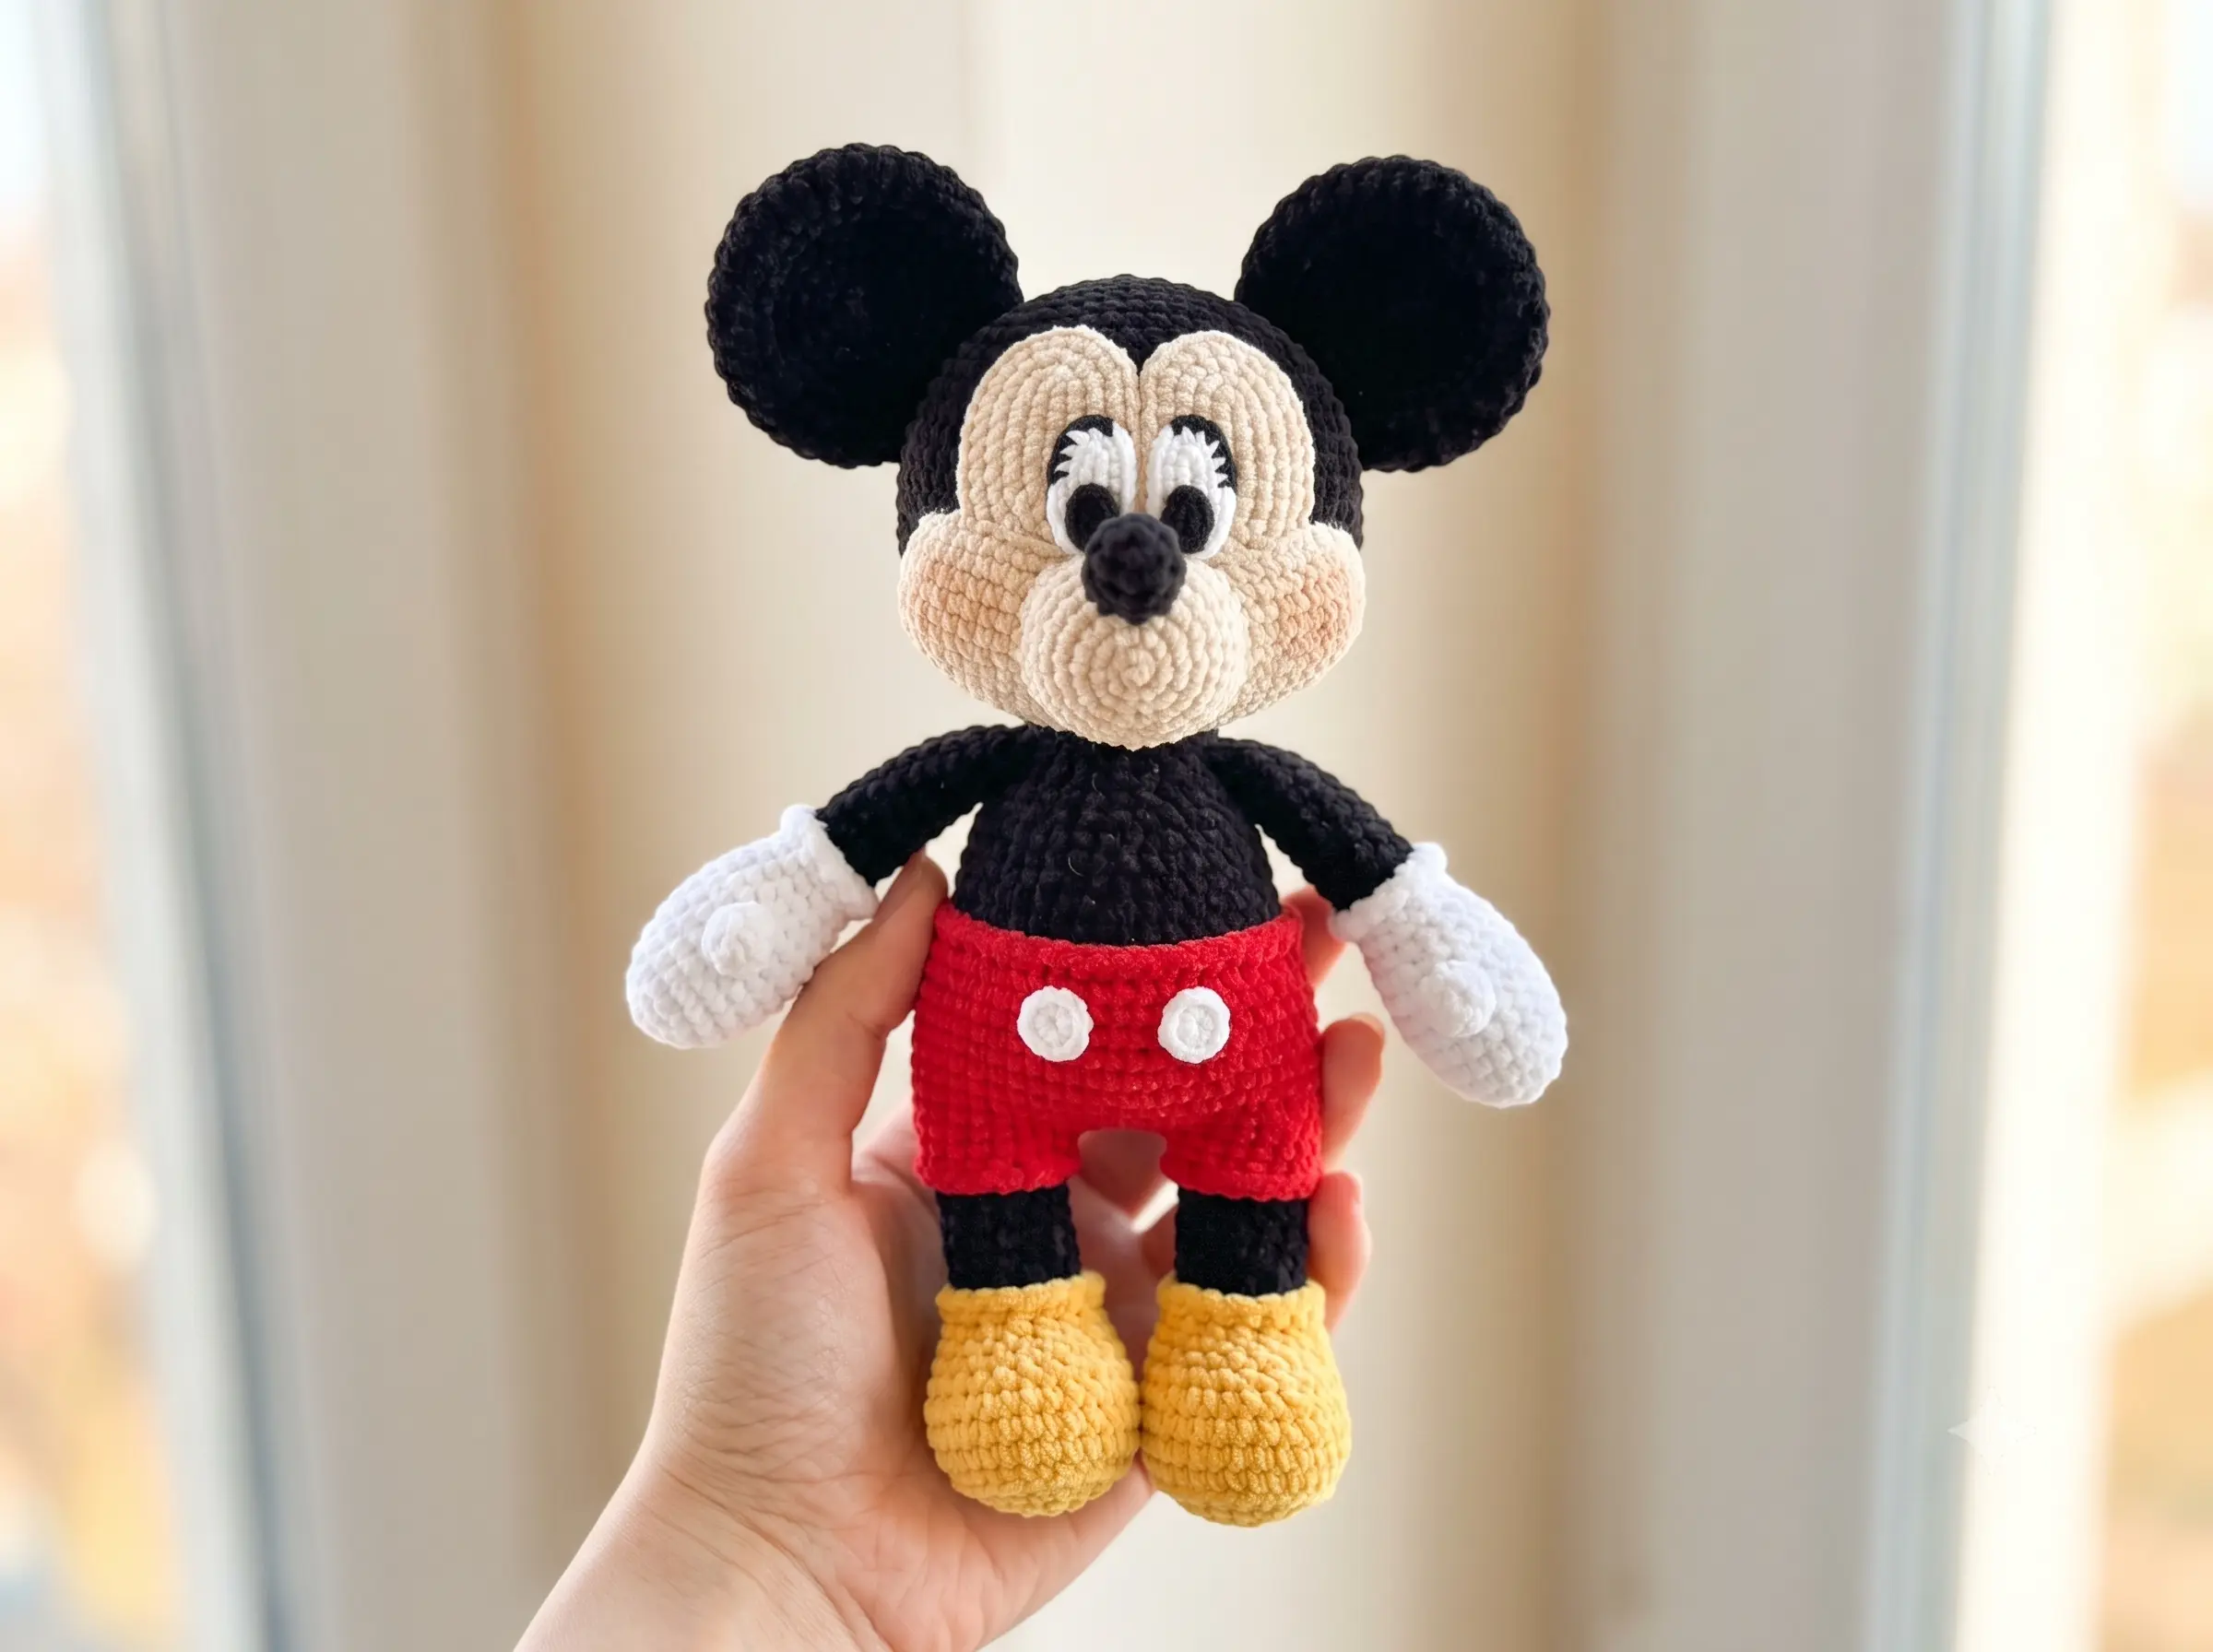
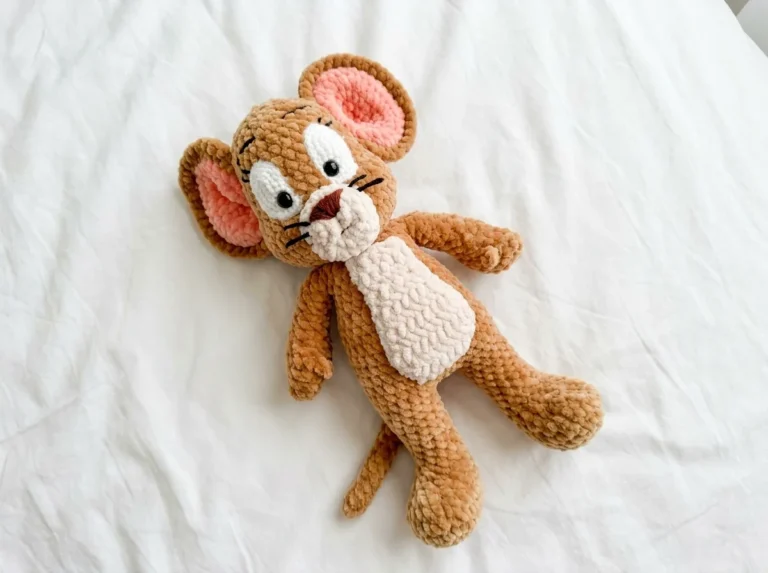
This crochet classic cartoon mouse pattern is the kind of project that makes you want to clear your whole weekend. Okay, real talk — it’s not a one-evening project like some of my other patterns, but every single piece is simple amigurumi shapes worked in familiar stitches. If I can do it, you definitely can. Grab your yarn in black, beige, white, yellow, and red, and let’s build this little guy piece by piece.
🧶 Why You’ll Love This Pattern
- ⭐ Difficulty: EASY-INTERMEDIATE (lots of pieces, but nothing tricky)
- ⏱️ Time: 4-6 hours — a cozy weekend project
- 🪡 Sewing: Standard — this one has several small parts to sew, but I’ll walk you through it
- 🧵 Yarn: Chunky velvet or chenille — soft, fast, and forgiving
- 💰 Yarn needed: Less than 1 skein of each color
Here’s the thing — I’m not going to pretend this is a no-sew pattern, because it isn’t. There are ears, arms, legs, eyes, and a muzzle to attach. But every single seam is simple, and I promise the payoff is worth it. Honestly? This is one of those patterns where the finished plush is SO much cuter than the process makes it sound.
Materials for This Crochet Classic Cartoon Mouse Pattern
- Black yarn — for the head, ears, arms (glove trim), and leg/pants details. A chunky velvet or chenille works beautifully here for that squishy plush look.
- Beige yarn — for the muzzle pieces and the under-eye pieces.
- White yarn — for the eyes and the glove-style arms.
- Yellow yarn — for the shoes.
- Red yarn — for the shorts/pants section of the body.
- Main hook: The original pattern doesn’t specify a main hook size, so match your hook to your yarn weight — for chunky chenille, something in the 4.0mm (US G/6) to 5.0mm range works great. This yarn falls into the Bulky (5) weight category, which is exactly why it works up so fast.
- Tiny detail hook: 1.3mm (no direct US letter equivalent — this is a small steel hook) for the eyes and nose only. Don’t panic — you’ll split your yarn into two thinner strands for these teeny pieces.
- Stuffing: Polyester fiberfill (Poly-Fil or similar), available at Joann, Michaels, or Hobby Lobby.
- Sewing pins — trust me, pin the muzzle and eyes before you commit to sewing. Future you will say thank you.
- Tapestry needle for assembly.
Don’t stress about matching yarn brands exactly — any worsted-to-bulky yarn in these five colors will get you a happy, huggable result.
Abbreviations Used in This Cartoon Mouse Amigurumi Pattern
| Abbreviation | What It Means |
|---|---|
| sc | single crochet — the basic stitch that makes up almost this entire pattern |
| inc | increase — work 2 single crochets into the same stitch to add width |
| dec | invisible decrease — insert your hook through the front loops of the next 2 stitches, then complete as one stitch. It keeps things smooth with no visible gap. |
| mr | magic ring — an adjustable starting loop that closes up tight, no hole in the middle |
| ch | chain — used to start the flat pieces, like the bottom of the muzzle |
| sl st | slip stitch — a tiny stitch used to join or finish off a round |
| BLO | back loop only — working into just the back loop of a stitch, used here for the shoe, pants, and glove trim details |
| dc | double crochet — used once, to make the little popcorn “thumb” on the hand |
Beginner Tips for This Crochet Classic Cartoon Mouse Pattern
Never made a magic ring before? No worries at all — our magic ring tutorial walks you through it in under two minutes, and once you’ve done it once you’ll wonder why it felt intimidating.
The “dec” you’ll see over and over is an invisible decrease. It sounds fancy, but it’s really just working through the front loops of two stitches at once — check out our invisible decrease guide if you want a visual walkthrough before you dive in.
This is a sewing-heavy pattern, so before you touch a needle, read through our guide to sewing amigurumi parts. Pinning everything in place first — especially the muzzle and eyes — makes the whole process so much less stressful.
Pattern: Crochet Classic Cartoon Mouse Amigurumi
Head (×1)
Yarn: Black | Starting Method: Magic ring
Row 1: 6 sc in mr (6)
Row 2: 6 inc (12)
Row 3: (1 sc, inc) × 6 (18)
Row 4: (2 sc, inc) × 6 (24)
Row 5: (3 sc, inc) × 6 (30)
Row 6: (4 sc, inc) × 6 (36)
Row 7: (5 sc, inc) × 6 (42)
Row 8: (6 sc, inc) × 6 (48)
Row 9: (7 sc, inc) × 6 (54)
Row 10: (8 sc, inc) × 6 (60)
Row 11: (9 sc, inc) × 6 (66)
Rows 12-23: 66 sc (12 rows total) (66)
🎉 Look at you go! That’s twenty-three rows in the books. This is the biggest piece in the whole pattern — everything else from here is smaller and quicker.
Row 24: (9 sc, dec) × 6 (60)
Row 25: (8 sc, dec) × 6 (54)
Row 26: (7 sc, dec) × 6 (48)
Row 27: (6 sc, dec) × 6 (42)
Row 28: (5 sc, dec) × 6 (36)
Time to add some stuffing — squeeze it in there and keep going.
Row 29: (4 sc, dec) × 6 (30)
Row 30: (3 sc, dec) × 6 (24)
Finishing: Stuff completely, fasten off, and leave a tail for sewing. Set your round, squishy head aside — you’re going to love how much personality it already has.
Muzzle — Part 1 (×1)
Yarn: Beige | Starting Method: Chain
Row 1: 26 ch (26)
Row 2: 24 sc, 2 sc in last st, 24 sc (50)
Row 3: 2 inc, 21 sc, 4 inc, 21 sc, 2 inc (58)
Row 4: 3 inc, 24 sc, 5 inc, 24 sc, 2 inc (68)
Rows 5-7: 68 sc (3 rows total) (68)
Finishing: Fasten off and leave a long tail for sewing. This flat, curved piece is going to become the bottom half of the muzzle.
Muzzle — Part 2 (×1)
Yarn: Beige | Starting Method: Magic ring
Row 1: 6 sc in mr (6)
Row 2: (1 sc, inc) × 3 (9)
Row 3: (2 sc, inc) × 3 (12)
Row 4: (2 inc, 2 sc) × 3 (18)
Row 5: (1 sc, inc) × 2, 2 sc, (1 sc, inc) × 2, 2 sc, (1 sc, inc) × 2, 2 sc (24)
Row 6: 24 sc (24)
Row 7: 4 sc, 3 sc in 1, 7 sc, 3 sc in 1, 7 sc, 3 sc in 1, 3 sc (30)
Row 8: 30 sc (30)
Finishing: Fasten off and leave a long tail for sewing. This small dome goes on top of Part 1, right between the eyes.
Under-Eye Piece (×2)
Yarn: Beige | Starting Method: Chain
Row 1: 9 ch (9)
Row 2: 7 sc, 4 sc in last st, 7 sc (18)
Row 3: 3 sc in 1, 7 sc, 2 inc, 7 sc, 3 sc in 1 (24)
Row 4: 2 sc, 3 sc in 1, 7 sc, 4 inc, 8 sc, 3 sc in 1, 1 sc (32)
Row 5: 3 sc, 3 sc in 1, 25 sc (31)
Finishing: Fasten off and leave a long tail for sewing on both pieces. These sit right on the head, and the eyes will attach on top.
Eyes (×2)
Yarn: White | Starting Method: Chain
Quick note before you start: switch to your tiny 1.3mm hook here, and split your yarn in half so you’re working with two strands instead of the full thickness. It feels fiddly for about thirty seconds, then it clicks.
Row 1: 9 ch (9)
Row 2: 7 sc, 4 sc in last st, 7 sc (18)
Row 3: 3 sc in 1, 7 sc, 2 inc, 7 sc, 3 sc in 1 (24)
Finishing: Fasten off and leave a long tail for sewing.
Nose (×1)
Yarn: Black | Starting Method: Magic ring
Same deal as the eyes — tiny hook, split yarn, two strands.
Row 1: 6 sc in mr (6)
Row 2: 6 inc (12)
Row 3: (1 sc, inc) × 6 (18)
Rows 4-6: 18 sc (3 rows total) (18)
Row 7: 9 dec (9)
Stuff this little nose lightly — just enough to give it shape, not enough to make it stiff.
Finishing: Fasten off and leave a long tail for sewing.
Right Eye Detail (×1)
Yarn: Black | Starting Method: Attach yarn directly to a white eye piece
Row 1: From the point where you finished crocheting the white eye piece, count over 9 sc and attach your black yarn. Work sc around the next 8 sc. (8)
Finishing: Fasten off.
Left Eye Detail (×1)
Yarn: Black | Starting Method: Attach yarn directly to a white eye piece
Row 1: From the point where you finished crocheting the second white eye piece, count over 4 sc and attach your black yarn. Work sc around the next 8 sc. (8)
Finishing: Fasten off.
🎉 Halfway-ish there! All the tiny face details are done. I know that section felt fussy, but this is genuinely the fiddliest part of the whole pattern — it gets easier from here, I promise.
Pupil / Dark Eye Piece (×2)
Yarn: Black | Starting Method: Magic ring
Tiny hook and split yarn again for this one.
Row 1: 6 sc in mr (6)
Row 2: 2 inc, 1 sc, 2 inc, 1 sc, sl st (11)
Finishing: Fasten off and leave a long tail for sewing.
Ears (×2)
Yarn: Black | Starting Method: Magic ring
Row 1: 6 sc in mr (6)
Row 2: 6 inc (12)
Row 3: (1 sc, inc) × 6 (18)
Row 4: (2 sc, inc) × 6 (24)
Row 5: (3 sc, inc) × 6 (30)
Row 6: (4 sc, inc) × 6 (36)
Rows 7-12: 36 sc (6 rows total) (36)
Row 13: (4 sc, dec) × 6 (30)
Row 14: (3 sc, dec) × 6 (24)
Finishing: Fasten off and leave a tail for sewing. Leave these two unstuffed and flat — that’s what gives that classic round ear shape.
Legs (×2)
Yarn: Yellow, then Black, then Red | Starting Method: Magic ring
Row 1: 6 sc in mr (6)
Row 2: 6 inc (12)
Row 3: 3 inc, 3 sc, 3 inc, 3 sc (18)
Row 4: (2 sc, inc) × 6 (24)
Row 5: (3 sc, inc) × 6 (30)
Row 6: (4 sc, inc) × 6 (36)
Rows 7-10: 36 sc (4 rows total) (36)
Row 11: 8 sc, 6 dec, 16 sc (30)
Start stuffing the foot now, and keep adding a little as you go.
Row 12: 30 sc (30)
Row 13: 5 sc, 6 dec, 13 sc (24)
Row 14: 24 sc (24)
Row 15: (2 sc, dec) × 6 (18)
Row 16: Switch to black yarn. BLO 18 sc (18)
Rows 17-26: 18 sc (10 rows total) (18)
This is the “leg” section of the leg — you’re building up the height before the pants start. Stuff this section before moving on to Row 27.
Row 27: Switch to red yarn. 18 sc (18)
Row 28: BLO 18 sc (18)
Rows 29-30: 18 sc (18)
Stuff the leg completely once you finish Row 30. Now go back to that back-loop line at the top of the yellow shoe — attach yellow yarn there and work a round of sc around, just to neaten the edge. Do the exact same thing at the pants back-loop line with red yarn.
Finishing: For your first leg, fasten off and weave in the ends. For your second leg, don’t cut the yarn — you’re going to keep crocheting straight into the body from here.
🎉 Two little legs, done! Shoes, black legs, red shorts — it’s already starting to look unmistakably like our classic cartoon mouse. Keep that second leg’s yarn attached, because the body starts right now.
Body (×1)
Yarn: Red, continuing from the second leg | Starting Method: Attach to both legs
Row 1: Ch 6 and join to the first leg (6)
Row 2: 18 sc across the first leg, 6 sc along the chain, 18 sc across the second leg, 6 sc along the chain (48)
Before Row 3, go back to the spot where you worked BLO in black yarn on the legs — attach red yarn there and work a round of front-loop-only sc, 42 sc around. That’s the little “shorts hem” detail.
Row 3: (7 sc, inc) × 6 (54)
Rows 4-8: 54 sc (5 rows total) (54)
Row 9: (7 sc, dec) × 6 (48)
Rows 10-11: 48 sc (48)
Row 12: (6 sc, dec) × 6 (42)
Row 13: 42 sc (42)
Row 14: Switch to black yarn. BLO 42 sc (42)
Row 15: 42 sc (42)
Row 16: (5 sc, dec) × 6 (36)
Rows 17-19: 36 sc (3 rows total) (36)
Start stuffing the body now, adding more as the rounds get smaller.
Row 20: (4 sc, dec) × 6 (30)
Rows 21-22: 30 sc (30)
Row 23: (3 sc, dec) × 6 (24)
Row 24: 24 sc (24)
Finishing: Stuff completely, fasten off, and cut the yarn. You now have a body already joined to both legs — one less seam for you later!
Arms (×2)
Yarn: White, then Black | Starting Method: Magic ring
Row 1: 6 sc in mr (6)
Row 2: 6 inc (12)
Row 3: 3 inc, 3 sc, 3 inc, 3 sc (18)
Row 4: (1 sc, inc) × 3, 3 sc, (1 sc, inc) × 3, 3 sc (24)
Rows 5-9: 24 sc (5 rows total) (24)
Row 10: Crochet the finger: 5 dc in 1 stitch (this makes a little popcorn-style thumb), then 23 sc (24)
Okay, this part is so satisfying — that little bobble thumb pops right up and suddenly it looks like a real glove.
Row 11: (6 sc, dec) × 3 (21)
Row 12: (5 sc, dec) × 3 (18)
Row 13: (4 sc, dec) × 3 (15)
Start stuffing the hand now, before the opening gets too small.
Row 14: (3 sc, dec) × 3 (12)
Rows 15-16: 12 sc (12)
Row 17: Switch to black yarn. BLO 12 sc (12)
Rows 18-25: 12 sc (8 rows total) (12)
Go back to that BLO line — attach white yarn to the remaining front loops and work a round of sc around, 12 sc. That little white cuff peeking out from the black arm is such a nice detail.
Finishing: Stuff only to about the middle of the arm — you want it to bend and pose a bit. Fasten off and weave in ends.
Pants Buttons (×2)
Yarn: White | Starting Method: Magic ring
Row 1: 6 sc in mr (6)
Row 2: 2 inc, sl st (5)
Finishing: Fasten off and leave a long tail for sewing. Tiny piece, big payoff — these are the little white buttons on the shorts.
🎉 Every single piece is done! I know that was a lot of parts, but seriously — look at that pile in front of you. Now for the fun part: putting it all together.
Assembly of Your Crochet Classic Cartoon Mouse
Grab your pins — we’re going to build the face in layers, so getting it pinned before you sew makes a huge difference.
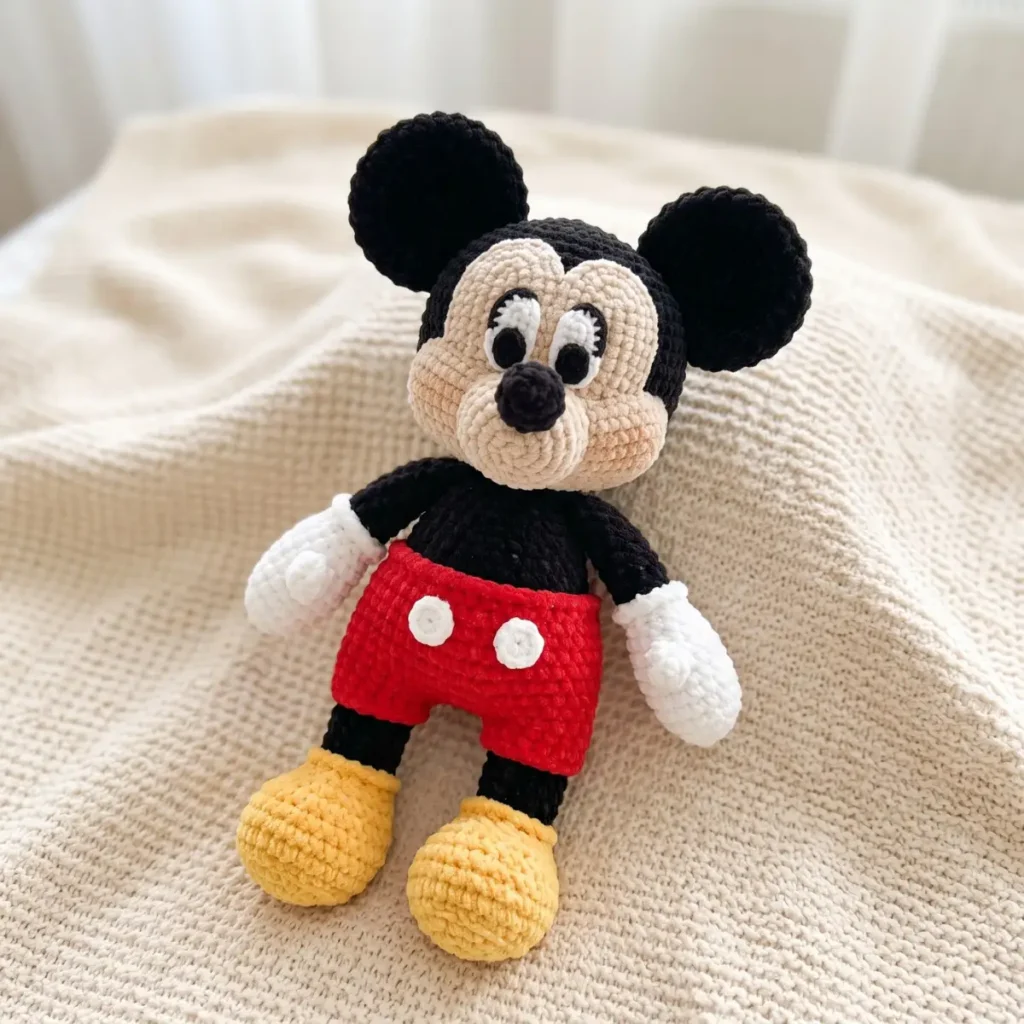
- Pin, then sew your two beige under-eye pieces onto the head, close together in the center. This gives you a base to attach the eyes to later.
- Pin Muzzle Part 1 onto the head over the under-eye pieces, gently shaping it into a slight semicircle as you go. Sew it in place, then stuff it a little for shape.
- Sew your white eye pieces (with the black borders and pupils already attached) close to the bottom edge of the muzzle, leaving just under 1 sc of space between them. Sew the base of each eye first, then the pupil.
- Sew Muzzle Part 2 on top, right between and just above the eyes.
- Sew the little nose in place at the center of the top muzzle piece.
- Sew the ears onto the head, spacing them about 10 sc apart.
- Sew the finished head onto the body.
- Sew the arms onto either side of the body.
- Sew the two white buttons onto the front of the shorts.
Take your time with steps 1-5 — that’s where the whole face comes together, and pinning first genuinely saves you from a lot of “wait, that eye is crooked” moments. Everything after that goes fast.
You Did It!
Seriously — look at that face. This was not a quick pattern, and if you made it all the way through every piece and every seam, you should be so proud of yourself right now. That’s a real skill you just built, not just a cute plush. Tag AmiLoops when you share your version — I want to see every single one, wonky ears and all. Next time you want something faster, go grab one of our keychain-sized amigurumi patterns for a quick win. 🧶
FAQ
What yarn is best for this crochet classic cartoon mouse pattern?
A chunky velvet or chenille yarn (Bulky weight 5) is highly recommended. It works up quickly and gives the amigurumi a soft, squishy plush finish.
How long does it take to crochet this classic cartoon mouse?
This pattern generally takes about 4 to 6 hours to complete. It’s an ideal cozy weekend project.
Is this mouse amigurumi pattern suitable for beginners?
Yes! Although it requires making and sewing several pieces, the pattern uses very simple amigurumi shapes and familiar stitches, making it an easy-to-intermediate project.