Free Crochet Gnome Pattern Amigurumi — Meet Sille, Your New Favorite Little Bearded Friend
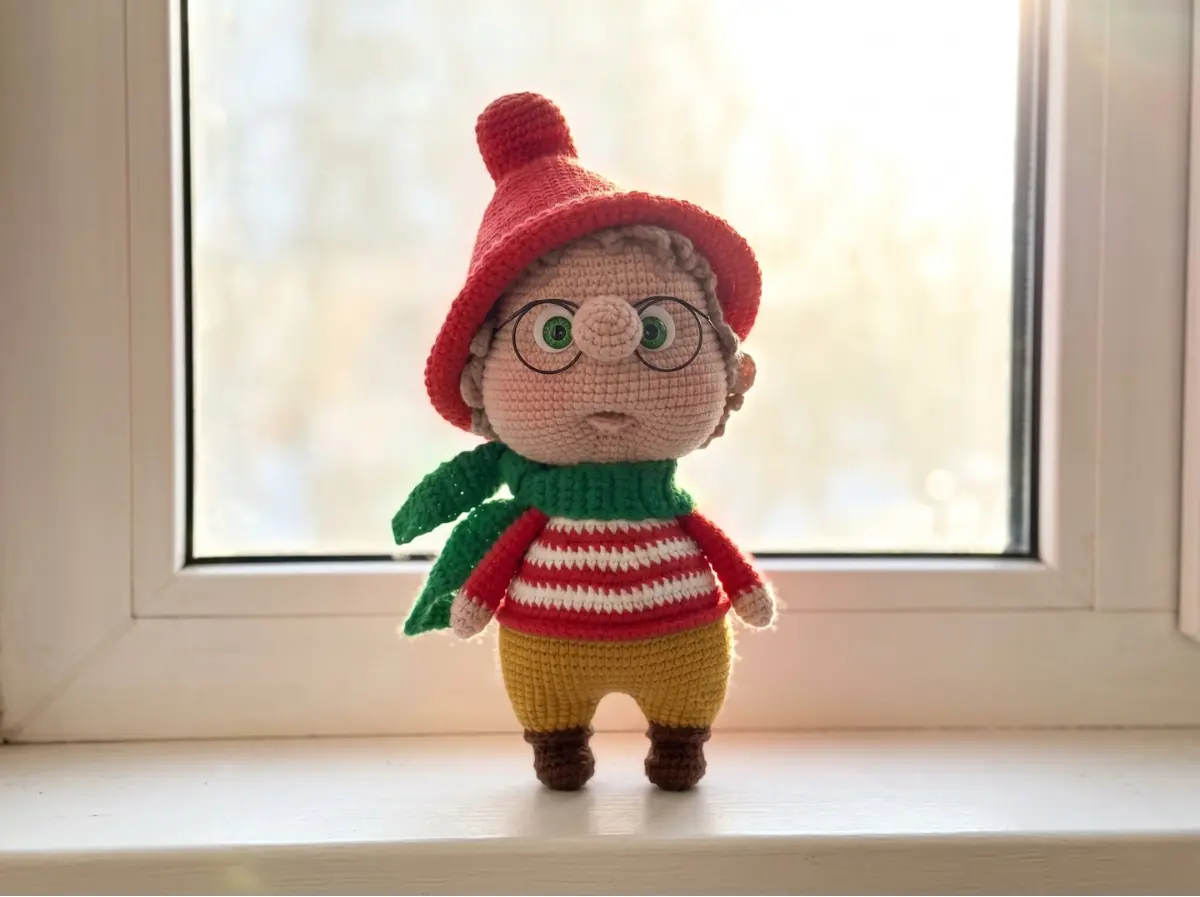
This free crochet gnome pattern amigurumi has been one of the most satisfying builds I’ve put together — the sculpted face, the layered construction, the little wig with individual strands. I designed this article around a gnome I’ve named Sille, and every single round has been checked and rechecked. At around 8 inches tall, he’s substantial enough to feel like a real project without becoming a marathon. Let’s get into it.
📋 Pattern Quick Stats
- Difficulty: Intermediate
- Finished Size: 7.9–8.7 in (20–22 cm)
- Hook Size: Appropriate for your chosen DK yarn (approx. 3.25–3.5mm / US D/3–E/4)
- Yarn Weight: DK / Light Worsted (3)
- Techniques: magic ring, invisible decrease, BLO, FLO, color changes, face sculpting, joined parts
- Estimated Time: 8–12 hours
Materials for This Free Crochet Gnome Pattern Amigurumi
- DK / Light Worsted (3) yarn in the following colors:
- Body/skin color
- Boot color
- Pants color
- Shirt color (2 alternating colors for stripes)
- Cap color
- Hair/wig color
- Scarf color
- US alternatives: Drops Muskat, Paintbox Simply DK, Lion Brand 24/7 Cotton (DK), or any DK cotton-acrylic blend. Each color requires approximately 20–50 yds depending on the part.
- Hook: Size appropriate for your yarn — approximately 3.25mm (US D/3) to 3.5mm (US E/4). Use whatever gives you a firm, dense fabric with no gaps.
- 10mm safety eyes (×2)
- White felt circles, 15mm diameter (×2) — for the eye whites
- Polyester fiberfill (polyfill) — enough to stuff the head and body firmly
- Strong sculpting thread — for face shaping
- Transparent all-purpose glue
- Tapestry needle for sewing parts and weaving ends
- Stitch markers
- Pins for assembly
- Scissors
- Optional: ready-made glasses, approximately 57–60mm wide
For yarn weight reference, DK falls under Weight 3 (Light) on the Craft Yarn Council yarn weight system.
Abbreviations Used in This Free Crochet Gnome Amigurumi Pattern
| Abbreviation | Meaning |
|---|---|
| mr | magic ring |
| sc | single crochet |
| dc | double crochet |
| ch | chain |
| st(s) | stitch(es) |
| inc | increase (2 sc in same stitch) |
| dec | invisible decrease |
| sl st | slip stitch |
| BLO | back loop only |
| FLO | front loop only |
| FO | fasten off |
| rep | repeat |
⚠️ Important: All decreases in this pattern use the invisible decrease method — insert your hook through the front loops only of the next two stitches simultaneously. This keeps the fabric clean and prevents gaps. Never use sc2tog for amigurumi.
Special Techniques — Free Crochet Gnome Pattern
This gnome uses several techniques that are worth reviewing before you start, especially if this is your first character-style amigurumi.
- Magic ring: Nearly every part of this gnome starts with a magic ring. If you’re still getting comfortable with it, our step-by-step magic ring tutorial walks through it in detail.
- Invisible decrease: Used throughout the head closure and body shaping. It’s the one technique I’d say makes the biggest difference in a finished piece. See our invisible decrease tutorial before you start if you’re new to it.
- Joining parts while crocheting: The arms are crocheted directly into the body in Row 24, and the legs are joined before the body begins. This is intermediate-level construction — take your time and don’t rush the joins.
- BLO and FLO rows: Row 10 of the legs and Row 11 of the body are worked into back loops only. The remaining front loops become the foundation for the boot trim and shirt hem respectively.
- Face sculpting: This gnome’s face is shaped after assembly using strong thread and a needle. The instructions are in the Decoration section — read through them completely before you start the head, so you understand what you’re building toward.
- Wig with individual strands: The wig is crocheted as a flat cap, then worked in reverse to add hair strands. It’s fiddly but completely worth it.
If you’re newer to amigurumi construction in general, our complete beginner’s guide covers the foundational concepts that will help everything here click into place.
Free Crochet Gnome Pattern — Step-by-Step Instructions
💡 Emma’s Tip: This gnome is built in parts that get assembled as you go — the legs join into the body, the arms crochet in mid-body, and the nose integrates into the head. Read through the full pattern once before you pick up your hook. The construction logic will make every step feel intentional rather than surprising.
Arms (×2)
Yarn: Body/skin color, changing to sleeve color at Row 5
Start: Magic ring
Row 1: 6 sc in mr (6)
Row 2: 6 inc (12)
Rows 3–4: 12 sc (12)
Row 5: Change to sleeve color. 10 sc (10)
💡 Note: In Row 5, decrease from 12 back to 10 is implied by the transition — continue with 10 sts from this row onward.
Rows 6–16: 10 sc (10)
Finishing: Stuff only the lower (hand) section lightly. Fold the open end flat and single crochet through both layers — 5 sc to close. FO and cut yarn, leaving a short tail. Set aside; the arms will be crocheted directly into the body at Row 24.
Nose (×1)
Yarn: Body/skin color
Start: Magic ring
Row 1: 6 sc in mr (6)
Row 2: 6 inc (12)
Row 3: (1 sc, inc) ×6 (18)
Rows 4–5: 18 sc (18)
Row 6: (1 sc, dec) ×6 (12)
Finishing: Do not stuff. FO and cut yarn. Set aside; the nose is crocheted into the head at Row 19.
Head (×1)
Yarn: Body/skin color
Start: Magic ring
Row 1: 6 sc in mr (6)
Row 2: 6 inc (12)
Row 3: (1 sc, inc) ×6 (18)
Row 4: (2 sc, inc) ×6 (24)
Row 5: (3 sc, inc) ×6 (30)
Row 6: (4 sc, inc) ×6 (36)
Row 7: (5 sc, inc) ×6 (42)
Row 8: (6 sc, inc) ×6 (48)
Row 9: (7 sc, inc) ×6 (54)
Row 10: (8 sc, inc) ×6 (60)
Rows 11–12: 60 sc (60)
Row 13: (9 sc, inc) ×6 (66)
Rows 14–18: 66 sc (66)
Row 19: 18 sc, (1 sc, inc) ×6, 6 sc together with 6 sts of the nose, (inc, 1 sc) ×6, 18 sc (78)
Row 20: 36 sc, 6 sc along the remaining sts of the nose, 36 sc (78)
Rows 21–30: 78 sc (78)
💡 Emma’s Tip: Row 19 is where the nose integrates into the face — you’re essentially crocheting around both the head and the nose simultaneously to merge them. Take this row slowly, stitch by stitch. After Row 20, lightly stuff the nose from inside the head before continuing. Install safety eyes after Row 30, between Rows 17 and 18, spaced 6–8 stitches apart. Push the shanks through white felt circles first for that classic gnome eye effect.
Row 31: (11 sc, dec) ×6 (72)
Row 32: (7 sc, dec) ×8 (64)
Row 33: (6 sc, dec) ×8 (56)
Row 34: (5 sc, dec) ×8 (48)
Row 35: (4 sc, dec) ×8 (40)
Row 36: (3 sc, dec) ×8 (32)
Row 37: (2 sc, dec) ×8 (24)
Finishing: Stuff the head firmly — but not so tightly that it distorts, since you’ll be sculpting the face afterward. FO and hide the yarn tail inside.
Legs (×2)
Yarn: Boot color, changing to pants color before Row 10
Start: Magic ring
Row 1: 6 sc in mr (6)
Row 2: 6 inc (12)
Row 3: (1 sc, inc) ×6 (18)
Rows 4–5: 18 sc (18)
Row 6: 3 sc, 6 dec, 3 sc (12)
Rows 7–8: 12 sc (12)
Row 9: (1 sc, inc) ×6 (18)
💡 Emma’s Tip: Before Row 10, change to your pants color. Row 10 is worked BLO — those front loops will become the boot trim in a later step.
Row 10: 18 sc BLO (18)
Row 11: (2 sc, inc) ×6 (24)
Row 12: 24 sc (24)
Finishing — First Leg: Crochet an additional 6 sc, FO and cut yarn. Count back 12 stitches from your stopping point and place a stitch marker — this is where the second leg connects.
Finishing — Second Leg: Crochet an additional 6 sc. Do not cut yarn. You’ll begin the body from here.
Body (×1)
Yarn: Pants color transitioning to shirt stripe colors, then body color at Row 27
Start: Chain 3 from the second leg
Row 1: 24 sc along first leg, 3 sc along ch, 24 sc along second leg, 3 sc along ch (54)
Row 2: (8 sc, inc) ×6 (60)
Row 3: 60 sc (60)
Row 4: (9 sc, inc) ×6 (66)
Rows 5–10: 66 sc (66)
Row 11: 66 sc BLO (66)
💡 Emma’s Tip: Row 11 is your shirt hem marker. The front loops left here will become the shirt’s lower edge later. From Row 12 onward you’re shaping the torso and adding stripe color changes.
Row 12: (9 sc, dec) ×6 (60)
Row 13: 60 sc — change color before this row (60)
Row 14: (8 sc, dec) ×6 (54)
Row 15: 54 sc — change color before this row (54)
Row 16: (7 sc, dec) ×6 (48)
Row 17: 48 sc — change color before this row (48)
Row 18: (6 sc, dec) ×6 (42)
Row 19: 42 sc — change color before this row (42)
Row 20: (5 sc, dec) ×6 (36)
Row 21: 36 sc — change color before this row (36)
Row 22: (4 sc, dec) ×6 (30)
Row 23: 30 sc — change color before this row (30)
Row 24: 7 sc, 5 sc together with first arm, 10 sc, 5 sc together with second arm, 3 sc (30)
Row 25: 30 sc — change color before this row (30)
Row 26: (3 sc, dec) ×6 (24)
Row 27: 24 sc — change to body/skin color before this row (24)
💡 Emma’s Tip: Row 24 is the arm join. Position the arms strictly on the sides of the body — the recommended placement is 7 sc before the first arm join. Stuff the body firmly as you go, leaving about 0.4 in (1 cm) unstuffed at the top so you have room to maneuver when attaching the head. The body is crocheted continuously and the shirt stripes change color every 2 rows (before Rows 13, 15, 17, 19, 21, 23, 25). That’s seven color changes total — I find it helps to pre-cut lengths of each stripe color before I start.
Finishing: If needed, crochet 1 additional sc and sl st into the next stitch to end cleanly at the center back. FO, leaving approximately 19.7 in (50 cm) of yarn tail for sewing the head. Remove your stitch marker. Stuff the body firmly to completion.
After body is complete: Working along the remaining front loops of Row 11 of the body (hold so the legs face away from you), crochet sc along those front loops to create the shirt hem edge. Repeat along the remaining front loops of Row 10 of the legs to create the boot trim.
Ears (×2)
Yarn: Body/skin color
Start: Magic ring
Row 1: 6 sc in mr (6)
💡 Note: After Row 1, pull the ring closed, do not join. Make a turning chain, turn, and crochet Row 2 back across the stitches.
Row 2: (1 sc, inc) ×3 (9)
Finishing: Leave a tail of approximately 9.8 in (25 cm) for sewing. Cut yarn.
Lower Lip (×1)
Yarn: Body/skin color
Start: Magic ring
Row 1: 6 sc in mr (6)
Finishing: Pull the ring tight. The piece will form a shallow semicircle shape — that’s correct. Leave a tail of approximately 15.7–17.7 in (40–45 cm) for attaching. Cut yarn.
Wig (×1)
Yarn: Hair color
Start: Magic ring
💡 Emma’s Tip: Crochet this piece more loosely than usual — the stitches should have a visible “V” shape. A slightly larger hook than you used for the rest of the gnome works well here. Try the cap on the head as you work to check the fit.
Row 1: 6 sc in mr (6)
Row 2: 6 inc (12)
Row 3: (1 sc, inc) ×6 (18)
Row 4: (2 sc, inc) ×6 (24)
Row 5: (3 sc, inc) ×6 (30)
Row 6: (4 sc, inc) ×6 (36)
Row 7: (5 sc, inc) ×6 (42)
Row 8: (6 sc, inc) ×6 (48)
Row 9: (7 sc, inc) ×6 (54)
Row 10: (8 sc, inc) ×6 (60)
Rows 11–12: 60 sc (60)
Row 13: (9 sc, inc) ×6 (66)
Rows 14–19: 66 sc (66)
The wig should reach the ears when placed on the head. Do not cut yarn.
Strands: Turn the wig inside out (wrong side facing you). Working in the opposite direction from the left ear, crochet the following strands using sl st to move between positions:
Strand 1: Ch 5, return along chain with 4 sc, sl st into 2nd st
Strand 2: Sl st into 3rd st, ch 6, return with 5 sc, sl st into 4th st
Strand 3: Sl st into 5th st, ch 7, return with 6 sc, sl st into 6th st
Strand 4: Sl st into 7th st, ch 3, return with 2 sc, sl st into 8th st
Strand 5: Sl st into 9th st, ch 4, return with 3 sc, sl st into 10th st
Strand 6: Sl st into 11th st, ch 5, return with 4 sc, sl st into 12th st
Strand 7: Sl st into 13th st, ch 6, return with 5 sc, sl st into 14th st
Strand 8: Sl st into 15th st, ch 7, return with 6 sc, sl st into 16th st
Strand 9: Sl st into 17th st, ch 8, return with 7 sc, sl st into 18th st
Strand 10: Sl st into 19th st, ch 7, return with 6 sc, sl st into 20th st
Strand 11: Sl st into 21st st, ch 6, return with 5 sc, sl st into 22nd st
Strand 12: Sl st into 23rd st, ch 5, return with 4 sc, sl st into 24th st
Strand 13: Sl st into 25th st, ch 4, return with 3 sc, sl st into 26th st
Strand 14: Sl st into 27th st, ch 3, return with 2 sc, sl st into 28th st
Strand 15: Sl st into 29th st, ch 7, return with 6 sc, sl st into 30th st
Strand 16: Sl st into 31st st, ch 6, return with 5 sc, sl st into 32nd st
Strand 17: Sl st into 33rd st, ch 5, return with 4 sc, sl st into 34th st
Strands 18–32: The 35th stitch should sit above the ear. Sl st into it, then continue to the 65th stitch (above the next ear), crocheting 15 identical strands of ch 5 with 4 sc return. Do not crochet past stitch 66.
Finishing: FO at the 65th stitch. Leave a tail for sewing the wig to the head. Cut yarn.
Scarf (×1)
Yarn: Scarf color
Start: Foundation chain
Crochet in turning rows, loosely, with open “V” stitches. The scarf is 5 sc wide and approximately 11.8 in (30 cm) long.
Finishing: FO and weave in ends.
Cap (×1)
Yarn: Cap color
Start: Magic ring
💡 Emma’s Tip: Like the wig, the cap should be crocheted loosely with open stitches. Try it on the head as you work — it needs to sit over the wig, so it may need to be slightly roomier than you’d expect.
Row 1: 6 sc in mr (6)
Row 2: 6 inc (12)
Row 3: (1 sc, inc) ×6 (18)
Row 4: (2 sc, inc) ×6 (24)
Rows 5–8: 24 sc (24)
Rows 9–13: 8 sc, 7 sl st, 9 sc (24)
Row 14: (3 sc, inc) ×6 (30)
Row 15: 30 sc (30)
Row 16: (4 sc, inc) ×6 (36)
Row 17: 36 sc (36)
Row 18: (5 sc, inc) ×6 (42)
Row 19: 42 sc (42)
Row 20: (6 sc, inc) ×6 (48)
Row 21: 48 sc (48)
Row 22: (7 sc, inc) ×6 (54)
Row 23: 54 sc (54)
Row 24: (8 sc, inc) ×6 (60)
Row 25: 60 sc (60)
Row 26: (9 sc, inc) ×6 (66)
Row 27: 66 sc (66)
Row 28: (10 sc, inc) ×6 (72)
Row 29: 72 sc (72)
Row 30: (11 sc, inc) ×6 (78)
Rows 31–36: 78 sc (78)
Finishing: When the cap is the right height for your gnome, FO and weave in ends. The cap is not attached — it sits on over the wig as a removable accessory.
Assembly — Free Crochet Gnome Pattern
- Attach the head to the body. Using the long yarn tail you left at the body, sew the head on securely. As you sew, add stuffing to the neck area to prevent it from collapsing. Pinning the head in place with a knitting needle or pin while you sew helps keep it centered.
- Attach the ears. The tops of the ears are sewn between Rows 22–23 from the crown. There should be approximately 40 stitches between the two ears across the front of the face (20 stitches to either side of center, beneath the nose).
- Attach the lower lip. Position the lower lip 2–3 rows below the mouth sculpting point. Fix the center of the lip slightly lower than the edges for a natural curve. Bring the middle thread through to the back of the head and back again, then hide it. Use the second thread length to secure both corners of the lip, bringing it to the nose attachment point between Rows 18 and 19.
- Attach the wig. Pin the wig into position, checking that the strands frame the face naturally. Sew or glue the wig securely to the head.
- Add the scarf and cap. These are not sewn — drape the scarf around the neck and place the cap over the wig. They can be repositioned freely.
For detailed guidance on part attachment technique, our tutorial on sewing amigurumi parts together covers pinning, placement, and invisible joining.
Face Decoration — Sculpting and Eyes
Face Sculpting
This step is what separates a flat-looking gnome from a character with real expression. Take your time and don’t rush it.
Mark 6 points on the face with pins:
- Points 1 and 6: Directly below the nose, between Rows 29 and 30, 2–3 stitches out from center on each side
- Points 2 and 3: Outer and inner corners of the left eye, between Rows 18 and 19
- Points 4 and 5: Outer and inner corners of the right eye, between Rows 18 and 19
Thread your sculpting needle. Insert at Point 1, bring out at Point 2. Insert at Point 3, bring out at Point 6. Pull thread tight to create the undereye shadow, then tie 2 secure knots. Without cutting the thread, insert at Point 6, bring out at Point 5. Insert at Point 4, bring out at Point 1. Pull tight, tie knots, and hide the thread inside the head. Apply a small dot of transparent glue to each entry point to secure.
Eyes
Insert safety eyes through the center of each white felt circle (make a small cross-shaped cut to allow the shank through). Secure the eyes between Rows 17 and 18, spaced 6–8 stitches apart.
If using glue-on eyes: position them close to the nose, slightly covering the sculpting entry points. Glue with transparent all-purpose glue and allow to dry fully before handling.
For more on installing safety eyes correctly — including timing and placement — our safety eyes tutorial covers everything you need.
Optional Glasses
If you’re adding ready-made glasses (approximately 57–60mm wide), simply place them over the nose after the face is complete. They rest naturally without attachment.
Emma’s Note
I’ve made a few gnomes over the years, but this one — with his sculpted face, layered wig, and striped shirt — is the most satisfying of them to finish. The construction is genuinely clever: the way the nose integrates into the head in Row 19, and the way the shirt hem and boot trim emerge from those held front loops, feels almost architectural once you’ve done it. Don’t skip the face sculpting. It looks a little intimidating on paper, but it takes maybe ten minutes and the transformation is remarkable. Happy hooking. 🧶
What yarn is best for this free crochet gnome pattern amigurumi?
DK or Light Worsted weight cotton-acrylic blend is recommended. It provides a firm, dense fabric that holds the gnome’s shape and keeps the stuffing hidden.
How long does it take to crochet this gnome amigurumi?
It takes approximately 8 to 12 hours depending on your crochet speed. The body works up relatively quickly, but the detailed face sculpting and wig construction require extra time.
Can beginners make this amigurumi gnome pattern?
This is an intermediate pattern because it involves joining parts as you go, working in BLO/FLO, and face sculpting. However, confident beginners can tackle it using the provided technique tutorials.