Ice Queen Amigurumi Free Pattern — Crochet Doll Guide
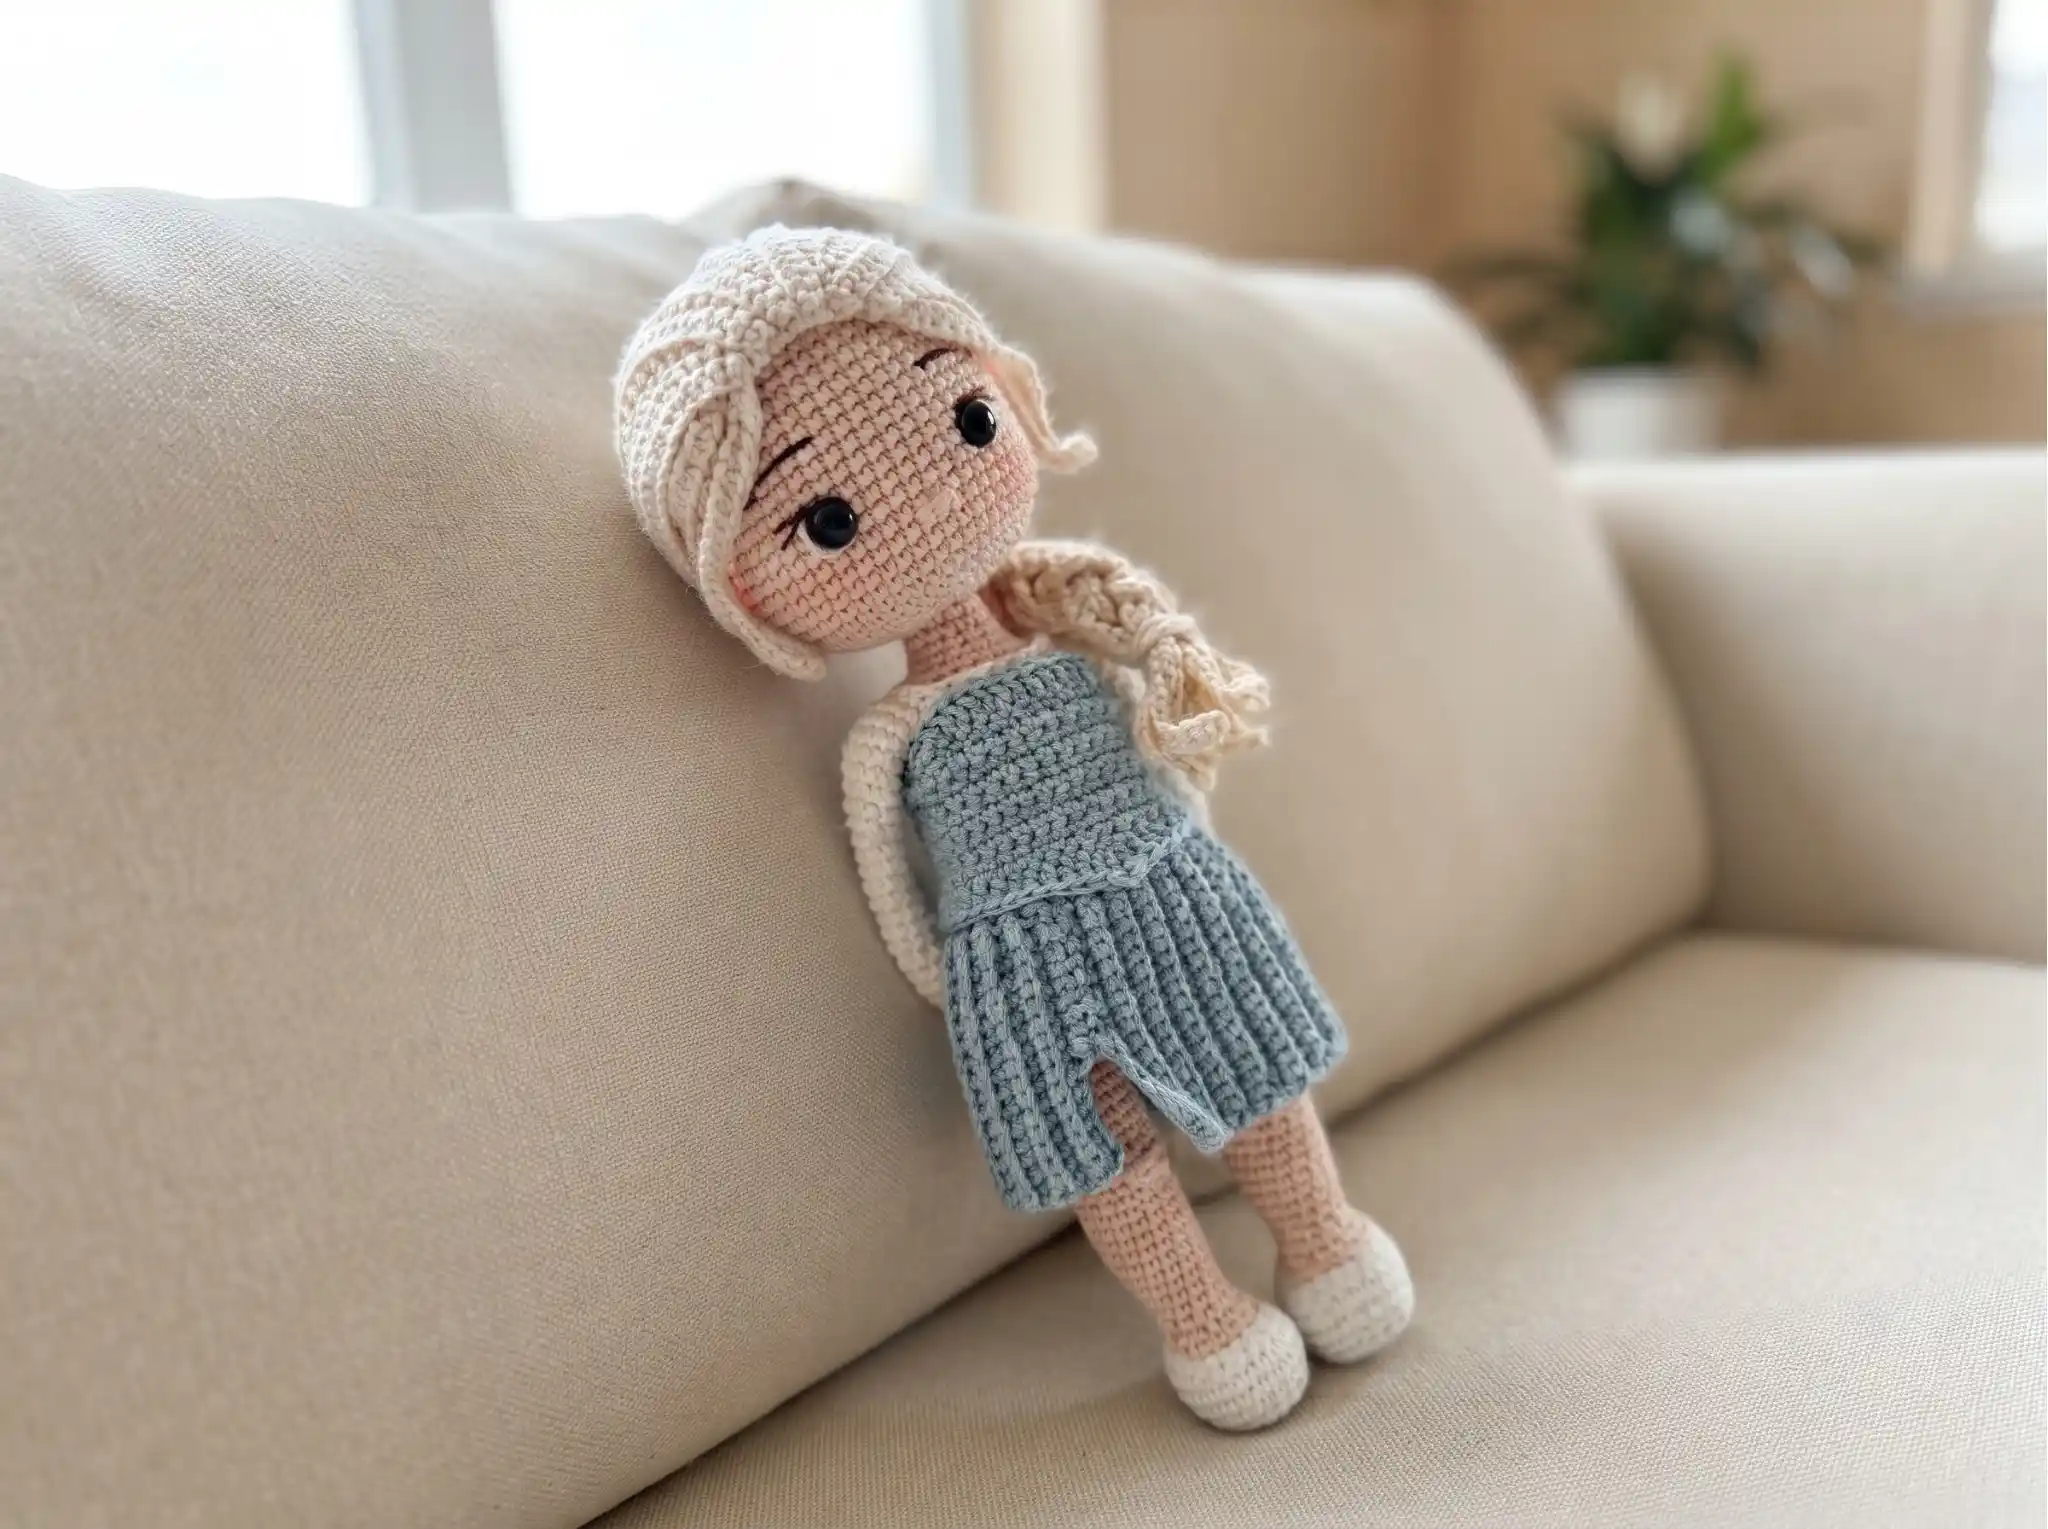
Are you looking for an ice queen amigurumi free pattern to challenge your crochet skills? This detailed guide helps you create a beautiful doll with a fitted top, a long ribbed skirt, and a delicate braided updo. I worked this design with a 2.0mm hook and fine mercerized cotton to ensure every detail holds perfectly.
📋 Pattern Quick Stats
- Difficulty: Advanced
- Finished Size: 10.2 in (26 cm)
- Hook Size: 2.0mm (this size falls below the standard US letter range, so work directly from the metric measurement)
- Yarn Weight: Fingering / Sock (CYCA #1) — mercerized cotton
- Techniques: chain foundation, magic ring, invisible decrease, front/back loop only, dc/hdc/tr shaping, color changes, wire armature, embroidery, braiding
- Estimated Time: 10-14 hours
Materials for This Ice Queen Amigurumi Pattern
This ice queen amigurumi pattern uses a fine mercerized cotton throughout, which is what gives the finished doll that smooth, dense surface with no stuffing peeking through. I always recommend sticking with a true fingering weight cotton here — anything heavier will throw off your row counts.
- Fingering weight mercerized cotton in beige (skin tone)
- Fingering weight mercerized cotton in white (accent shading)
- Fingering weight mercerized cotton in milk/cream (hair)
- Fingering weight mercerized cotton in light blue (top and skirt)
- 2.0mm crochet hook
- Fiberfill stuffing
- 9mm safety eyes
- 2mm craft wire (for internal support through the arms and body)
- Tapestry needle
- Stitch marker
- Scissors and craft glue
This yarn falls into the Fingering / Sock (1) category on the Craft Yarn Council yarn weight system — it’s my go-to for dolls where I want every stitch to stay crisp and defined.
Because you’re working with safety eyes on a piece like this, it’s worth reviewing the Consumer Product Safety Commission’s guidance on toy safety before gifting this ice queen amigurumi to a child, especially regarding age recommendations for small parts.
Abbreviations Used in This Pattern
| Abbreviation | Meaning |
|---|---|
| mr | magic ring |
| ch | chain |
| sl st | slip stitch |
| sc | single crochet |
| hdc | half double crochet |
| dc | double crochet |
| tr | treble crochet |
| inc | increase |
| dec | invisible decrease |
| BLO | back loop only |
| FLO | front loop only |
I designed this ice queen amigurumi free pattern to provide a structured, professional-looking doll that stands out.
Special Techniques in This Ice Queen Amigurumi Doll
This pattern leans on a handful of techniques that are worth reviewing before you start, especially if this is your first doll-style amigurumi.
You’ll open nearly every part with a magic ring — if you haven’t worked one before, our step-by-step magic ring tutorial will get you comfortable with it in a few minutes.
Every decrease in this pattern should be worked as an invisible decrease rather than a standard sc2tog. It takes a beat longer, but it’s the difference between a visible ridge and a clean, seamless line — take your time with it, and if you need a refresher, here’s our invisible decrease tutorial.
This doll also uses safety eyes, which need to go in before you stuff and close the head. Our guide to attaching safety eyes safely covers placement and locking the washer in place.
You’ll also see plenty of front loop only (FLO) and back loop only (BLO) instructions, which create the ribbed texture in the skirt and the subtle shaping around the limbs. Work these carefully — it’s easy to slip and catch both loops without noticing.
How to Crochet the Ice Queen Amigurumi — Pattern
This ice queen amigurumi comes together in nine separate pieces before assembly: the top, the top section, the skirt, two arms, two legs, the body, the head, and the hair. I’d recommend working through them in this order so the pieces are ready for you when you reach assembly.
Top (light blue)
Row 1: 33 ch, working in back loops from 2nd ch from hook: 32 sc, ch 1, turn (32)
Rows 2-4: 32 sc, ch 1, turn (32)
Row 5: 1 sc, 4 sc, inc, 4 sc, inc, 10 sc, inc, 4 sc, inc, 5 sc, ch 1, turn (36)
Rows 6-8: 36 sc, ch 1, turn (36)
Row 9: 1 sc, 7 sc, inc, 18 sc, inc, 8 sc, ch 1, turn (38)
Row 10: 38 sc, ch 1, turn (38)
Row 11: 1 sc, 13 sc, 2 hdc, 2 dc, in next 1 st work 1 dc and 1 tr, in next 1 st work 1 tr, 1 dc, 2 dc, 2 hdc, 14 sc (43)
💡 Emma’s Tip: Row 11 packs a lot of stitch types into one row — go slowly and count as you go. If your total doesn’t land on 43, don’t panic, just frog back to Row 10 and try again.
Top Section (light blue)
Row 1: 1 ch, 1 sc, 9 sc, hdc, dc, 2 dc-inc, dc, 2 hdc, dc, 2 dc-inc, dc, hdc, 10 sc (36)
Skirt (light blue)
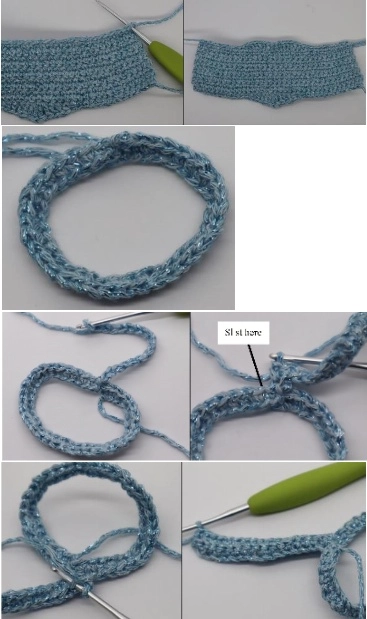
Row 1: 37 ch, from 2nd ch: 36 sc, sl st to join in a ring (36)
Row 1 (ribbing): 17 ch, from 2nd ch work sc in back loops to end, skip 1 st, sl st, ch 1, turn (18)
Row 2: BLO 16 sc, ch 1, turn (16)
Row 3: BLO 1 sc, 15 sc, sl st, ch 1, turn (16)
Rows 4-6: Repeat Rows 2-3 (16)
Row 7: BLO 1 sc, 15 sc, skip 1 st, sl st, ch 1, turn (16)
Rows 8-12: Repeat Rows 2-3 (16)
Row 13: BLO 1 sc, 15 sc, skip 1 st, sl st, ch 1, turn (16)
Rows 14-22: Repeat Rows 2-3 (16)
Row 23: BLO 1 sc, 15 sc, skip 1 st, sl st, ch 1, turn (16)
Rows 24-32: Repeat Rows 2-3 (16)
Row 33: BLO 1 sc, 15 sc, skip 1 st, sl st, ch 1, turn (16)
Rows 34-42: Repeat Rows 2-3 (16)
Row 43: BLO 1 sc, 15 sc, skip 1 st, sl st, ch 1, turn (16)
Rows 44-48: Repeat Rows 2-3 (16)
Row 49: BLO 1 sc, 15 sc, skip 1 st, sl st, ch 1, turn (16)
Rows 50-54: Repeat Rows 2-3 (16)
Row 55: BLO 1 sc, 15 sc, skip 1 st, sl st, ch 1, turn (16)
Row 56: BLO 1 sc, 7 sc, sl st (9)
Finishing: Leave a long tail for sewing the skirt to the body later.
💡 Emma’s Tip: This ribbed skirt is a long, repetitive stretch — this is exactly the kind of section where I like to use a stitch marker on every tenth row so I don’t lose my place. Trust me, it’s worth the extra effort.
Arms (make 2 — beige, then white)
Row 1: 6 sc in mr (6)
Row 2: (1 sc, inc) × 3 (9)
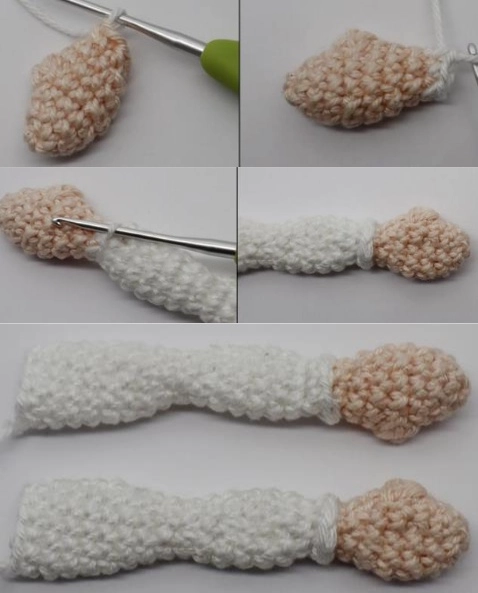
Row 3: 9 sc (9)
Row 4: (2 sc, inc) × 3 (12)
Row 5: 3 dc cluster (bobble), 11 sc (12)
Row 6: (dec, 2 sc) × 3 (9)
Row 7: 1 sc, (dec, 2 sc) × 2 (6)
Row 8: 7 sc [change to white] (7)
Row 9: BLO inc, 3 sc, inc, 2 sc (9)
Row 10: 4 sc, inc, 4 sc (10)
Rows 11-12: 10 sc (10)
Row 13: 4 sc, dec, 4 sc (9)
Row 14: 9 sc (9)
Row 15: dec, 3 sc, dec, 2 sc (7)
Row 16: 4 sc, inc, 2 sc (8)
Row 17: 1 sc, inc, 6 sc (9)
Row 18: 4 sc, inc, 4 sc (10)
Row 19: 1 sc, inc, 8 sc (11)
Rows 20-23: 11 sc (11)
Row 24 (Left arm): 8 sc (8)
Row 24 (Right arm): 3 sc (3)
Finishing: Join white yarn at Row 8, work 16 stitches, then 7 slip stitches. Cut the yarn. Do not stuff the arms — they need to stay soft and slightly flexible for the wire armature that runs through the body later.
Legs (make 2 — white, then beige)
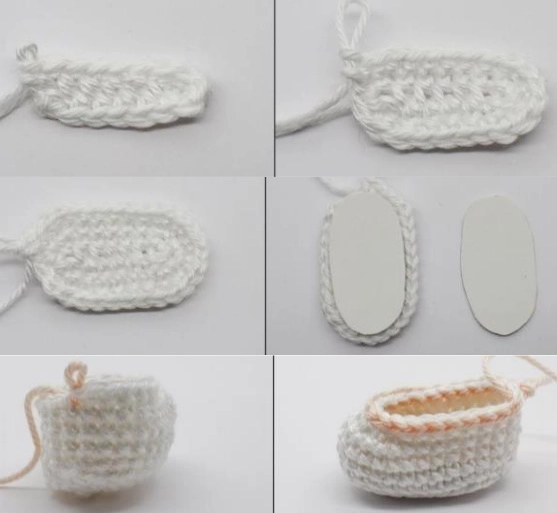
Row 1: 8 ch, from 2nd ch: 5 sc, 3 sc in 1 st, 5 sc, inc (16)
Row 2: inc, 5 sc, 3 inc, 5 sc, 2 inc (22)
Row 3: 1 sc, inc, 6 sc, 5 inc, 5 sc, (1 sc, inc) × 2 (30)
Row 4: BLO 30 sc (30)
Rows 5-7: 30 sc (30)
Row 8: 7 sc, 8 dec, 7 sc (22)
Row 9: BLO 22 sc (22)
Row 10: BLO 7 sc, 4 dec, 7 sc (18)
Row 11: 5 sc, 4 dec, 5 sc (14)
Row 12: 14 sc (14)
Row 13: inc, 13 sc (15)
Row 14: 2 sc, inc, 11 sc, inc (17)
Row 15: 17 sc (17)
Row 16: 3 sc, inc, 11 sc, inc, 1 dc (19)
Rows 17-19: 19 sc (19)
Row 20: 3 sc, dec, 11 sc, dec, 1 sc (17)
Row 21: 17 sc (17)
Row 22: 1 sc, dec, 6 sc, 3 inc, 5 sc (19)
Row 23: 19 sc (19)
Row 24: inc, 1 sc, inc, 5 sc, 3 dec, 5 sc (18)
Row 25: 18 sc (18)
Row 26: (inc, 5 sc) × 3 (21)
Rows 27-30: 21 sc (21)
Row 31 (Left leg): 21 sc (21)
Row 32 (Left leg): 11 sc (11)
💡 Emma’s Tip: Rows 8 through 11 shape the ankle and foot in a fairly compressed space — I like to slide a cardboard or plastic insert into the foot before I stuff, so the ice queen amigurumi can stand on her own once she’s finished.
Body (white, then beige)
Row 1: 3 ch, 21 sc on left leg, 3 sc on ch, 21 sc on right leg, 2 sc (50)
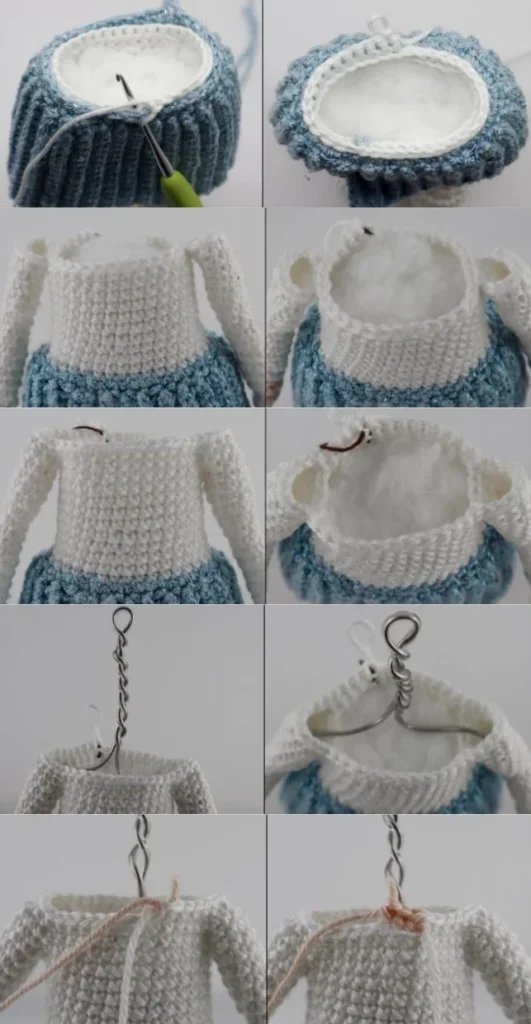
Row 2: 48 sc (48)
Rows 3-6: 48 sc (48)
Row 7: 5 sc, dec, (10 sc, dec) × 3, 5 sc (44)
Row 8: 44 sc (44)
Row 9: (dec, 9 sc) × 4 (40)
Row 10: 4 sc, dec, (8 sc, dec) × 3, 4 sc (36)
Row 11: (skirt + body) 36 sc (36)
Rows 12-13: 36 sc (36)
Row 14: (dec, 7 sc) × 4 (32)
Rows 15-20: 32 sc (32)
Row 21: 8 sc on body, 3 sc on arm and body, 13 sc on body, 3 sc on arm and body, 5 sc on body (32)
Row 22: 8 sc on body, 8 sc on arm, 13 sc on body, 8 sc on arm, 5 sc on body (42)
Row 23: 42 sc (42)
Row 24: 7 sc, dec, (1 sc, dec) × 3, 10 sc, dec, (1 sc, dec) × 3, 3 sc (33)
Row 25: BLO 6 sc, dec, (1 sc, dec) × 2, 9 sc, dec, (1 sc, dec) × 2, 3 sc (27)
Row 26: dec, 2 sc, dec, (1 sc, dec) × 3, 2 sc, (dec, 1 sc) × 3, 2 sc (19)
Row 27: (2 sc, dec) × 5 (15)
Rows 28-39: 15 sc (15)
Row 40: (3 sc, dec) × 3 (12)
Finishing: Stuff firmly and close the opening. Join white yarn to Row 25 and work 16 stitches, then 34 slip stitches around.
💡 Emma’s Tip: Rows 21-22 are where the arms join the body, and it’s easy to lose track of which stitches belong to which piece. Take your time here — pin the arms in place first so you can see exactly where each stitch needs to land before you commit.
Head (beige)
Row 1: 9 sc in mr (9)
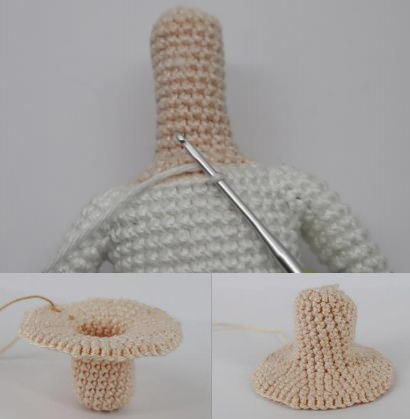
Row 2: 9 inc (18)
Rows 3-12: 18 sc (18)
Row 13: 18 inc (36)
Row 14: (5 sc, inc) × 6 (42)
Row 15: 3 sc, inc, (6 sc, inc) × 5, 3 sc (48)
Row 16: (7 sc, inc) × 6 (54)
Rows 17-22: 54 sc (54)
Row 23: 13 sc, 1 dc, 8 sc, ch 1, skip 1 st, 9 sc, ch 1, skip 1 st, 7 sc, 1 dc, 13 sc (54)
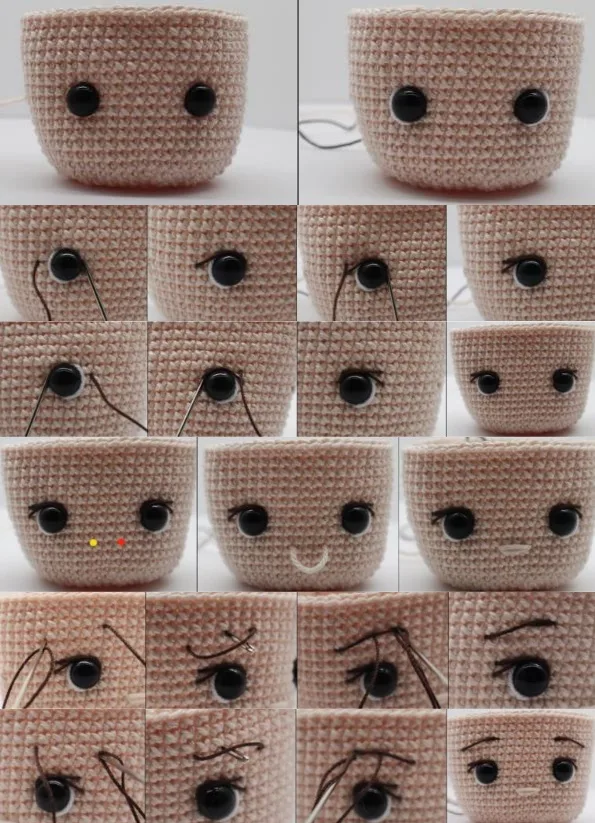
Row 24: 22 sc, 1 dc under ch, 9 sc, 1 sc under ch, 21 sc (54)
Rows 25-30: 54 sc (54)
Rows 31-33: 54 sc (54)
Row 34: (7 sc, dec) × 6 (48)
Row 35: (6 sc, dec) × 6 (42)
Row 36: (5 sc, dec) × 6 (36)
Row 37: (4 sc, dec) × 6 (30)
Row 38: (3 sc, dec) × 6 (24)
Row 39: (2 sc, dec) × 6 (18)
Row 40: (1 sc, dec) × 6 (12)
Finishing: Stuff firmly and close the opening.
💡 Emma’s Tip: Rows 23-24 place the safety eyes and shape the eye sockets in the same breath — get your eyes positioned and test them from a few angles before you lock the washers on. Once they’re in, they’re in.
Hair (milk/cream)
Row 1: 6 sc in mr (6)
Row 2: 6 inc (12)
Row 3: BLO (1 sc, inc) × 6 (18)
Row 4: (2 sc, inc) × 6 (24)
Row 5: (3 sc, inc) × 6 (30)
Row 6: (4 sc, inc) × 6 (36)
Row 7: (5 sc, inc) × 6 (42)
Row 8: (6 sc, inc) × 6 (48)
Row 9: (7 sc, inc) × 6 (54)
Rows 10-17: 54 sc (54)
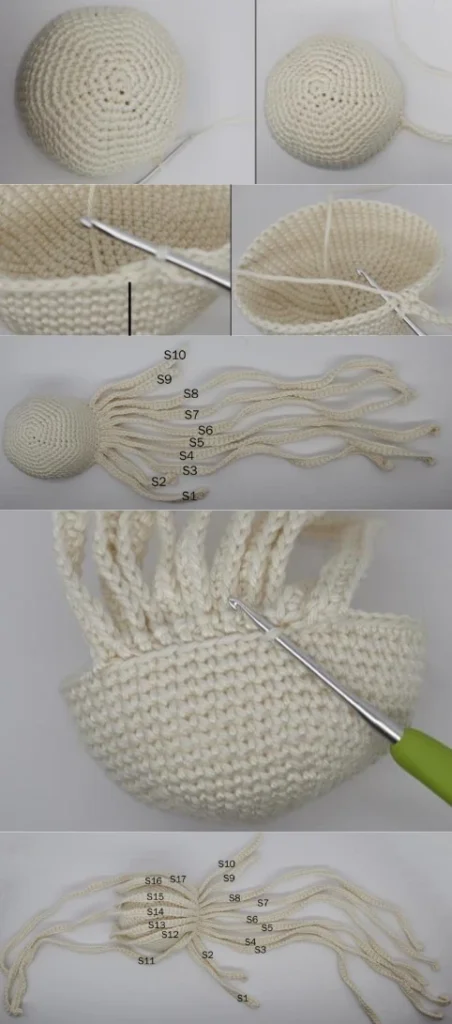
Finishing: Do not cut the yarn — continue directly into the hair strands.
Assembling Your Ice Queen Amigurum
- Insert the safety eyes into the openings prepared in Rows 23-24 of the head.
- Connect the body to the head using a long needle and two lengths of yarn, roughly 20 in each. Thread the yarn through the neck opening — between Rows 35 and 36 of the body, and again two rows lower — then up through the top of the head. Tighten to bring the head snug against the neck, then tie off the ends inside the head.
💡 Emma’s Tip: Don’t rush the head-to-neck join. Pin it in place first, check that she’s sitting straight from the front and the side, and only then tighten the yarn permanently.
Finishing & Details for This Ice Queen Amigurumi
- Embroider the eyelids, eye highlights, and eyebrows using contrasting thread for definition.
- Embroider the nose about 3 stitches wide, positioned between Rows 20 and 21 of the head.
- Join beige yarn at Row 23 of the head, just behind the double crochet stitch, chain 16, work a half double crochet, and fasten off — this forms a small detail loop.
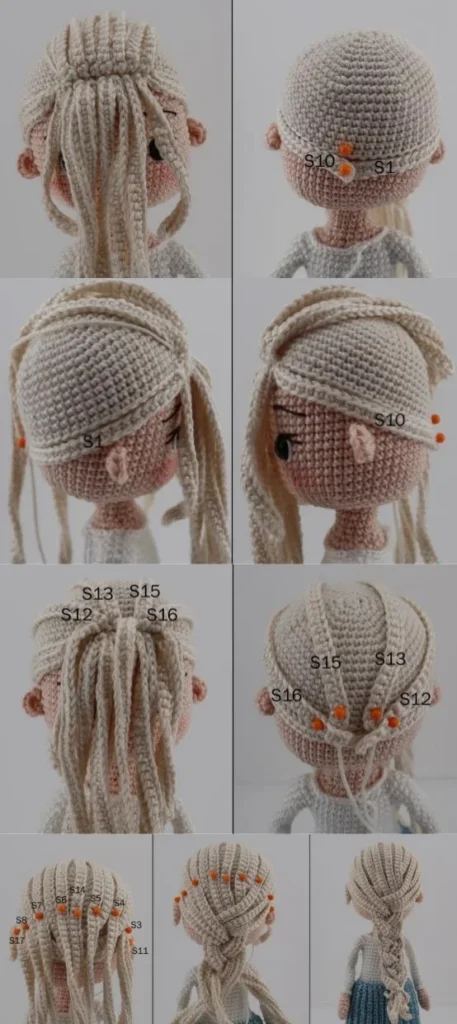
- For the hair, secure strands 1 through 10 at the front of the head and strands 12, 13, 15, and 16 at the back, then braid the hair down the length you’d like.
Emma’s Note
This ice queen amigurumi took me a few tries to get the ribbed skirt sitting the way I wanted — that long stretch of front-loop-only rows is unglamorous work, but it’s what gives the finished piece that clean, structured drape instead of a floppy edge. If your tension runs tight like mine, you’ll notice the body and legs hold their shape beautifully once stuffed. Take your time with the head-to-body join, and don’t be afraid to frog the braid and restart it if it looks lopsided — mine always does on the first attempt. I hope you enjoy making this ice queen amigurumi free pattern as much as I enjoyed creating it. Happy hooking! 🧶
FAQ
What yarn is best for this ice queen amigurumi free pattern?
We recommend using fingering weight mercerized cotton (CYCA #1). It provides the dense, smooth fabric needed to keep the doll’s shape and prevents stuffing from showing through.
How long does it take to crochet this ice queen amigurumi?
This is an advanced project, and it typically takes between 10 to 14 hours to complete, depending on your familiarity with the techniques and speed.
Is this ice queen amigurumi pattern suitable for beginners?
This pattern is rated as advanced. It requires knowledge of complex techniques like wire armature, intricate color changes, and specific shaping methods, so it is better suited for intermediate to advanced crocheters.