Free Tom and Jerry Crochet Pattern — Make Chenille Jerry Mouse
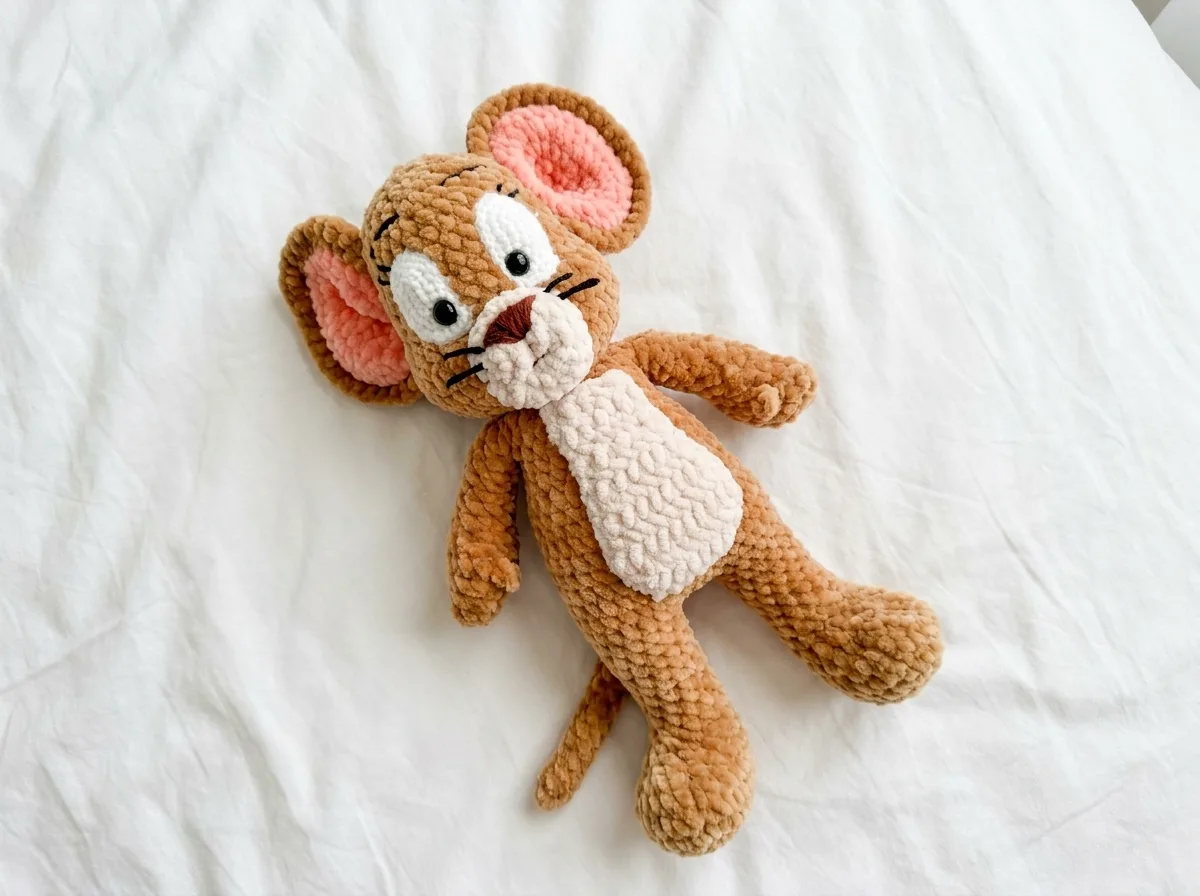
If you are looking for a tom and jerry crochet pattern free, this guide gives you the most iconic cartoon mouse in chunky chenille — standing a solid 11.8 inches tall and immediately recognizable to anyone who’s ever watched Saturday morning TV. One main color skein handles the body, head, arms, legs, and tail. The face and ears pull from small scrap amounts. The whole build clocks in at around 4–6 hours and costs almost nothing if you’re working from stash. Grab your gray chenille and let’s get into it.
🧶 What You’ll Need From Your Stash
- 💰 Yarn Needed: ~220 yds main color, ~35 yds face color, ~45 yds ear color, ~15 yds white DK
- 🎨 Colors: gray (body/main), lighter gray or tan (face), pink (inner ear), white DK (eye whites) — or similar from your stash
- 🪝 Hook: E/4 (3.5 mm)
- ⏱️ Time: 4–6 hours
- 📏 Finished Size: ~11.8 in (30 cm)
- 💡 Difficulty: Intermediate
- 🎁 Great For: gifts, character display collections, cartoon fan gifts
Materials for This Jerry Crochet Pattern Free
- Main color — Bulky (5) chenille yarn, approx. 220 yds. US alternatives: Premier Parfait, Bernat Baby Velvet. One standard skein covers the body, head, arms, legs, and tail with a little left over.
- Face color — Bulky (5) chenille, approx. 35 yds. A lighter gray, tan, or cream. This is a scrap job — dig through your bin before buying anything.
- Ear/inner color — Bulky (5) chenille, approx. 45 yds. Pink or dusty rose. Any leftover pink chenille from a previous project works perfectly here.
- White DK / Light Worsted yarn — approx. 15 yds. For the eye whites only. The brand doesn’t matter — grab any white DK you’ve got lying around.
- E/4 (3.5 mm) crochet hook
- 10mm safety eyes × 2
- Polyester fiberfill stuffing
- Stitch marker
- Tapestry needle
- Sculpting thread and needle (for facial shaping during assembly)
The main, face, and ear yarns all fall under Bulky (5) weight per the CYCA standard — the thick, plush chenille kind that gives this project that soft toy feel and works up faster than you’d expect for a nearly foot-tall piece.
Abbreviations
| Abbreviation | Meaning |
|---|---|
| mr | magic ring |
| ch | chain |
| st | stitch |
| sc | single crochet |
| inc | increase — 2 sc worked into the same stitch |
| dec | invisible decrease — insert hook through front loops only of next 2 stitches simultaneously, yarn over, pull through, yarn over, pull through 2 loops |
| sl st | slip stitch |
Smart Crafter Tips for This Free Tom and Jerry Crochet Pattern
The eye whites switch yarn weight on purpose. The body is bulky chenille, but the eye whites use white DK. That’s not a mistake — the thinner yarn gives you a flatter, more defined oval shape that sits cleanly against the chunky body surface. About 15 yards of scrap white DK is all you need for both pieces. If you’ve finished any baby or home dec project recently, you probably already have this in your stash.
Don’t skip the sculpting thread. The facial sculpting in the assembly section is what turns this from a generic gray mouse into recognizable Jerry. It takes maybe 10 extra minutes and the difference is significant. Budget a little patience for that step — the muzzle shaping especially.
New to magic rings? The legs, body, and head all start with one. Our magic ring tutorial walks through it step by step — it’s faster to learn than you’d think, and it eliminates the center hole you’d otherwise get with a starting chain.
Get the safety eye timing right. You’ll insert the eyes between Rows 11 and 12 of the head — after the widest point starts to decrease, but well before closing. Once the washers are locked in, they don’t come out. Our guide to attaching safety eyes covers the full process so you don’t end up having to frog the head.
Stuff as you go. With a piece this size, it’s easy to get to the closing rows and realize the body is under-stuffed. Our stuffing guide covers the gradual fill technique that keeps the shape right on larger amigurumi — worth a quick read before you start on the body.
Jerry Mouse — Full Pattern Instructions
Arms (Make 2)
Yarn: Main color chenille
Starting method: Chain
Row 1: 6 ch, starting from the 2nd ch: 4 sc, 3 sc in 1 st, 4 sc, 3 sc in 1 st (14)
Rows 2–4: 14 sc (14)
Row 5 (left arm): 1 sc, 3 ch, 1 sc in the 3rd ch, continue working in the round: 11 sc to end of row (14)
Row 5 (right arm): 3 sc, 3 ch, 1 sc in the 3rd ch, continue working in the round: 9 sc (14)
Row 6: (2 sc, 1 dec) × 2, 6 sc (12)
Row 7: (1 sc, 1 dec) × 4 (8)
Rows 8–15: 8 sc (8)
Row 5 creates the finger/thumb. The stitch position differs between the left and right arm — check which version you’re working before starting that row. Due to chenille density, stitch count may vary very slightly; use the finger position as your guide rather than counting alone.
🧶 Scrap Check: Each arm uses approximately 25–30 yards of main color. Both arms together draw from one continuous section of your skein — no need to cut between them unless you prefer to work them separately.
Legs (Make 2) and Body
Yarn: Main color chenille
Starting method: Magic ring
Make both legs first following Rows 1–16, then join them at Row 17 to continue the body as one piece.
Row 1: 6 sc in mr (6)
Row 2: 6 inc (12)
Row 3: (1 sc, 1 inc) × 6 (18)
Row 4: (2 sc, 1 inc) × 6 (24)
Row 5: (3 sc, 1 inc) × 6 (30)
Row 6: 5 sc, (2 sc, 1 dec) × 5, 5 sc (25)
Row 7: 5 sc, (1 sc, 1 dec) × 5, 5 sc (20)
Row 8: 5 sc, 5 dec, 5 sc (15)
Row 9: 4 sc, 3 dec, 5 sc (12)
Rows 10–13: 12 sc (12)
Row 14: 4 sc, 1 inc, 6 sc, 1 inc (14)
Rows 15–16: 14 sc, sl st (14)
At the end of the second leg, work 1 extra sc (shift stitch) before joining. The beginning of Row 17 starts at the front of the left leg.
Row 17 (join legs): 4 ch, 14 sc along right leg, 4 ch, 14 sc along left leg, place marker (total not stated)
Row 18: 4 sc along ch, 1 inc, 7 sc, 1 inc, 4 sc, 4 sc along ch, 1 inc, 4 sc, 1 inc, 8 sc (39)
Row 19: 18 sc, 7 inc (increases at center back), 14 sc (46)
Row 20: 1 dec, 2 sc, 1 dec, 7 sc, 1 dec, 22 sc, 1 dec, 5 sc, 1 dec (41)
Rows 21–22: 41 sc (41)
Row 23: 1 sc, 1 dec, (9 sc, 1 dec) × 3, 3 sc, 1 dec (36)
Row 24: 36 sc (36)
Row 25: (4 sc, 1 dec) × 6 (30)
Rows 26–27: 30 sc (30)
Row 28: (3 sc, 1 dec) × 6 (24)
Rows 29–30: 24 sc (24)
Row 31: 9 sc, 4 sc joining arm, 6 sc, 4 sc joining arm, 1 sc (24)
Row 32: 9 sc, 4 sc joining arm, 6 sc, 4 sc joining arm, 1 sc (24)
Row 33: (2 sc, 1 dec) × 6 (18)
Row 34: (1 sc, 1 dec) × 6 (12)
Attach the arms at Rows 31–32. Stitch counts at arm attachment may vary slightly depending on yarn density — position by fit rather than strict count.
Eye Whites (Make 2)
Yarn: White DK / Light Worsted
Starting method: Chain
Row 1: 6 ch, starting from the 2nd ch: 4 sc, 3 sc in 1 st, 4 sc, 3 sc in 1 st (14)
Row 2: 4 sc, 3 inc, 4 sc, 3 inc (20)
Row 3: 4 sc, (1 sc, 1 inc) × 3, 4 sc, (1 sc, 1 inc) × 3, sl st (26)
Leave a long tail for sewing. Insert the 10mm safety eyes through the eye whites before attaching them to the head.
🧶 Scrap Check: Both eye whites together use about 12–15 yards of white DK. This is a genuine stash-buster scrap piece — no new yarn needed.
Head
Yarn: Main color chenille
Starting method: Magic ring
Row 1: 6 sc in mr (6)
Row 2: 6 inc (12)
Row 3: (1 sc, 1 inc) × 6 (18)
Row 4: (2 sc, 1 inc) × 6 (24)
Row 5: (3 sc, 1 inc) × 6 (30)
Row 6: (4 sc, 1 inc) × 6 (36)
Row 7: 6 inc, 7 sc, 6 inc, 17 sc (48)
Rows 8–9: 48 sc (48)
Row 10: 6 dec, 7 sc, 6 dec, 17 sc (36)
Row 11: (4 sc, 1 dec) × 6 (30)
Rows 12–19: 30 sc (30)
Row 20: (3 sc, 1 dec) × 6 (24)
Row 21: (2 sc, 1 dec) × 6 (18)
Row 22: (1 sc, 1 dec) × 6 (12)
Row 23: 6 dec (6)
After Row 11, insert the safety eyes (already through the eye whites) between Rows 11 and 12, with 5 sc between them. Lock the washers before stuffing and closing.
Tail
Yarn: Main color chenille
Starting method: Magic ring
Row 1: 6 sc in mr (6)
Rows 2–11: 6 sc (6)
Finish with sl st. The tail uses about 8 yards of main color — a true scrap offcut. If you’ve got a short leftover length from joining, use it here.
Ears (Make 2)
Yarn: Pink/ear color chenille (inner piece) + Main color chenille (outer piece)
Starting method: Chain
Make the inner ear once in pink and once in main color using the same rows. Then place the two pieces together and work 2 additional joining rows.
Row 1: 6 ch, starting from the 2nd ch: 4 sc, 3 sc in 1 st, 4 sc, 3 sc in 1 st (14)
Row 2: 4 sc, 3 inc, 4 sc, 3 inc (20)
Row 3: 4 sc, (1 sc, 1 inc) × 3, 4 sc, (1 sc, 1 inc) × 3 (26)
Row 4: 4 sc, (1 sc, 1 inc, 1 sc) × 3, 4 sc, (1 sc, 1 inc, 1 sc) × 3, sl st (32)
Place the pink and main color pieces together with right sides facing outward. Work 32 sc in the round for 2 rows to join them into a single ear.
🧶 Scrap Check: The pink inner ear uses about 20–22 yards per ear, so 40–44 yards total for the pair. If you’ve got leftover pink chenille from any other project, this is exactly where it belongs.
Assembly
- Tail: Sew the tail to the back of the body at approximately Row 21, centered.
- Eye whites and safety eyes: Insert the 10mm safety eyes through the eye whites first. Position them on the head between Rows 11 and 12 with 5 sc between them. Lock the washers firmly before stuffing.
- Stuff the head: Fill firmly with polyester fiberfill. Close the head and sew it to the top of the body, centered over Rows 33–34.
- Eye sculpting: Using sculpting thread and needle, insert the needle through the center bottom of the head and bring it out under the eye white on the inner side of one eye. Insert through 1 sc toward the outer side of the eye, then bring the needle back out at the bottom of the head through 1 sc from the original entry point. Pull both thread ends and tie 2 knots to set the shaping. Repeat for the other eye using a new length of thread.
- Muzzle sculpting: Insert the needle at the bottom of the head. Bring it out at the bottom of the inner side of one eye, then insert through 1 sc upward on the inner side of that same eye. Bring the thread out on the opposite side of the eye at the same level, then insert 1 sc lower and bring it back out at the bottom of the head. Pull gently to shape the muzzle. Secure with a knot.
- Ears: Sew the finished two-layer ear pieces onto the head in position.
- Limb details: Use sculpting thread to define the finger shapes on the hands and any additional texture on the legs.
The sculpting is the step that makes this recognizably Jerry rather than just a generic mouse. Don’t rush it. If you want a reference for sewing the head and ears into position cleanly, our guide to sewing amigurumi parts covers the attachment technique in detail.
💡 Stretch It Further: Jerry is a complete standalone piece, but if you want a set — work the body and head only in a larger gray chenille for a simplified companion mouse, then display them together. Alternatively, bundle this free tom and jerry crochet pattern piece with our free Stitch amigurumi pattern or Baby Yoda amigurumi for a mixed character gift set that covers every generation. A kraft box, some tissue paper, and three characters from stash yarn: under $15 total and instantly giftable.
Mia’s Take
One main color skein, small scrap amounts for the face and ears, and 15 yards of white DK you probably already have — that’s an 11.8-inch character piece that every cartoon fan will clock immediately. The sculpting step is what earns it, and it takes maybe 10 extra minutes that are absolutely worth it. Make one for a shelf, one as a gift, or raid every gray chenille scrap in your bin and turn them into a collection. You’ve almost certainly got most of what you need already. 🧶
What yarn is best for this Jerry crochet pattern?
Bulky (5) weight chenille yarn is best to achieve the 11.8-inch size and soft texture, though any scrap yarn can be used if you adjust the hook size.
How long does it take to crochet Jerry Mouse?
This project typically takes between 4 to 6 hours, depending on your speed and experience with facial sculpting.
Is this pattern suitable for beginners?
This is an intermediate pattern due to the facial sculpting and specific arm details, but adventurous beginners can follow along using our linked tutorials.