Free Tulip Crochet Pattern — Chenille Amigurumi Flower
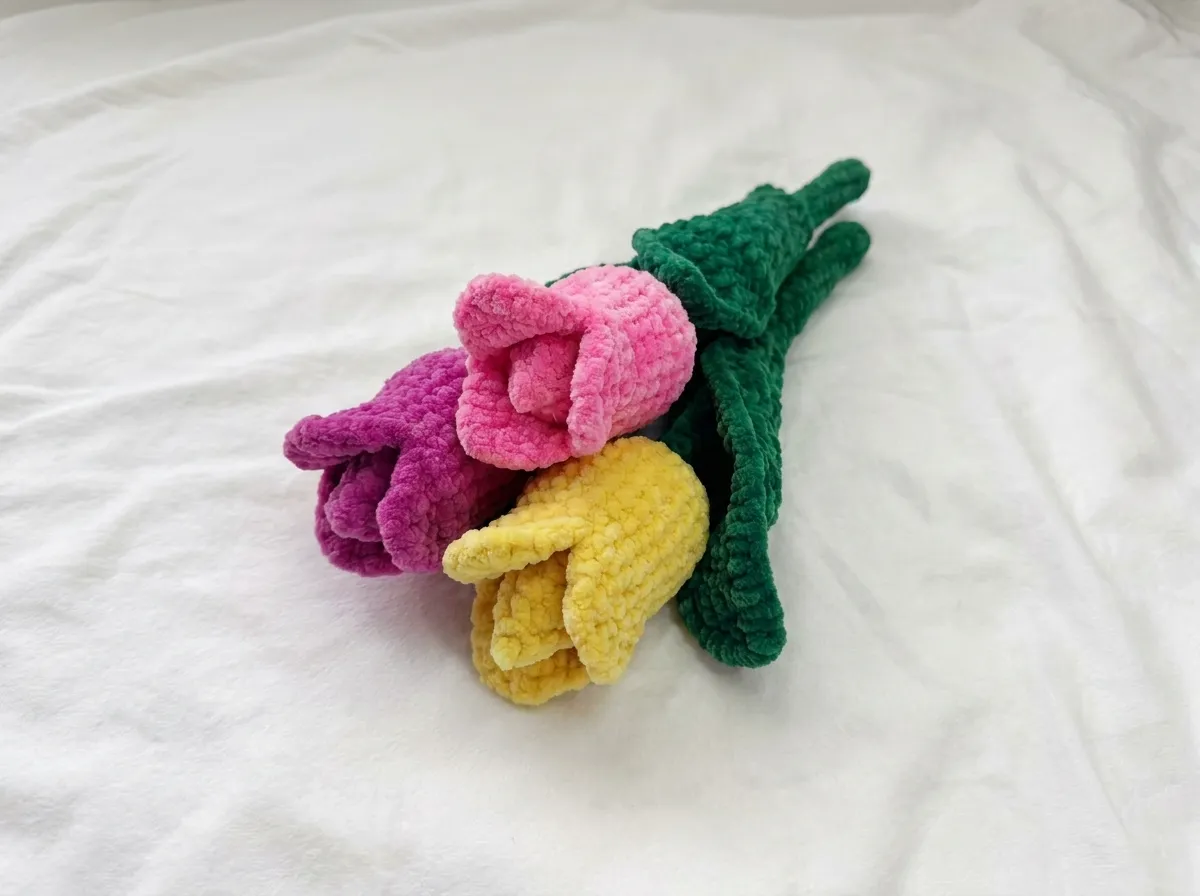
This tulip crochet pattern has become one of my favorite flower projects — soft chenille, a clean color change from green to pink, and a finished bloom that stands at nearly 10 inches. I originally worked up this tulip crochet pattern as a gift and ended up making three more before I stopped counting. It’s beginner-friendly, worked mostly in single crochet, and every stitch count is checked. Let’s start from the stem.
📋 Pattern Quick Stats
- Difficulty: Beginner
- Finished Size: 9.8 in (25 cm)
- Hook Size: E/4 (3.5 mm)
- Yarn Weight: Bulky (5) — chenille/velvet
- Techniques: chain start, single crochet, double crochet, inc, dec, color change, continuous rounds, turned rows
- Estimated Time: 3–5 hours
Materials for This Tulip Crochet Pattern
- Green chenille yarn — Bulky (5) weight, approximately 20 g. I used a plush chenille similar to Bernat Baby Velvet or Premier Parfait Chunky, both widely available at Joann, Michaels, and Hobby Lobby.
- Pink chenille yarn — same weight as the green, approximately 10–15 g
- Crochet hook: E/4 (3.5 mm)
- Wooden stick, thin dowel, or floral wire — for the internal stem armature. A bamboo skewer or chopstick is the right size and easy to find.
- Toy stuffing — Poly-Fil polyester fiberfill or similar
- Tapestry needle — for weaving in ends
- Stitch marker — to track round beginnings and to mark Row 8 of the bud (more on that below)
- Scissors
This yarn falls into the Bulky (5) category on the Craft Yarn Council yarn weight system. Chenille and velvet yarns in this weight give amigurumi a soft, plush texture that holds its shape beautifully — and they’re forgiving for beginners because minor tension variations barely show.
💡 Emma’s Tip: The wooden stick is non-negotiable for this pattern — it’s what allows the tulip to stand upright on its own. A bamboo skewer works perfectly. If you want a more flexible, poseable stem, floral wire is a great alternative. Either way, trim it to length once the tulip is finished.
Abbreviations
| Abbreviation | Meaning |
|---|---|
| ch | chain |
| sl st | slip stitch |
| sc | single crochet |
| dc | double crochet |
| inc | increase — 2 sc in the same stitch (or 2 dc in the same stitch when working the leaf in dc rows) |
| dec | decrease — work 2 sc together (see technique note below for my recommended substitution) |
| × 3 | repeat the instructions in parentheses the stated number of times |
Special Techniques for This Tulip Crochet Pattern
Before you cast on, a few technique notes that will save you time — and possibly some frogging — later on.
Decrease (dec): This pattern calls for a standard decrease throughout the bud. I always recommend substituting the invisible decrease in amigurumi work wherever possible — it eliminates the visible gap that a standard sc2tog creates, and on a bud that closes to a point, the difference is noticeable. If you’re not familiar with it yet, our complete invisible decrease tutorial walks through it step by step. The stitch counts remain exactly the same whether you use the standard decrease or the invisible one.
Color change: This tulip transitions from green to pink at the start of the bud. Getting a clean, jog-free join at that transition is worth the extra 30 seconds it takes to do it properly — it’s the first thing anyone looks at on the finished piece. Our guide to seamless color changes in amigurumi covers exactly how to handle it.
Stuffing as you go: Unlike many amigurumi patterns where you stuff at the very end, this tulip requires you to stuff the stem tip early and the bud at a specific window during construction. Timing matters here — miss it and it becomes genuinely difficult to get the stuffing distributed evenly. Our guide to stuffing amigurumi properly without lumps is worth a read before you start if you’re new to working this way.
Turned rows for petals and leaf: The stem and bud are worked in continuous rounds — no joining, no turning. The petals and leaf, however, are worked in back-and-forth turned rows, which is standard flat crochet. You’ll turn your work at the end of each row. In the petals, the chain at the beginning of Rows 2–5 counts as one stitch in the row total. In the leaf, the 3 ch at the beginning of each row counts as one dc. These are called turning chains, and they’re there to bring your hook up to the correct height for the next row — count them.
Chain start: This pattern starts the stem with 2 ch rather than a magic ring. Work your first 6 sc into the 2nd chain from the hook. The leaf also begins with a chain start (4 ch). Neither piece uses a magic ring.
Tulip Crochet Pattern — Step-by-Step Instructions
Part 1: Stem (×1)
Yarn color: green
Starting method: 2 ch — work 6 sc into the 2nd chain from hook to begin
Row 1: 6 sc in 2nd ch from hook (6)
Rows 2–30: 6 sc (6)
Work in continuous rounds, placing your stitch marker at the beginning of each round.
💡 Emma’s Tip: At around Rows 8–10, pause and stuff the tip of the stem before it gets too narrow to reach inside. Don’t overfill — you want the stem to feel firm and hold the wooden stick without bulging. The finished stem should measure approximately 6.7–7 in (17–18 cm) before you begin the flower base. At only 6 stitches around for 30 rows, losing your place is easy; keep that stitch marker clipped and move it up every single round.
Do not fasten off after Row 30. Continue directly into the flower base without joining or cutting yarn.
Part 2: Flower Base (×1)
Yarn color: green
Starting method: Continue working from the stem — no fasten off, no join
Row 1: 6 inc (12)
Row 2: (1 sc, 3 inc) × 3 (21)
💡 Emma’s Tip: Row 2 of the flower base reads: one single crochet followed by three consecutive increases, repeated three times total around the round. Three increases in a row feels unusual if you’re used to evenly spaced shaping — it will seem like a lot of stitches piling into a small space, and that’s intentional. It creates the flared base that the bud sits on. Count carefully when you’re done: you need exactly 21 stitches before you move on.
Do not fasten off. Change to pink yarn and continue into the bud.
Part 3: Bud (×1)
Yarn color: pink
Starting method: Color change directly from the flower base — no fasten off, no join
Row 1: (inc, 6 sc) × 3 (24)
Row 2: (4 sc, inc, 3 sc) × 3 (27)
Rows 3–4: 27 sc (2 rows) (27)
Row 5: (7 sc, dec) × 3 (24)
Rows 6–8: 24 sc (3 rows) (24)
Row 9: (2 sc, dec) × 6 (18)
Row 10: (1 sc, dec) × 6 (12)
Row 11: 12 sc (12)
Row 12: 6 dec (6)
Row 13: 3 dec (3)
💡 Emma’s Tip: Rows 6–8 are your stuffing window. During these three even rounds, insert the wooden stick down through the center of the stem (it should be partially positioned already from when you stuffed the stem tip) and then stuff the bud firmly around it. Get the stuffing in now — once you work past Row 8 and the bud starts closing, you won’t be able to distribute it evenly. The bud should feel solid and hold its rounded shape without looking stretched or lumpy.
⚠️ Important — mark Row 8 before you close: Place a second stitch marker at the beginning of Row 8 before you continue past it. You’ll need to pick up stitches from Row 8 when you work the petals, and finding those stitches on a closed, stuffed bud without a marker is harder than it sounds. Mark it now and thank yourself later.
Finishing: Cut yarn, leaving a short tail. Thread your tapestry needle, run it through the remaining 3 stitches, and pull tight to close the top of the bud. Weave the end securely to the inside.
Part 4: Petals (×3)
Yarn color: pink
Starting method: Insert hook into the stitches of Row 8 of the bud to pick up stitches
Begin by working a foundation round of 24 sc around the stitches of Row 8 of the bud. This creates the base ring from which all three petals will be worked.
Foundation round: 24 sc around Row 8 of the bud (24)
From this 24-stitch foundation round, work 3 petals separately in turned rows. The 24 stitches divide evenly into three sections of 8 stitches — start each petal at the same position relative to the last, spacing them evenly around the bud. Each petal is worked back and forth in rows, starting from 7 stitches of the foundation round.
💡 Emma’s Tip: The chain at the beginning of Petal Rows 2–5 counts as one stitch in the row total. Do not crochet into it on the way back — it is not a stitch to work into, it’s a turning chain that brings your height up. Counting it correctly is what keeps your petal decreasing at the right rate and ending in a clean pointed tip. Work the first petal slowly, count after every row, and the second and third will go quickly once you understand the logic.
Each petal is worked as follows (repeat 3 times total):
Petal Row 1: 7 sc (7)
Petal Row 2: ch, 2 sc, dec, 2 sc (6)
Petal Row 3: ch, 2 dec, 1 sc (4)
Petal Row 4: ch, dec, 1 sc (3)
Petal Row 5: ch, dec (2)
Petal Row 6: ch, 4 sc down the side edge of the petal, 1 sl st into the starting row stitch
Finishing each petal: Cut yarn, fasten off, and weave the end to the inside of the bud. Repeat for all 3 petals.
Part 5: Leaf (×1 — Worked Separately)
Yarn color: green
Starting method: 4 ch
The leaf is worked entirely in double crochet in turned rows. The 3 ch at the beginning of each row counts as 1 dc — this is the standard turning chain for double crochet rows. Once the leaf is complete, join the two long side edges with 2 sc to give it a 3D, slightly cupped shape. The finished leaf is removable and simply slips onto the stem.
💡 Emma’s Tip: If you’ve only worked single crochet amigurumi before, double crochet rows might feel unfamiliar. The key difference: you yarn over before inserting your hook into the stitch, and you work through the loops in two stages. Take a few practice stitches if needed before you start the leaf — getting comfortable with the dc turning chain will make the shaping rows feel much more natural.
Row 1: 2 dc in 1st st (3 ch turning chain at beginning counts as 1 dc) (3)
Row 2: inc, 1 dc, inc (5)
Row 3: inc, 3 dc, inc (7)
Row 4: inc, 5 dc, inc (9)
Row 5: inc, 7 dc, inc (11)
Rows 6–9: 3 ch, 10 dc (4 rows) (11)
Row 10: 3 ch, dec, 5 dc, dec, 1 dc (9)
Row 11: 3 ch, dec, 3 dc, dec, 1 dc (7)
Row 12: 3 ch, 6 dc (7)
Row 13: Work sc around the entire outer edge of the leaf
After Row 13, join the two long side edges of the leaf with 2 sc. This closes the leaf into a slightly rounded, three-dimensional shape.
Finishing: Cut yarn, fasten off, and weave in all ends.
💡 Emma’s Tip: The sc edging in Row 13 is what defines the leaf’s final shape — don’t skip it or rush it. Work at a consistent tension all the way around and you’ll get a clean, crisp edge that looks deliberate. The removable design is one of my favorite details here: you can slide the leaf up or down the stem to adjust the look, or make two leaves for a fuller arrangement.
Assembly
- This tulip is worked in one continuous piece from stem through bud, with the color change from green to pink as the only transition. There is no sewing required for the main structure.
- The wooden stick should already be positioned inside the stem from when you stuffed it during construction. Once the bud is closed, check that the stick sits centered and trim it to length — leave a small amount extending below the stem base if you plan to display the tulip in a vase or floral foam, or trim flush if it will be freestanding on its base.
- All three petals are attached by picking up stitches from Row 8 of the bud. They are worked directly onto the piece — no sewing, no pins needed.
- Slide the finished leaf onto the stem from the bottom. Position it wherever it looks best — there is no fixed placement. The slight 3D shape from the edge join will keep it sitting at a natural angle.
💡 Emma’s Tip: If any of the three petals are sitting slightly askew after you’ve woven in all the ends, a single anchor stitch through the base of the petal and into the bud — using a short length of matching pink yarn and your tapestry needle — will hold it in place without being visible from the outside.
Finishing Your Tulip Crochet Pattern
Once all yarn ends are woven in, take a moment to shape the finished piece. Gently roll the bud between your palms to encourage a smooth, even roundness — chenille responds well to light shaping. If the top of the bud has a slight pucker where you pulled the final 3 stitches closed, smooth it with your fingers and it will relax.
The three petals should splay outward naturally from the base of the bud. If they’re pressing too close together, gently open them out with your fingers. If the leaf is curling, a few hours under a heavy book will flatten it without any pressing or steaming needed.
This tulip crochet pattern makes a wonderful standalone piece, but it’s also a natural starting point if you enjoy botanical crochet. Our crochet strawberry amigurumi and free mushroom amigurumi pattern both use the same chenille texture and scale well together for a little nature-themed arrangement.
Emma’s Note
I’ve had a soft spot for botanical crochet ever since I realized that a well-stuffed chenille piece holds its shape in a way that acrylic never quite does — and this tulip is a perfect example. The turned rows for the petals sound intimidating on paper, but once you work the first one, the logic clicks immediately and the second and third go fast. Don’t skip the stitch marker at Row 8 of the bud; that single habit saves you from having to hunt through a closed, stuffed piece for your pick-up stitches. Take your time with the color change at the green-to-pink transition, and the finished flower will look far more polished than the effort it took. Happy hooking! 🧶
Is this tulip crochet pattern suitable for beginners?
Yes, this pattern is beginner-friendly. It is worked mostly in simple single crochet stitches and includes detailed instructions for techniques like seamless color changes and basic decreases.
What type of yarn is best for this crochet tulip?
Bulky (5) weight chenille or velvet yarn is highly recommended. It gives the amigurumi a soft, plush texture that holds its shape beautifully and helps hide minor tension variations.
How long does it take to crochet this tulip?
It typically takes about 3 to 5 hours to complete this tulip, depending on your crochet speed and experience level with bulky yarn.