Duck in a Cap Amigurumi — A Scrap-Friendly Advanced Pattern Worth the Yardage
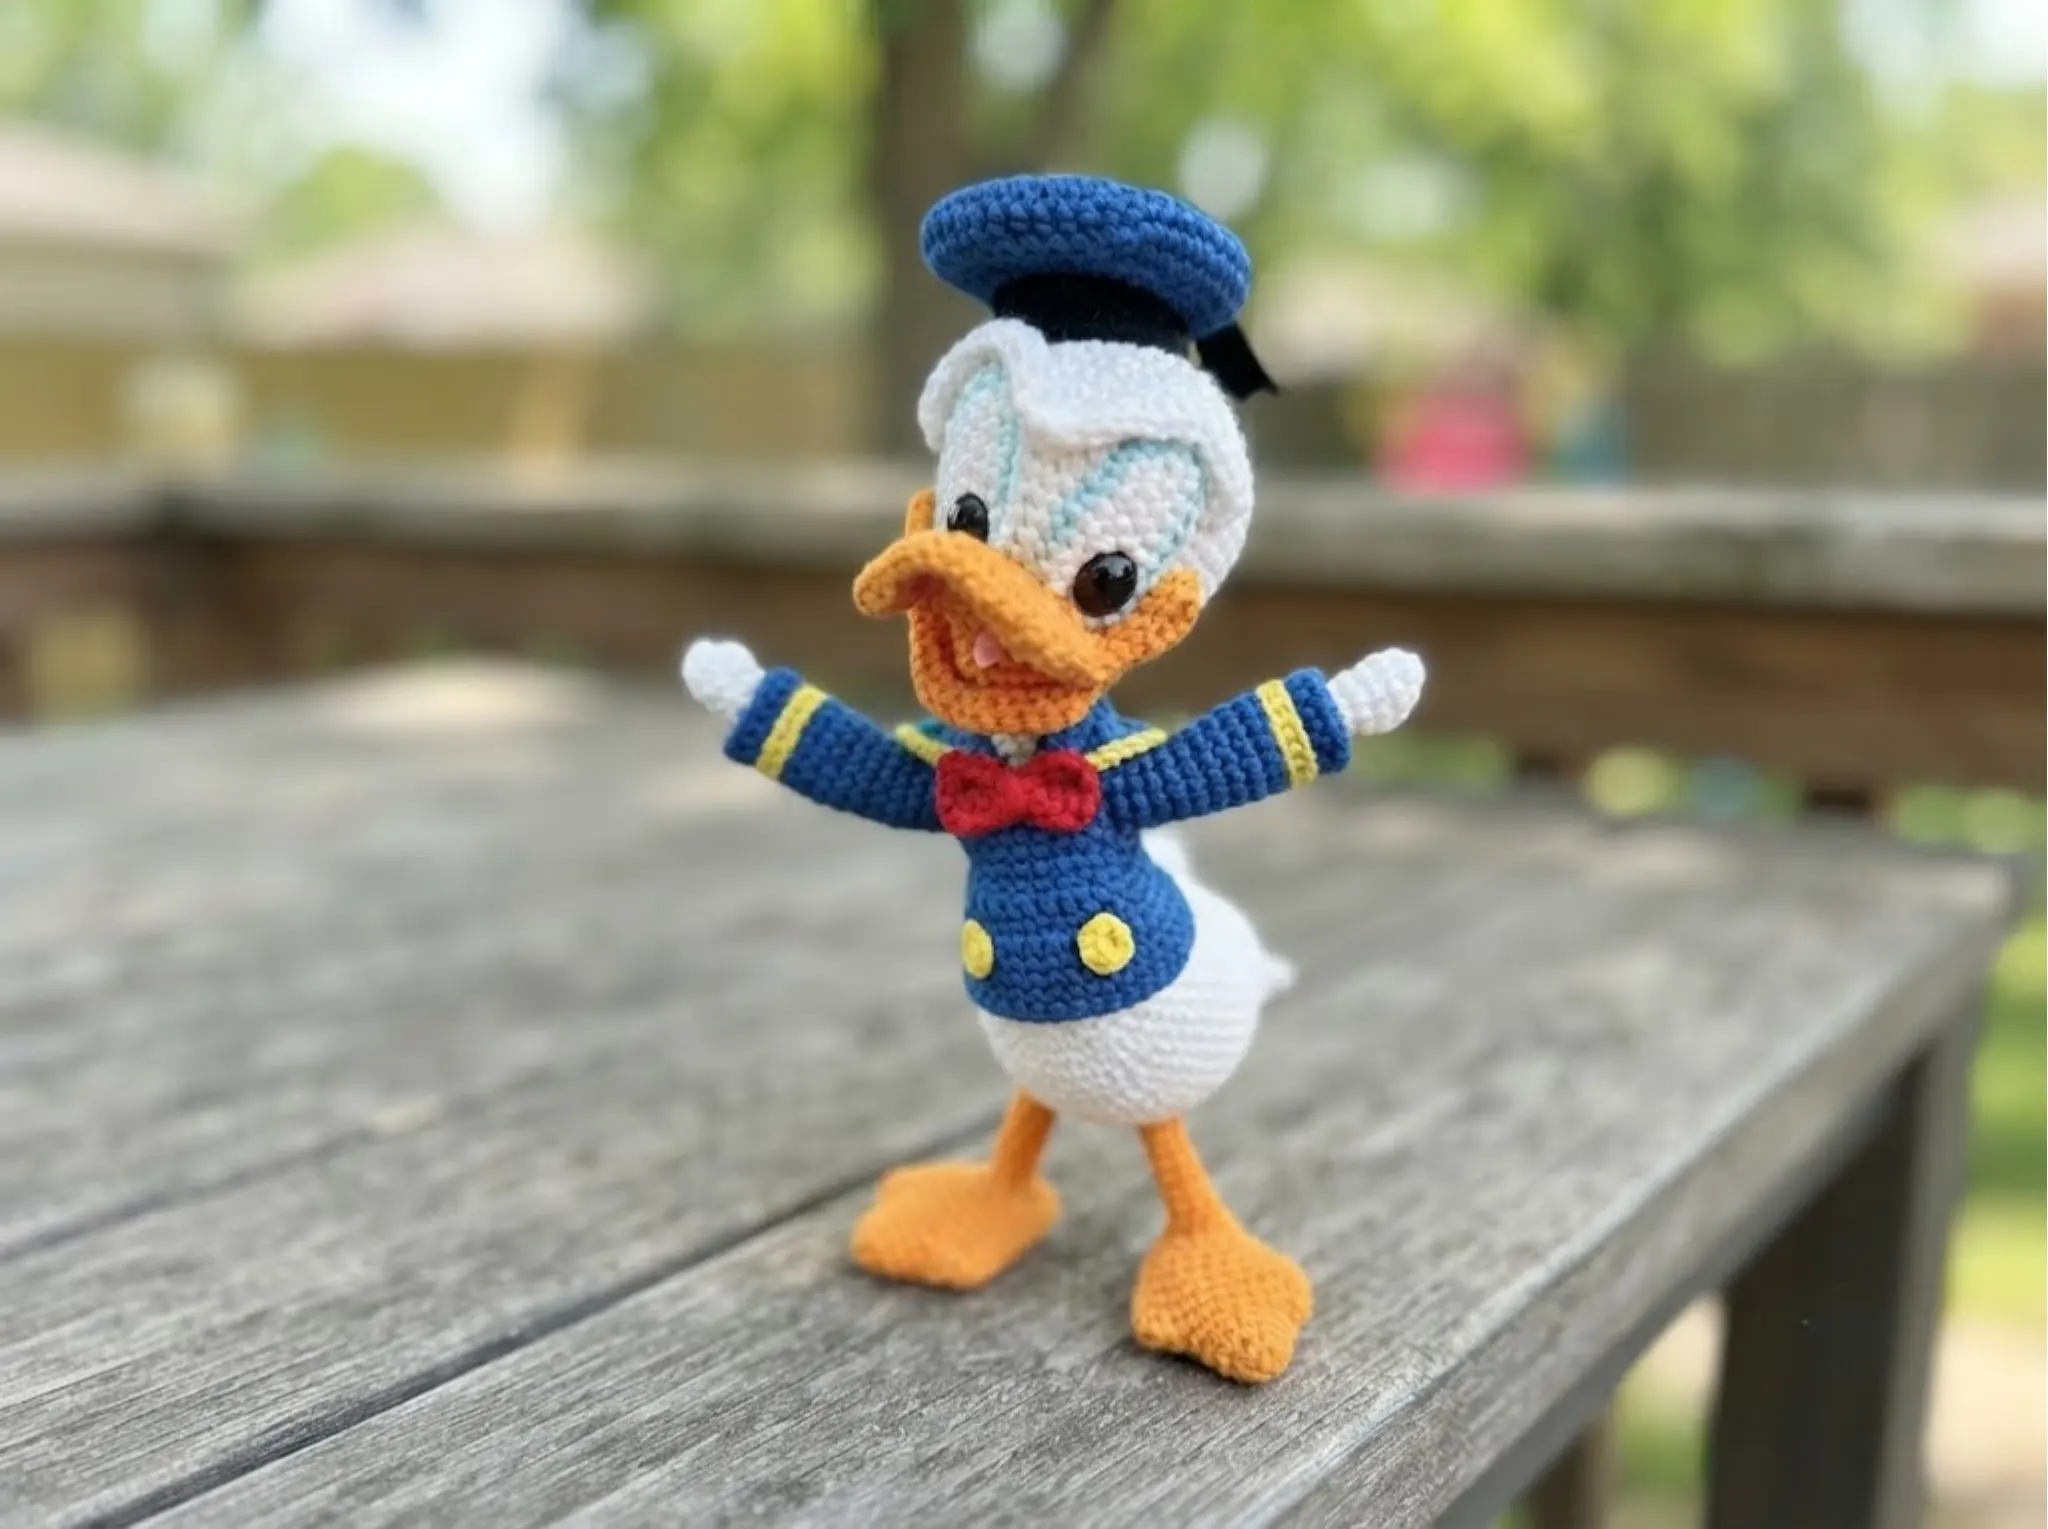
This duck in a cap amigurumi pattern is not a quick weeknight project, and I’m not going to pretend it is — it’s an advanced, thread-weight build with a working jacket, a jointed wire body, and a felt-and-crochet beak that actually holds its shape. What it is, though, is genuinely efficient with materials: you’re working in six small color sections, which means it’s the kind of project where your odds-and-ends bin of orange, yellow, red, blue, white, and black scraps finally gets used up instead of sitting there. Grab your smallest hook. This one rewards patience, not yarn.
🧶 What You’ll Need
- 💰 Yarn Needed: a small amount of each — orange, yellow, red, blue, white, and black (thread-weight; exact yardage will depend on your tension, but this is a low-yardage, high-detail project overall)
- 🎨 Colors: orange, yellow, red, blue, white, black (or similar leftover thread-weight scraps from your stash)
- 🪝 Hook: 2.0 mm (no US letter equivalent) and 1.3 mm (no US letter equivalent)
- ⏱️ Time: several sessions — this is not a one-sitting project
- 📏 Finished Size: 7.1 in (18 cm)
- 💡 Difficulty: Advanced
- 🎁 Great For: collectors, shelf display, a stand-out gift for someone who’ll appreciate the detail
Materials — What’s Actually in Your Stash Already
Because this duck in a cap amigurumi uses six colors in fairly small quantities, it’s a legitimate stash-buster even though the overall project is advanced. You don’t need full skeins of anything.
- Orange yarn — a small amount, thread-weight, for the beak
- Yellow yarn — a small amount for the legs and beak details
- Red yarn — a small amount for the jacket accents
- Blue yarn — a small amount for the jacket body
- White yarn — the bulk of your yardage, used for the arms, eyes, body, head, and feathers
- Black yarn — a small amount for the beret/cap and felt-paired detailing
- Hook: 2.0 mm and 1.3 mm (there’s no US letter size for either — at this scale you’re working thread-weight, so if you don’t already own hooks this small, this is one place I wouldn’t skip buying the right size; stitch definition at this scale depends on it)
- 8 mm safety eyes — long-shank, since they need to sit through the crocheted eye piece
- Fiberfill — a small amount; several parts of this pattern are intentionally left unstuffed or only lightly stuffed
- Pink and black felt — small scraps, for the inner beak and beret detailing
- Wire — for the arms and legs, so the finished piece can be posed
- Needle, stitch marker, scissors
If you’re not sure your stash yarn will hold up at 1.3 mm, test a swatch first. Thread-weight cotton is the most forgiving choice here — it’s what gives this kind of small-scale amigurumi its crisp stitch definition.
Abbreviations Used in This Duck in a Cap Amigurumi Pattern
| Abbreviation | Meaning |
|---|---|
| mr | magic ring |
| ch | chain |
| sl st | slip stitch |
| sc | single crochet |
| hdc | half double crochet |
| dc | double crochet |
| tr | treble crochet |
| dec | decrease (invisible decrease recommended for a clean finish) |
| inc | increase |
| × | repeat |
Smart Crafter Tips for This Pattern
A few things that’ll save you time and frustration on a build this detailed:
First — if you haven’t worked at thread-weight before, don’t start here cold. Our hook size guide covers how tension changes when you drop down to a small hook like this 1.3 mm, and it’s worth a read before you start the eyes piece, which is the most fiddly part of the whole project.
Second, this pattern uses a straight dec throughout rather than specifying invisible decrease row by row — but at this scale, working your decreases as an invisible decrease (front loops only, both stitches together) will make a real difference in how clean the head and body shaping look. Our invisible decrease tutorial walks through the exact motion.
Third — several parts here (the arms, and the lower leg sections) are intentionally left unstuffed or only lightly stuffed, which is unusual if you’re used to fully-packed amigurumi. That’s not a mistake in the pattern — it’s what lets the wire armature do its job and keep the finished duck poseable. If you’ve never worked wire into a piece before, our stuffing guide covers the difference between structural stuffing and shape-holding stuffing, which is exactly what’s happening here.
This hook size conversion reference is worth bookmarking too — at 2.0 mm and 1.3 mm you’re below most standard US letter sizing, so it helps to know exactly where you land relative to your other hooks.
Pattern — Arms (Make 2)
Yarn: white | Starting method: mr
Row 1: 6 sc in mr (6)
Row 2: (1 sc, inc) × 3 (9)
Row 3: 9 sc (9)
Row 4: 1 popcorn stitch of 4 dc, 8 sc (9)
Rows 5-8: 9 sc, worked 4 times (9)
Row 9: dec, 7 sc (8)
Rows 10-13: 8 sc, worked 4 times (8)
Row 14: dec, 6 sc (7)
Rows 15-18: 7 sc, worked 4 times (7)
Finishing: Fasten off. Do not stuff — the wire does the work of holding the arm’s shape and pose.
🧶 Scrap Check: Two arms at this scale barely make a dent in a leftover white ball. If you’ve got a small amount of white sitting from another project, it’s almost certainly enough for both.
Pattern — Legs (Make 2)
Yarn: yellow | Starting method: mr
Row 1: 6 sc in mr (6)
Row 2: 6 inc (12)
Row 3: (3 sc, inc) × 3 (15)
Row 4: 15 sc (15)
Row 5: 4 ch, starting from 2nd ch work 3 sc, 7 sc along the piece, 4 ch, starting from 2nd ch work 3 sc, 8 sc along the piece, work 2 sc in the first ch worked, inc (25)
Row 6: 10 sc, 2 sc along the chain, inc, 15 sc (29)
Rows 7-8: 29 sc, worked 2 times (29)
Row 9: 12 sc, dec, 13 sc, dec (27)
Row 10: 6 sc, dec, 11 sc, dec, 6 sc (25)
Row 11: 10 sc, dec, 11 sc, dec (23)
Row 12: 5 sc, dec, 9 sc, dec, 5 sc (21)
Row 13: 8 sc, dec, 9 sc, dec (19)
Row 14: 4 sc, 5 ch, skip 3 sc, 12 sc (16)
Row 15: 4 sc, 5 sc along the chain, 12 sc (21)
Row 16: (3 sc, dec) × 4, 1 sc (17)
Row 17: 1 sc, (1 sc, dec) × 5, 1 sc (12)
Row 18: 6 dec (6)
🧶 Scrap Check: At Row 5, this becomes the new beginning of the round. Cut about 10 in (25 cm) of wire, fold it in half, secure the fold with electrical tape, and insert it into the opening before you continue — this is the wire that gives the leg its pose.
Finishing: Fasten off. Connect to the open hole for the second part of the leg.
Legs — Part 2
Row 1: 10 sc (10)
Row 2: (3 sc, dec) × 2 (8)
Row 3: 8 sc (8)
Row 4: 6 sc, dec (7)
Rows 5-12: 7 sc, worked 8 times (7)
Finishing: Stuff the heel section slightly. The leg is not fully stuffed — again, the wire is doing most of the structural work here, so resist the urge to overstuff.
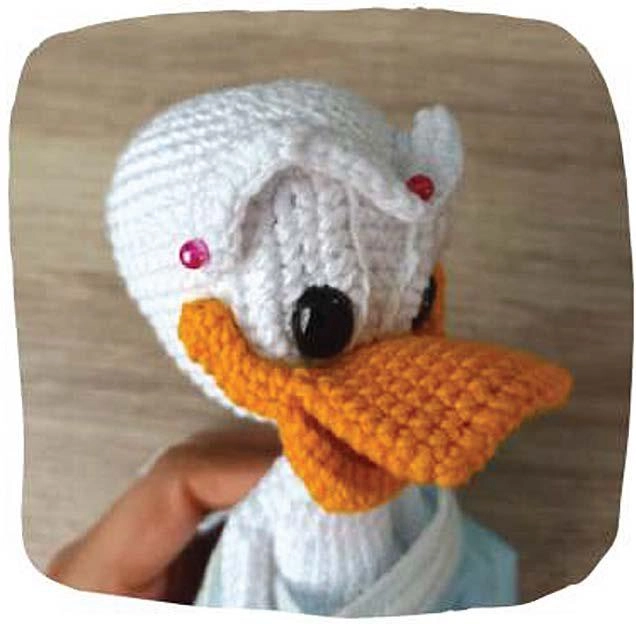
Pattern — Eyes (Make 1 piece, both eyes together)
Yarn: white | Starting method: 8 ch
Row 1: 8 ch, work (inc, 5 sc, 4 sc in 1 stitch, 5 sc, inc) (18)
Row 2: 2 inc of hdc, 5 hdc, 4 inc of hdc, 5 hdc, 2 inc of hdc (26)
Finishing: Fasten off with a sl st, leaving a tail for sewing. Insert the long-shank safety eyes through this piece before attaching it to the head.
Pattern — Body and Head
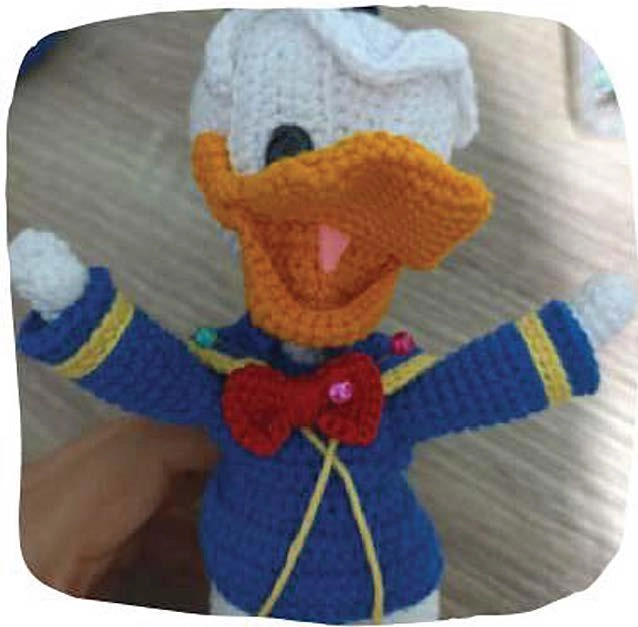
Yarn: white | Starting method: mr
Row 1: 6 sc in mr (6)
Row 2: 6 inc (12)
Row 3: 12 sc (12)
Row 4: (sc, inc) × 6 (18)
Row 5: 18 sc (18)
Row 6: 3 sc, (sc, inc) × 6, 3 sc (27)
Row 7: 6 sc, (2 sc, inc) × 4, 6 sc (28)
Rows 8-9: 28 sc (28)
Row 10: 8 sc, (2 hdc, inc of hdc) × 4, 8 sc (32)
Row 11: 7 sc, (2 hdc, inc of hdc) × 6, 7 sc (38)
Row 12: 38 sc (38)
Row 13: 1 sc, (5 sc, inc) × 6, 1 sc (44)
Row 14: 4 sc, (inc, 6 sc) × 5, inc, 4 sc (50)
Rows 15-20: 50 sc, worked 6 times (50)
Row 21: 10 sc, (4 sc, dec) × 5, 10 sc (45)
Row 22: 10 sc, 25 hdc, 10 sc (45)
Row 23: 10 sc, (3 sc, dec) × 5, 10 sc (40)
Row 24: 3 inc, 4 sc, (3 sc, dec) × 5, 5 sc, 3 inc (43)
Row 25: 6 sc, 29 hdc, 6 sc (41)
Row 26: 6 sc, (3 sc, dec) × 6, 5 sc (35)
Row 27: 5 sc, (2 sc, dec) × 6, 6 sc (29)
Row 28: 6 sc, 17 sc, 10 ch, skip 12 stitches; 6 stitches remain from this row plus 6 stitches from the next row (23)
Row 29: 7 sc, dec, 8 sc, 10 sc along the ch (26)
Row 30: 1 sc, (2 sc, dec) × 3, 1 sc, (2 sc, dec) × 3 (20)
Row 31: 10 dec (10)
Finishing: Close the piece. The head continues directly from the body — no fastening off between them.
🧶 Scrap Check: The body and head together are the largest white section by far. This is where most of your white yardage goes — everything else on this duck (arms, eyes, feathers) is a rounding error by comparison.
Head (continues from body)
Row 1: in front loops only, 7 inc (14)
Row 2: (sc, inc) × 7 (21)
Row 3: (2 sc, inc) × 7 (28)
Row 4: 28 sc (28)
Row 5: (3 sc, inc) × 7 (35)
Row 6: 35 sc (35)
Row 7: (4 sc, inc) × 7 (42)
Rows 8-10: 42 sc, worked 3 times (42)
Row 11: (5 sc, inc) × 7 (49)
Row 12: (6 sc, inc) × 7 (56)
Rows 13-17: 56 sc, worked 5 times (56)
Row 18: (26 sc, dec) × 2 (54)
Row 19: (7 sc, dec) × 6 (48)
Row 20: 3 sc, (dec, 6 sc) × 5, dec, 3 sc (42)
Row 21: (5 sc, dec) × 6 (36)
Row 22: 2 sc, (dec, 4 sc) × 5, dec, 2 sc (30)
Row 23: (3 sc, dec) × 6 (24)
Row 24: 1 sc, (dec, 2 sc) × 5, dec, 1 sc (18)
Row 25: (1 sc, dec) × 6 (12)
Row 26: 6 dec (6)
Finishing: Fasten off and stuff the head firmly before closing — this is the one part of the whole duck that should be well-packed, since it doesn’t have wire support.
Pattern — Beak
Yarn: yellow | Starting method: 11 ch
Row 1: 11 ch, 10 sc, 10 sc on the other side (20)
A quick note here: the source pattern for this section only specifies this opening row in detail before referring back to the designer’s original chart for the remaining shaping. I’d rather tell you that plainly than guess at rows that weren’t given to me — if you’re working from this pattern, cross-reference the beak shaping against the full chart before you start, since guessing at stitch counts on a piece this small will throw off the fit against the head.
Finishing: Sew the entire piece by folding it in half.
🧶 Scrap Check: The beak takes almost nothing — a few yards of yellow at most. Any leftover yellow thread-weight from another project will do the job.
Pattern — Jacket
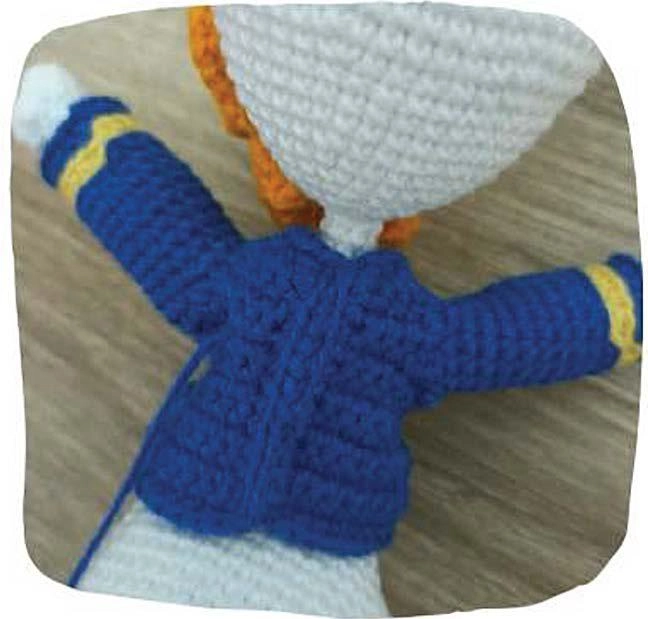
Yarn: blue, yellow | Starting method: 19 ch
Row 1: 19 ch, 18 sc, ch, turn (18)
Same note as the beak: only the opening row was provided for this piece in the source material, with the remaining rows referred back to the original detailed chart. Rather than fill those rows in with guesses, work this section directly from the full chart if you have it, and treat this opening row as your starting point.
Pattern — Feathers
Yarn: white | Starting method: mr
Row 1: 5 sc in mr (5)
Assembly
- Attach the legs to the base of the body between rows 13 and 16.
- Insert wire into the arms, and run it through the middle of the leg wire to secure the whole armature together.
- Sew the eyes on first, then position the beak using pins before committing to stitches — this is much easier to adjust before sewing than after.
- Place the jacket with the opening at the back and sew it shut. Add the collar, then sew the bow to the middle front.
Decoration Details
- Cut a small triangle from pink felt and glue it to the inside of the beak.
- Make 2 buttons: 5 sc in mr.
- Cut a strip with a triangular edge from black felt for the beret.
- Eyebrows: 31 ch, worked according to the chart.
💡 Stretch It Further: Once you’ve built the wire armature and worked through the color-blocking here, the same body-and-head shaping opens the door to a whole line of little sailor-outfit birds — swap the blue jacket for red, or the yellow legs for orange, and you’ve got a different character from the exact same base pattern. If you’re someone who likes making sets, this is a strong one to batch: build two or three duck bodies back to back, then vary only the jacket color and beret detail for a small collection that all shares the same construction.
Mia’s Take
This one’s a slow build, and I won’t pretend otherwise — the wire armature, the two-hook thread work, and the felt detailing all take real time. But it’s also proof that “advanced” doesn’t have to mean “expensive.” Every color here comes from a small amount of yarn, which means this whole duck can come out of scraps you already own if you crochet at thread weight regularly. Save this one for a week when you want a project that rewards patience over speed, and keep your eyes and beak pieces easy to reposition with pins before you commit to sewing — that’s where most of the personality in the final face comes from. 🧶
FAQ
What yarn is best for this Duck in a Cap Amigurumi?
Thread-weight cotton is the best choice for this pattern, as it provides the crisp stitch definition needed for small-scale amigurumi details.
Is this Duck in a Cap Amigurumi suitable for beginners?
This is an advanced project that requires experience with thread-weight yarn, wire armatures, and complex color changes, so it is recommended for experienced crafters.