A Free Crochet Pumpkin Pattern for Every Color in Your Stash
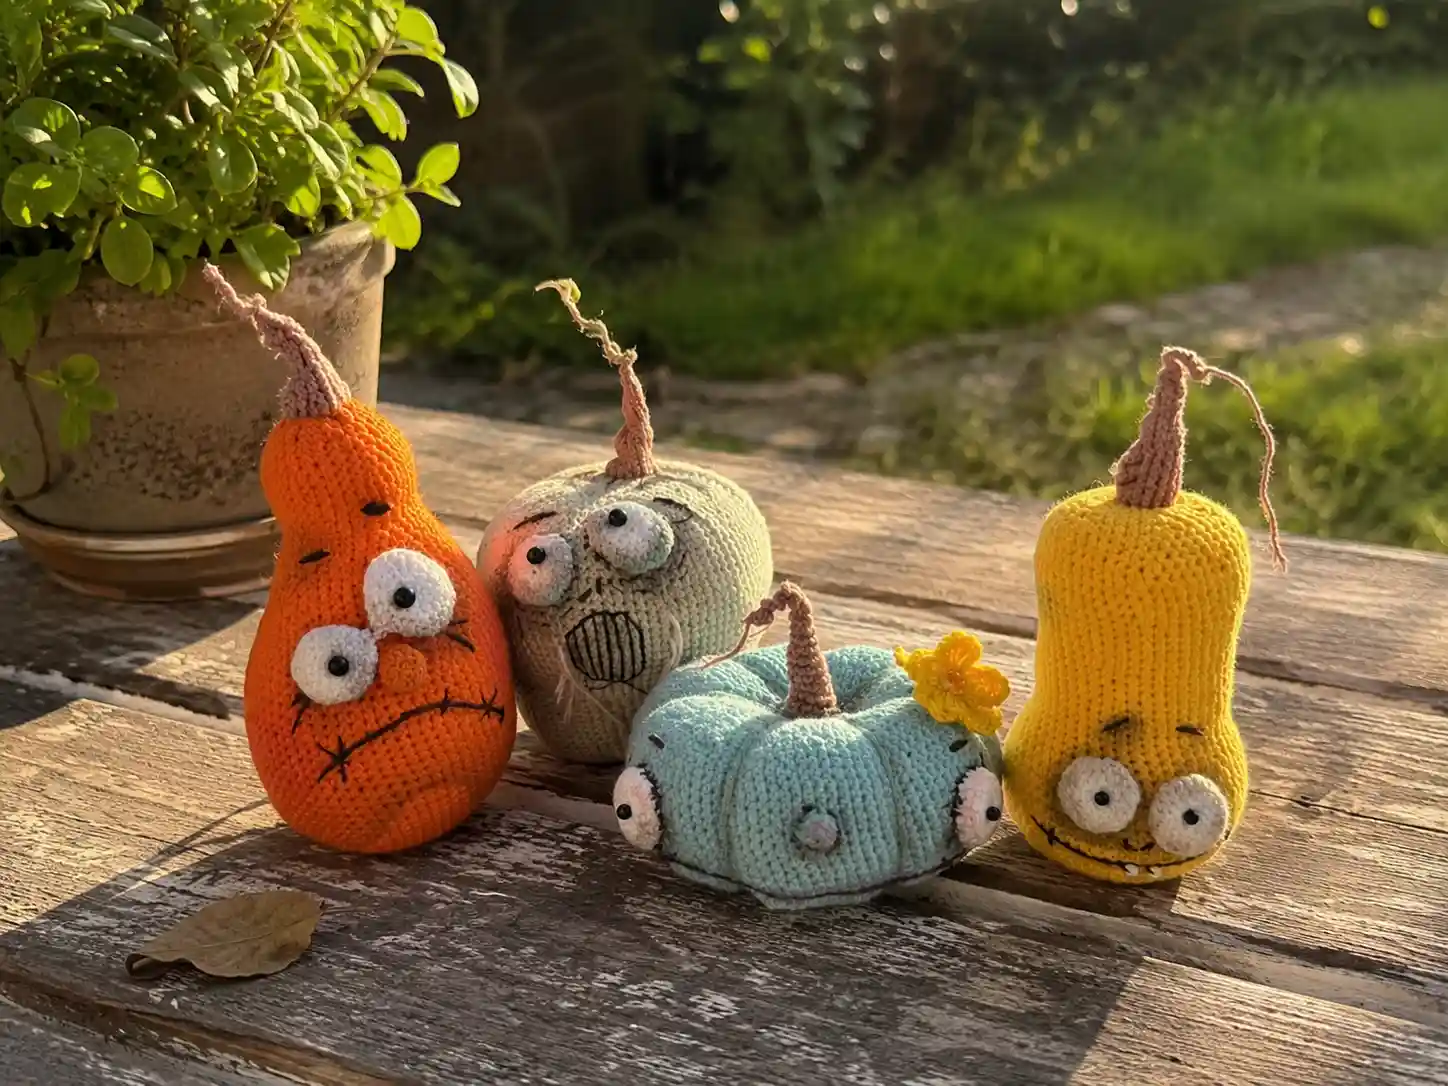
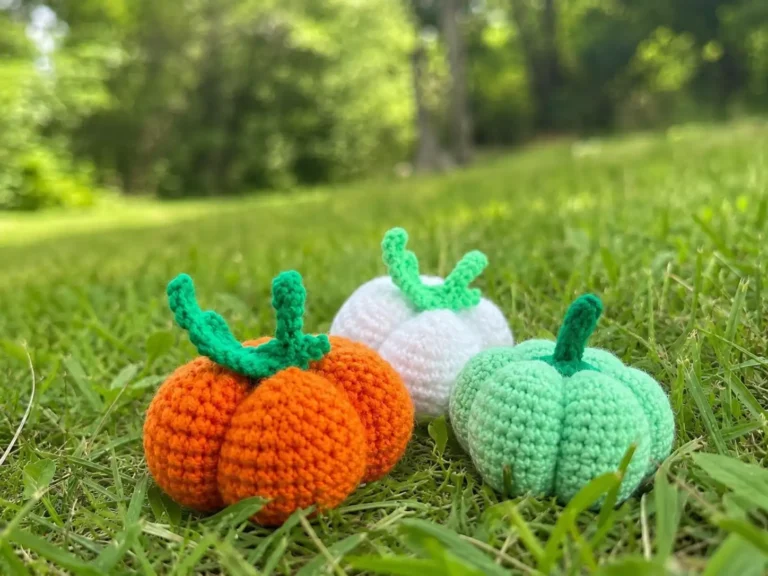
This free crochet pumpkin pattern is actually four pumpkins in one — a Butternut Squash, a Ginger Pumpkin, a Pale Pumpkin, and a two-tiered Blue Lady Pumpkin — and every one of them is designed to use up the DK-weight leftovers you already have sitting in your bin. You don’t need matching skeins here. Yellow, orange, white, blue, and a little brown for the stems is all it takes to build a whole pumpkin patch on your shelf. Grab your smallest hooks and let’s get stitching.
🧶 What You’ll Need
- 💰 Yarn Needed: a small amount of each color per pumpkin — these work up from scraps, not full skeins (see note below on exact yardage)
- 🎨 Colors: yellow + brown (Butternut Squash), orange + brown (Ginger), milk white + brown (Pale), blue + brown (Blue Lady) — or any DK-weight scraps in similar tones
- 🪝 Hook: 1.5mm and 2.0mm (see flag below — no direct US letter match)
- ⏱️ Time: this is a multi-session project — plan for several sittings per pumpkin, longer if you’re making all four
- 📏 Finished Size: mini, palm-sized pumpkins (exact size will vary slightly by tension and hook)
- 💡 Difficulty: Advanced — small-gauge stitching, front/back loop shaping, and needle sculpting throughout
- 🎁 Great For: a fall shelf display, Halloween decor, market sets, or a scrap-busting pumpkin patch gift set
What You Need for This Free Crochet Pumpkin Pattern
Because this pattern doesn’t include specific yardage, I’m not going to guess at numbers for you — these pumpkins are small, so a small amount of each color goes a long way, but exactly how far depends on your gauge and hook. If you’re working from scrap-bin leftovers, a partial skein of each color is almost always plenty for one pumpkin.
- Butternut Squash Pumpkin: yellow yarn for the body, brown for the stem, plus a small amount of white cotton thread for the eyes
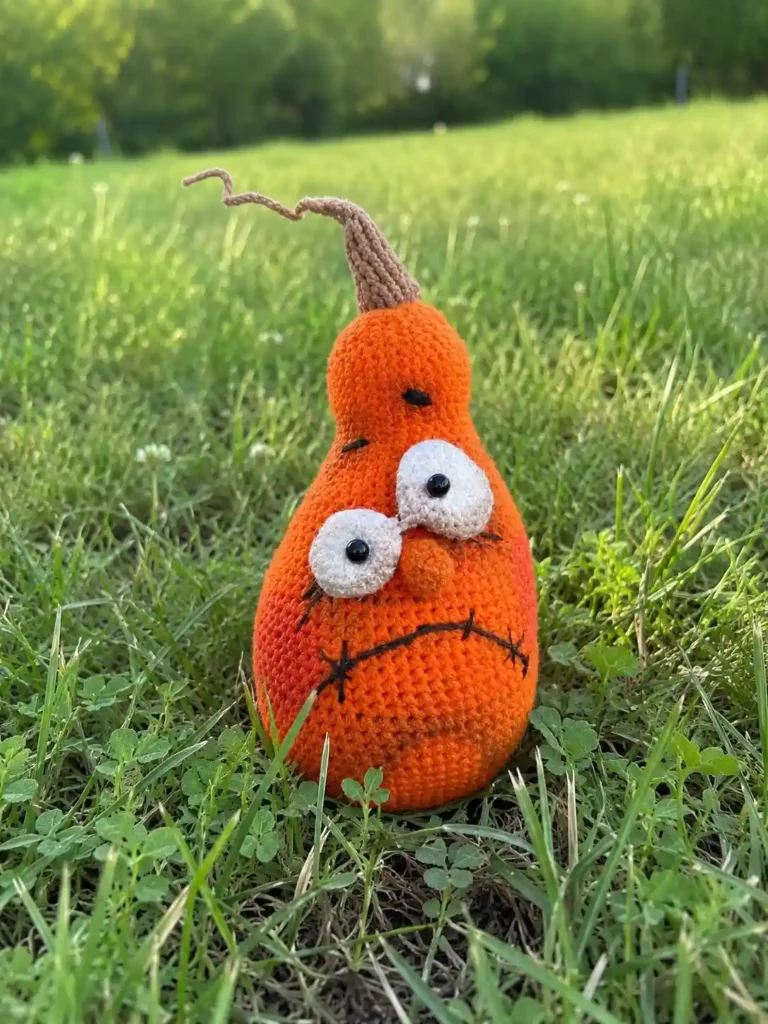
- Ginger Pumpkin: orange yarn for the body, brown for the stem, white cotton thread for the round and oval eyes, and a scrap of orange for the nose
- Pale Pumpkin: milk white yarn for the body, brown for the stem, white cotton thread for the eyes
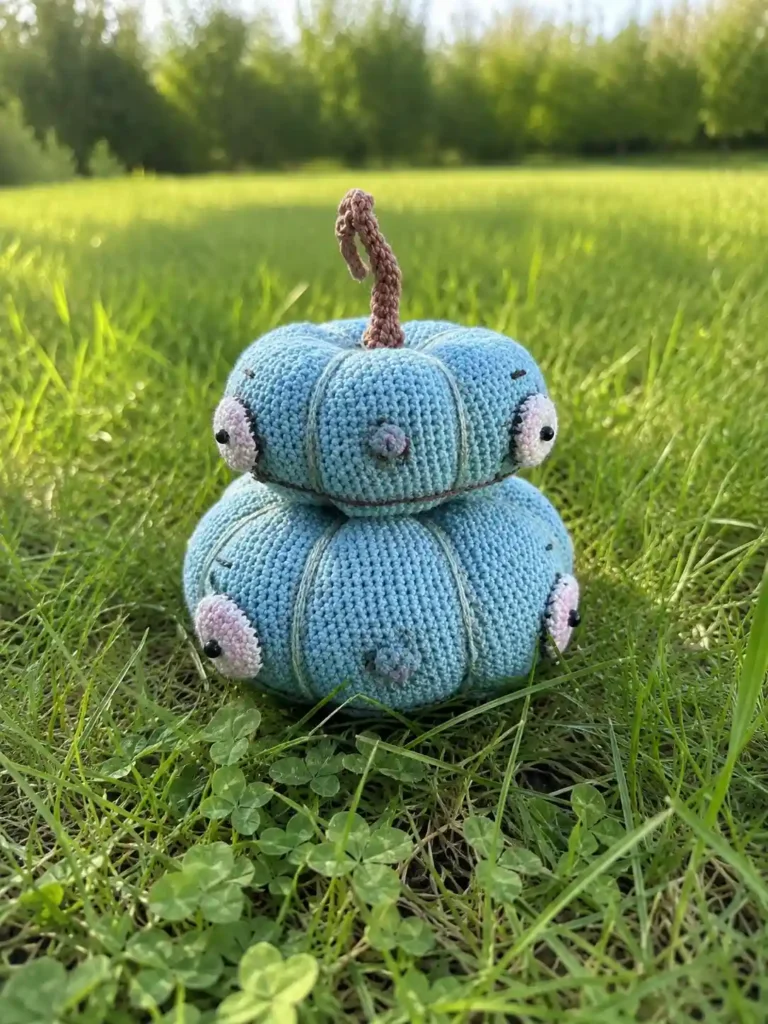
- Blue Lady Pumpkin: blue yarn for the body and nose, brown for the stem, white cotton thread for the round eyes
- All four: polyester fiberfill stuffing, a tapestry needle, black sewing thread for facial embroidery, small black and white beads for pupils/teeth, pins, and pastels or watercolors for shading
⚠️ Hook Size Flag: This pattern calls for 1.5mm and 2.0mm hooks (1.0mm for the finest eye details). None of these have a direct US letter equivalent — our smallest standard US hook is a B/1 (2.25mm). If you don’t own hooks this small, a B/1 is the closest substitute, but expect a slightly bigger, looser finished piece. Worth a quick check with a specialty crochet or lace-weight supplier if you want to match the original scale exactly.
This yarn falls in the DK / Light Worsted range, which the Craft Yarn Council’s weight guide classifies as a #3 — light enough for detail, substantial enough to hold shape without a wire armature.
Abbreviations Used in This Pattern
| Abbreviation | Meaning |
|---|---|
| mr | magic ring |
| ch | chain |
| sc | single crochet |
| inc | increase (2 sc in same stitch) |
| dec | invisible decrease (worked through the front loops of the next 2 stitches) — AmiLoops’ standard gap-free decrease |
| BLO | back loop only |
| FLO | front loop only |
| st(s) | stitch(es) |
Smart Crafter Tips
New to starting in the round? Our magic ring tutorial walks through it in under two minutes, and it’s the very first thing you’ll do on every single piece in this pattern.
Every “dec” in this pattern is worked as an invisible decrease — it keeps the same stitch count as a standard decrease but skips the visible hole, which matters a lot on pumpkins this small where every stitch shows.
You’ll be switching from body color to brown for every stem in this set. Our color change guide covers how to keep that transition clean instead of lumpy, especially useful right before you start the BLO rows on each stem base.
Here’s a trick that saves you frustration: stuff each pumpkin firmly before you close the bottom, and check our stuffing guide if you’re not sure how much is “firm enough” — these small pieces need more stuffing pressure than you’d expect to hold their round shape once sculpted.
Want another pumpkin for the patch once you’ve finished this set? We’ve also got a squishy velvet pumpkin pattern and a second pumpkin plush pattern worth adding to the shelf.
The Pattern
Four pumpkins, four color stories — work through them in any order. Each one starts with a magic ring and gets stuffed and sculpted before its stem goes on.
Butternut Squash Pumpkin — Body & Stem (×1)
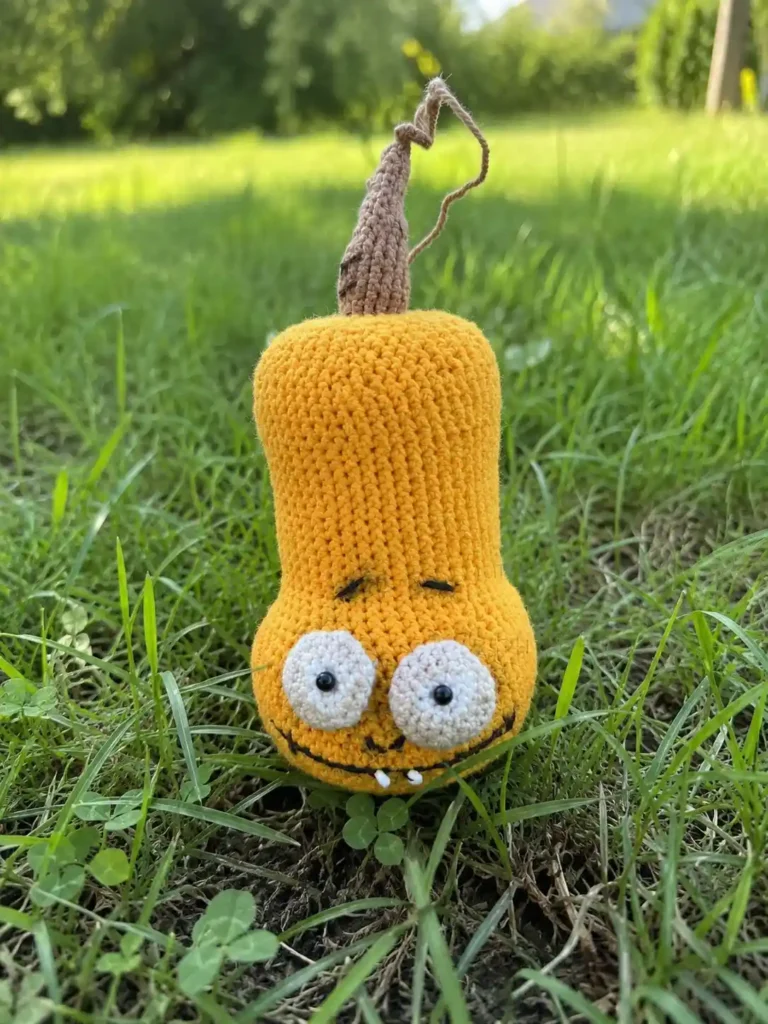
Work in yellow, switching to brown at Row 53 for the stem.
Row 1: 6 sc in mr (6)
Row 2: 6 inc (12)
Row 3: (inc, 1 sc) × 6 (18)
Row 4: (inc, 2 sc) × 6 (24)
Row 5: (inc, 3 sc) × 6 (30)
Row 6: (inc, 4 sc) × 6 (36)
Row 7: (inc, 5 sc) × 6 (42)
Row 8: (inc, 6 sc) × 6 (48)
Row 9: (inc, 7 sc) × 6 (54)
Row 10: (inc, 8 sc) × 6 (60)
Rows 11–20: 60 sc, worked even (10 rows) (60)
Row 21: (dec, 8 sc) × 6 (54)
Row 22: (dec, 7 sc) × 6 (48)
Rows 23–38: 48 sc, worked even (16 rows) (48)
Row 39: (7 sc, inc) × 6 (54)
Rows 40–44: 54 sc, worked even (5 rows) (54)
Row 45: (7 sc, dec) × 6 (48)
Row 46: 48 sc (48)
Row 47: (6 sc, dec) × 6 (42)
Row 48: (5 sc, dec) × 6 (36)
Row 49: (4 sc, dec) × 6 (30)
Row 50: (3 sc, dec) × 6 (24)
Row 51: (2 sc, dec) × 6 (18)
Row 52: (4 sc, dec) × 3 (15)
🧶 Sculpting note: Stuff the pumpkin firmly here. Before Row 53, thread a long strand from the open top hole down through to the bottom center, catch a couple of stitches, bring the needle back up through the top, and pull tight to indent the bottom. Knot securely. Switch to brown for the stem.
Row 53: BLO 15 sc (brown) (15)
Rows 54–55: 15 sc, worked even (2 rows) (15)
Row 56: 3 sc, dec, 10 sc (14)
Row 57: 3 sc, dec, 9 sc (13)
Row 58: 3 sc, dec, 8 sc (12)
Row 59: 3 sc, dec, 7 sc (11)
Row 60: 3 sc, dec, 6 sc (10)
Row 61: (3 sc, dec) × 2 (8)
Row 62: (2 sc, dec) × 2 (6)
Row 63: (1 sc, dec) × 2 (4)
Row 64: 2 dec (2)
Finish with ch 12 to form the curled stem tip, fasten off, and weave in ends.
Butternut Squash Pumpkin — Eyes (×2)
Work in white cotton thread on a 1.0mm or 1.5mm hook. Work with the wrong side facing out as the right side.
Row 1: 6 sc in mr (6)
Row 2: 6 inc (12)
Row 3: (1 sc, inc) × 6 (18)
Row 4: (2 sc, inc) × 6 (24)
Row 5: 24 sc (24)
Row 6: (3 sc, dec) × 6 (18)
Row 7: (2 sc, dec) × 6 (12)
Row 8: (1 sc, dec) × 6 (6)
Fasten off, leaving a long tail for sewing.
Ginger Pumpkin — Body & Stem (×1)
Work in orange, switching to brown at Row 58. Work with the wrong side facing out throughout.
Row 1: 6 sc in mr (6)
Row 2: 6 inc (12)
Row 3: (inc, 1 sc) × 6 (18)
Row 4: (inc, 2 sc) × 6 (24)
Row 5: (inc, 3 sc) × 6 (30)
Row 6: (inc, 4 sc) × 6 (36)
Row 7: (inc, 5 sc) × 6 (42)
Row 8: (inc, 6 sc) × 6 (48)
Row 9: (inc, 7 sc) × 6 (54)
Row 10: (inc, 8 sc) × 6 (60)
Row 11: (inc, 9 sc) × 6 (66)
Rows 12–30: 66 sc, worked even (19 rows) (66)
Row 31: (dec, 9 sc) × 6 (60)
Row 32: (dec, 8 sc) × 6 (54)
Row 33: (dec, 7 sc) × 6 (48)
Row 34: FLO 20 sc, 28 sc (48)
Row 35: BLO of previous row’s unworked loops, 20 sc, 28 sc (48)
Row 36: (14 sc, dec) × 3 (45)
Row 37: (13 sc, dec) × 3 (42)
Row 38: BLO 20 sc, 22 sc (42)
Row 39: FLO of previous row’s unworked loops, 20 sc, 22 sc (42)
Row 40: (12 sc, dec) × 3 (39)
Row 41: (11 sc, dec) × 3 (36)
Row 42: (10 sc, dec) × 3 (33)
Row 43: (9 sc, dec) × 3 (30)
Row 44: 30 sc (30)
Row 45: (4 sc, inc) × 6 (36)
Row 46: (11 sc, inc) × 3 (39)
Rows 47–49: 39 sc, worked even (3 rows) (39)
Row 50: (11 sc, dec) × 3 (36)
Row 51: 18 sc, (dec, 4 sc) × 3 (33)
Row 52: (9 sc, dec) × 3 (30)
Row 53: (8 sc, dec) × 3 (27)
Row 54: 27 sc (27)
Row 55: (7 sc, dec) × 3 (24)
Row 56: (6 sc, dec) × 3 (21)
Row 57: (5 sc, dec) × 3 (18)
Row 58: BLO 18 sc (switch to brown) (18)
Row 59: (4 sc, dec) × 3 (15)
Row 60: 15 sc (15)
Row 61: 13 sc, dec (14)
Row 62: 12 sc, dec (13)
Row 63: 11 sc, dec (12)
Row 64: (1 sc, dec) × 4 (8)
Row 65: (2 sc, dec) × 2 (6)
Row 66: (1 sc, dec) × 2 (4)
Row 67: 2 dec (2)
Finish with ch 15, cut thread, and weave in ends.
🧶 Scrap Check: The FLO/BLO row pairs on Rows 34–35 and 38–39 are what create the pumpkin’s ribbed texture — they look fussy on paper but they’re just a single round worked into the front loops, then the next round picked up in the loops you skipped. Don’t rush it, and don’t skip it; it’s the detail that makes this one read as “pumpkin” instead of “orange ball.”
Ginger Pumpkin — Round Eye (×1)
Work in white cotton thread.
Row 1: 6 sc in mr (6)
Row 2: 6 inc (12)
Row 3: (1 sc, inc) × 6 (18)
Row 4: (2 sc, inc) × 6 (24)
Row 5: 24 sc (24)
Row 6: (3 sc, dec) × 6 (18)
Row 7: (2 sc, dec) × 6 (12)
Row 8: (1 sc, dec) × 6 (6)
Ginger Pumpkin — Oval Eye (×1)
Work in white cotton thread.
Row 1: ch 3, starting in the 2nd ch from hook, 3 inc into the foundation loops (6)
Row 2: (3 sc in 1 st, 2 sc) × 2 (10)
Row 3: (3 inc, 2 sc) × 2 (16)
Row 4: (1 sc, inc) × 3, 3 sc, (1 sc, inc) × 2, inc, 1 sc (22)
Row 5: (2 sc, inc) × 3, 4 sc, (2 sc, inc) × 2, inc, 2 sc (28)
Row 6: 28 sc (28)
Row 7: 5 sc, (dec, 1 sc) × 3, 5 sc, (dec, 1 sc) × 3 (22)
Row 8: (5 sc, 3 dec) × 2 (16)
Row 9: (2 sc, 3 dec) × 2 (10)
Row 10: 5 dec (5)
Ginger Pumpkin — Nose (×1)
Work in orange.
Row 1: 6 sc in mr (6)
Row 2: (1 sc, inc) × 3 (9)
Rows 3–4: 9 sc, worked even (2 rows) (9)
Pale Pumpkin — Body & Stem (×1)
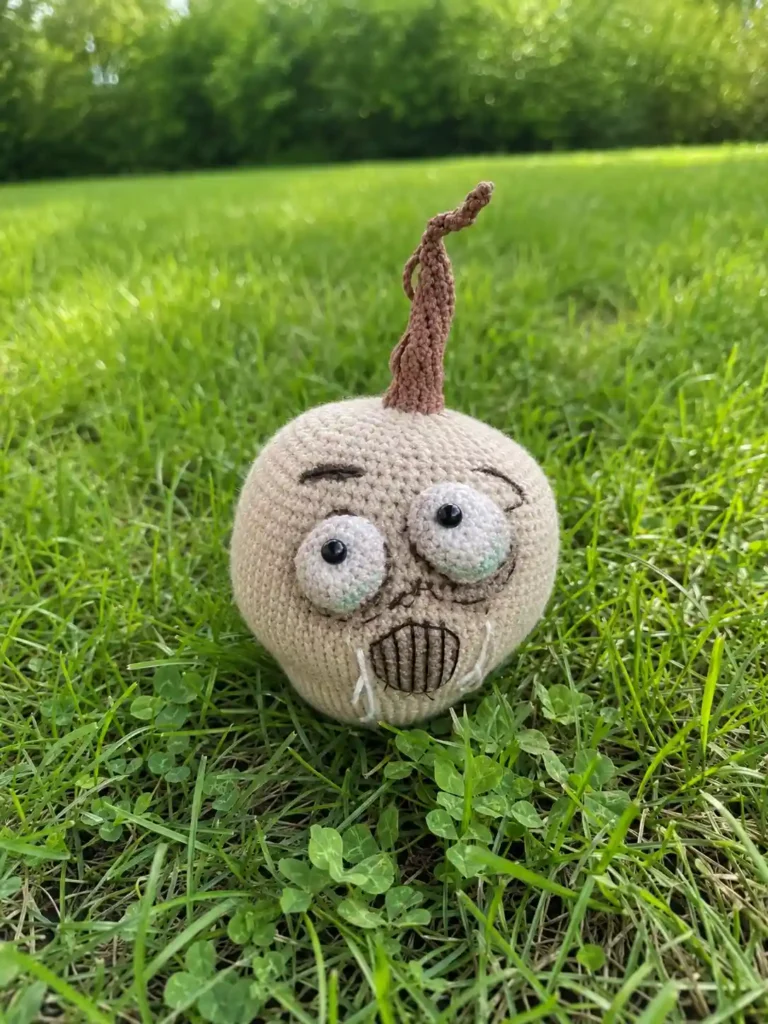
Work in milk white, switching to brown at Row 54.
Row 1: 6 sc in mr (6)
Row 2: 6 inc (12)
Row 3: (inc, 1 sc) × 6 (18)
Row 4: (inc, 2 sc) × 6 (24)
Row 5: (inc, 3 sc) × 6 (30)
Row 6: (inc, 4 sc) × 6 (36)
Row 7: (inc, 5 sc) × 6 (42)
Row 8: (inc, 6 sc) × 6 (48)
Rows 9–12: 48 sc, worked even (4 rows) (48)
Row 13: (inc, 7 sc) × 6 (54)
Rows 14–15: 54 sc, worked even (2 rows) (54)
Row 16: (inc, 7 sc) × 3, 30 sc (57)
Row 17: 57 sc (57)
Row 18: (inc, 8 sc) × 3, 30 sc (60)
Row 19: 60 sc (60)
Row 20: (inc, 9 sc) × 6 (66)
Row 21: 66 sc (66)
Row 22: 36 sc, (inc, 4 sc) × 6 (72)
Row 23: (inc, 11 sc) × 6 (78)
Row 24: 36 sc, (inc, 6 sc) × 6 (84)
Row 25: 84 sc (84)
Row 26: 36 sc, (inc, 9 sc) × 6 (90)
Row 27: (inc, 14 sc) × 6 (96)
Rows 28–39: 96 sc, worked even (12 rows) (96)
Row 40: (dec, 14 sc) × 6 (90)
Row 41: 90 sc (90)
Row 42: (dec, 13 sc) × 6 (84)
Row 43: (dec, 12 sc) × 6 (78)
Row 44: (dec, 11 sc) × 6 (72)
Row 45: (dec, 10 sc) × 6 (66)
Row 46: (dec, 9 sc) × 6 (60)
Row 47: (dec, 8 sc) × 6 (54)
Row 48: (dec, 7 sc) × 6 (48)
Row 49: (dec, 6 sc) × 6 (42)
Row 50: (dec, 5 sc) × 6 (36)
Row 51: (dec, 4 sc) × 6 (30)
Row 52: (dec, 3 sc) × 6 (24)
Row 53: (dec, 2 sc) × 6 (18)
Rows 54–55: 18 sc (switch to brown, 2 rows) (18)
Row 56: 1 sc, 3 dec, 11 sc (15)
Row 57: 1 sc, 2 dec, 10 sc (13)
Row 58: 2 sc, dec, 1 sc, dec, 6 sc (11)
Row 59: 11 sc (11)
Row 60: 2 sc, 2 dec, 5 sc (9)
Row 61: 2 sc, dec, 1 sc, dec, 2 sc (7)
Row 62: 2 sc, dec, 3 sc (6)
Row 63: 2 sc, dec, 2 sc (5)
Row 64: 2 sc, dec, 1 sc (4)
Row 65: 2 sc, dec (3)
Row 66: 1 sc, dec (2)
Finish with ch 10, cut thread, weave in ends.
Pale Pumpkin — Eyes (×2)
Work in white cotton thread.
Row 1: ch 3, starting in the 2nd ch from hook: 2 sc in 1st ch, 3 sc in next ch, 1 sc on the other side (6)
Row 2: 3 sc in 1 st, 2 sc, 3 sc in 1 st, 2 sc (10)
Row 3: 3 inc, 2 sc, 3 inc, 2 sc (16)
Row 4: (1 sc, inc) × 3, 3 sc, (inc, 1 sc) × 2, inc, 2 sc (22)
Row 5: (2 sc, inc) × 3, 4 sc, (inc, 2 sc) × 2, inc, 2 sc (28)
Row 6: 28 sc (28)
Row 7: 5 sc, (dec, 1 sc) × 3, 5 sc, (dec, 1 sc) × 3 (22)
Row 8: 5 sc, 3 dec, 5 sc, 3 dec (16)
Row 9: 2 sc, 3 dec, 2 sc, 3 dec (10)
Row 10: 5 dec (5)
Blue Lady Pumpkin — Body (×1)
Work in blue.
Row 1: 8 sc in mr (8)
Row 2: 8 inc (16)
Row 3: (1 sc, inc) × 8 (24)
Row 4: (2 sc, inc) × 8 (32)
Row 5: (3 sc, inc) × 8 (40)
Row 6: (4 sc, inc) × 8 (48)
Row 7: (5 sc, inc) × 8 (56)
Row 8: (6 sc, inc) × 8 (64)
Row 9: (7 sc, inc) × 8 (72)
Row 10: (8 sc, inc) × 8 (80)
Row 11: (9 sc, inc) × 8 (88)
Row 12: (10 sc, inc) × 8 (96)
Row 13: 96 sc (96)
Row 14: (11 sc, inc) × 8 (104)
Row 15: 104 sc (104)
Row 16: (25 sc, inc) × 4 (108)
Rows 17–28: 108 sc, worked even (12 rows) (108)
Row 29: (25 sc, dec) × 4 (104)
Row 30: 104 sc (104)
Row 31: (11 sc, dec) × 8 (96)
Row 32: 96 sc (96)
Row 33: (10 sc, dec) × 8 (88)
Row 34: (9 sc, dec) × 8 (80)
Row 35: (8 sc, dec) × 8 (72)
Row 36: (7 sc, dec) × 8 (64)
Row 37: (6 sc, dec) × 8 (56)
Row 38: 56 sc, worked even (56)
Row 39: (5 sc, dec) × 8 (48)
Row 40: (4 sc, dec) × 8 (40)
Row 41: (3 sc, dec) × 8 (32)
Row 42: (2 sc, dec) × 8 (24)
Row 43: (1 sc, dec) × 8 (16)
Row 44: 8 dec (8)
Row 45: 4 dec (4)
Fasten off and weave in the end.
💡 Shaping note: This one gets its two-tiered pumpkin look from needle sculpting, not from the stitch count alone. After stuffing, sculpt from top to bottom to create a flattened, stacked shape, then wrap matching blue yarn around the outside to draw in 7–8 vertical ribs.
Blue Lady Pumpkin — Stem (×1)
Work in brown.
Row 1: 6 sc in mr (6)
Row 2: 6 inc (12)
Row 3: (3 sc, inc) × 3 (15)
Row 4: FLO 15 sc (15)
Row 5: 15 sc (15)
Row 6: 2 sc, 3 inc, 10 sc (18)
Row 7: 18 sc (18)
Row 8: 2 sc, 3 dec, 10 sc (15)
Row 9: 2 sc, 2 dec, 9 sc (13)
Row 10: 2 sc, dec, 9 sc (12)
Row 11: 4 sc, 2 dec, 4 sc (10)
Row 12: 4 sc, 1 dec, 4 sc (9)
Row 13: 3 sc, 2 dec, 2 sc (7)
Row 14: 2 sc, dec, 3 sc (6)
Row 15: 2 sc, dec, 2 sc (5)
Row 16: 2 sc, dec, 1 sc (4)
Row 17: 2 dec (2)
Row 18: ch 10 to form the stem tip (stem tip)
Blue Lady Pumpkin — Nose
Source note: the pattern lists this piece as ×1 or ×2 — count wasn’t pinned down in the source material, so test-make one first and add a second only if the face needs it. Work in blue.
Row 1: 6 sc in mr (6)
Row 2: 6 inc (12)
Row 3: 6 dec (6)
Blue Lady Pumpkin — Round Eye (×2)
Work in white cotton thread.
Row 1: 6 sc in mr (6)
Row 2: 6 inc (12)
Row 3: (1 sc, inc) × 6 (18)
Row 4: (2 sc, inc) × 6 (24)
Row 5: 24 sc (24)
Row 6: (3 sc, dec) × 6 (18)
Row 7: (2 sc, dec) × 6 (12)
Row 8: (1 sc, dec) × 6 (6)
Assembly & Finishing
Each pumpkin gets its face added after stuffing and sculpting, so don’t rush past the shaping notes above — the face placement depends on it.
Butternut Squash Pumpkin:
- Attach the two eyes between Rows 20–25 on the body.
- Sew a black bead inside each eye for the pupil.
- Embroider eyebrows and a smile with black sewing thread, and sew two white beads inside the mouth as teeth.
- Tint around the eyes, cheeks, and stem base with brown and pink pastels for a soft, weathered look.
Ginger Pumpkin:
- Sew the round eye and the oval eye onto the upper-middle section of the face.
- Attach the nose between the two eyes.
- Add a black bead to each eye for the pupils.
- Embroider an expressive mouth and tilted eyebrows in black thread.
- Shade the base and facial contours with dark pastels.
Pale Pumpkin:
- Sew the two eyes on with brown sewing thread.
- Add a black bead to each eye for the pupils.
- Embroider a cross-hatched oval mouth and eyebrows.
- Attach a hanging thread at the bottom for the “roots/tears” detail.
- Apply pastel shading around the eye sockets and base.
Blue Lady Pumpkin:
- Pull a thread through the center to compress the top and bottom, forming the double-tiered pumpkin shape.
- Wrap thread around the outer shell to segment it into 7–8 vertical ribs.
- Sew the stem slightly off-center on the top tier.
- Sew the nose and both round eyes onto the sides of the tiers, inserting a black bead into each eye.
⚠️ Small parts note: These faces use loose beads for pupils and teeth rather than locking safety eyes, so these pumpkins are best kept as shelf decor or for gifting to older kids and adults — not handed to a child under 3 who might still mouth small parts.
💡 Stretch It Further: Make all four and you’ve got a full pumpkin patch for one fall display, but you don’t have to stop there. Swap the color story entirely — a lavender-and-sage “ghost pumpkin” duo instead of orange and blue — and the exact same rows still work. Bag up one of each as a boxed mini set for a fall craft fair table, or make just the Butternut Squash and Ginger pair as a quick two-pumpkin gift set if the full four feels like too much for one sitting.
Mia’s Take on This Free Crochet Pumpkin Pattern
This one isn’t a quick evening project, and I’m not going to pretend it is — four separate pumpkins, tiny hooks, and needle sculpting on every single one means you should plan for several sittings, not one. But the payoff is a whole pumpkin patch built almost entirely from leftover DK scraps and a spool of white thread. Start with just one pumpkin if the full set feels like a lot, then add the rest as your scrap bin allows. That’s how a shelf full of pumpkins happens without ever buying a new skein.
FAQ
What yarn weight works best for this free crochet pumpkin pattern?
This pattern is designed for DK-weight (#3 light worsted) yarn scraps, making it ideal for using up leftovers in your stash without buying full skeins.
What size hook do I need to crochet these mini pumpkins?
The pattern specifies 1.5mm and 2.0mm hooks (and a 1.0mm hook for thread eye details) to create tight, firm stitches that keep fiberfill from showing through.
Are these crochet pumpkins suitable for beginners?
This set is rated as Advanced due to small-gauge stitching, needle sculpting, and front/back loop texture work, though adventurous intermediate crocheters can also complete them.