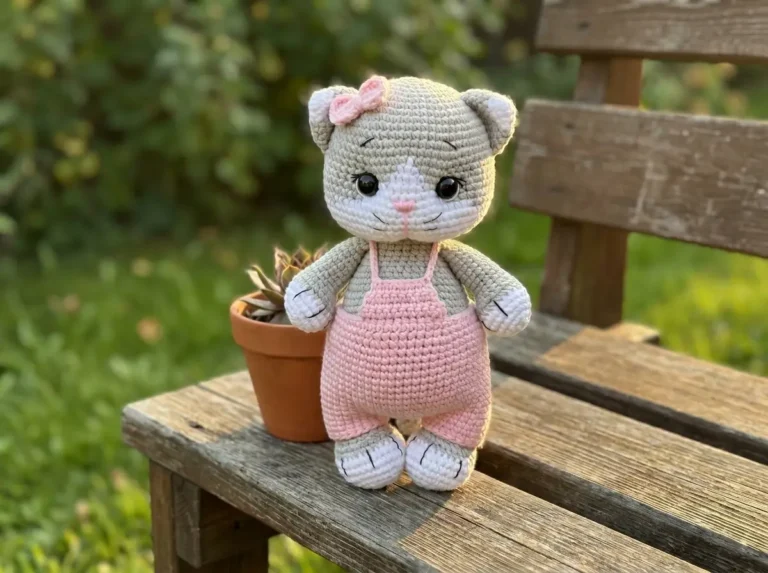
Crochet Kitten Pattern Free — Meet Little Mi, the Chenille Cat You’ll Make Over and Over
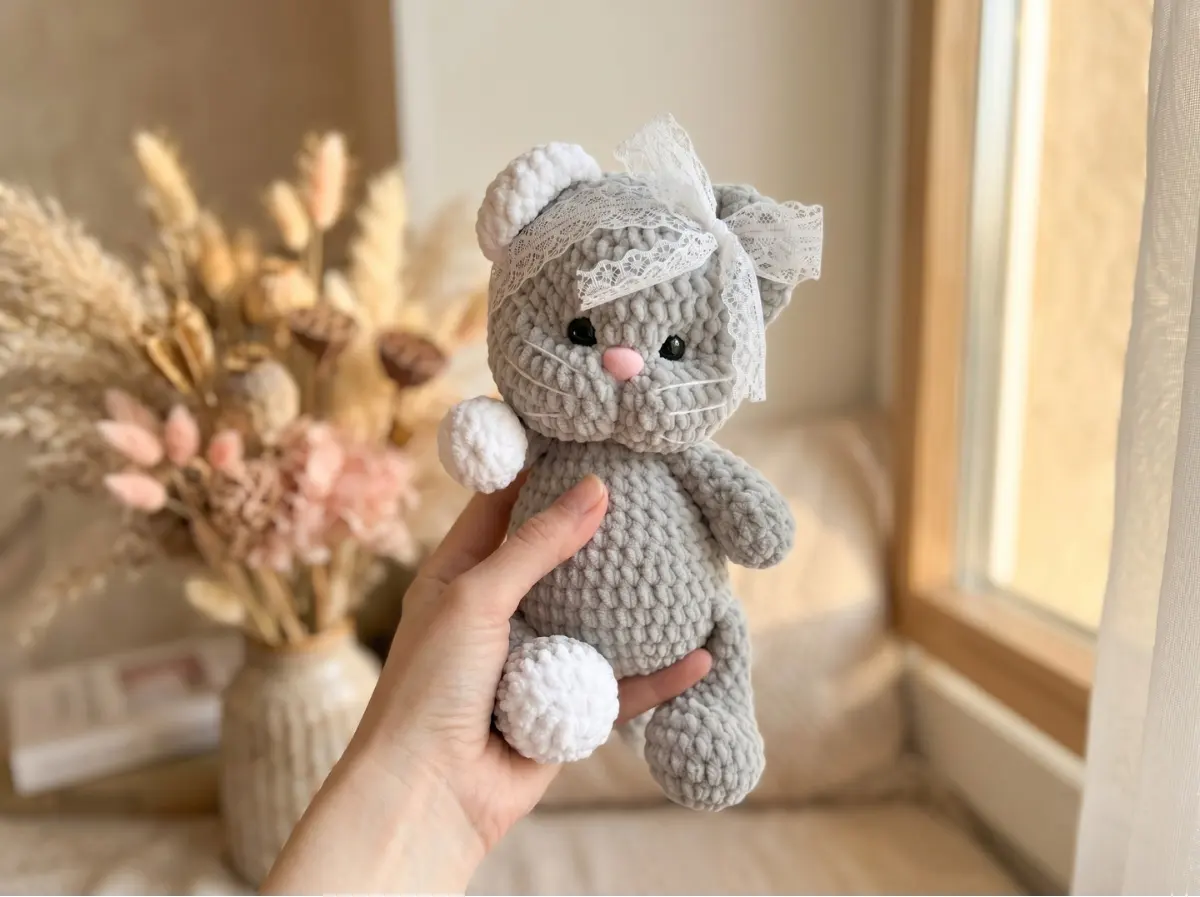
This crochet kitten pattern free of charge is one of those projects that earns permanent real estate in your pattern folder — and I say that as someone who is very selective about what stays. Little Mi is a chenille body-and-head construction, built in continuous rounds, with jointed arms and legs that get worked directly into the body as you go. I’ve checked every single round, and the counts are clean. Let’s get into it.
📋 Pattern Quick Stats
- Difficulty: Intermediate
- Finished Size: Approx. 7–8 in (18–20 cm) seated
- Hook Size: G/6 (4.5mm)
- Yarn Weight: Bulky (5) — chenille/velvet + small amount DK (3)
- Techniques: magic ring, invisible decrease, color changes, BLO joining, flat ear construction
- Estimated Time: 6–9 hours
Materials for This Crochet Kitten Pattern Free
- Main yarn (body, head, limbs): Bulky (5) chenille or velvet yarn — US alternatives include Premier Parfait, Bernat Baby Velvet, or any Bulky chenille. You’ll need approximately 150–200 yds in your main color (gray, or your choice). A small amount of white is needed if you’re doing the two-tone leg colorway.
- Detail yarn (eye indentations, whiskers): A small amount of DK/Light Worsted (3) cotton yarn — US alternatives include Drops Muskat or Paintbox Simply Cotton DK. Use a color close to your main body color for the eye sculpting, and white for the whiskers.
- Hook: 4.5mm (approx. US G/6)
- Safety eyes: 14mm (×2)
- Safety nose: 16×13mm oval (×1) — glued in place after shaping (see Finishing & Details)
- Polyfill stuffing — I use Poly-Fil by Fairfield; it’s available at Joann, Michaels, and Hobby Lobby
- Tapestry needle
- Stitch marker
- Scissors
- Super glue (for attaching the safety nose after sculpting)
Chenille is classified as Bulky (5) on the Craft Yarn Council yarn weight system. If you’re substituting yarn, stay within the Bulky (5) category to maintain the finished size.
Abbreviations Used in This Crochet Kitten Pattern
| Abbreviation | Meaning |
|---|---|
| sc | single crochet |
| inc | increase (2 sc in the same stitch) |
| dec | invisible decrease (through front loops only of next 2 stitches) |
| mr | magic ring |
| FO | fasten off |
| (…)×N | repeat the sequence N times |
| (N) | total stitch count at end of row |
Special Techniques for This Crochet Kitten Pattern Free
Before you start, I want to flag a few techniques that will make or break how Little Mi turns out.
Magic ring: Every single part in this pattern opens with a magic ring. If yours tends to loosen as you work, give the tail end one extra tug before continuing. Our step-by-step magic ring tutorial walks through exactly how to close it so it stays shut.
Invisible decrease: Every decrease in this pattern is an inv dec — worked through the front loops only of the next two stitches simultaneously. This eliminates the gap you’d get with a standard sc2tog. It’s especially important here because chenille yarn is forgiving on texture but shows structural gaps more than you’d expect. If you haven’t done it before, read through our complete invisible decrease tutorial before you start the body.
Joining limbs mid-body: The legs join at Row 8 of the body, and the arms join at Row 18. You’ll crochet directly through both the body stitches and the folded limb — 6 sc together for legs, 5 sc together for arms. Take your time with this step. I pin the limbs in position before I start that row so nothing shifts on me.
Stuffing: Stuff the lower half of each leg firmly before folding. For the body and head, you’ll stuff in stages as you go — I’ve marked the notes in the pattern. For a full overview of how I approach stuffing amigurumi without lumps, see our guide to stuffing amigurumi properly.
Little Mi Crochet Kitten Pattern
Part 1: Legs (×2)
Yarn: Main color (gray). For the left leg: white for Rows 1–4, then switch to gray.
Start: Magic ring
Row 1: 7 sc in mr (7)
Row 2: 7 inc (14)
Row 3: (1 sc, inc)×7 (21)
Rows 4–5: 21 sc (2 rows) (21)
Row 6: 3 sc, (dec, sc)×5, 3 sc (16)
Row 7: 5 sc, 3 dec, 5 sc (13)
Row 8: 5 sc, dec, 6 sc (12)
Rows 9–13: 12 sc (5 rows) (12)
💡 Note on the two-tone leg: For the left leg, crochet Rows 1–4 in white, then switch to your main gray for Row 5 onward. This gives Little Mi her characteristic white paws. The right leg is worked entirely in the main color.
Finishing: Crochet sc to the midpoint of the leg. Stuff the lower section firmly — up to approximately Row 9. Fold the opening flat and crochet 6 sc through both layers to close. Leave the yarn tail long — you’ll use it to help anchor the leg inside the body at joining. Repeat for the second leg.
Part 2: Arms (×2)
Yarn: Main color
Start: Magic ring
Row 1: 7 sc in mr (7)
Row 2: inc×7 (14)
Row 3: 14 sc (14)
Row 4: 5 sc, 2 dec, 5 sc (12)
Row 5: 4 sc, 2 dec, 4 sc (10)
Rows 6–9: 10 sc (4 rows) (10)
Finishing: Crochet sc to the midpoint. Stuff the lower section firmly up to approximately Rows 6–7. Fold flat and crochet 5 sc through both layers to close. Leave a long yarn tail. Repeat for the second arm.
Part 3: Body–Head (×1)
Yarn: Main color
Start: Magic ring
The body and head are worked as a single continuous piece — no seam, no rejoining. The legs are incorporated at Row 8, the arms at Row 18, and the head begins naturally from Row 20 onward.
Row 1: 7 sc in mr (7)
Row 2: inc×7 (14)
Row 3: (1 sc, inc)×7 (21)
Row 4: (2 sc, inc)×7 (28)
Row 5: (3 sc, inc)×7 (35)
Row 6: (4 sc, inc)×7 (42)
Row 7: 42 sc (42)
Row 8: 1 sc, 6 sc together with the leg, 15 sc, 6 sc together with the leg, 14 sc (42)
💡 Emma’s Tip: Before Row 8, hold both finished legs in position against the bottom of the body. The legs should face forward. Pin them in place if you need to — once you start crocheting through them, there’s no adjusting. I always double-check the leg orientation here before I commit.
Rows 9–10: 42 sc (2 rows) (42)
Row 11: (4 sc, dec)×7 (35)
Rows 12–13: 35 sc (2 rows) (35)
Row 14: (3 sc, dec)×7 (28)
Rows 15–16: 28 sc (2 rows) (28)
Row 17: (2 sc, dec)×7 (21)
💡 Stuff the body now, before you join the arms at Row 18. Once the arms are in, reaching inside gets awkward. Pack the stuffing firmly — chenille yarn has enough stretch that under-stuffed pieces look shapeless.
Row 18: 1 sc, 5 sc together with the arm, 6 sc, 5 sc together with the arm, 4 sc (21)
Row 19: (1 sc, dec)×7 (14)
💡 Do not cut the yarn after Row 19. The head continues directly from here.
Row 20: 14 inc (28)
Row 21: 28 sc (28)
Row 22: (3 sc, inc)×7 (35)
Row 23: (4 sc, inc)×7 (42)
Row 24: (5 sc, inc)×7 (49)
Rows 25–27: 49 sc (3 rows) (49)
Row 28: (5 sc, dec)×7 (42)
Rows 29–32: 42 sc (4 rows) (42)
💡 Safety eye placement: Insert the 14mm safety eyes between Rows 30 and 31, with 5 sc between them. Install the washer backings before you continue — once the head closes further, you won’t be able to reach inside. Also begin stuffing the head now and continue as you work the remaining rows.
Row 33: (4 sc, dec)×7 (35)
Row 34: (3 sc, dec)×7 (28)
Row 35: 28 sc (28)
Row 36: (2 sc, dec)×7 (21)
Row 37: (1 sc, dec)×7 (14)
Row 38: 7 dec (7)
Finishing: Close the remaining 7 stitches with a tapestry needle (weave through the front loops, pull tight). Fasten off and bury the yarn end inside the head.
Part 4: Ears (×2)
Yarn: One ear in main color, one in white (or both in main color — your choice).
Start: Magic ring
Row 1: 6 sc in mr (6)
Row 2: inc×6 (12)
Row 3: (1 sc, inc)×6 (18)
Row 4: 18 sc (18)
Finishing: Do not stuff. Fold the ear flat and crochet 9 sc through both layers to close. Leave a long yarn tail for sewing. Repeat for the second ear.
Part 5: Tail (×1)
Yarn: Main color
Start: Magic ring
Row 1: 6 sc in mr (6)
Row 2: (1 sc, inc)×3 (9)
Rows 3–13: 9 sc (11 rows) (9)
Finishing: Fasten off, leave a tail for sewing.
Assembly
- Legs are joined directly during Row 8 of the body — no sewing required. The yarn tails from each leg can be tucked and hidden inside the body cavity as you stuff.
- Arms are joined directly during Row 18 of the body — same method. Hide the yarn tails inside.
- Ears: Sew to the head between Rows 30 and 36. I pin them in place first and try the whole thing at eye level before committing — ear placement makes a huge difference in the expression. Slightly asymmetrical ears can actually give Little Mi more personality.
- Tail: Sew to the back of the body between Rows 8 and 9. I always try it on before sewing — sometimes slightly higher or lower changes the whole silhouette. Use your tapestry needle and the yarn tail to anchor it securely through several stitches.
💡 Emma’s Tip: Before sewing anything, sit Little Mi on a flat surface and look at her from the front, back, and side. Adjust ear and tail positioning with pins until you’re happy. Sewing amigurumi parts is much easier when you’re not second-guessing placement mid-stitch. Our guide to sewing amigurumi parts has the exact method I use for invisible attachment.
Finishing & Details
Eye Indentations
This is the step that transforms a round-faced plush into an actual cat. Use your DK cotton yarn in a color close to your main chenille — or slightly darker.
- Thread your tapestry needle with the DK yarn. Insert the needle at the center of the mouth area (Point 1) and bring it out at the outer edge of the right eye (Point 2).
- Insert the needle at the inner edge of the right eye (Point 3) and bring it back out at Point 1 (the mouth). Pull firmly and tie 2 knots.
- For the left eye: from Point 1, bring the needle out at the outer edge of the left eye (Point 4), insert at the inner edge (Point 5), and return to Point 1. Pull firmly and knot.
- Repeat both eye pulls until you get the depth of indentation you like. The eyes will sink slightly into the head — this is exactly what you want.
Muzzle Indentation
- Insert the needle between the eyes (Point 6) and bring it out at the mouth area (Point 1). Pull firmly and knot. Repeat until the muzzle has a defined, slightly pushed-in shape.
Nose
Use your 16×13mm oval safety nose. Before gluing, hold it against the face at Point 6 (between the eyes, just above the muzzle indent) to check placement. When you’re satisfied, apply a small amount of super glue to the post of the nose and press it into position. Hold for 30 seconds. The pin on safety noses can be trimmed with wire cutters before gluing if needed.
⚠️ Note: If this kitten is intended as a toy for a child under 3, please do not use safety eyes, a safety nose, or any glued-on hardware. Embroider facial features with yarn instead. For full guidance on toy safety standards, refer to the U.S. Consumer Product Safety Commission (CPSC).
Whiskers
Thread your tapestry needle with white DK yarn. Embroider 3 whiskers on each side of the nose using a straight stitch, passing through the muzzle from one side to the other. Pull gently — you want them to lie flat without distorting the face. Secure with a small knot and bury the ends inside the head.
Bow (Optional)
Tie a small ribbon bow around Little Mi’s neck or attach it to the top of one ear. A 0.5-inch wide grosgrain ribbon in a contrasting color (dusty pink, cream, or red) works beautifully against the chenille texture.
Emma’s Note
I’ve always had a soft spot for cat amigurumi — there’s something about those sculpted eye indentations that makes them feel genuinely expressive rather than just stuffed. The eye and muzzle sculpting in this crochet kitten pattern is worth every extra step; don’t skip it. If you’ve never done face sculpting before, go slowly on your first pass and pull gradually rather than yanking — you can always tighten further, but you can’t undo a pulled stitch. Take your time with the ear placement too. Happy hooking. 🧶
What yarn is best for this crochet kitten pattern?
Bulky (5) chenille or velvet yarn (like Premier Parfait or Bernat Baby Velvet) is recommended for a soft finish, along with a small amount of DK cotton yarn for the facial detailing.
How long does it take to crochet this kitten?
This intermediate-level amigurumi project typically takes between 6 to 9 hours, depending on your familiarity with joint-in-place techniques and facial sculpting.
Can beginners make this kitten pattern?
While rated as intermediate due to the continuous limb joins and face sculpting, an ambitious beginner can complete it by following the detailed step-by-step tutorials provided.