Free Amigurumi Bunny Pattern — Scrap-Friendly Light Blue Plush
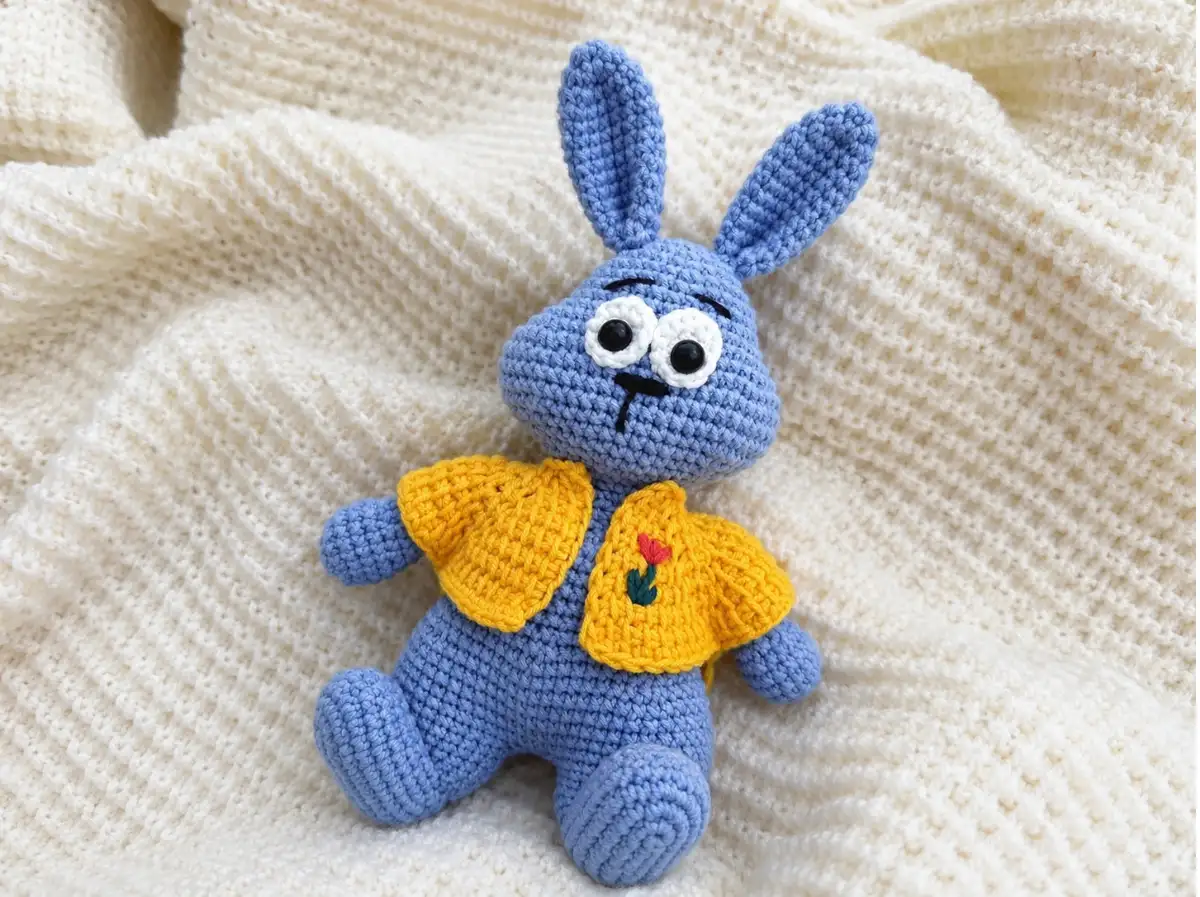
This free amigurumi bunny pattern is built for your scrap bin — it uses DK weight yarn in two colors, works up with a small hook for tight, clean stitches, and finishes as a plush little bunny that looks like you put in way more effort than you did. The shaped head gives it that classic floppy-eared look without any complicated color changes. Got a partial skein of light blue sitting around? That’s probably your main color. Let’s go.
🧶 What You’ll Need From Your Stash
- 💰 Yarn Needed: ~120 yards total (light blue ~90 yds, white ~25 yds, small amount of black for embroidery)
- 🎨 Colors: light blue (main), white (eye edging), black (embroidery accent — scraps only)
- 🪝 Hook: 2.0mm (approx. US B/1)
- ⏱️ Time: 3–5 hours
- 📏 Finished Size: approx. 6–7 in (15–18 cm) seated
- 💡 Difficulty: Intermediate
- 🎁 Great For: gifts, nursery décor, Easter baskets, market items, baby shower presents
Materials for Your Amigurumi Bunny
- DK / Light Worsted (weight 3) yarn in light blue — approximately 90 yards. YarnArt Jeans is the original; US alternatives include Drops Muskat or Paintbox Simply DK Cotton. Any smooth DK cotton or cotton-blend you have on hand works perfectly.
- DK / Light Worsted (weight 3) yarn in white — approximately 25 yards. A leftover ball from almost any DK project will cover this.
- Small amount of black yarn — just a few yards for nose/mouth embroidery. Seriously, check the bottom of your scrap bag — you already have this.
- 2.0mm crochet hook (approx. US B/1)
- 5mm safety eyes × 2
- Polyester fiberfill (Poly-Fil or similar — available at Joann, Michaels, Hobby Lobby)
- Tapestry needle and scissors
- Stitch marker — non-negotiable for tracking your continuous rounds
🧶 Scrap Check: The white yarn for the eye edging circles uses less than 25 yards total for both. If you’ve got a small leftover ball from any DK project — a dishcloth, a baby hat, anything — that’s more than enough. No new skein needed.
Abbreviations
| Abbreviation | Meaning |
|---|---|
| mr | magic ring |
| sc | single crochet |
| inc | increase (2 sc in same stitch) |
| dec | invisible decrease (through front loops of next 2 stitches) |
| sl st | slip stitch |
| ch | chain |
Smart Crafter Tips for This Amigurumi Bunny
First time starting with a magic ring? Our magic ring tutorial covers the whole thing in under two minutes — it’s the fastest thing you’ll learn today.
On the hook size: 2.0mm is a small hook, and that’s intentional. DK yarn worked at this tension produces tight, dense fabric that hides stuffing completely. If you crochet loosely by nature, try dropping down to a 1.75mm. If your stitches look open or the stuffing shows through, go smaller. Tension matters more than hook size on the label. Our hook size guide for amigurumi explains exactly how to check this before you commit to a full piece.
On the decrease method: Always use the invisible decrease (through front loops only) — never sc2tog. On a light blue cotton yarn at this gauge, a standard decrease leaves a visible gap that’s really hard to hide at the finishing stage.
On the legs and body: This pattern crochets the legs separately and joins them mid-way through to form the body — a clever construction that gives the bunny its seated pose without any seaming at the bottom. Read through rows 10–18 of the legs section before you start so the short-row shaping and join don’t catch you off guard.
Pattern
Head (× 1) — Light Blue
The head uses shaped increases and decreases to create that slightly flattened, wide-cheeked bunny face. Work in continuous rounds throughout.
Row 1: 6 sc in mr (6)
Row 2: 6 inc (12)
Row 3: (1 sc, inc)*6 (18)
Row 4: (2 sc, inc)*6 (24)
Row 5: 24 sc (24)
Row 6: (3 sc, inc)*6 (30)
Rows 7–9: 30 sc (3 rows) (30)
Row 10: 3 inc, 12 sc, 3 inc, 12 sc (36)
Row 11: (1 sc, inc)*3, 12 sc, (inc, 1 sc)*3, 12 sc (42)
Row 12: (2 sc, inc)*3, 12 sc, (inc, 2 sc)*3, 12 sc (48)
Row 13: (3 sc, inc)*3, 12 sc, (inc, 3 sc)*3, 12 sc (54)
Rows 14–16: 54 sc (3 rows) (54)
Now is the time to install your 5mm safety eyes and attach the white eye edging circles (see Eye Edging section below). Position eyes between rows 14–15, with the white circles framing them. Attach the safety eye washers from the inside before you begin decreasing — you cannot add them once the head is closed.
Row 17: (3 sc, dec)*3, 12 sc, (dec, 3 sc)*3, 12 sc (48)
Row 18: (2 sc, dec)*3, 12 sc, (dec, 2 sc)*3, 12 sc (42)
Row 19: (1 sc, dec)*3, 12 sc, (dec, 1 sc)*3, 12 sc (36)
Row 20: 3 dec, 12 sc, 3 dec, 12 sc (30)
Row 21: (3 sc, dec)*6 (24)
Row 22: (2 sc, dec)*6 (18)
Row 23: 18 sc (18)
Stuff head firmly before fully closing. Fasten off with sl st, ch. Leave a long tail for sewing.
Ears (× 2) — Light Blue
🧶 Scrap Check: Both ears together use roughly 15 yards of light blue. A small leftover scrap is all you need — no need to pull from your main skein if you have offcuts.
Row 1: 6 sc in mr (6)
Row 2: (inc, 2 sc)*2 (8)
Row 3: (inc, 3 sc)*2 (10)
Row 4: (inc, 4 sc)*2 (12)
Row 5: (inc, 5 sc)*2 (14)
Rows 6–15: 14 sc (9 rows) (14)
Fasten off with sl st, ch. Sew the ear in half lengthwise before attaching to the head — this creates that classic folded bunny ear shape without any extra shaping rows. Pinch the bottom edge together and stitch across to close.
Eye Edging (× 2) — White
These small white circles frame the safety eyes and give the face more personality. They’re worked in white and attached behind the eye before the washer is secured.
Row 1: 8 sc in mr (8)
Row 2: 3 inc (11)
Fasten off with sl st, ch. Thread the safety eye post through the center of the white circle before pushing through the head fabric, then lock the washer in place from inside. Leave the white circle sitting on the surface.
Legs with Body (× 1) — Light Blue
This is the most technical section of this amigurumi bunny pattern. You crochet each leg separately, shape the feet using short rows, then join both legs into a single body piece. Read through the whole section once before starting.
Make two legs individually first:
Row 1: 6 sc in mr (6)
Row 2: 6 inc (12)
Row 3: (1 sc, inc)*6 (18)
Rows 4–6: 18 sc (3 rows) (18)
Row 7: (1 sc, dec)*6 (12)
Rows 8–9: 12 sc (2 rows) (12)
Row 10: 6 sc, turn — 5 sc, turn — 4 sc, turn — 3 sc, turn — 2 sc, then without turning, finish the row 8 sc (13)
Row 11: 13 sc (13)
Row 12: 9 sc, 2 inc, 2 sc (15)
Row 13: 9 sc, (1 sc, inc)*2, 2 sc (17)
Row 14: 9 sc, (2 sc, inc)*2, 2 sc (19)
Row 15: 9 sc, (3 sc, inc)*2, 2 sc (21)
Row 16: 9 sc, (4 sc, inc)*2, 2 sc (23)
Row 17: 9 sc, (5 sc, inc)*2, 2 sc (25)
After Row 17, crochet approximately 5 sc to reach the middle of the heel — this positions the yarn correctly for the join.
Make the second leg in the same way. On the second leg, do not fasten off — continue directly to Row 18 to join both legs.
Row 18 (join): 2 ch, sl st to join to first leg — then continue: 25 sc, 2 inc, 25 sc, 2 inc (58)
Rows 19–23: 58 sc (5 rows) (58)
Row 24: 6 sc, dec, 9 sc, dec, 16 sc, dec, 9 sc, dec, 10 sc (54)
Row 25: (7 sc, dec)*6 (48)
Row 26: (6 sc, dec)*6 (42)
Row 27: (5 sc, dec)*6 (36)
Rows 28–32: 36 sc (5 rows) (36)
Row 33: (4 sc, dec)*6 (30)
Row 34: (3 sc, dec)*6 (24)
Row 35: (2 sc, dec)*6 (18)
Row 36: 3 sc, crochet into 1st arm 4 sc, 5 sc, crochet into 2nd arm 4 sc, 2 sc (18)
Stuff body firmly and evenly before reaching Row 33 — the body narrows quickly and it gets harder to add stuffing cleanly after that point. Fasten off with sl st, ch.
For guidance on stuffing without lumps, our stuffing tutorial covers exactly how much fill to add and where to push it for a smooth shape.
Arms (× 2) — Light Blue
Make two. Arms are incorporated directly into Row 36 of the body — do not fasten off the arms before attaching.
Row 1: 6 sc in mr (6)
Row 2: 6 inc (12)
Row 3: (1 sc, inc)*6 (18)
Rows 4–6: 18 sc (3 rows) (18)
Row 7: (1 sc, dec)*6 (12)
Rows 8–16: 12 sc (9 rows) (12)
Row 17: (1 sc, dec)*4 (8)
Do not stuff arms — leave them flat and slightly floppy. This gives them natural movement. Fasten off with sl st, ch, leaving a long tail. Arms are attached directly into Row 36 of the body (4 sc worked into each arm during that row).
Assembly
- Prepare the ears. Fold each ear in half lengthwise and stitch across the open base to hold the shape. This creates the natural forward-curve of a bunny ear without any extra shaping work.
- Install safety eyes and eye edging. If you haven’t already — thread each safety eye through its white eye edging circle, then push through the head at your chosen position (between rows 14–15 works well, with eyes roughly 6–8 stitches apart). Secure with washers from the inside. This must be done before fully stuffing and closing the head.
- Close and stuff the head. Finish stuffing, then use your tapestry needle to close the remaining stitches using the yarn tail. Pull tight to close the center hole cleanly.
- Embroider the nose and mouth. Using a small length of black yarn and your tapestry needle, embroider a small Y-shape or inverted triangle nose between rows 16–17, centered below the eyes. A few stitches is all you need.
- Attach ears. Pin ears in position on top of the head — typically between rows 3–5 from the top, spaced about 8 stitches apart. Sew each ear down firmly at the base, stitching around all edges to prevent flopping.
- Attach head to body. Pin the head centered on top of the body, aligned with the front of the piece. Using a tapestry needle and yarn tail, sew in a circle around the neck join, pulling securely. Weave in all ends. Our guide to sewing amigurumi parts has the full technique if this is your first time joining a head and body.
💡 Stretch It Further: This amigurumi bunny pattern works beautifully in any DK weight — try it in pale pink and white for a Valentine’s version, or cream and tan for an Easter market set. Make three in different colorways from leftover DK skeins and bundle them together in a small basket. Total yarn cost per bunny comes in well under $3 using stash yarn. That’s a handmade gift set for under $10 that looks like it cost four times that.
Mia’s Take
About 120 yards of DK yarn, a couple of scrap colors, and one genuinely clever construction trick in the legs — that’s all this bunny takes. The joined-leg body method is the kind of technique that sounds complicated until you actually do it, and then you realize it’s just smart pattern writing. Make one in your main scrap color, then raid your stash for a second colorway. You’ll have a matched pair before the week’s out.
What yarn is best for this amigurumi bunny?
Any smooth DK or Light Worsted (weight 3) cotton or cotton-blend yarn works perfectly. Great options include YarnArt Jeans, Drops Muskat, or Paintbox Simply DK Cotton.
Can beginners make this amigurumi bunny pattern?
This pattern is perfect for a patient beginner to a confident advanced beginner. It introduces accessible techniques like short-row shaping and joining legs to form the body.
What size hook do I need for this amigurumi bunny?
A 2.0mm hook is recommended when using DK yarn to create a tight, dense fabric that hides the stuffing completely.