Free Cow Crochet Pattern Amigurumi — Meet Zoya, the Scrap-Ready Mini Cow
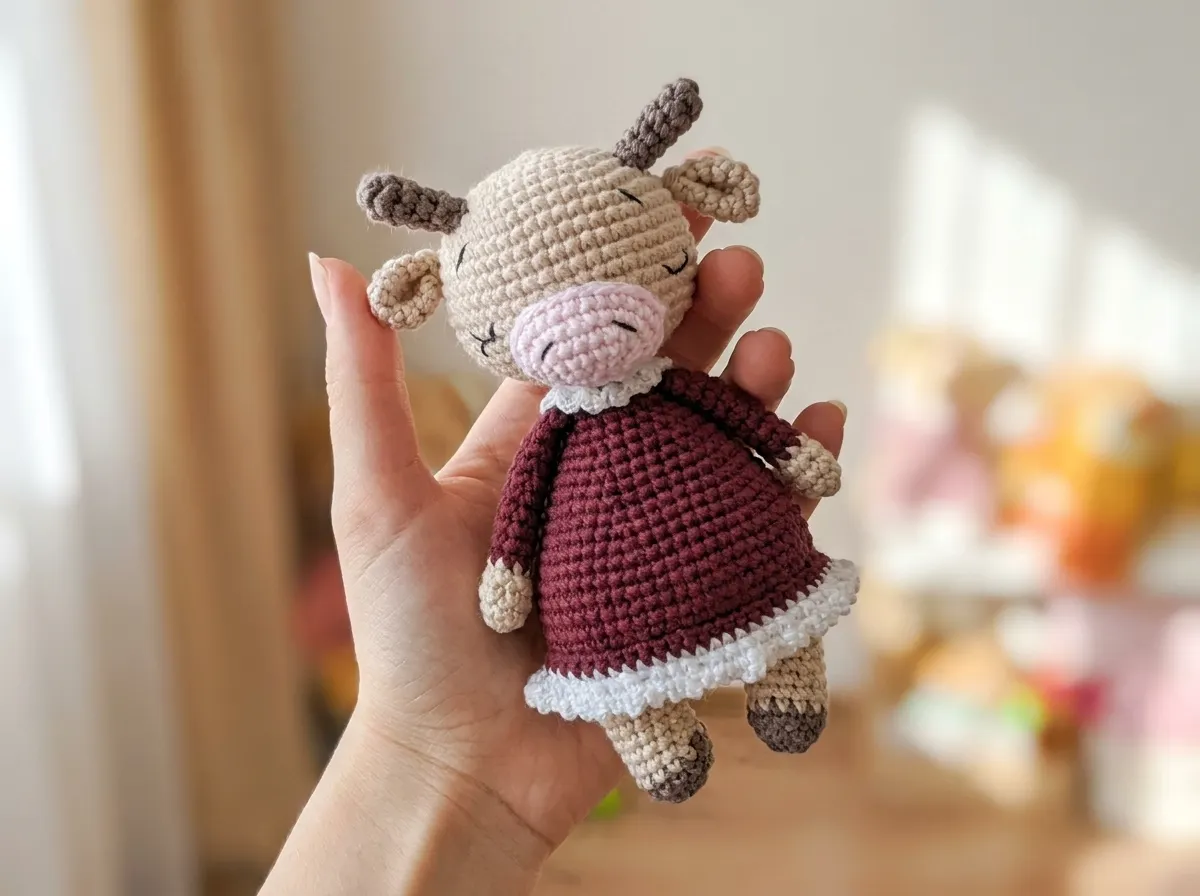
This free cow crochet pattern amigurumi is five colors, about 240 yards total, and honestly one of the better ways to use up that random DK weight sitting at the bottom of your basket. Zoya is a little cow in a dress — she has horns, folded ears, a pink muzzle, a ruffled hem, and embroidered sleeping eyes that make her look impossibly serene for something made of yarn scraps. She takes a few hours across parts, but each piece is small and satisfying. Grab whatever DK weight you’ve got and let’s go.
🧶 What You’ll Need From Your Stash
- 💰 Yarn Needed: ~240 yards total (beige ~130 yds, dress color ~60 yds, brown ~20 yds, white ~20 yds, pink ~10 yds)
- 🎨 Colors: beige (main body), any dress color you love, brown, white, pink — or whatever DK scraps you have on hand
- 🪝 Hook: 2.2mm (approx. US B/1 at 2.25mm — your closest standard size)
- ⏱️ Time: 4–6 hours total across all parts
- 📏 Finished Size: approx. 6.5 in (17 cm) tall
- 💡 Difficulty: Intermediate
- 🎁 Great For: gifts, nursery décor, market items, character collections
Materials for This Free Cow Crochet Pattern Amigurumi
Zoya is a DK / Light Worsted (Weight 3) project, which means she’s a step up from fingering cotton but still works up with excellent stitch definition at a small hook. The pattern calls for Gazzal Baby Cotton — a cotton-blend DK that’s widely available — but any DK weight cotton or cotton-acrylic blend works. Don’t have it? Use whatever DK scraps you have. Here’s what you need and roughly how much:
- Beige / cream DK yarn — approximately 130 yards (body, head, arm tops, leg lower sections, ears). This is your main color. Any DK weight beige or off-white works — Paintbox Simply DK, Lion Brand 24/7 Cotton in Ecru, Cascade 220 Superwash, whatever’s in your bin.
- Dress color DK yarn — approximately 60 yards (arm lower sections, body from Row 6 up). This is your creative call. Blue, red, sage, mustard — pick whatever scrap you have that makes you happy. You don’t need much.
- Brown DK yarn — approximately 20 yards (horns + tops of legs / hooves). Small amount. A single leftover ball is more than enough for three cows.
- Pink DK or sport weight yarn — approximately 10 yards (muzzle only). The muzzle is flat and small. Dig out any pink scrap you’ve got.
- White fingering / thread weight yarn (thin) — approximately 20 yards (collar detail + dress hem trim). The original uses YarnArt Etamin; any thin white yarn or crochet thread works for the decorative loops.
- Hook: 2.2mm — your closest standard size is a US B/1 (2.25mm). Either works.
- Other tools: Black sewing thread (for embroidering eyes, eyebrows, and nostrils), tapestry needle, scissors, polyester fiberfill for stuffing, stitch marker
🧶 Scrap Check: The dress color section is roughly 60 yards — that’s under half a typical 131-yard DK skein. If you’ve got a leftover ball from another project, you’re covered. The brown and pink pieces are so small that almost any scrap will work. The only color you genuinely need a good amount of is beige.
Abbreviations
| Abbreviation | Meaning |
|---|---|
| mr | magic ring |
| sc | single crochet |
| ch | chain |
| inc | increase — 2 sc worked into the same stitch |
| dec | invisible decrease — insert hook through front loops only of next 2 stitches simultaneously, yarn over, pull through, yarn over, pull through 2 loops |
| FLO | front loop only — work into the front loop of the stitch only |
| BLO | back loop only — work into the back loop of the stitch only |
| FO | fasten off |
| sl st | slip stitch |
Smart Crafter Tips for This Free Cow Crochet Pattern Amigurumi
Tip 1: The invisible decrease is non-negotiable here. Zoya has a lot of decreasing rows in both the head and the body, and every single one of them should be worked as an invisible decrease — through the front loops only of two stitches at once. The result is a smooth, gap-free surface that holds the stuffing behind it cleanly. If you haven’t done it before, our invisible decrease guide walks through it step by step. It’s faster than it sounds once your hands know the motion.
Tip 2: Work the legs before you commit to your dress color. The legs start brown (the hoof sections) and shift to beige — but the first four body rows are also beige, and then everything jumps into your dress color at Row 6. Before you’re locked in, hold your beige and your dress color side by side against what you have. This is a small cow and a small color story — mismatched values (too light vs. too dark) will read as muddy rather than charming at this scale. Pick colors with enough contrast to let the dress read clearly against the body.
Tip 3: Stuff gradually and stuff firmly. Zoya has a lot of body rows at 54 stitches and a large head at 48 — both of which need enough stuffing to hold their shape without looking lumpy. The trick is to add stuffing in small amounts every few decrease rows rather than cramming it in at the end. Need more on this? Our stuffing guide covers exactly how much pressure to apply and when. For a piece this size, you’ll use more stuffing than you think.
Tip 4: The collar and hem are worked last, in thin white yarn. These are purely decorative — loops of chain stitches that give Zoya her delicate lacy finish. If you don’t have thin white yarn, any crochet thread or even a strand of fingering weight pulled from a skein works perfectly. This isn’t load-bearing crochet; it just needs to look pretty.
Free Cow Crochet Pattern Amigurumi — Full Instructions
Arms (Make 2)
Yarn: Begin in beige; switch to dress color at Row 5.
Start: magic ring
New to magic rings? Our magic ring tutorial covers the setup in under two minutes — it’s the cleanest way to start a round piece with no center hole.
Row 1: 6 sc in mr (6)
Row 2: (1 sc, inc) × 3 (9)
Rows 3–4: 9 sc (2 rows) (9)
Rows 5–13: 9 sc (9 rows) in dress color (9)
To finish: Work 4 sc through both sides of the arm to close it flat — do not stuff. Arms are joined directly into the body at Row 23, so leave the yarn end long enough to weave in. Make both arms before starting the body.
🧶 Scrap Check: Each arm uses about 8 yards of beige and 10 yards of dress color — roughly 18 yards per arm, 36 yards for the pair. If you’ve got any leftover DK from the main colors, both arms are covered.
Legs (Make 2)
Yarn: Begin in brown; switch to beige at Row 4.
Start: magic ring
Row 1: 6 sc in mr (6)
Row 2: inc × 6 (12)
Row 3: 12 sc (12)
Rows 4–7: 12 sc (4 rows) in beige (12)
To finish: For the first leg, cut yarn and set aside. For the second leg, do not cut — chain 5, then join to the first leg to begin the body. Keep a stitch marker in the last stitch of the chain so you don’t lose your count.
Body
Yarn: Begin in beige (joined from legs); switch to dress color at Row 6.
Start: Joined to legs via chain bridge
Row 1: 12 sc across first leg, 5 sc across bridge ch, 12 sc across second leg, 5 sc across bridge ch (34)
Row 2: (inc, 16 sc) × 2 (36)
Row 3: (5 sc, inc) × 6 (42)
Row 4: (6 sc, inc) × 6 (48)
Row 5: (7 sc, inc) × 6 (54)
Row 6: switch to dress color: 54 sc (54)
Row 7: 54 sc in FLO of Row 6 (54)
Row 8: 54 sc in BLO of Row 6 (54)
💡 What’s happening at Rows 6–8: Working FLO on Row 7 and BLO on Row 8 of the same row creates the pocket of free loops you’ll come back to later for the dress hem. Don’t skip this — those free loops are where the ruffle comes from. After Row 8 you continue as normal into Row 9.
Rows 9–12: 54 sc (4 rows) (54)
Row 13: (7 sc, dec) × 6 (48)
Row 14: 48 sc (48)
Row 15: (6 sc, dec) × 6 (42)
Row 16: 42 sc (42)
Row 17: (5 sc, dec) × 6 (36)
Row 18: 36 sc (36)
Row 19: (4 sc, dec) × 6 (30)
Row 20: 30 sc (30)
Row 21: (3 sc, dec) × 6 (24)
Row 22: (2 sc, dec) × 6 (18)
Row 23: attach arms: 4 sc with arm, 5 sc, 4 sc with arm, 5 sc (18)
At Row 23, hold one arm flat against the body at each side and work 4 sc through both the body stitch and the arm opening simultaneously to join each arm into place. The arms sit at the sides naturally.
Row 24: switch to thin white yarn: 18 sc (18)
Row 25: (3 ch, 1 sc) × 18
Row 25 creates Zoya’s decorative collar — a loop of small chain arches around the neck. After the last repeat, cut yarn leaving a 4–6 in tail and tack the collar down to the dress body with a few small stitches so it lays flat.
Dress hem (worked after body is complete):
Return to the free loops left at Row 6. With thin white yarn:
Hem Row 1: 54 sc into free loops of Row 6 (54)
Hem Row 2: (3 ch, 1 sc) × 54
This creates the same looped trim as the collar but all the way around the dress hem. Fasten off and weave in ends.
🧶 Scrap Check: The body uses the most yarn of any single piece — roughly 35–40 yards of beige for rows 1–5, then 50–55 yards of dress color for rows 6–25. Stuff as you work the decrease rows; don’t wait until the opening is small or you’ll fight to get stuffing in.
Head
Yarn: beige throughout
Start: magic ring
Row 1: 6 sc in mr (6)
Row 2: (1 sc, inc) × 3 (9)
Row 3: inc × 9 (18)
Row 4: (2 sc, inc) × 6 (24)
Row 5: (3 sc, inc) × 6 (30)
Row 6: (4 sc, inc) × 6 (36)
Row 7: (5 sc, inc) × 6 (42)
Row 8: (6 sc, inc) × 6 (48)
Rows 9–15: 48 sc (7 rows) (48)
Row 16: (6 sc, dec) × 6 (42)
Row 17: (5 sc, dec) × 6 (36)
Row 18: (4 sc, dec) × 6 (30)
Row 19: (3 sc, dec) × 6 (24)
Row 20: (2 sc, dec) × 6 (18)
FO, leaving a long tail of approximately 10–12 in for sewing the head to the body. Stuff the head firmly before the opening gets too small — at Row 19 it starts closing quickly.
Ears (Make 2)
Yarn: beige
Start: magic ring
Row 1: 6 sc in mr (6)
Row 2: inc × 6 (12)
Rows 3–5: 12 sc (3 rows) (12)
To finish: Fold the ear in half, then fold in half again to create a small layered tab. Work 3 sc through all layers to close. FO, leaving a tail for sewing. Each ear uses about 5 yards of beige.
Horns (Make 2)
Yarn: brown
Start: magic ring
Row 1: 6 sc in mr (6)
Rows 2–5: 6 sc (4 rows) (6)
FO, leaving a tail for sewing. Do not stuff — horns stay flat and firm on their own. Each horn is about 4 yards of brown. Got leftover brown from the legs? That’s exactly where this comes from.
Muzzle
Yarn: pink
Start: foundation chain of 6
Row 1: ch 6 (6)
Row 2: starting from second ch from hook: inc, 3 sc, 3 sc in last ch, 3 sc along second side, inc (13)
Row 3: 1 sc, inc, 3 sc, inc, 1 sc, inc, 4 sc, inc (17)
Row 4: 2 inc, 5 sc, 3 inc, 6 sc, inc (23)
Row 5: 23 sc (23)
FO, leaving a tail for sewing. The muzzle is a flat oval — about 10 yards of pink total, which means virtually any pink scrap you have will cover it.
Assembly
- Attach ears to head: Position each ear at Row 9 of the head, roughly where the curve starts to flatten on either side. Sew down using the yarn tail, taking a few stitches through the folded base of each ear so it sits slightly forward and doesn’t flop.
- Attach horns to head: Position horns between Rows 6 and 7, sitting just above and slightly inward from the ears. Sew through the base of each horn into the head firmly — they’re small but they carry themselves better when anchored well.
- Attach muzzle to head: Center the muzzle between Rows 14 and 19 of the head, oval oriented horizontally. Add a small amount of stuffing behind it as you sew — just enough to give it a slight rounded lift. Our parts sewing guide covers exactly how to do this neatly without puckering.
- Embroider facial details: Using black sewing thread, embroider two arched lines for closed sleepy eyes (positioned around Row 11–12, roughly centered above the muzzle). Add two small straight dashes above each arch for eyebrows. On the muzzle, add two short horizontal lines for nostrils.
- Sew head to body: Using the long tail left on the head, position the head centered on top of the body neck opening. Sew around the full circumference, pulling firmly enough that the head sits stable. Weave in all ends.
Decorating Zoya
The embroidery is simple but it carries a lot of the personality. For the sleepy-eye arcs, use a blunt tapestry needle threaded with two strands of black sewing thread. Stitch smooth arcs — aim for symmetry but don’t stress if they’re not perfectly identical. Slight variation reads as charm, not error. The eyebrow dashes are 3–4 thread strands wide, angled very slightly upward toward the center for a gentle, calm expression. The nostrils are just two straight horizontal stitches on the lower half of the muzzle, about 0.4 in apart.
💡 Stretch It Further: Make three Zoya cows in different dress colors — one in dusty rose, one in sage green, one in soft mustard — using the same beige body throughout. The color variation does all the work of making them feel like a set without any extra pattern complexity. Tuck them in a kraft box with tissue paper and you’ve got a handmade gift that looks like it cost serious money. Total yarn across all three: under 700 yards of DK weight — easily done from a mixed scrap collection. If you want to go smaller, this same pattern logic works beautifully at a smaller gauge for a mini keychain version.
Mia’s Take
Five colors, about 240 yards total, and a little patience during the head assembly — that’s all this cow costs you. Zoya is the kind of project where the scrap bin stops looking like a problem and starts looking like a palette. The dress color is where your personality goes, so dig past the default beige and pick something that makes you happy. Make two. Make three in different shades and bundle them. That’s the kind of math I’m always here for. 🧶
What yarn is best for this cow amigurumi?
This pattern is designed for DK weight (Light Worsted / Weight 3) yarn. A cotton or cotton-acrylic blend like Gazzal Baby Cotton works best for stitch definition, but you can use any DK scraps from your stash.
How long does it take to crochet this free cow amigurumi?
It typically takes 4 to 6 hours to complete. The time is split across several small, manageable pieces like the arms, legs, body, and head.
What size is the finished cow amigurumi?
Using the recommended DK weight yarn and a 2.2mm hook, the finished cow stands approximately 6.5 inches (17 cm) tall.