Why This Amigurumi Bear Free Pattern Has My Whole Heart
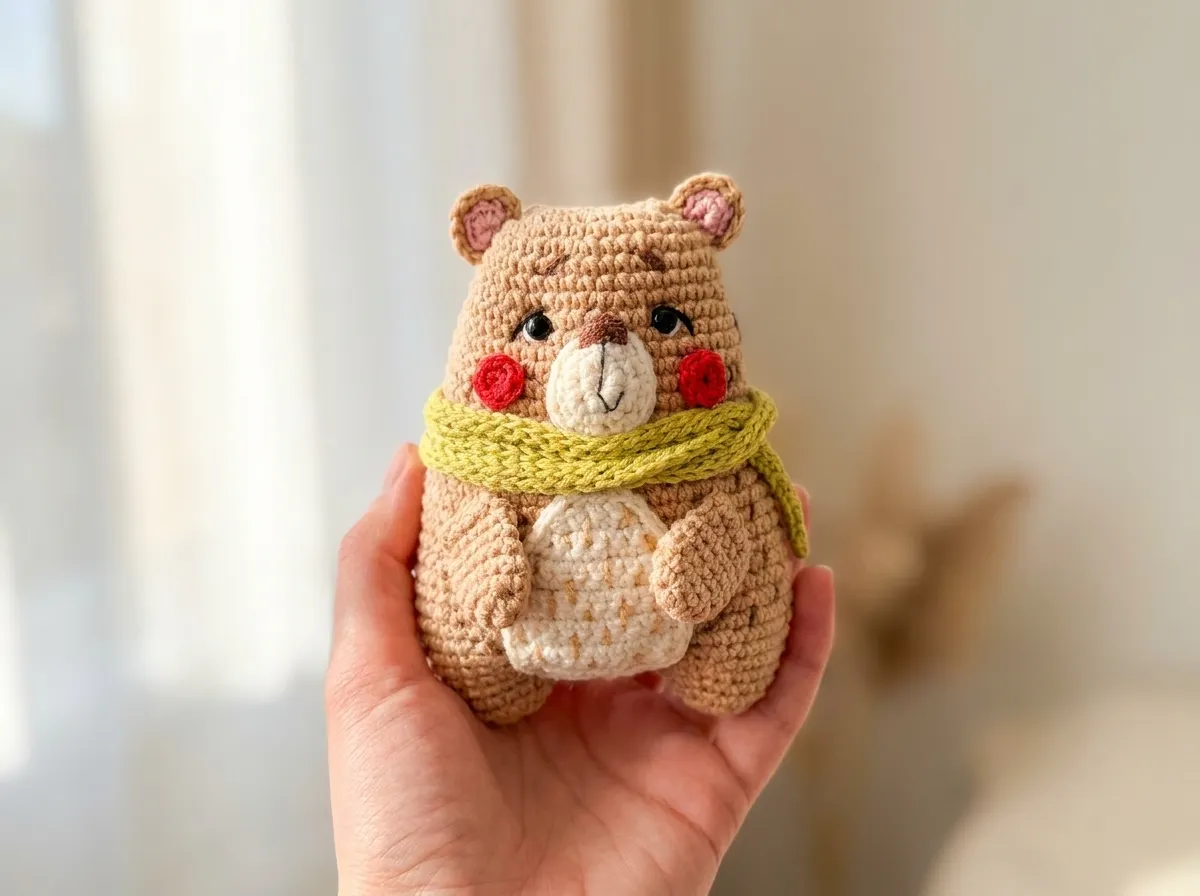
This free amigurumi bear pattern makes the most huggable little plush — soft beige all over, with a cream muzzle, an embroidered nose that is frankly too cute to be legal, and a tiny pistachio green scarf wrapped snugly around its neck. The amigurumi bear free pattern works the head and body in one seamless, continuous piece, which gives it that beautifully rounded, no-visible-seam silhouette. Powder pink inner ears, glossy 6mm safety eyes, tiny red cheeks — this little bear has so much personality packed into such a small package. Let me show you how it all comes together.
🩷 Pattern Highlights
- Cuteness Rating: 🩷🩷🩷🩷🩷
- Finished Size: Approximately 4–5 in (10–13 cm) tall
- Difficulty: Intermediate
- Hook Size: 1.5 mm (main body); G/6 (4.0 mm) for scarf only
- Yarn Palette: soft beige, warm cream, powder pink, pistachio green, red
- Key Detail: Sculpted safety eyes, embroidered eyelids and nose, rosy cheek circles, and a wrapped pistachio scarf
- Estimated Time: 5–7 hours
Materials for This Free Amigurumi Bear Pattern
- Soft beige yarn — DK/Light Worsted weight (CYCA 3), such as YarnArt Jeans in shade 07 or US alternatives like Paintbox Simply DK or Drops Muskat. This is your main color — the entire body, legs, and arms are worked in this.
- Warm cream yarn — DK/Light Worsted weight (CYCA 3), same brand or equivalent. Used for the oval muzzle and belly patch — just a small amount of each.
- Powder pink yarn — DK/Light Worsted weight (CYCA 3), a soft blush pink cotton DK. Used for the inner ear pieces only — you won’t need much, but that pop of pink makes the ears so sweet.
- Pistachio green yarn — DK/Light Worsted weight (CYCA 3), such as Gazzal Baby Cotton or a similar smooth cotton DK. Used for the scarf. The scarf is 140 stitches long, so have a full ball on hand.
- Red yarn — DK/Light Worsted weight (CYCA 3), a small amount for the cheek circles.
- Hook: 1.5 mm (for all main pieces) and G/6 (4.0 mm) for the scarf only. Note: 1.5 mm has no US letter equivalent — use the metric size directly.
- 6 mm safety eyes — glossy black, ×2
- Polyfill stuffing
- Tapestry needle
- Stitch markers — you’ll need these for the leg construction
- Black, white, and brown embroidery thread or fine yarn for the face details (eyelids, eyebrow, nose, mouth, eye highlights)
- Scissors
All the main yarns in this pattern are classified as DK/Light Worsted (CYCA 3) — smooth, lightweight, and excellent for capturing tiny embroidered details on the face and belly.
Abbreviations
| Abbreviation | Meaning |
|---|---|
| mr | magic ring |
| ch | chain |
| sc | single crochet |
| sl st | slip stitch |
| inc | increase — 2 sc worked into the same stitch |
| dec | invisible decrease — insert hook through front loops only of next 2 stitches simultaneously, yarn over, pull through, yarn over, pull through 2 loops |
| BLO | back loop only |
| FO | fasten off |
| st(s) | stitch(es) |
Before You Begin — The Details That Make This Bear Magical
The head and body are one continuous piece. This is what creates that seamless, smooth silhouette — no visible joining line around the waist, no awkward stuffed-sausage effect. The legs are then worked directly from the lower body using stitch markers to divide them. Read through the entire leg construction section before you reach Row 29 so nothing catches you off guard when you get there.
Install your safety eyes between Rows 8 and 9. The pattern note is very specific about this — spaced 8 stitches apart, installed before the piece closes up any further. This is the moment you have the most access to the inside. If you’ve never positioned safety eyes before, our safety eyes tutorial shows exactly how to check their alignment before locking the washers in. Once those washers are pressed on, they are on for good.
Budget extra time for the face. This bear has embroidered eyelids, eyebrows, a nose, a mouth, eye sculpting, and optional fur texture stitches. None of it is difficult — it’s just detail work that deserves patience and good lighting. The face is what gives this bear its personality. Don’t rush it.
🩷 Chloe’s Detail Tip: Before pressing the safety eye washers in, hold the piece under a bright lamp and look at it straight on from the front. Check that both eyes sit at the same height and the same distance from the center of the muzzle. Thirty extra seconds of checking here saves so much heartbreak later.
For a refresher on the basic techniques, our guide to stuffing amigurumi without lumps is especially helpful for this pattern — the head-body-legs construction means you’ll be stuffing at different stages throughout the build.
Free Amigurumi Bear Pattern — Full Instructions
Head, Body & Legs (×1) — Soft Beige
This piece works the entire bear from the nose down in one continuous spiral. It starts from a chain foundation rather than a magic ring — this creates the slightly oval head shape that gives the face more room for the muzzle and eyes.
Row 1: 8 ch, from 2nd ch from hook: inc, 5 sc, 4 sc in same st, 5 sc, inc (work in spiral) (18)
Row 2: (1 sc, inc), (2 sc, inc) × 5, 1 sc (24)
Row 3: (3 sc, inc) × 6 (30)
Row 4: (2 sc, inc), (4 sc, inc) × 5, 2 sc (36)
Rows 5–6: 36 sc (36)
Row 7: (5 sc, inc) × 6 (42)
Rows 8–10: 42 sc (42)
🩷 Safety Eyes — Install Now: Between Rows 8 and 9, install your 6mm safety eyes, spaced 8 stitches apart. Do not move past Row 10 without doing this first.
Row 11: (3 sc, inc), (6 sc, inc) × 5, 3 sc (48)
Rows 12–16: 48 sc (48)
Row 17: (7 sc, inc) × 6 (54)
Rows 18–23: 54 sc (54)
Row 24: (8 sc, inc) × 6 (60)
Rows 25–28: 60 sc (60)
This is where the little body is at its fullest and squishiest. So satisfying to watch it filling out into that round teddy shape.
Row 29: (8 sc, dec) × 6 (54)
Row 30: 54 sc (54)
Row 31: (7 sc, dec) × 6 (48)
🩷 Leg Marker Note: After completing Row 31, work 6 more sc, then place a stitch marker. This marks the starting point for Leg 1. The exact stitch may vary slightly depending on your tension — what matters is that the marker sits at the outer side edge of the piece.
Leg 1 (continues from body) — Soft Beige
Before beginning the legs, stuff the upper body now while you still have good access. You won’t be able to stuff the head and torso as easily once the legs are underway.
Row 1: Starting from the marked st, work 8 sc; on the opposite side, count 10 sts from the marker, work the 9th st together with the corresponding st on the opposite side (the 10th from the marker), then work 9 more sc (18)
Row 2: 18 sc (18)
Row 3: dec × 9 BLO (9)
Finishing: Fasten off and close the opening.
Leg 2 (join yarn to body) — Soft Beige
Row 1: Count 19 sts; join the 19th to the 1st st with a marker. Begin working from the marker (along the bear’s back): 17 sc + 1 sc (working the 1st and 19th sts together) (18)
Row 2: 18 sc (18)
Row 3: dec × 9 BLO (9)
Finishing: Stuff the second leg, then sew the opening between the legs closed.
Ears (4 pieces total) — Powder Pink + Soft Beige
Each ear is made in two layers — a soft powder pink inner piece and a beige outer piece — then joined together as you work Row 2 of the outer piece. That pink peeking out from behind the beige? It’s one of my favorite tiny details on this whole bear.
Inner ear pieces (×2) — Powder Pink:
Row 1: 6 sc in mr — do not close (6)
Fasten off, weave in ends. Set aside.
Outer ear pieces (×2) — Soft Beige:
Row 1: 6 sc in mr — do not close; ch 1, turn (6)
Row 2: Hold the pink inner piece against the beige piece and work them together (for the pink piece: through BLO; for the beige piece: through both loops): (1 sc, inc) × 3 (9)
Fasten off, leave a long tail for sewing.
Muzzle (×1) — Warm Cream
The muzzle starts from a chain for a lovely oval shape. This is where all the most important embroidery lives — the nose, the mouth, the eyebrows. Keep your embroidery needle and brown thread close by for the finishing stage.
Row 1: 4 ch, from 2nd ch: 2 sc, 4 sc in same st, 2 sc (work in spiral) (8)
Row 2: inc, 1 sc, (inc, 2 sc, inc), 1 sc, inc (12)
Row 3: 1 sc, inc, 1 sc, (1 sc, inc) × 3, 1 sc, inc, 1 sc (17)
Fasten off, leaving a long tail for sewing. Before sewing onto the face, add a small amount of stuffing inside the muzzle to give it that slightly rounded, puffed-out look.
Belly Patch (×1) — Warm Cream
A sweet cream oval worked from a chain — it sits on the front of the body like the most adorable little tummy panel. Before sewing it on, you’ll embroider a small decorative design across the surface. A simple cross-stitch pattern or a few rows of running stitch looks so charming.
Row 1: 5 ch, from 2nd ch: 4 sc (4)
Row 2: inc, 2 sc, inc (6)
Row 3: 6 sc (6)
Row 4: inc, 4 sc, inc (8)
Row 5: 8 sc (8)
Row 6: inc, 6 sc, inc (10)
Row 7: 10 sc (10)
Rows 8–12: 10 sc (10)
Row 13: dec, 6 sc, dec (8)
Row 14: dec, 4 sc, dec (6)
Work sl st around the entire edge. Embroider your decorative stitches on the front surface before sewing to the body.
Arms (×2) — Soft Beige
The arms are worked in the round and then flattened at the top — folded and worked through both layers — which creates that slight flat-paddle shape that makes them look so natural when they’re attached to the sides of the body. Like the bear is ready for a hug.
Row 1: 6 sc in mr (6)
Row 2: (inc) × 6 (12)
Rows 3–6: 12 sc (12)
Row 7: Fold the piece flat so the two sides meet; work 6 sc through both layers, ch 1, turn (6)
Row 8: dec, 2 sc, dec (4)
Fasten off, leaving a long tail for sewing.
Cheek Circles (×2) — Red
Tiny flat rounds of red yarn that become the most irresistible little rosy cheeks once they’re sewn on. I may have audibly said “oh no” when I first placed them on the face. They are that cute.
Row 1: 7 sc in mr, close with sl st (7)
Fasten off, leaving a tail for sewing.
Scarf (×1) — Pistachio Green
Switch to your G/6 (4.0 mm) hook for this piece only. The scarf is worked entirely in slip stitch BLO, which creates a beautiful ribbed texture. That soft pistachio green against the warm beige body is — I cannot even explain it. Just so right.
Hook: G/6 (4.0 mm)
Rows 1–2: Ch 141, work 140 sl st (all subsequent rows are worked in sl st BLO) (140)
🩷 Chloe’s Tip: If you’d like a wider, chunkier scarf, simply add more rows — the stitch count stays the same. Even two or three extra rows makes such a difference wrapped around that tiny neck.
Assembly
- While working the legs, stuff the upper body and completed first leg before the openings close.
- Position and sew the muzzle onto the face with a small amount of stuffing inside it, centered below the safety eyes.
- Sew the ears symmetrically onto the top sides of the head, pink inner surface facing forward.
- Sew the red cheek circles on either side of the muzzle — slightly outward and overlapping the muzzle edge gives the most natural blushing position.
- Embroider your decorative design onto the belly patch, then sew the belly patch to the center front of the body.
- Sew the arms to either side of the body, positioned just below where the head meets the torso.
- Wrap the scarf around the neck and tack it in place with a few invisible stitches, or simply knot it at the front for a casual look.
For tips on getting each sewn piece perfectly positioned and securely attached, our guide to sewing amigurumi parts together covers every technique you’ll need for a clean, professional finish.
Making This Amigurumi Bear Pattern Extra Irresistible — Finishing Details
This is the part where the magic actually happens. Everything up to now has been building a lovely little beige shape. What you do in the next thirty minutes turns it into a bear with a face you’ll fall completely in love with. Good lighting and no interruptions — this is your moment.
Eye sculpting. Thread a length of yarn through the post of each safety eye and gently pull both eyes slightly inward toward each other through the back of the head. This creates a soft indentation in the fabric around each eye, making them look deep-set and expressive rather than flat and stuck-on. Subtle but transformative.
Embroidered eyelids. Using black thread, add a small curved stitch just above each eye — following the curve of the eye shape. A gentle arc gives a soft, sleepy look. A straighter line gives a more alert expression. Try both on a scrap of fabric first to find the mood you want for this particular bear.
Eyebrows. Two small angled stitches in brown thread, positioned above the eyelids. Keep them light. Tiny eyebrows change the entire personality of the face — and slightly tilted inward toward the nose gives the most endearing, slightly worried little expression.
Nose and mouth. Using brown thread, embroider a small oval or triangular nose at the top center of the muzzle. Then switch to a single strand of black thread and add a small Y-shaped mouth just below — two short diagonal stitches down from the center of the nose. The smaller and more delicate, the sweeter.
White eye highlights. One tiny highlight stitch in white thread to the upper corner of each eye. This is the detail that makes the eyes look like they’re catching light — like the bear is actually looking at you. One stitch. Do not skip it.
Optional fur texture. Using brown thread, scatter short stitches across the body and head to suggest fur. Keep them small and irregular — a little goes a long way. Too many and it starts to look heavy; just a suggestion of texture across the back and top of the head is perfectly charming.
🩷 Chloe’s Cheek Tip: When sewing on the red cheek circles, position them flush and flat against the face — you don’t want them puffing up. Sew through the center and around the edge to keep them lying smooth. Once they’re on, step back and look at the whole face together. Those two little circles make such a difference it’s almost unreasonable.
Chloe’s Final Look 🩷
I’ve been staring at this little bear for an embarrassingly long time and I am not even slightly sorry. The soft beige and warm cream together are so cozy, the powder pink ears are the sweetest accent, and that pistachio scarf wrapped around its neck is everything — the color combination is genuinely dreamy. Try making a second one in dusty lavender with a sage green scarf and display them side by side. You won’t be able to stop at one, I’m warning you.
If this squishy little bear won your heart, our velvet panda has that same round, palm-sized energy with a gorgeous two-tone color scheme — and our sweet little bunny is another round, soft amigurumi that uses very similar construction techniques. Both are waiting for you. 🩷
What is the best yarn for this amigurumi bear?
We recommend using DK or Light Worsted weight cotton blend yarn (CYCA 3), such as YarnArt Jeans, for a smooth finish and clear stitch definition.
How long does it take to finish this bear pattern?
Most intermediate crocheters can complete this pattern in approximately 5 to 7 hours, including the detailed embroidery work.
Is this pattern suitable for beginners?
This pattern is rated as Intermediate due to the head-to-body seamless construction and the precise embroidery details required for the face.