Meet the Amigurumi Chick You’ll Want to Make a Dozen Of
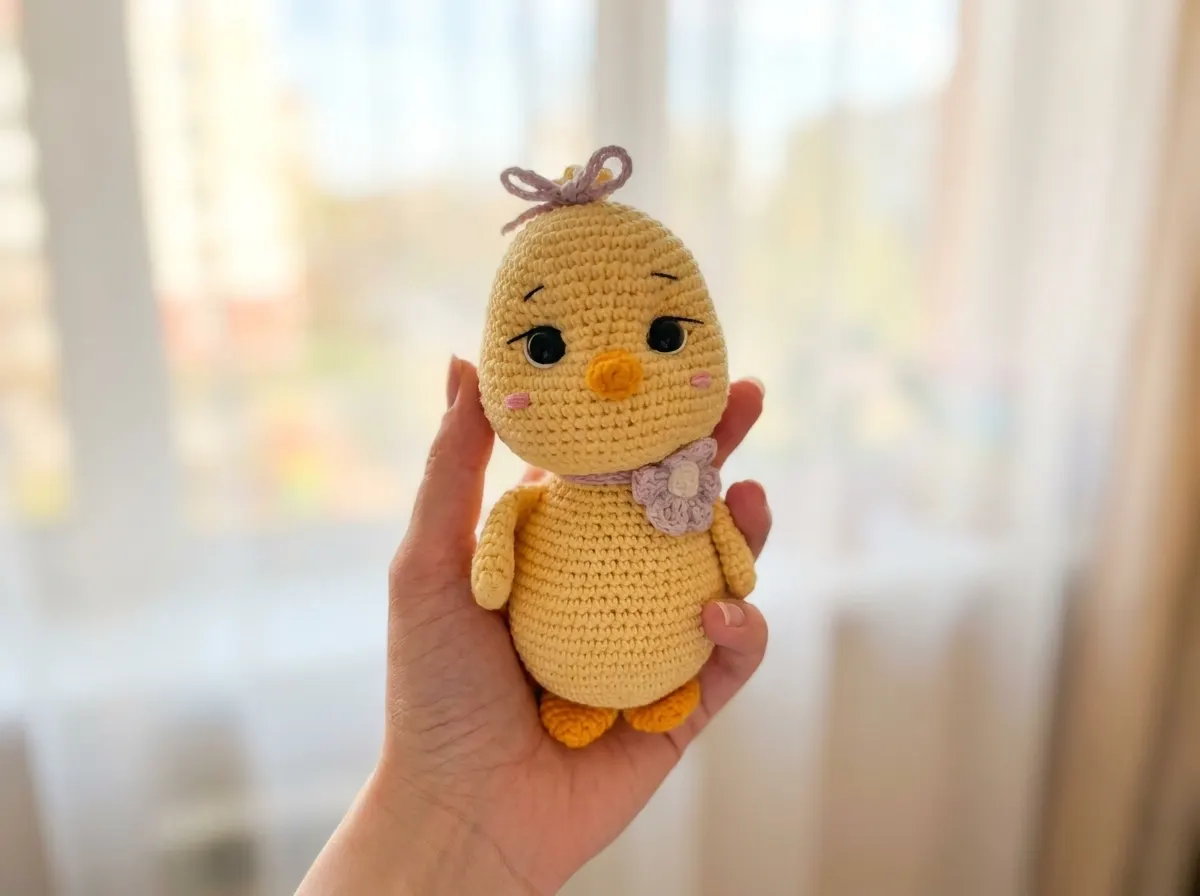
This amigurumi chick has been sitting at the top of my to-make list for longer than I’d like to admit — the tiny embroidered eyelashes, the sculpted belly, the little crest you work directly onto the head. I crocheted this with a deliberately tight fabric so not a single bit of stuffing shows through. Every stitch count has been checked twice. Let’s get into it.
📋 Pattern Quick Stats
- Difficulty: Intermediate
- Finished Size: Approx. 4–5 in (10–12 cm) — varies with tension
- Hook Size: 2.0mm (steel hook — no US letter equivalent)
- Yarn Weight: DK / Light Worsted (3)
- Techniques: magic ring, increase, decrease, hdc shaping, color changes, surface crochet, embroidery
- Estimated Time: 7–10 hours
What You Need to Make This Amigurumi Chick
Yarn
The original pattern uses YarnArt Jeans, which is a DK/Light Worsted weight (3) cotton-acrylic blend. For US crafters, Drops Muskat or Paintbox Simply DK are excellent alternatives — both are widely available and give that same clean stitch definition this kind of fine-hook work demands. You’ll need the following colors:
- Main body color (warm yellow in the original) — for the head, body, wings, and crest. Less than one full skein.
- Beak and feet color (orange in the original) — for the beak and lower feet. A small amount.
- Accent color (light pink or lilac in the original) — for the flower, headband, and crest bow. A small amount.
- White — for the flower center and embroidered eye whites. A small amount.
- Pink (any shade) — for the embroidered cheeks. A few yards.
- Black embroidery floss or fine black yarn — for the eyelashes and eyebrows.
You can find DK weight yarns at Joann, Michaels, Hobby Lobby, or online at KnitPicks and LoveCrafts (US shipping). For a reference on weight categories, the Craft Yarn Council yarn weight system is always my first stop.
Tools and Supplies
- 2.0mm steel crochet hook
- 12mm safety eyes × 2
- Polyester fiberfill (polyfill) for stuffing
- Stitch marker
- Tapestry needle (for sewing parts and weaving in ends)
- Scissors
- Straight pins (for assembly)
💡 Emma’s Note on Hook Size: A 2.0mm steel hook paired with DK weight yarn is intentional — it creates a very dense, tight fabric with no gaps for stuffing to peek through. If you’re used to working DK at 3.5mm or 4.0mm, be prepared for a bit of adjustment. Your hands will feel it after a while. Take breaks and shake them out. It’s worth it.
Abbreviations Used in This Amigurumi Chick Pattern
| Abbreviation | Meaning |
|---|---|
| mr | magic ring |
| sc | single crochet |
| hdc | half double crochet |
| dc | double crochet |
| ch | chain |
| sl st | slip stitch |
| inc | increase — 2 sc worked into the same stitch |
| dec | decrease — 2 stitches worked together |
| sc3tog | triple decrease — insert hook into next stitch, pull up loop, repeat in next two stitches, yarn over and pull through all 4 loops |
| FLO | front loop only |
| BLO | back loop only |
| FO | fasten off |
| (…)×6 | repeat the instructions in brackets the indicated number of times |
| (X) | total stitch count at end of round |
💡 Emma’s Tip on Decreases: This pattern calls for dec throughout. I always use the invisible decrease method in amigurumi — it eliminates the gap you get with a standard sc2tog and keeps the fabric looking clean and tight. If you’re not familiar with it yet, our invisible decrease tutorial walks through it step by step. It takes five minutes to learn and makes a real difference.
Special Techniques for This Amigurumi Chick
Before you start, I’d recommend being comfortable with the following:
- Magic Ring — Every main part of this pattern starts with one. If you’re still getting a hole in the center of your ring, our step-by-step magic ring tutorial covers every common fix.
- Safety Eye Placement — Timing matters here. The eyes go in at a specific point during the head construction and must be secured before you close and stuff. Our guide to attaching safety eyes explains everything, including how to get symmetrical placement.
- HDC Shaping Rows — The body of this chick uses several rows of mixed sc and hdc to sculpt the belly shape. The hdc is just slightly taller than sc, and working “3 hdc in 1 st” creates a small raised bump. Work these rows slowly and follow the counts carefully — they’re the most unusual part of this pattern and they’re what gives the chick that round, plump silhouette.
- Stuffing Gradually — Both the head and body need to be stuffed as you work. Don’t wait until the opening is too small. Our guide to stuffing amigurumi without lumps is worth a read if you’re newer to this.
Amigurumi Chick Free Crochet Pattern
This pattern is worked in continuous rounds (no joining, no turning) unless otherwise noted. Use a stitch marker to track the beginning of each round.
Head (× 1)
Yarn: Main body color (yellow) | Start: Magic ring
Row 1: 6 sc in mr (6)
Row 2: 6 inc (12)
Row 3: (1 sc, inc) × 6 (18)
Row 4: (2 sc, inc) × 6 (24)
Row 5: (3 sc, inc) × 6 (30)
Row 6: (4 sc, inc) × 6 (36)
Row 7: (5 sc, inc) × 6 (42)
Row 8: (6 sc, inc) × 6 (48)
Rows 9–14: 48 sc (6 rows) (48)
⚠️ Safety Eye Placement: Insert safety eyes between Rows 14 and 15, spaced 8 sc apart. Once the washer is locked in place, there’s no going back — take your time positioning them. Our safety eyes tutorial has tips for getting them level. Begin stuffing the head loosely at this point; you’ll continue stuffing as you decrease.
Row 15: (5 sc, inc) × 8 (56)
Row 16: (13 sc, inc) × 4 (60)
Rows 17–22: 60 sc (6 rows) (60)
Row 23: (13 sc, dec) × 4 (56)
Row 24: (5 sc, dec) × 8 (48)
Row 25: (4 sc, dec) × 8 (40)
Row 26: (3 sc, dec) × 8 (32)
Row 27: (2 sc, dec) × 8 (24)
Row 28: (2 sc, dec) × 6 (18)
Row 29: (1 sc, dec) × 6 (12)
Row 30: 6 dec (6)
Finishing: Close the opening. FO, cut yarn and weave in ends.
Body (× 1)
Yarn: Main body color (yellow) | Start: Magic ring
Row 1: 6 sc in mr (6)
Row 2: 6 inc (12)
Row 3: (1 sc, inc) × 6 (18)
Row 4: (2 sc, inc) × 6 (24)
Row 5: (3 sc, inc) × 6 (30)
Row 6: (4 sc, inc) × 6 (36)
Row 7: (5 sc, inc) × 6 (42)
Row 8: (6 sc, inc) × 6 (48)
Row 9: (7 sc, inc) × 6 (54)
Rows 10–11: 54 sc (2 rows) (54)
💡 Emma’s Note on Rows 12–17: These rows use a mix of sc and hdc to sculpt the belly shape of the chick. The “3 hdc in 1 st” creates a raised bump at the center front — this is intentional and gives the chick its characteristic plump silhouette. Follow each row precisely and count carefully. The stitch counts shift quickly over these six rows.
Row 12: inc, 3 hdc in 1 st, inc, 51 sc (58)
Row 13: 3 sc, 3 hdc in 1 st, 54 sc (60)
Row 14: 4 sc, 3 hdc in 1 st, 55 sc (62)
Row 15: dec, 3 sc, 1 hdc, 3 sc, dec, 51 sc (60)
Row 16: dec, 2 sc, hdc, 2 sc, dec, 51 sc (58)
Row 17: 2 sc, sc3tog, 53 sc (56)
Row 18: (5 sc, dec) × 8 (48)
Rows 19–20: 48 sc (2 rows) (48)
Row 21: (6 sc, dec) × 6 (42)
Row 22: 42 sc (42)
Row 23: (5 sc, dec) × 6 (36)
Row 24: 36 sc (36)
Row 25: (4 sc, dec) × 6 (30)
Row 26: 30 sc (30)
Row 27: (3 sc, dec) × 6 (24)
💡 Stuffing: Stuff the body firmly before the opening gets too small. Work the sc offset stitches to the center front of the body — this helps with head attachment later. Our stuffing guide has tips for keeping things even and lump-free.
Finishing: FO, leaving a long tail for sewing.
Wings (× 2)
Yarn: Main body color (yellow) | Start: Magic ring
Row 1: 6 sc in mr (6)
Row 2: 6 inc (12)
Row 3: 12 sc (12)
Row 4: (3 sc, inc) × 3 (15)
Row 5: 15 sc (15)
Row 6: (4 sc, inc) × 3 (18)
Row 7: (2 sc, inc) × 6 (24)
Rows 8–9: 24 sc (2 rows) (24)
Row 10: (6 sc, dec) × 3 (21)
Finishing: Fold the wing flat and sc 10 stitches through both layers to close. FO, leaving a long tail for sewing.
Lower Feet (× 2)
Yarn: Beak and feet color (orange) | Start: Magic ring
Row 1: 7 sc in mr (7)
Row 2: 7 sc (7)
Row 3: 7 inc (14)
Rows 4–6: 14 sc (3 rows) (14)
Finishing: Fold flat and sc 5–6 stitches through both layers to close. FO, leaving a long tail for sewing.
Beak (× 1)
Yarn: Beak and feet color (orange) | Start: Magic ring
Row 1: 6 sc in mr (6)
Row 2: (1 sc, inc) × 3 (9)
Finishing: FO, leaving a long tail for sewing.
Flower (× 1)
Yarn: White (for center) and accent color — pink or lilac (for petals) | Start: Magic ring
Row 1: 6 sc in mr [white]; change to accent color, sl st in first st (6)
Petals: Work all 6 petals as follows, starting in the same stitch as the sl st just worked:
*In current st: ch 2, 3 dc, ch 2, sl st. In next st: sl st, ch 2, 3 dc, ch 2, sl st.* Repeat from * to * for all 6 petals around.
Finishing: Fasten off all yarn ends from the flower.
Flower Center (× 1)
Yarn: White | Start: Magic ring
Row 1: 6 sc in mr, sl st in first st (6)
Finishing: FO, leaving a long tail for sewing the center onto the flower. Use the same tail to sew the finished flower onto the headband.
Headband (× 1)
Yarn: Accent color (pink or lilac) | Start: Chain
Row 1: Ch 70 (70–80 ch is acceptable); starting from the 2nd ch from hook, sl st to end of row.
Finishing: FO and weave in ends. Sew the flower with its center onto the headband.
Crest Bow (× 1)
Yarn: Accent color (pink or lilac) | Start: Chain
Row 1: Ch 70.
Finishing: Pull tight at both ends and trim any excess yarn.
Assembling Your Amigurumi Chick
Take your time with this part. Pin everything in place before you commit to sewing — it makes a real difference in the finished look. Our guide to sewing amigurumi parts together has placement tips that are worth reading before you start.
- Head to Body: Sew the head to the body through the head stitches between Rows 27 and 28. Do not sew all the way around in one pass — stuff the neck area first, then finish sewing the head closed.
- Beak: Sew the beak to the head between Rows 15–18, centered on the face.
- Wings: Sew one wing to each side of the body between Rows 14–25, angled slightly downward. Leave approximately 12 sc of spacing between them across the back.
- Lower Feet: Sew the two feet side by side at the center of the body’s magic ring (the bottom of the body).
Finishing Details and Decoration
Eye Embroidery
Cinch the safety eyes slightly inward for that characteristic amigurumi look. Then, using white yarn, embroider the eye whites around each eye. Using black embroidery floss or fine black yarn, embroider eyelashes below each eye and eyebrows between Rows 9 and 10 of the head.
Cheeks
Using pink yarn, embroider each cheek with 3 stitches spanning 2 sc in width, placed between Rows 18–19 of the head — one on each side of the beak.
Crest
This is worked directly onto the head — no separate piece to sew on. Join main body color yarn between Rows 2–3 of the head at the front center:
- Ch 4; starting from the 2nd ch from hook, work 3 inc. Sl st into the next stitch of the head.
- Ch 5; starting from the 2nd ch from hook, work 4 inc. Sl st into the next stitch of the head.
- Ch 4; starting from the 2nd ch from hook, work 3 inc.
💡 Emma’s Tip: The crest works up quickly but the chain starts can feel fiddly. Hold the chain taut as you work the increases — it keeps the little tufts from twisting. Three tufts in slightly different heights gives the chick that just-hatched look.
Accessories
Wrap the headband around the chick’s head and position the flower toward the front, just above one eye. Tie the crest bow loosely around the base of the crest tufts.
Emma’s Note
I’ve made more than a few of these little chicks now, and the thing that always catches people is the eyes — that combination of cinched safety eyes, embroidered whites, and those tiny eyelashes gives it a personality that’s hard not to love. Don’t rush the decoration stage; it’s what takes this from a crochet exercise to something genuinely charming. If you enjoy this kind of detailed small-scale work, you might also like our free amigurumi penguin pattern — another bird with serious personality. Happy hooking. 🧶
SEO PACKAGE:
Focus Keyword: amigurumi chick
SEO Title: Amigurumi Chick — Free Crochet Baby Chick Pattern (59 chars)
Meta Description: Make this adorable amigurumi chick with full step-by-step instructions. Free crochet pattern with embroidered details and flower headband. (143 chars)
URL Slug: /amigurumi-chick-free-pattern
Suggested Alt Text for Hero Image: Amigurumi chick crochet pattern — yellow baby chick with flower headband and embroidered eyelashes
What yarn is best for this amigurumi chick?
We recommend a DK weight cotton-acrylic blend like YarnArt Jeans or Drops Muskat for clean stitch definition and durability.
Can a beginner make this amigurumi chick pattern?
This is an intermediate pattern due to the HDC belly shaping and detailed embroidery, but a dedicated beginner could follow it with our tutorials.
What size is the finished chick?
Using a 2.0mm hook and DK yarn, the finished chick stands approximately 4–5 inches (10–12 cm) tall.