Meet Opal — A Chameleon Amigurumi Free Pattern Worth Slowing Down For
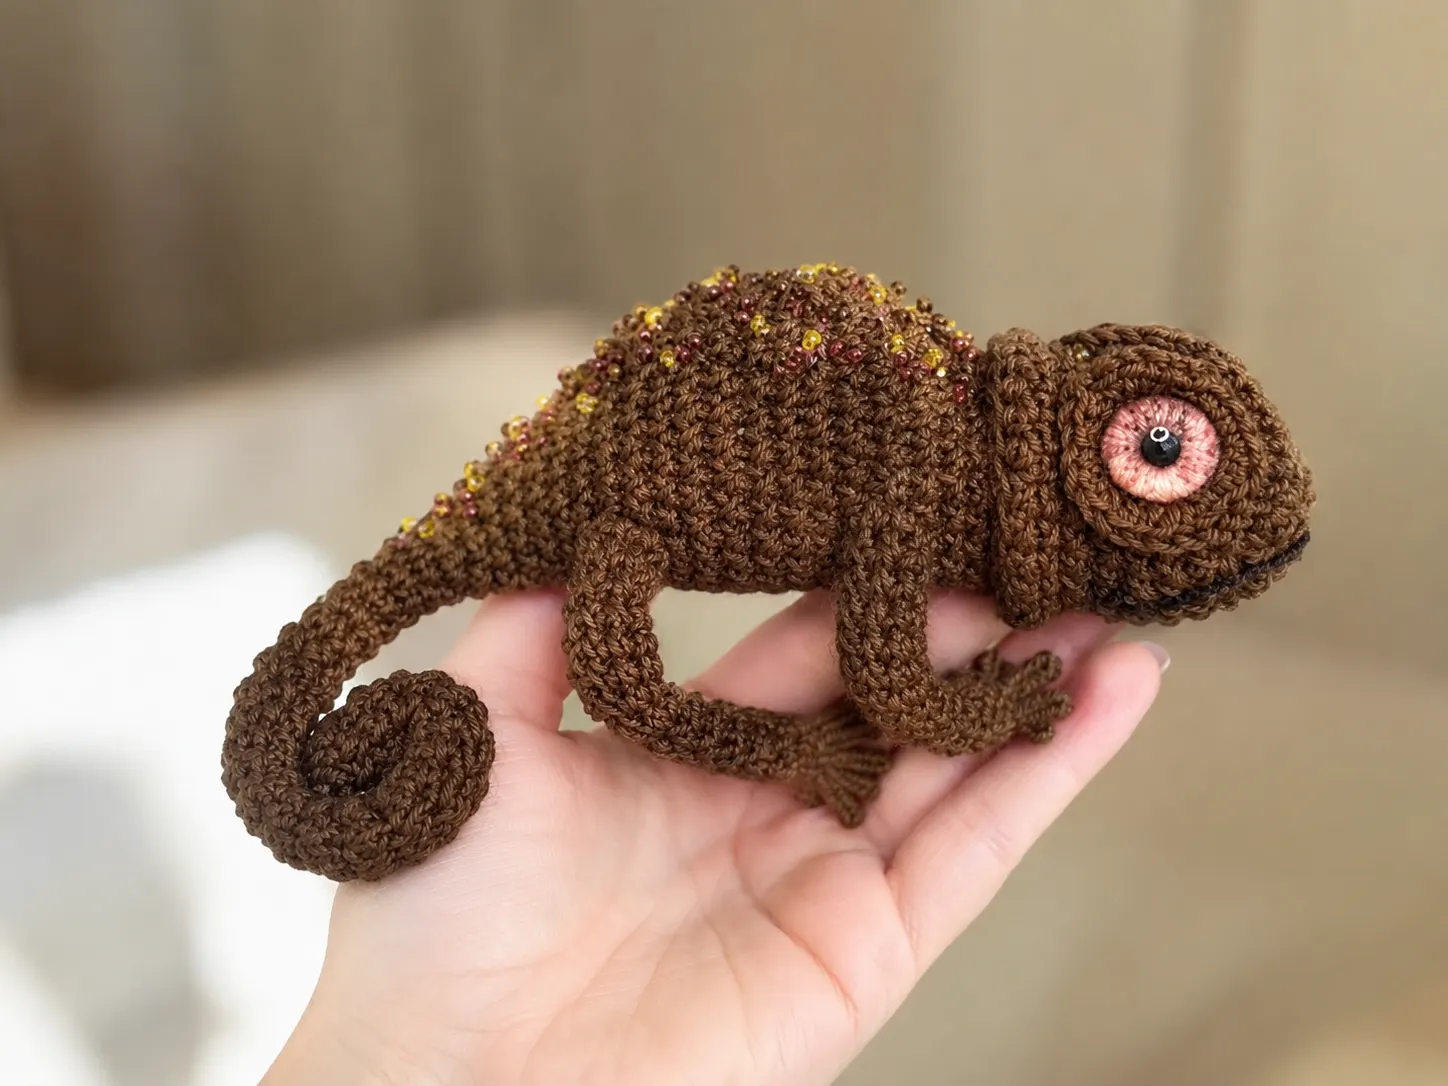
This chameleon amigurumi free pattern doesn’t rush anywhere — and neither should you. Opal moves the way real chameleons do: slowly, deliberately, one careful step at a time, tail curled tight like he’s still deciding whether to trust the branch he’s on. I built him with wire in his legs and spine so he can hold a pose — head tilted, tail wrapped, one foot lifted mid-step — and that’s when he stopped being a plush and started being someone who watches quietly from wherever you set him down.
📖 Meet Opal
- 🌟 Personality: watchful, patient, quietly curious
- 🎨 Color Palette: deep moss green body with warm amber-toned safety eyes and a soft chestnut-brown ridge along the spine
- 📏 Size: Adjustable — finished size depends on the yarn weight and hook you choose (see Materials below); this pattern was made in several sizes by the original designer
- 🪝 Hook: 1.5 mm for sport-weight yarn, or 0.75 mm for lace-weight thread
- ⏱️ Time: 10-14 hours
- ✨ Signature Detail: wire-jointed legs and a wire-reinforced spine that let you pose him exactly like a real chameleon mid-step
- 💡 Difficulty: Advanced
Materials for This Chameleon Amigurumi Pattern
The original maker photographed Opal in a few different weights of yarn, and I’d encourage you to pick based on how large — and how fine-featured — you want him to turn out.
- Sport weight (2) acrylic in deep moss green — the original used Pekhorka Detskaya Novinka; a close US alternative is Lion Brand Ice Cream, or check your local shop for a similar sport-weight acrylic. This gives Opal a slightly larger, soft, huggable scale.
- Lace weight (0) cotton thread in warm chestnut brown — the original used Vita Coco; a close US alternative is Aunt Lydia’s Classic Crochet Thread, Size 10. Working in thread shrinks Opal down to something delicate enough to sit in your palm.
- Lace weight (0) microfiber/acrylic thread in a soft heathered neutral — the original used Alize Forever Melange; a close US alternative is Lizbeth Premium Cotton, Size 10, or a comparable lace-weight blend from your local shop.
- Black embroidery floss (for the mouth)
- Embroidery floss in a contrasting shade (optional, for the back ridge — see Decoration)
- Fiberfill stuffing
- Thin insulated wire — the original maker repurposes wire pulled from an old internet/LAN cable, which works beautifully and costs nothing extra
- 6 mm cabochon-style safety eyes
- Craft glue
- Small decorative beads (optional, for the back ridge)
- Tapestry needle, scissors
The matte texture of the cotton thread version especially gives Opal a quiet, storybook stillness — like he’s mid-thought rather than mid-motion. If you’re unfamiliar with how yarn weights are categorized, the Craft Yarn Council’s yarn weight system is a helpful reference for matching your local yarn to what’s listed here.
Abbreviations Used in This Chameleon Amigurumi Free Pattern
| Abbreviation | Meaning |
|---|---|
| ch | chain |
| sl st | slip stitch |
| sc | single crochet |
| inc | increase (2 sc in same stitch) |
| inv dec | invisible decrease (worked through front loops only of the next 2 stitches) |
| 3-sc dec | a three-stitch decrease — see Sophie’s Note at first use, in the Tail section |
| hdc | half double crochet |
| mr | magic ring |
| FLO | front loop only |
| BLO | back loop only |
✨ Sophie’s Note: Wherever the original pattern called for a standard decrease, I’ve written it here as an invisible decrease instead — it closes cleanly with no visible gap, and it doesn’t change a single stitch count anywhere in the pattern.
Before the Story Begins
Opal starts the same way every character here does — with a magic ring. It’s such a small, quiet beginning for something that ends up this alive.
Because Opal is built almost entirely in a spiral of single crochet, most of the shaping happens through invisible decreases, which keep his head, body, and tail smooth and gap-free. If the technique is new to you, our invisible decrease tutorial walks through the motion slowly and clearly.
And because so much of Opal’s personality comes from how firmly (or gently) he’s stuffed — especially through that long tail — it’s worth reading through our guide to stuffing amigurumi before you begin. A little patience here goes a long way.
One more thing before you pick up your hook: this isn’t a quiet-afternoon project. There’s wire involved, three possible yarn weights, and a spine that gets embroidered or beaded after everything else is done. Take it slowly, part by part. Opal isn’t in a hurry, and neither should you be.
Pattern: Chameleon Amigurumi Free Pattern
Body & Head (make 1)
Yarn Color: main color (moss green)
Starting Method: mr
Row 1: 6 sc in mr (6)
Row 2: 6 inc (12)
Row 3: 12 sc (12)
Row 4: (1 sc, inc) × 6 (18)
Row 5: 18 sc (18)
Row 6: (2 sc, inc) × 6 (24)
Rows 7-10: 24 sc (4 rows) (24)
✨ Sophie’s Note: This is where the head begins to separate from the body, even though it’s all one continuous piece right now. Set it down for a second — there’s already a shape settling in.
Row 11: FLO 24 sc (24)
Row 12: 8 sc, 8 hdc, 8 sc (24)
✨ Sophie’s Note: Row 11 works only into the front loops, leaving the back loops of that round free — you’ll come back for them in Row 13. Row 12 builds on top of those front loops, with the taller hdc stitches gently raising the brow ridge above the eyes. This little ledge is what gives Opal that watchful, slightly hooded gaze.
Row 13: Working into the BLO of Row 11: (4 sc, inv dec) × 4 (20)
Row 14: 20 sc (20)
Row 15: 9 sc, 2 inc, 9 sc (22)
✨ Sophie’s Note: Center these two increases directly beneath the 8 hdc stitches from Row 12 — that alignment is what shapes the eye ridges properly. Depending on your tension, your starting stitch count going into this row may shift very slightly, and that’s completely fine. From here forward, always try to stack your increases and decreases directly above the ones from the row before.
Row 16: 10 sc, 2 inc, 10 sc (24)
Row 17: 11 sc, 3 inc, 10 sc (27)
Rows 18-23: 27 sc (6 rows) (27)
Row 24: 14 sc, inv dec, 11 sc (26)
Row 25: 13 sc, inv dec, 11 sc (25)
Row 26: 12 sc, inv dec, 11 sc (24)
✨ Sophie’s Note: This is the moment the body starts narrowing into the tail. Nothing dramatic happens yet — just a slow, steady taper, the way a real chameleon’s body actually flows into its tail without a hard line between the two.
Tail Transition
This next stretch uses a technique the original pattern calls a 3-sc dec — a three-stitch decrease, where three stitches are worked together into one, rather than the usual two-into-one. It pulls the tail in more sharply than an invisible decrease would, which is exactly what gives Opal’s tail its quick, tapering curl instead of a long gradual point.
Row 27: 10 sc, 3-sc dec, 11 sc (22)
Row 28: 9 sc, 3-sc dec, 10 sc (20)
Row 29: 8 sc, 3-sc dec, 9 sc (18)
Row 30: 7 sc, 3-sc dec, 8 sc (16)
Row 31: 6 sc, 3-sc dec, 7 sc (14)
Row 32: 5 sc, 3-sc dec, 6 sc (12)
Row 33: 4 sc, 3-sc dec, 5 sc (10)
Row 34: 3 sc, 3-sc dec, 4 sc (8)
✨ Sophie’s Note: Stuff the body and head firmly right up to this row before you go any further — you won’t get another chance once the tail is worked past this point. Leave the tail itself unstuffed from here on; it needs to stay flexible around the wire that goes in later.
Tail Extension
Rows 35-59: 8 sc (25 rows) (8)
Finishing: Fasten off, leaving a long tail of yarn for closing the tip. If you’d like to add the back ridge (crocheted, embroidered, or beaded — see Decoration below), this is a good time to anchor a piece of wire along the spine before you close everything up. Take a length of wire and bend a small hook into one end. Feed the straight end in through the back of the body — somewhere around Rows 15-17 — and push it all the way down through the tail. Pull it snug so the hooked end catches inside the body and settles deep, then bend and tape (or wrap in yarn) the end poking out of the tail tip. You can secure a second, shorter piece of wire inside the head in the same way, anchored near where the eye backings will sit. Once the wire is placed, use your needle to close the small opening at the tail tip, then weave in and hide the working yarn tail inside the body.
Legs (make 4)
Yarn Color: main color
Starting Method: mr
Row 1: 7 sc in mr (7)
Rows 2-14: 7 sc (13 rows) (7)
✨ Sophie’s Note: Don’t pull your magic ring closed too tightly on Row 1 — leave a small opening there, since the wire needs to slide in through it later.
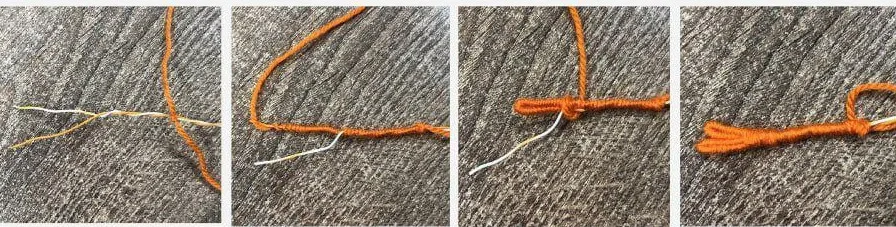
Finishing: Fasten off, leaving a tail for closing the opening. Cut two 15 cm (about 6 in) pieces of wire for each leg (or use a single length folded double, if yours isn’t already doubled). A short distance from one end, knot your yarn around both wires together, then wrap about 1 cm (roughly ⅜ in) of the two wires bound as one before separating the ends and wrapping each individually — this is what forms the tiny “fingers” that will poke out past the toes. Slide the crocheted leg piece over the wire, then draw the opening closed snugly with your needle so only the wrapped fingers extend beyond the leg. Secure the yarn tail and hide it inside the leg.
Eye Backings (make 2)
Yarn Color: main color
Starting Method: mr
Row 1: 18 sc in mr, sl st in the first sc (18)
Finishing: Pull the ring closed just enough to fit snugly around your 6 mm cabochon safety eye. Fasten off, leaving a long tail for sewing.
Assembly
This is the part where four separate wire-jointed legs, a coiled tail, and a quietly watchful head all become one small creature who can actually hold a pose.
- Front legs: Use the exposed wire end from one front leg to pierce straight through the body around Rows 13-14. Sew that leg securely to the body in a small circle, fasten off, and hide the yarn tail. Slide the second front leg onto the wire poking out the opposite side, wrap its fingers, and sew it in place the same way.
- Back legs: Repeat the same process for the second pair of legs, piercing through the lower body around Rows 22-23.
- Eyes: Glue or sew the eye backings (with the 6 mm cabochons already attached) onto either side of the head, aligned symmetrically around Rows 5-8. Moving them even a single row can shift Opal’s whole expression, so take a moment to check the angle before you commit.
If you’d like the legs and body to hold their own poses even after stuffing, our guide to sewing amigurumi parts together and our safety eye placement tutorial are both useful references for getting these joins secure.
Finishing Touches: Mouth and Back Ridge
The mouth: Thread your needle through the magic ring at the very center of the head (Row 1) and bring it out to the side, leaving a short tail of floss where you start. Embroider the mouth using black embroidery floss, then bring the needle back through that same magic ring point. Tie the two floss ends together securely and hide the knot inside the head.
The back ridge: real chameleons carry a soft crest of ridged scales down the spine, and there are three ways to bring that detail to Opal:
- Crocheted: Attach yarn at the base of the spine, right where the tail begins (around Row 34), and crochet up along the back to the middle of the head (Row 5), working 3 sc into each stitch as you go.
- Embroidered: Work a line of bullion (rococo) stitch embroidery down the spine using contrasting floss.
- Beaded: Sew a straight line of small decorative beads down the center of the back.
I’ve tried all three, and each one changes Opal’s mood a little — the crocheted ridge reads as textured and wild, the embroidered version feels delicate and old-fashioned, and the beaded line gives him something almost jewel-like, which pairs nicely with the cabochon eyes.
Meet Opal
Meet Opal. He’s perched on the edge of my desk right now, one wire-jointed foot lifted mid-step, tail curled in on itself like he’s still deciding whether the surface below him is safe. That’s the strange gift of building in wire — you’re not just making something soft, you’re making something that can hold still in exactly the pose that makes it feel alive. A slightly crooked back leg isn’t a flaw here; it’s just how Opal happens to be standing today. Name yours, pose him somewhere with good light — a windowsill, a shelf near a plant, anywhere he can watch quietly — and see what kind of stillness he settles into.
FAQ
What is the best yarn for this chameleon amigurumi free pattern?
You can use sport weight acrylic yarn for a soft, huggable scale, or size 10 lace-weight cotton thread if you want a delicate, palm-sized finish with a storybook texture.
How long does it take to crochet this chameleon amigurumi?
It typically takes between 10 to 14 hours to complete, depending on your familiarity with wire framing and working with fine thread.
Can beginners make this chameleon amigurumi pattern?
This pattern is rated as Advanced because it requires working with wire framing, intricate row placement for the eyes, and advanced stitches like the 3-sc decrease.