Free Daisy Duck Amigurumi Pattern — Diva in Tiny Pink Heels
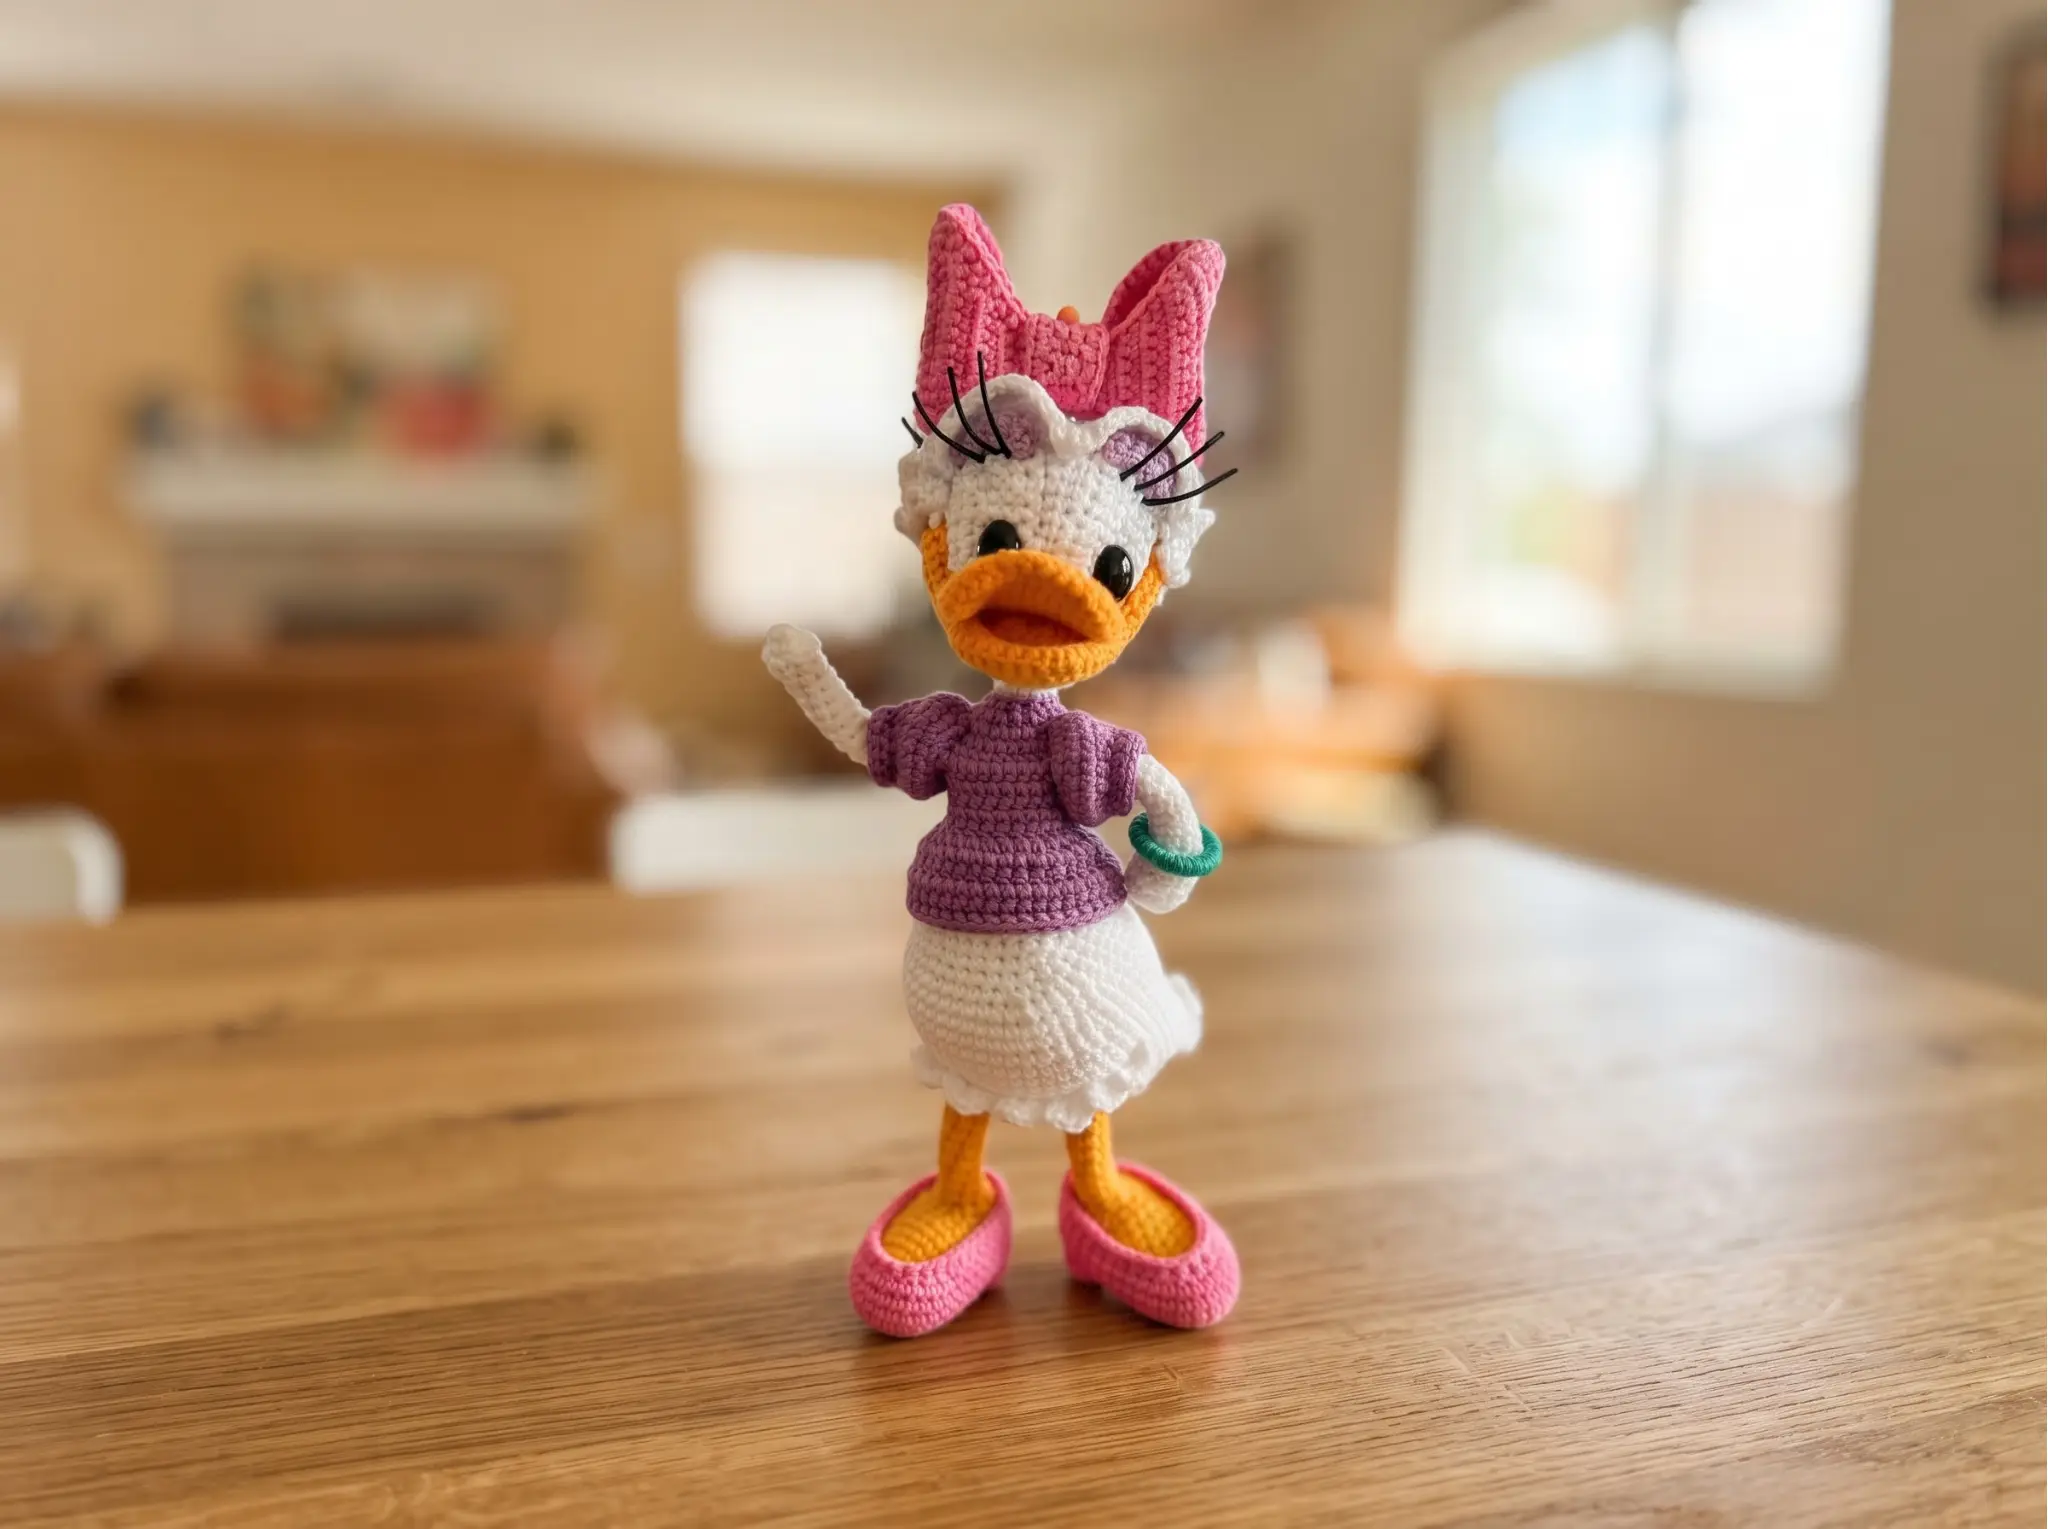
This free Daisy Duck amigurumi pattern is for anyone who believes a duck can have strong opinions about footwear. This Daisy Duck amigurumi pattern gives you all of her: crisp white feathers, a violet blouse, a pink bow perched just so — and the tiniest heels, which she absolutely insists on. She takes time. She’s worth every hour. Shall we bring her to life?
📖 Meet Daisy
- 🌟 Personality: poised, dramatic, secretly soft-hearted
- 🎨 Color Palette: crisp snow white with petal pink, violet, and a whisper of lilac
- 📏 Size: 7.9 in (20 cm)
- 🪝 Hook: 2.25 mm (US B/1)
- ⏱️ Time: 18–25 hours
- ✨ Signature Detail: hand-wired eyelashes and removable pink heels with sculpted heel caps
- 💡 Difficulty: Advanced
Materials for This Daisy Duck Amigurumi Pattern
Daisy is particular about her wardrobe, so gather everything before you begin. There’s a quiet pleasure in laying it all out — the whites, the pinks, the violet — like setting a stage before the character walks on.
- Yarn: fingering-weight cotton or cotton blend in snow white, buttercup yellow, petal pink, deep violet, soft lilac, ink black, and a small length of emerald green (for her bracelet). The fine cotton gives her that smooth, storybook finish — every stitch stays crisp, which matters on a character with this much presence.
- Hook: 2.25 mm (US B/1). The original pattern calls for 2.0 mm; a standard 2.25 mm (US B/1) or a 2.0 mm steel hook both work beautifully. If you’re unsure how these tiny sizes compare, the Craft Yarn Council hook size chart lays it out clearly.
- Safety eyes: 8 mm, long-stemmed
- Fiberfill stuffing
- Tapestry needle
- Pink and black felt — for her tongue and lash details
- Wire and electrical tape — her legs are wired so she can stand with intention
- Scissors, stitch marker
- Pastel chalk (optional) — for the softest shading around her eyes
Abbreviations
| Abbreviation | Meaning |
|---|---|
| mr | magic ring |
| ch | chain |
| sl st | slip stitch |
| sc | single crochet |
| hdc | half double crochet |
| dc | double crochet |
| tr | treble crochet |
| dec | decrease |
| inc | increase |
| BLO | back loop only |
| FLO | front loop only |
| hdc-inc | half double crochet increase |
| hdc-dec | half double crochet decrease |
Before the Story Begins — A Few Gentle Notes
Every character begins with a magic ring, and Daisy is no exception. If you haven’t made one before, our magic ring tutorial walks through it quietly and clearly — it’s the small closed circle where every one of these creatures takes their first breath.
For every decrease in this pattern, work it invisibly. Daisy’s shaping is subtle — the curve of her body, the taper of her arms — and how to work an invisible decrease is the difference between shaping that disappears into the fabric and shaping that announces itself. She would prefer the former.
Her 8 mm safety eyes go in before stuffing and closing — our guide to attaching safety eyes covers the locking washers and placement. And one more thing, from me to you: this is an advanced pattern with many small parts, wired legs, and sculpted shoes. Don’t hurry it. The details are what give her personality, and details ask for patience.
The Daisy Duck Amigurumi Pattern — Part by Part
Work in continuous rounds unless noted otherwise, with a stitch marker at the start of each round. Stitch counts are in parentheses at the end of each row — copy them faithfully, and Daisy will emerge exactly as she means to.
Arms (make 2)
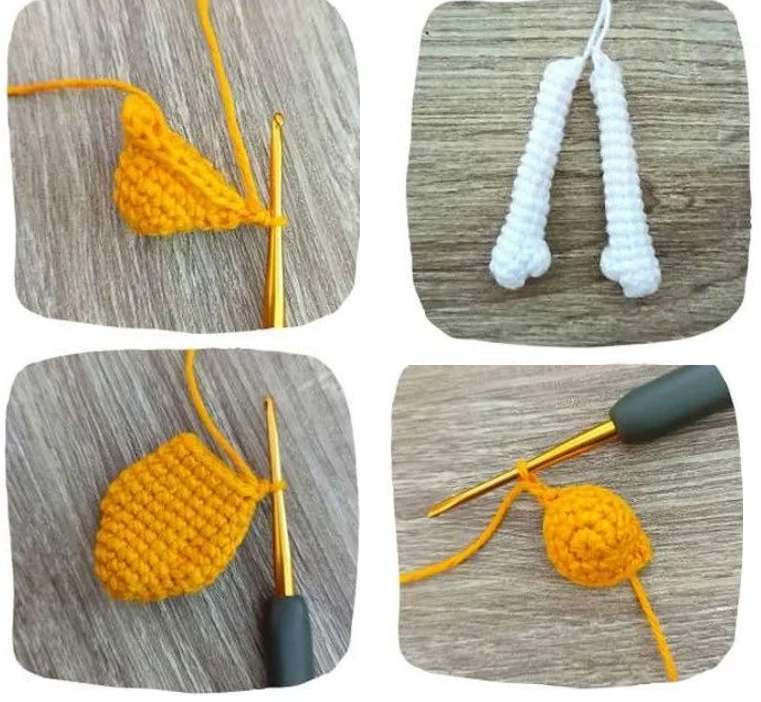
In white. Start with a magic ring.
Row 1: 6 sc in mr (6)
Row 2: (1 sc, inc) × 3 (9)
Row 3: 9 sc (9)
Row 4: 1 bobble stitch (of 4 dc), 8 sc (9)
Rows 5–8: 9 sc (4 rows) (9)
Row 9: dec, 7 sc (8)
Rows 10–13: 8 sc (4 rows) (8)
Row 14: dec, 6 sc (7)
Rows 15–18: 7 sc (4 rows) (7)
Finishing: Fasten off, do not stuff.
✨ Sophie’s Note: That single bobble stitch in Row 4 is her thumb. One stitch — that’s all it takes to turn a tube into a hand. It’s my favorite kind of design decision: nearly invisible, completely essential.
Legs (make 2)
In yellow. Start with a magic ring.
Row 1: 6 sc in mr (6)
Row 2: 6 inc (12)
Row 3: (3 sc, inc) × 3 (15)
Row 4: 15 sc (15)
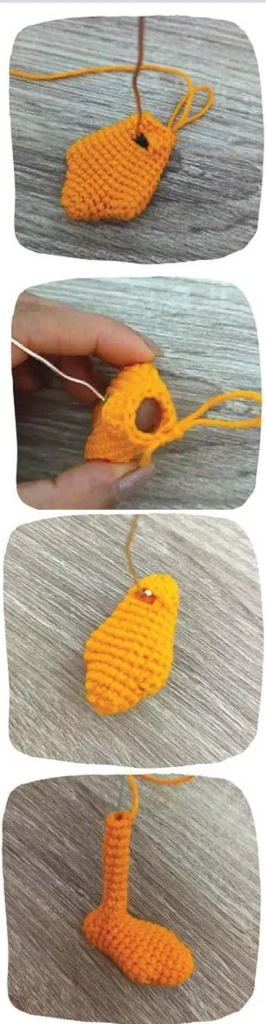
Row 5: 2 ch, starting from 2nd ch 1 sc, 7 sc along the piece, 2 ch, starting from 2nd ch 1 sc, 8 sc along the piece, in the first ch made work an increase (19)
Row 6: 8 sc, work inc along the chain, 11 sc (21)
Rows 7–8: 21 sc (21)
Row 9: 8 sc, dec, 9 sc, dec (19)
Row 10: 4 sc, dec, 7 sc, dec, 4 sc (17)
Row 11: 7 sc, dec, 6 sc, dec (15)
Row 12: 15 sc (15)
Row 13: 3 sc, 5 ch, skip 3 sts, 9 sc (12)
Row 14: 3 sc, 5 sc along the chain, 9 sc (17)
Row 15: (1 sc, dec) × 2, 1 sc, (1 sc, dec) × 3, 1 sc (12)
Row 16: 6 dec (6)
✨ Sophie’s Note: Cut about 10 in (25 cm) of wire, fold it, secure it with electrical tape, and insert it into the opening. This is what lets Daisy stand — and, more importantly, stand like herself, with a little attitude in the ankles.
Finishing: Fasten off. Join to the open hole and continue:
Row 1: 10 sc (10)
Row 2: (3 sc, dec) × 2 times (8)
Row 3: 8 sc (8)
Row 4: 6 sc, dec (7)
Rows 5–12: 7 sc (8 rows) (7)
Stuff the heel area slightly; the rest of the leg is not stuffed.
Shoes (make 2)
In pink. Start with a chain of 8.
Row 1: 8 ch, inc, 5 sc, 4 sc in 1 st, on the other side 5 sc, inc (18)
Row 2: 2 inc, 5 sc, 4 inc, 5 sc, 2 inc (26)
Row 3: (1 sc, inc) × 2, 5 sc, (inc, 1 sc) × 2 × 2 (34)
Row 4: 2 sc, inc, 8 sc, (2 hdc, hdc-inc) × 3, 2 hdc, 8 sc, inc, 2 sc, inc (40)
Row 5: BLO 40 sc (40)
Rows 6–8: 40 sc (3 rows) (40)
Row 9: 12 sc, 8 hdc-dec, 12 sc (32)
Finishing: Fasten off.
✨ Sophie’s Note: The BLO row in Row 5 is what gives the shoe its crisp sole edge — that clean line where the sole ends and the shoe begins. Daisy would notice if it weren’t there. She notices everything.
Heels (make 2)
In pink. Start with a magic ring.
Row 1: 6 sc in mr (6)
Row 2: 6 hdc-inc (12)
Row 3: 12 BLO (12)
Rows 4–5: 12 sc (2 rows) (12)
Finishing: Join with sl st, fasten off. Leave a tail for sewing.
Eyes (make 2)
In white. Start with a chain of 8.
Row 1: 8 ch, inc, 5 sc, 4 sc in 1 st, 5 sc, inc (18)
Row 2: 2 hdc-inc, 5 hdc, 4 hdc-inc, 5 hdc, 2 hdc-inc (26)
Finishing: Fasten off with sl st, leave a tail for sewing. Insert long-stemmed safety eyes.
Body & Head
In white. Start with a magic ring. The body and head are worked as one continuous piece — which means somewhere around the middle of this section, you’ll be holding all of Daisy in your hands at once.
Row 1: 6 sc in mr (6)
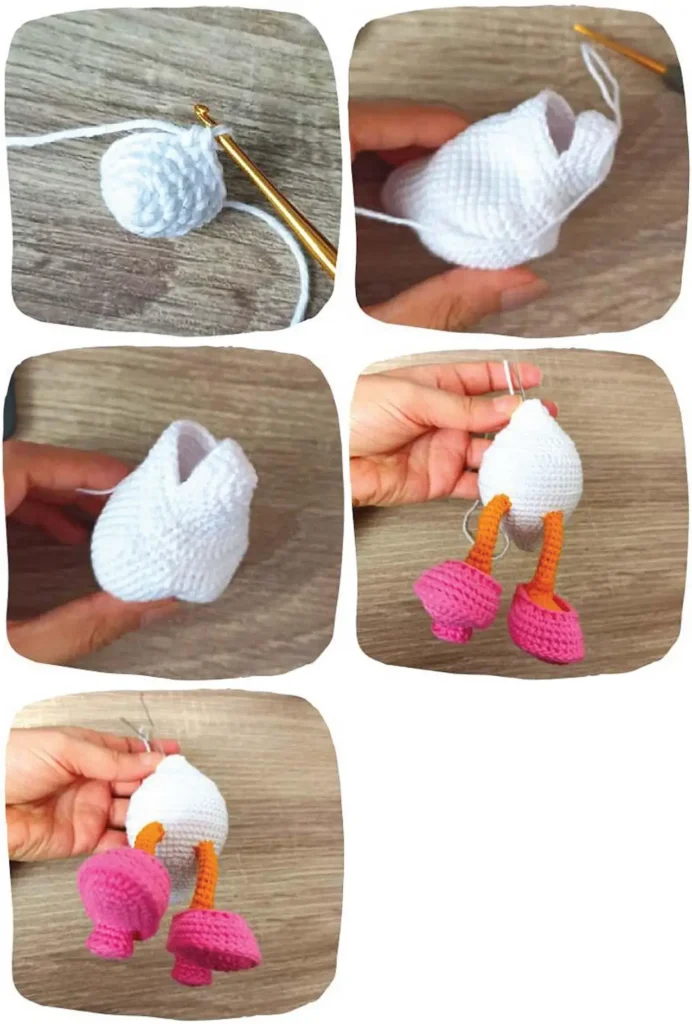
Row 2: 6 inc (12)
Row 3: 12 sc (12)
Row 4: (1 sc, inc) × 6 (18)
Row 5: 18 sc (18)
Row 6: 3 sc, (1 sc, inc) × 6, 3 sc (24)
Row 7: 6 sc, (2 sc, inc) × 4, 6 sc (28)
Rows 8–9: 28 sc (28)
Row 10: 8 sc, (2 hdc, hdc-inc) × 4, 8 sc (32)
Row 11: 7 sc, (2 hdc, hdc-inc) × 6, 7 sc (38)
Row 12: 38 sc (38)
Row 13: 1 sc, (5 sc, inc) × 6, 1 sc (44)
Row 14: 4 sc, (inc, 6 dc) × 5, inc, 4 sc (46)
Rows 15–17: 50 sc (3 rows) (50)
Row 18: 12 sc, BLO 26 sc, 12 sc (50)
Rows 19–20: 50 sc (50)
Row 21: 10 sc, (4 sc, dec) × 5, 10 sc (45)
Row 22: 10 sc, 25 hdc, 10 sc (45)
Row 23: 10 sc, (3 sc, dec) × 5, 10 sc (40)
Row 24: 3 inc, 4 sc, (3 sc, dec) × 5, 5 sc, 3 inc (42)
Row 25: 6 sc, 29 hdc, 6 sc (41)
Row 26: 6 sc, (3 sc, dec) × 6, 5 sc (35)
Row 27: 5 sc, (2 sc, dec) × 6, 6 sc (29)
Row 28: 6 sc, 17 sc, 10 ch, skip 12 sts, 6 sts remaining from this row and 6 sts from the next row (35)
Row 29: 7 sc, dec, 8 sc, 10 sc along the ch (26)
Row 30: 1 sc, (2 sc, dec) × 3, 1 sc, (2 sc, dec) × 3 (20)
Row 31: 10 dec (10)
✨ Sophie’s Note: Pause here. The body is done, and the front-loop round you’re about to work is her neck — the exact place where the body ends and someone begins. Set her down and look at the posture that’s already there. That gentle forward curve? That’s Daisy leaning in to tell you something.
Continue directly into the head:
Head Row 1: FLO 7 inc (14)
Head Row 2: (1 sc, inc) × 7 (21)
Head Row 3: (2 sc, inc) × 7 (28)
Head Row 4: 28 sc (28)
Head Row 5: (3 sc, inc) × 7 (35)
Head Row 6: 35 sc (35)
Head Row 7: (4 sc, inc) × 7 (42)
Head Rows 8–10: 42 sc (3 rows) (42)
Head Row 11: (5 sc, inc) × 7 (49)
Head Row 12: (6 sc, inc) × 7 (56)
Head Rows 13–17: 56 sc (5 rows) (56)
Head Row 18: (26 sc, dec) × 2 (54)
Head Row 19: (7 sc, dec) × 6 (48)
Head Row 20: 3 sc, (dec, 6 sc) × 5, dec, 3 sc (42)
Head Row 21: (5 sc, dec) × 6 (36)
Head Row 22: 2 sc, (dec, 4 sc) × 5, dec, 2 sc (30)
Head Row 23: (3 sc, dec) × 6 (24)
Head Row 24: 1 sc, (dec, 2 sc) × 5, dec, 1 sc (18)
Head Row 25: (1 sc, dec) × 6 (12)
Head Row 26: 6 dec (6)
Finishing: Sew the opening closed.
Beak (make 1)
In buttercup yellow. Start with a chain of 11, working around both sides of the foundation chain.
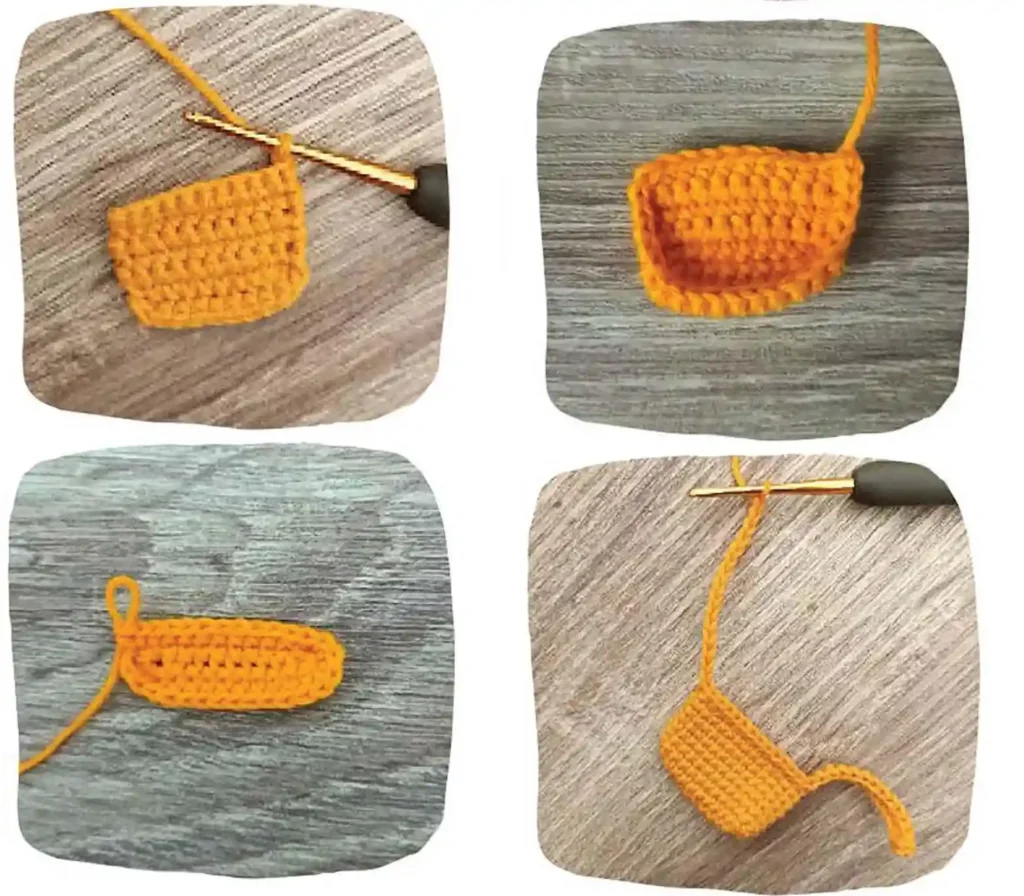
Row 1: starting from the 2nd ch from hook: inc, 8 sc, 4 sc in 1 st, on the other side 8 sc, inc (24)
Row 2: 2 inc, 8 sc, 4 inc, 8 sc, 2 inc (32)
Row 3: (1 sc, inc) × 2, 8 sc, (1 sc, inc) × 4, 8 sc, (1 sc, inc) × 2 (40)
Rows 4–6: 40 sc (3 rows) (40)
Row 7: (8 sc, dec) × 4 (36)
Row 8: 36 sc (36)
Finishing: Fasten off, leaving a long tail for sewing. Add only a thin layer of fiberfill — just enough to hold the shape. The beak should stay soft and flexible so you can sew it on with that gentle downward curve.
✨ Sophie’s Note: The curve is everything here. A beak sewn on flat says nothing; a beak curved slightly downward gives her that composed, faintly skeptical expression she’s known for. Pin it, curve it, and look at her from the side before you commit.
Feathers (make 3)
In snow white. Start with a magic ring.
Row 1: 6 sc in mr (6)
Row 2: (1 sc, inc) × 3 (9)
Rows 3–4: 9 sc (2 rows) (9)
Row 5: (1 sc, dec) × 3 (6)
Row 6: 6 sc (6)
Finishing: Fasten off, leaving a tail for sewing. Do not stuff. Flatten each feather gently between your fingers — they should look like soft little petals, not tubes.
Bow (make 1)
In buttercup yellow. Start with a chain of 11, working around both sides of the foundation chain.
Row 1: starting from the 2nd ch from hook: inc, 8 sc, 4 sc in 1 st, on the other side 8 sc, inc (24)
Row 2: 2 inc, 8 sc, 4 inc, 8 sc, 2 inc (32)
Row 3: (1 sc, inc) × 2, 8 sc, (1 sc, inc) × 4, 8 sc, (1 sc, inc) × 2 (40)
Rows 4–6: 40 sc (3 rows) (40)
Row 7: (8 sc, dec) × 4 (36)
Row 8: 36 sc (36)
Finishing: Fasten off, leaving a long tail for sewing. Add only a thin layer of fiberfill — just enough to hold the shape. The beak should stay soft and flexible so you can sew it on with that gentle downward curve.
✨ Sophie’s Note: The curve is everything here. A beak sewn on flat says nothing; a beak curved slightly downward gives her that composed, faintly skeptical expression she’s known for. Pin it, curve it, and look at her from the side before you commit.
Blouse (make 1)
In deep violet. Start with a chain of 19, worked flat from the neckline down in turned rows — the opening stays at the back, exactly where the assembly asks for it.
Row 1: starting from the 2nd ch from hook: 18 sc, ch 1, turn (18)
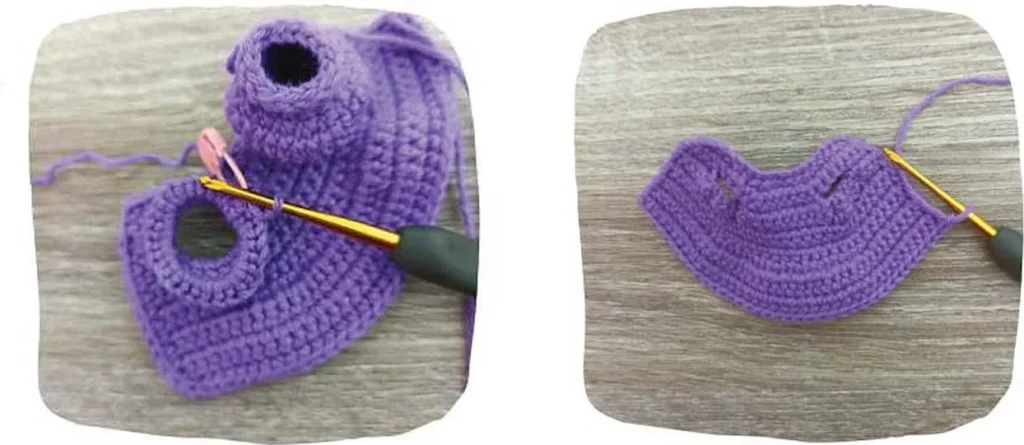
Row 2: (2 sc, inc) × 6, ch 1, turn (24)
Row 3: 24 sc, ch 1, turn (24)
Row 4: (3 sc, inc) × 6, ch 1, turn (30)
Row 5: 30 sc, ch 1, turn (30)
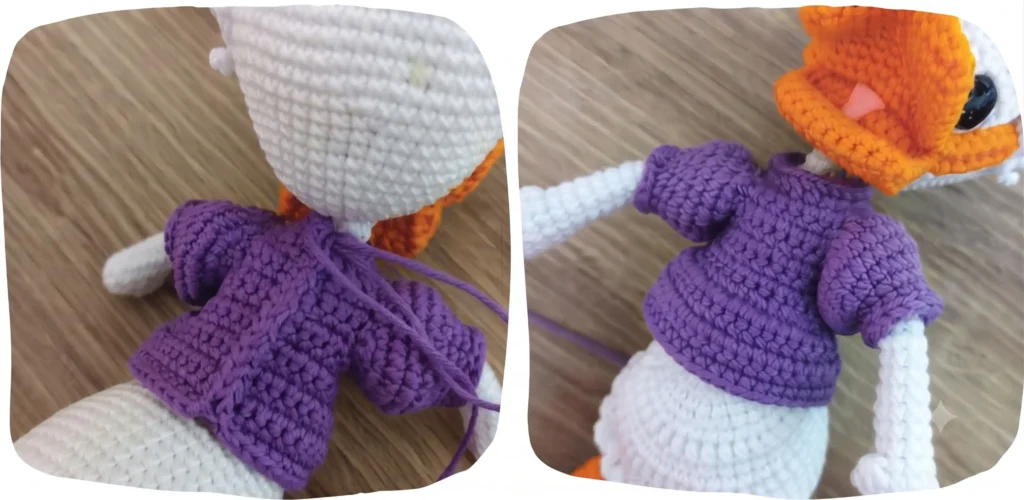
Row 6: (4 sc, inc) × 6, ch 1, turn (36)
Row 7 (armholes): 5 sc, 4 ch, skip 8 sts, 10 sc, 4 ch, skip 8 sts, 5 sc, ch 1, turn (28)
Row 8: 28 sc, working 4 sc into each ch-4 space, ch 1, turn (28)
Row 9: (3 sc, inc) × 7, ch 1, turn (35)
Row 10: (4 sc, inc) × 7, ch 1, turn (42)
Rows 11–15: 42 sc, ch 1, turn (5 rows) (42)
Row 16 (scalloped hem): sl st in first st, (skip 1 st, 5 dc in next st, skip 1 st, sl st in next st) × 10, sl st in last st (10 shells)
Finishing: Fasten off and weave in ends. For soft cap sleeves (optional), join violet yarn at one underarm and work 1 round of (1 sc, inc) around the armhole; fasten off and repeat on the second armhole. Dress Daisy after assembly and sew the back opening closed with matching yarn.
✨ Sophie’s Note: The scalloped hem is the blouse’s one small flourish — ten little shells that catch the light and swing just slightly when you pick her up. It’s the kind of detail nobody asks for and everybody notices.
Assembly — The Moment Daisy Becomes Whole
This is the part I love most. Until now you’ve had pieces — a body, two wired legs, a pair of very serious little shoes. Now they become a character. Take your time with placement; where you position the eyes and beak decides who Daisy is. Move the eyes one row and the expression changes completely.
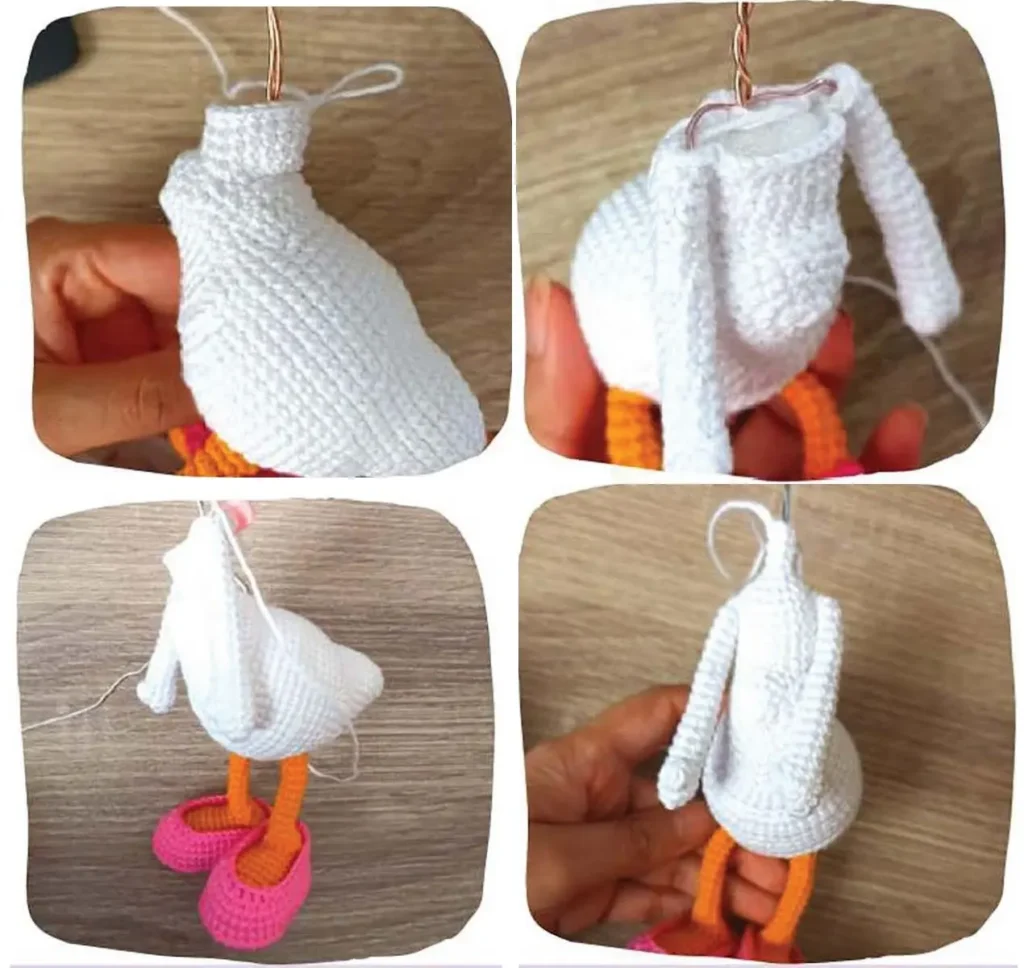
- Attach the legs to the base of the body between rows 13 and 16, inserting the wire.
- Join the arms to the body: Row 6: 4 sc along the body, 7 sc with the arm, 12 sc, 7 sc with the arm, 4 sc along the body.
- Sew the eyes to the head; place the eyelids on the upper edge of the eyes with the curve facing down.
- Sew on the beak, shaping it into a curve.
- Sew the eyebrows above the rim of the eyes.
- Sew the feathers on each side of the beak, pointing upwards.
- Clothing: Put on the blouse and sew the opening at the back.
✨ Sophie’s Note: Before you sew anything permanently, pin it. Prop the eyes and beak in place and turn her toward the light. Tilt them a fraction — the curve of the beak especially. Somewhere in those small adjustments, she’ll suddenly look back at you. Sew everything down at that moment, not before.
Her Outfit & Finishing Touches
Daisy without her accessories is only half a story. The blouse, the bow, the heels — each one shifts her from “crocheted duck” to “duck with a social calendar.” These finishing details are where I always lose track of time, and I’ve made peace with that.
- Glue a triangle of pink felt inside the beak (tongue).
- Eyelashes: 3 black wires for each eye (longest in the center), glue to the eyelid.
- Draw a shadow line with black thread above the eyelashes.
- Outline the edges of the eyes with blue pastel chalk (optional).
- Use wire and emerald thread for the bracelet.
The wired lashes are her signature. Three tiny wires per eye, the longest in the center — it sounds fussy, and it is, gloriously. But they’re what give her that knowing, slightly theatrical gaze. The emerald bracelet is the detail almost nobody will notice, which is exactly why it matters. Characters are built from the things only their maker knows are there.
If you enjoy dressing your characters as much as making them, our Hello Kitty amigurumi pattern with her tiny bow and overalls carries the same spirit — small wardrobes, big personality.
Meet Daisy
Daisy is standing on my bookshelf right now — wired legs planted, lashes catching the afternoon light, looking mildly unimpressed with the dust situation up there. That’s the thing about finishing a daisy duck amigurumi pattern like this one: somewhere between the last lash and the emerald bracelet, she stops being yarn and starts being someone with expectations. Yours will have her own temperament — maybe sweeter, maybe even more dramatic, depending on where you set those eyes. Give her a middle name; she’d like that. And put her somewhere prominent — a shelf, a desk, next to a reading lamp. Daisy does not do hidden corners. 🧶
FAQ
What yarn is best for this Daisy Duck amigurumi?
We recommend using cotton or acrylic yarn for a crisp finish and durability in your Daisy Duck amigurumi pattern.
How long does it take to crochet this Daisy Duck?
It typically takes about 8 hours to complete this Daisy Duck amigurumi pattern, depending on your experience level.