Free Crochet Ladybug Pattern — The Cutest Little Amigurumi Doll with Rosy Cheeks
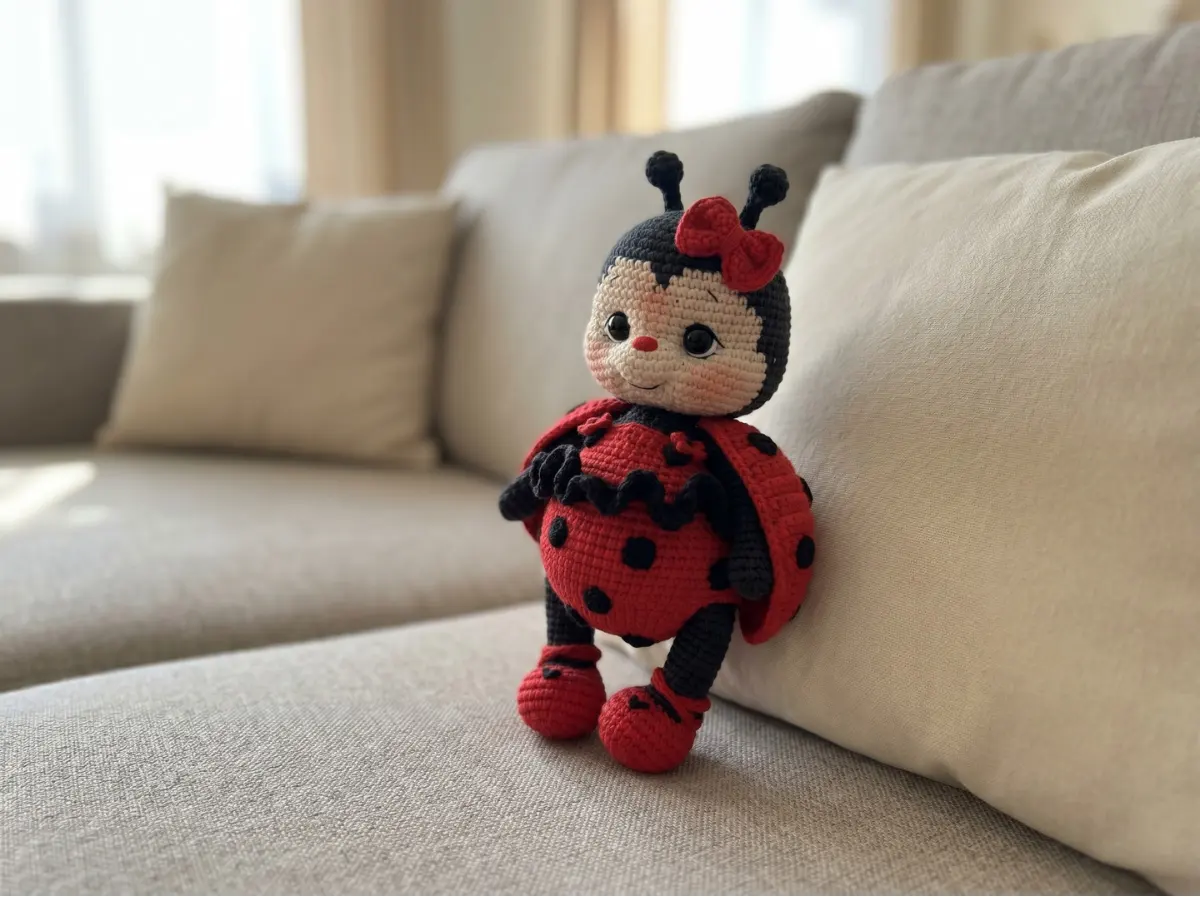
This free crochet ladybug pattern makes the most irresistible little doll you can imagine — a round, squishy 7.9 in figure dressed head to toe in the sweetest red and black bodysuit, with sculpted cheeks, glossy safety eyes, and the tiniest embroidered nose. She’s got white wings peeking out from under her red elytra, a little red bow on her head, and that soft, chubby silhouette that makes your hands want to reach for your hook immediately. Every single detail on this crochet ladybug has been thought through. Let me walk you through how she comes together.
🩷 Pattern Highlights
- Cuteness Rating: 🩷🩷🩷🩷🩷
- Finished Size: 7.9 in (20 cm)
- Difficulty: Intermediate
- Hook Size: 1.8 mm (fine steel, no standard US letter equivalent) for the toy body; 2.0 mm (US steel 4) for the clothes
- Yarn Palette: creamy black main color, bright red for elytra and bodysuit, soft white for wings, black for spots and straps
- Key Detail: sculpted muzzle, embroidered eyelashes and eyebrows, 11–12mm glossy safety eyes, and blush cheeks with optional freckles
- Estimated Time: 8–12 hours
Materials for This Crochet Ladybug Amigurumi
The yarns used here are fine-weight cotton blends that give those tiny stitches their beautiful, crisp definition. You’ll want smooth, tightly twisted yarn for a piece like this — it’s what makes the sculpted muzzle and embroidered details really pop.
- YarnArt Jeans (or US alternative: Drops Muskat, Paintbox Cotton DK) — DK / Light Worsted weight (3), 50g / 175 yds per skein
- Color 28 — black (main color for head, body, arms, legs, antennae) — 1 skein
- Color 26 — red (for elytra, bodysuit, ruffles, bib, bow)
- Color 01 — white (for wings)
- Color 53 — black (for spots, eyelashes, eyebrows, mouth embroidery)
- Color 90 — for nose embroidery
- Alize Cotton Gold (or US alternative: Lion Brand 24/7 Cotton) — Worsted (4): neutral/muzzle tone — a small amount, approximately 1/8 skein
- Hook: 1.8 mm fine steel hook for the toy body; 2.0 mm (US steel 4) for the clothing pieces
- Safety eyes: 11–12 mm black glossy safety eyes × 2
- Polyester fiberfill stuffing (Poly-Fil by Fairfield works beautifully)
- Tapestry needle for assembly and embroidery
- Long sculpting needle for muzzle and eye sculpting
- Lavsan (polyester) thread for sculpting, or YarnArt Jeans thread folded in half
- Pastel chalk or blush powder in soft pink and warm brown, plus a small brush
- Brown pencil or marker for optional freckle details
- Stitch markers
- Scissors
- Small buttons × 2 (for bodysuit straps)
🩷 Chloe’s Color Note: The contrast between the deep black yarn and the bright poppy red is what makes this ladybug so striking. If you’d like a softer, more vintage feel, try a dusty brick red instead of a true red — it photographs beautifully and gives the whole piece a more muted, artisanal look.
Abbreviations Used in This Crochet Ladybug Pattern
| Abbreviation | Meaning |
|---|---|
| mr | magic ring |
| ch | chain |
| sl st | slip stitch |
| sc | single crochet |
| hdc | half double crochet |
| dc | double crochet |
| inc | increase (2 sc in same stitch) |
| dec | invisible decrease (through front loops only) |
| FLO | front loop only |
| BLO | back loop only |
| offset st | offset stitch (used to reposition the start of a round) |
| FO | fasten off |
Before You Begin — A Few Tips for the Best Results
This crochet ladybug has more pieces than your average amigurumi, and the finishing is where she truly transforms into something magical. A few things worth knowing before you cast on:
Work tightly. Because this pattern uses very fine yarn and a small hook, keeping a tight, even tension is what gives the finished doll that smooth, professional surface. If you can see gaps between your stitches, go down a hook size. Our hook size guide can help you find the right fit for your tension style.
The two-color head technique needs patience. Rows 11 through 28 of the head alternate between the main color and an additional muzzle color. To keep the color sections from shifting to one side, gently pull the additional color thread toward the left as you work. When you finish row 28, tie the two threads together on the wrong side before continuing — this locks everything in place.
Don’t skip the sculpting. The sculpted muzzle and eye area is what gives this ladybug her personality. The stuffing in the eye area should be slightly looser than the rest — this makes it easier to press and shape the muzzle later. Our guide to stuffing amigurumi evenly walks through exactly how to manage this.
🩷 Chloe’s Eye Tip: Before you press those safety eye washers in, hold the head under a bright lamp and look at it straight on. Place both eyes loosely, step back, squint a little. Are they perfectly level? Is the spacing even? Take all the time you need — once that washer clicks into place, the decision is made. Those 11–12mm glossy eyes are the heart of her expression, and they deserve the extra thirty seconds. Our safety eyes tutorial covers everything you need to know about positioning them just right.
The Crochet Ladybug Pattern
Head (× 1)
Color: Black main color (28)
Start: Magic ring
Row 1: 6 sc in mr (6)
Row 2: 6 inc (12)
Row 3: (1 sc, inc)*6 (18)
Row 4: 1 sc, inc, (2 sc, inc)*5, 1 sc (24)
Row 5: (3 sc, inc)*6 (30)
Row 6: 2 sc, inc, (4 sc, inc)*5, 2 sc (36)
Row 7: (5 sc, inc)*6 (42)
Row 8: 3 sc, inc, (6 sc, inc)*5, 3 sc (48)
Row 9: (7 sc, inc)*6 (54)
Row 10: (17 sc, inc)*3 (57)
From row 11, begin introducing the additional muzzle color. Pull the additional color thread to the left to prevent shifting.
Row 11: 22 sc [main color], 5 sc [add. color], 3 sc [main color], 5 sc [add. color], 22 sc [main color] (57)
Row 12: 21 sc [main color], 7 sc [add. color], 1 sc [main color], 7 sc [add. color], 21 sc [main color] (57)
Row 13: 20 sc [main color], 17 sc [add. color], 20 sc [main color] (57)
Row 14: 19 sc [main color], 19 sc [add. color], 19 sc [main color] (57)
Row 15: 18 sc [main color], 21 sc [add. color], 18 sc [main color] (57)
Row 16: 9 sc, inc, 8 sc [main color], 10 sc, inc, 10 sc [add. color], 8 sc, inc, 9 sc [main color] (60)
Rows 17–18: 19 sc [main color], 22 sc [add. color], 19 sc [main color] (2 rows) (60)
🩷 Between rows 18 and 19, tie the two yarn threads together on the wrong side, then insert your safety eyes. Place them 8 visible stitches apart. This is the moment she starts looking like herself — take your time here.
Row 19: 18 sc [main color], (inc, 1 sc)*3, 12 sc, (1 sc, inc)*3 [add. color], 18 sc [main color] (66)
Rows 20–24: 18 sc [main color], 30 sc [add. color], 18 sc [main color] (5 rows) (66)
Row 25: 9 sc, dec, 8 sc, 1 sc, dec [main color], (9 sc, dec)*2, 3 sc [add. color], 6 sc, dec, 9 sc, dec [main color] (60)
Row 26: 4 sc, dec, 8 sc, dec, 3 sc [main color], 5 sc, dec, 8 sc, dec, 6 sc [add. color], 2 sc, dec, 8 sc, dec, 4 sc [main color] (54)
Row 27: (7 sc, dec)*2, 1 sc [main color], 6 sc, dec, 7 sc, dec [add. color], (7 sc, dec)*2 [main color] (48)
Row 28: 3 sc, (dec, 6 sc)*2, dec [main color], 6 sc, dec, 1 sc [add. color], 5 sc, dec, 6 sc, dec, 3 sc [main color] (42)
After row 28, tie the two yarn threads together on the wrong side. Continue row 29 with main color only.
Row 29: 21 dec [main color] (21)
FO, cut yarn. Stuff firmly — a little looser around the eye area to allow for sculpting. Pay extra attention to the cheeks; they need to be well-filled to give her that soft, round face.
Antennae (× 2)
Color: Black main color
Start: Magic ring
Row 1: 6 sc in mr (6)
Row 2: 6 inc (12)
Row 3: (3 sc, inc)*3 (15)
Row 4: (3 sc, dec)*3 (12)
Row 5: 6 dec (6)
After row 5, stuff the little ball very lightly with tweezers — just enough to give it shape without bulk.
Row 6: dec, 4 sc (5)
Row 7: 5 sc (5)
Fold in half, crochet 2 sc through both layers. FO, cut yarn leaving a long tail for sewing.
Arms (× 2)
Color: Black main color
Start: Magic ring
Row 1: 6 sc in mr (6)
Row 2: 6 inc (12)
Row 3: (3 sc, inc)*3 (15)
Row 4: 15 sc (15)
Row 5: 9 sc, 3 dec (12)
Row 6: 9 sc, dec, 1 sc (11)
Row 7: (2 sc, dec)*2, 1 sc, dec (8)
Row 8: 5 sc, 3 inc (11)
Rows 9–19: 11 sc (11 rows) (11)
In the last row, crochet an additional 3–4 offset stitches to reposition. Stuff to the midpoint, not too firmly. Fold in half so the bend of the arm faces inward; crochet 5 sc through both layers. FO, cut yarn.
Legs (× 2)
Color: Black main color
Start: Chain of 6
Row 1: from 2nd st from hook: inc, 3 sc, 4 sc in one st, along the opposite side of chain: 3 sc, inc (14)
Row 2: 2 inc, 3 sc, 4 inc, 3 sc, 2 inc (22)
Row 3: (1 sc, inc)*2, 3 sc, (1 sc, inc)*4, 3 sc, (1 sc, inc)*2 (30)
Rows 4–6: 30 sc (3 rows) + 2 offset sts to position start of row at back center (30)
Row 7: 6 sc, 9 dec, 6 sc (21)
Row 8: 5 sc, 6 dec, 4 sc (15)
Row 9: 5 sc, 2 dec, 6 sc (13)
Rows 10–11: 13 sc (2 rows) (13)
Row 12: 6 sc, 2 inc, 5 sc (15)
Rows 13–21: 15 sc (9 rows) (15)
Stuff firmly through row 9, then stuff more loosely to row 15. Fold so paws face slightly inward; crochet 7 sc through both layers. FO, cut yarn.
Body (× 1)
Color: Black main color (28)
Start: Magic ring
Row 1: 6 sc in mr (6)
Row 2: 6 inc (12)
Row 3: (1 sc, inc)*6 (18)
Row 4: 1 sc, inc, (2 sc, inc)*5, 1 sc (24)
Row 5: (3 sc, inc)*6 (30)
Row 6: 2 sc, inc, (4 sc, inc)*5, 2 sc (36)
Row 7: (5 sc, inc)*6 (42)
Row 8: 3 sc, inc, (6 sc, inc)*5, 3 sc (48)
Row 9: (7 sc, inc)*6 (54)
Row 10: 4 sc, inc, (8 sc, inc)*5, 4 sc (60)
Rows 11–13: 60 sc (3 rows) (60)
Row 14: Join legs: 12 sc, 7 sc together with the leg, 22 sc, 7 sc together with the leg, 12 sc (60)
Rows 15–16: 60 sc (2 rows) (60)
Row 17: 4 sc, dec, (8 sc, dec)*5, 4 sc (54)
Rows 18–19: 54 sc (2 rows) (54)
After row 19: if the start of the round has shifted, crochet additional offset stitches to reposition it to center.
Row 20: 14 sc, dec, (2 sc, dec)*6, 14 sc (47)
Rows 21–22: 47 sc (2 rows) (47)
Row 23: 14 sc, dec, (1 sc, dec)*6, 13 sc (40)
Rows 24–25: 40 sc (2 rows) (40)
Row 26: (8 sc, dec)*4 (36)
Row 27: 36 sc (36)
Row 28: 2 sc, dec, (4 sc, dec)*5, 2 sc (30)
Row 29: 30 sc (30)
Row 30: (3 sc, dec)*6 (24)
Row 31: Join arms: 3 sc, (3 sc, dec together with arm), 6 sc, (dec, 3 sc together with arm), 3 sc, dec (21)
Stuff firmly, paying special attention to the tummy which forms beautifully after row 20. FO, cut yarn leaving a long tail for sewing.
Wings (× 2)
Color: White (01)
Start: Magic ring
Row 1: 6 sc in mr (6)
Row 2: 6 inc (12)
Row 3: (1 sc, inc)*6 (18)
Row 4: 1 sc, inc, (2 sc, inc)*5, 1 sc (24)
Row 5: 3 sc, dec, (6 sc, dec)*2, 3 sc (21)
Rows 6–7: 21 sc (2 rows) (21)
Row 8: (5 sc, dec)*3 (18)
Row 9: 18 sc (18)
Row 10: 2 sc, dec, (4 sc, dec)*2, 2 sc (15)
Row 11: (3 sc, dec)*3 (12)
Rows 12–13: 12 sc (2 rows) (12)
Row 14: 1 sc, dec, (2 sc, dec)*2, 1 sc (9)
Fold in half, crochet 4 sc through both layers. FO, cut yarn leaving a long tail for sewing.
Elytra / Wing Covers (× 2) — Ladybug Only
Color: Red (26)
Start: Magic ring — tighten but do not join, ch 1 and turn.
Row 1: 6 sc in mr, tighten ring but do not join, ch 1 + turn (6)
Row 2: (1 sc, inc)*3, ch 1 + turn (9)
Row 3: (2 sc, inc)*3, ch 1 + turn (12)
Row 4: (3 sc, inc)*3, ch 1 + turn (15)
Row 5: (4 sc, inc)*3, ch 1 + turn (18)
Row 6: (5 sc, inc)*3, ch 1 + turn (21)
Row 7: (6 sc, inc)*3, ch 1, then sc along the straight edge; in the last st crochet 1 sc, ch, 1 sc (24)
Join with the white wing piece and crochet together: 2 dec. FO, cut yarn leaving a long tail for sewing.
Spots for Wings (× 6)
Color: Black
Start: Magic ring
Row 1: 6 sc in mr, sl st into first sc (6)
FO, cut yarn leaving a tail for sewing. Sew onto the elytra.
Bodysuit (× 1)
Color: Red (26) for ladybug, with black stripe detail
Start: Ch 54, join in a round with sl st
Row 1: 54 sc (54)
Row 2: in BLO: 54 sc — change to black in this row (54)
Row 3: (8 sc, inc)*6 — back to both loops (60)
Rows 4–5: 60 sc (2 rows) (60)
Rows 6–9: 60 sc (4 rows) — change back to red from row 6 (60)
FO, weave in ends on the wrong side. Mark the central 19 stitches at both front and back; 11 stitches remain on each side for leg openings.
Back panel (turning rows): Attach yarn to back center 19 sts.
Row 10: 19 sc (19)
Row 11: 1 sc, dec, 13 sc, dec, 1 sc (17)
Row 12: 17 sc (17)
Row 13: 1 sc, dec, 11 sc, dec, 1 sc (15)
Row 14: 1 sc, dec, 9 sc, dec, 1 sc (13)
Row 15: 13 sc (13)
Row 16: 1 sc, dec, 7 sc, dec, 1 sc (11)
Rows 17–18: 11 sc (2 rows) (11)
Row 19: 1 sc, dec, 5 sc, dec, 1 sc (9)
Row 20: 9 sc (9)
FO, weave in ends. Repeat for the front panel. Sew side seams from the wrong side. Border each leg opening: attach yarn at the seam and crochet 2 sc, dec around. Finish with sl st in the first stitch. FO and weave in ends.
Ruffles (× 1)
Color: Red
Start: Attach red yarn at the back to the FLO of row 1 of the bodysuit.
Row 1: (2 dc in one st, 3 dc in next st)*27 (135)
Row 2: sl st + ch 3 to end of row
FO, cut yarn, weave in ends on the wrong side. Those ruffles add the most darling little flounce around her waist.
Bib (× 1)
Color: Red
Start: Mark 15 central front stitches, attach yarn, crochet in turning rows with ch 1 at the end of each row.
Rows 1–2: 15 sc (2 rows) (15)
Row 3: 1 sc, dec, 3 sc, dec, 4 sc, dec, 1 sc (12)
Rows 4–6: 12 sc (3 rows) (12)
Tie threads in a knot, weave in ends on the wrong side. Border the upper edge of the bodysuit: attach red yarn at the back and sc along the entire top edge. At the corners of the bib, crochet 1 sc, ch, 1 sc into the same stitch.
Straps (× 2)
Color: Black
Start: Ch 25
Row 1: from 3rd st from hook in the back bumps: 3 hdc, ch 2, skip 2 sts, insert hook in 3rd st and crochet: 18 hdc (21)
FO, cut yarn leaving a long tail. Sew straps to the back of the bodysuit. Sew buttons at the front button loops.
Spots for Bodysuit (× 15)
Color: Black
Start: Magic ring
Row 1: 6 sc in mr, sl st into first sc (6)
FO, leaving a tail for sewing. Arrange and sew onto the bodysuit however your heart tells you — she’s your ladybug!
Bow (× 1)
Color: Red
Start: Ch 9, crochet in turning rows with ch 1 at end of each row.
Rows 1–6: from 2nd st from hook: 8 sc (6 rows) (8)
Border the bow with sc, crocheting 1 sc, ch, 1 sc into each corner. FO, leaving a 20 cm tail. Bring the tail to the middle, fold the bow accordion-style, and wrap tightly with yarn to create the bow shape. Secure and sew to the top of the head.
Assembly
- Attach the head to the body. Both pieces have 21 stitches open at the neck — sew stitch by stitch, bringing the thread to the center of the body and connecting to the center of the head first to keep everything aligned. As you sew, stuff the neck area well with fiberfill for support. Our guide to sewing amigurumi parts shows exactly how to achieve a seamless, even join.
- Sculpt the eyes. Using your long sculpting needle threaded with lavsan (or YarnArt Jeans doubled), work in three stages. Points 1 and 2 are anchored in the center of the neck, one stitch apart. In each stage, pass the needle from the anchor points out to points 3–6 positioned around each eye, alternating passes from below and from inside the eye. The thread gradually tightens to draw the eyes inward and create dimension. After all three stages, tie the thread ends together inside the head and trim.
- Distribute the stuffing from the eye area down into the muzzle using your needle, shaping the cheeks and snout.
- Sew the antennae at the level of rows 3–5 of the head.
- Sew the arms between rows 30–31. Sew the legs between rows 13–14 (if not crocheted in), then bring the needle 5 rows lower and tack the legs to the body to hold their angle.
- Sew the wings. Mark attachment points with pins: points 1 and 2 are between rows 29–30, 4 stitches apart; point 3 is in the center between rows 27–28. Pin both white wings into position, sew in place, then layer the red elytra on top and secure. Weave all remaining tails into the body.
Making It Extra Cute — Finishing Details for Your Crochet Ladybug
Okay, this is the part I get the most excited about. Everything up to now has been building toward this — and this is where your crochet ladybug goes from cute to absolutely irresistible.
Sculpt the muzzle. Using the same needle and thread technique as the eyes (points 1 and 2 in the center of the neck), insert the needle and bring it out at point 3 on the muzzle; then insert at point 4 and come out at point 2. Pull gently but firmly, helping with your fingers on the outside to coax the muzzle into its soft, protruding shape. Press gently around the eyes at the same time to deepen the overall face structure. Tie and hide the thread inside.
Embroider the mouth. Between rows 23–24, use a single strand of dark yarn to embroider a small curved smile. Keep it delicate — just a gentle arc. Tiny embroidered mouths look so much more precious than you’d expect.
Decorate the eyes. First, embroider small white highlights (the whites of the eyes) above the safety eye. Then add the eyelid line, tiny eyelashes along the top, and eyebrows above. For the lashes and brows, split your YarnArt Jeans thread and use just one strand — this makes them wispy and delicate rather than thick and heavy.
Embroider the nose. Between rows 20–21, using two strands, work a small oval or triangular nose shape in the muzzle color. It needs to be tiny to look right — resist the urge to make it bigger than it wants to be.
Blush the cheeks. This is my favorite step. Using a small fluffy brush, sweep soft pink pastel chalk or blush powder in a circular motion onto each cheek. Build it up gradually — you can always add more, but you can’t take it away. A warm dusky rose reads beautifully on camera. If you want freckles, use a fine brown pencil to dot 3–5 tiny freckles across the muzzle. They are completely optional and completely wonderful.
🩷 Chloe’s Finishing Secret: After you apply the blush, let it sit for a minute, then very lightly press the cheek area with a dry fingertip. This presses the chalk slightly into the yarn fibers so it lasts longer. The result is that soft, diffused flush that looks like she’s just been out in the cool morning air.
Dress her up. Slide the bodysuit onto the doll, snap the straps into place at the front buttons, and adjust the ruffle so it sits evenly all the way around. Arrange the black spots on the bodysuit however you like — evenly spaced reads classic; slightly scattered reads charming. There’s no wrong answer.
Final spot placement on the wings. Sew the six small black circles onto the red elytra before attaching them to the body — it’s much easier to embroider on a flat piece. Three spots per wing, evenly spaced, is the classic look. Two on one side and four on the other is secretly my favorite.
Chloe’s Final Look
I finished mine late on a Tuesday evening and spent about ten minutes just holding her up to the lamp, turning her in my hands, not quite believing how much personality fits into a 7.9 inch doll. The glossy eyes catch the light in the most perfect way, the blush on her cheeks is warm and soft, and those red elytra layered over the white wings — I mean. Come on. She’s too much.
Try making her in a slightly different palette if you’d like a variation — dusty rose and cream gives a more vintage, muted feel, or deep burgundy and ivory for a more dramatic look. Set her on a shelf next to a little mushroom or a tiny potted plant and you’ll have the most delightful little corner I can imagine. She deserves to be somewhere she can be seen. 🩷
What is the best yarn for this crochet ladybug?
A tightly twisted fine-weight cotton blend like YarnArt Jeans or Paintbox Cotton DK works best for crisp stitch definition and facial sculpting.
How long does it take to crochet this ladybug amigurumi?
It typically takes about 8 to 12 hours to complete, depending on your crochet speed and experience with facial sculpting details.
What size hook is needed for this pattern?
You will need a 1.8 mm hook for the main toy body to ensure tight stitches without gaps, and a 2.0 mm hook for the clothing pieces.