Free Shiba Inu Crochet Pattern — Tiny Plush Pup with a Golden Bell
This free shiba inu crochet pattern makes the most perfectly squishy little pup you’ve ever seen — warm biscuit-brown all over, with a soft white muzzle, the tiniest white belly patch, and pale pink paws that make you want to hold it forever. It’s palm-sized, round-bodied, and comes together in a handful of small parts that assemble into something that genuinely looks like a miniature Shiba. Add a little ribbon collar with a bell at the end and I promise you, you will not be able to put it down. Let’s make this tiny pup together.
🩷 Pattern Highlights
- Cuteness Rating: 🩷🩷🩷🩷🩷
- Finished Size: Approx. 3.5–4 in (9–10 cm)
- Difficulty: Beginner–Intermediate
- Hook Size: C/2 (2.75 mm) recommended for plush yarn; E/4 (3.5 mm) for DK acrylic
- Yarn Palette: warm biscuit / caramel (main), soft white, blush pink
- Key Detail: white muzzle disc, pink paw tips, and a red ribbon collar with a tiny golden bell
- Estimated Time: 3–5 hours
Materials for Your Shiba Inu Crochet Project
- Yarn — Main Color: Warm biscuit or caramel brown — a soft, slightly fluffy acrylic or plush yarn works beautifully here. You need just a small amount, roughly 20–30 yards.
- Yarn — White: Soft white in the same weight as your main color. Used for the muzzle, tummy, inner ears, and the base of the arms. About 10–15 yards.
- Yarn — Blush Pink: A soft, dusty blush pink. Just a few yards for the paw tips of the arms.
- Hook Size: C/2 (2.75 mm) for plush or sport-weight yarn; E/4 (3.5 mm) for DK acrylic. Use whatever hook keeps your fabric tight so stuffing doesn’t peek through.
- Safety Eyes: Two 6mm black safety eyes. Smaller eyes give the Shiba that intense, alert expression that’s so characteristic of the breed — 6mm is perfect here.
- Safety Nose: One 6mm black safety nose (oval or round), centered below the eyes.
- Polyfill stuffing: A small amount — enough to give the head a firm, round shape. Poly-Fil by Fairfield works perfectly and is available at Joann, Michaels, or Hobby Lobby.
- Stitch marker: One — non-negotiable for tracking your continuous rounds.
- Tapestry needle: For assembly and weaving in ends.
- Optional: A thin red ribbon or yarn strand + a tiny gold jingle bell for the collar. This finishing touch is so worth it.
Abbreviations Used in This Shiba Inu Crochet Pattern
| Abbreviation | Meaning |
|---|---|
| sc | single crochet |
| inc | increase (2 sc in same stitch) |
| dec | invisible decrease (through front loops only of next 2 stitches) |
| mr | magic ring |
| ch | chain |
| FO | fasten off |
| sl st | slip stitch |
Note on decreases: All decreases in this pattern use the invisible decrease method — insert your hook through the front loops only of the next two stitches simultaneously. This keeps your fabric smooth and gap-free, which makes such a difference on a small piece like this. If you’re new to it, our invisible decrease tutorial walks you through it step by step.
Before You Begin — Details That Make the Difference
A few things worth knowing before you cast on your magic ring:
The color change on the head is the heart of this design. Rows 1–7 of the head are worked in your warm brown main color. Before you begin Row 8, you switch to white. This creates the soft muzzle-area shading that gives the Shiba its characteristic face — a gentle two-tone look that’s one of the most satisfying reveals in the whole pattern. Take your time with this transition and keep the float tidy on the inside.
The arms are worked in two colors. Rows 1 and 2 are white (the upper arm and body-contact area), and Row 3 switches to blush pink for the paw tip. It’s just one row of pink but it makes the whole piece. Those little pink paws are everything.
Install your safety eyes and nose before stuffing. Always. Once you’re happy with the placement and have pressed the washers firmly in place, then you stuff and close. If this is your first time working with safety hardware, our safety eyes tutorial has all the placement guidance you need.
🩷 Chloe’s Detail Tip: Before you press any safety eye washer in, hold the unstuffed head up under a bright lamp and look at it straight-on. The eyes should sit symmetrically on either side of center, at the same height. Spend an extra minute here — once those washers click, there’s no going back, and perfectly placed eyes make this little face absolutely irresistible.
For a deeper look at working in continuous rounds (which is how every part of this pattern is crocheted), our continuous vs. joined rounds tutorial explains the technique and why it gives amigurumi such a clean, seamless finish.
The Pattern
Head (×1) — Main Color + White
Start in your warm brown main color. Work in continuous rounds throughout.
Row 1: 6 sc in mr (6)
Row 2: 6 inc (12)
Row 3: (sc, inc)*6 (18)
Row 4: (sc, inc, sc)*6 (24)
Row 5: (3 sc, inc)*6 (30)
Row 6: 30 sc (30)
Row 7: 5 sc, 3 inc, 10 sc, 3 inc, 9 sc (36)
🩷 Color Change: Switch to white before beginning Row 8. This creates the soft muzzle shading. The moment those white stitches appear along the front of the head, the little Shiba face starts to take shape — this is where it goes from “ball of yarn” to “actual dog.” So satisfying.
Row 8: 36 sc (36)
Row 9: 5 sc, 3 dec, 10 sc, 3 dec, 9 sc (30)
Row 10: (3 sc, dec)*6 (24)
Row 11: (sc, dec, sc)*6 (18)
Row 12: (sc, dec)*6 (12)
FO, leaving a long tail for assembly. Do not stuff yet — install safety eyes and nose first.
Legs and Body (×1) — White
This part starts as two separate little legs that you then join together into one body. It’s clever and fun to do. Start with white yarn.
First leg:
Row 1: 6 sc in mr (6)
Row 2: (sc, inc)*3 (9)
FO the first leg and set it aside.
Second leg (do not fasten off):
Row 1: 6 sc in mr (6)
Row 2: (sc, inc)*3 (9)
Do not fasten off the second leg. Chain 3. Join to the first leg and continue:
Row 3: 9 sc along the 1st leg, 3 sc along the ch, 9 sc along the 2nd leg, 3 sc along the ch (24)
Row 4: 24 sc (24)
Row 5: 24 sc (24)
Row 6: (sc, dec, sc)*6 (18)
Row 7: 18 sc (18)
Row 8: 18 sc (18)
Row 9: (sc, dec)*6 (12)
FO, leaving a long tail for assembly.
Muzzle (×1) — White
This is a simple little disc that gets sewn flat onto the front of the head. It’s small but absolutely essential — the muzzle is what gives the Shiba that distinctive, slightly protruding snoot.
Row 1: 6 sc in mr (6)
FO, leaving a long tail for assembly.
Tummy (×1) — White
A soft white oval that gets sewn onto the front of the body. Such a sweet little detail.
Row 1: 8 sc in mr (8)
FO, leaving a long tail for assembly.
Arms (×2) — White + Blush Pink
Start in white yarn. These are worked as tiny tubes — short, round, and perfectly paw-like.
Row 1: 6 sc in mr (6)
Row 2: 6 sc (6)
🩷 Color Change: Switch to blush pink before Row 3. This is the paw tip! Just one row of pink and it transforms the whole arm from plain white tube to an actual little paw. I may have gasped a little the first time I made these.
Row 3: 6 sc (6)
FO, leaving a tail. Make two.
Ears (×2) — Main Color
Work in your warm brown main color. These small triangles give the Shiba its iconic perky, upright ears.
Row 1: 4 sc in mr (4)
Row 2: (sc, inc)*2 (6)
Row 3: (sc, inc, sc)*2 (8)
FO, leaving a tail. Make two. Set aside — you’ll attach the inner ear pieces before sewing these onto the head.
Inner Ear (×2) — White
Tiny white inserts that get sewn into the center of each ear. This detail is so small and so worth it — it’s what makes the ears look dimensional rather than flat.
Row 1: 2 ch, from the 2nd ch from hook: sc
FO, leaving a tail. Make two. Sew one inner ear piece onto the center of each outer ear before attaching the ears to the head.
Tail (×1) — Main Color
The iconic Shiba curl! A short little tube that gets attached at the back of the body and curled upward.
Row 1: 6 sc (6)
Row 2: 6 sc (6)
FO, leaving a tail for assembly.
Assembly — Putting Your Shiba Inu Together
- Ears: Sew the white inner ear piece onto the center of each brown outer ear piece. Set both assembled ears aside.
- Safety eyes: Before stuffing, insert both 6mm safety eyes into the head between Rows 7–8, approximately 4–5 stitches apart, centered over the muzzle area. Look at the head straight-on under good light and confirm they’re symmetrical. Then press the washers firmly into place on the inside.
- Safety nose: Insert the 6mm safety nose at Row 6, centered between the two eyes. Press the washer in firmly.
- Muzzle: Lightly stuff the muzzle disc if desired for a little dimension. Sew it flat onto the head, centered below the nose, spanning approximately Rows 5–7. The white of the muzzle should connect visually with the white section of the head.
- Stuff the head: Now that the safety hardware is in, stuff the head firmly through the remaining opening. Aim for a smooth, round shape with no lumps.
- Tummy: Sew the white tummy disc flat onto the front center of the body, spanning approximately Rows 4–6.
- Arms: Sew one arm to each side of the body at the very top, between Rows 1–2, with the blush pink paw end pointing downward.
- Tail: Sew the tail to the back center of the body at Row 1. Curve it upward and tack it in place with a stitch or two so it holds that classic Shiba curl.
- Ears: Sew the assembled ears onto the top of the head, between Rows 3–5, one on each side. Angle them very slightly forward — this gives that characteristic alert, fox-like Shiba expression.
- Head onto body: Center the head on top of the body and sew securely all the way around, matching the base of the head (Row 12) to the top opening of the body.
- Collar (optional but wonderful): Tie a thin red ribbon or a strand of red yarn around the neck join and attach a tiny gold bell at the front center. This detail, I’m telling you. It’s everything.
Making It Extra Cute — Finishing Details
This is the section I look forward to most with every single pattern. The actual crocheting is satisfying, but this? This is where the piece goes from a little stuffed shape to a tiny creature with a personality.
The eyes: I know I already mentioned checking symmetry before pressing the washers — but I want to say it again, because it matters so much on this particular pattern. The Shiba Inu has such a distinctive, intense expression in real life, and 6mm glossy black eyes placed just right can absolutely capture that. Too wide apart and it looks confused. Too close together and it looks worried. Right in the middle — alert, curious, and endlessly charming. Take your time.
Embroidered cheeks: Using a few strands of blush pink embroidery floss or a thin strand of pink yarn, embroider two small soft circles just below the outer corners of the eyes. Keep them light and gentle — barely-there rosy cheeks, not clown circles. A few loose satin stitches worked in a small oval shape does it perfectly. This is the step that makes people go “oh my goodness” when they see the finished piece. Every time.
The muzzle position: When you sew the white muzzle disc onto the head, make sure it sits slightly over the center of the white color-change section, between the nose hardware and the bottom edge of the eyes. A centered, flat muzzle that connects seamlessly with the white forehead section gives the most realistic Shiba face.
The tail curl: Don’t just attach the tail flat — give it that signature Shiba swagger. Attach the base at the back of the body, then use a stitch or two of your tapestry needle to tack the tip of the tail slightly forward and upward, maintaining the curl shape. If your yarn is a little floppy, a tiny bit of extra stuffing inside the tail tube before you close it helps it hold the shape.
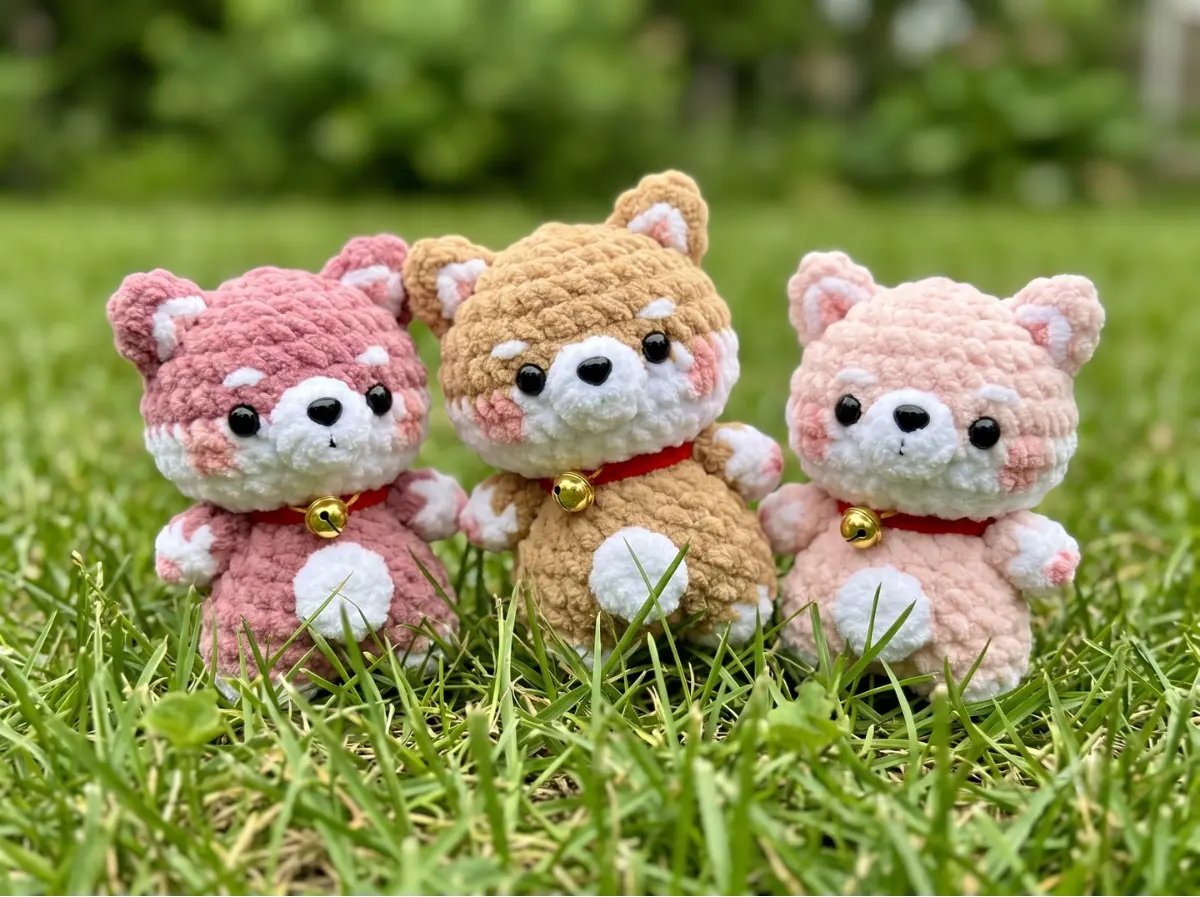
Color variations to obsess over: The classic warm biscuit brown is iconic, but the photo reference shows these little pups also come in a bright candy pink and a soft blush — and both are completely precious. A pale cream version with ivory undertones would be stunning. A full dusty lavender Shiba? I need to try that immediately.
🩷 Chloe’s Detail Tip: If you’re making more than one of these (and you will want to — they’re that addictive), try making a set in the classic brown, soft pink, and pale cream, and arranging them together in a little wooden tray or bowl. They look incredible as a trio, and the white muzzle and belly patches read beautifully across all three colorways. Instant shelf decor.
For more guidance on sewing pieces like muzzles and tummy patches so they lie perfectly flat without puckering, our amigurumi parts assembly tutorial has all the tips you need.
Chloe’s Final Look
I’ve been holding this tiny Shiba for an unreasonable amount of time and I have zero regrets. The warm brown against the soft white muzzle, those little pink paws peeking out, the perky ears with their white inner lining, and then that red collar with the gold bell — it’s so perfectly put together. It really does look like a miniature version of the real dog, and that face with its glossy eyes and tiny embroidered cheeks is just too much. Try making one in the classic brown first, then immediately make a pastel pink version, because once you finish the first one you will absolutely need a second. 🩷
What is the best yarn for this shiba inu crochet pattern?
A soft, fluffy acrylic or plush yarn works beautifully for this pattern, giving the pup a perfectly squishy and cuddly feel.
How long does it take to crochet this amigurumi shiba inu?
It typically takes about 3 to 5 hours to complete this pattern, depending on your crochet speed and experience level.
Is this shiba inu crochet pattern suitable for beginners?
Yes, this pattern is rated for Beginner-Intermediate crocheters. It uses basic stitches like single crochet, increases, and invisible decreases in continuous rounds.