A Frog Crochet Pattern Free Amigurumi Fans Are Going to Absolutely Love
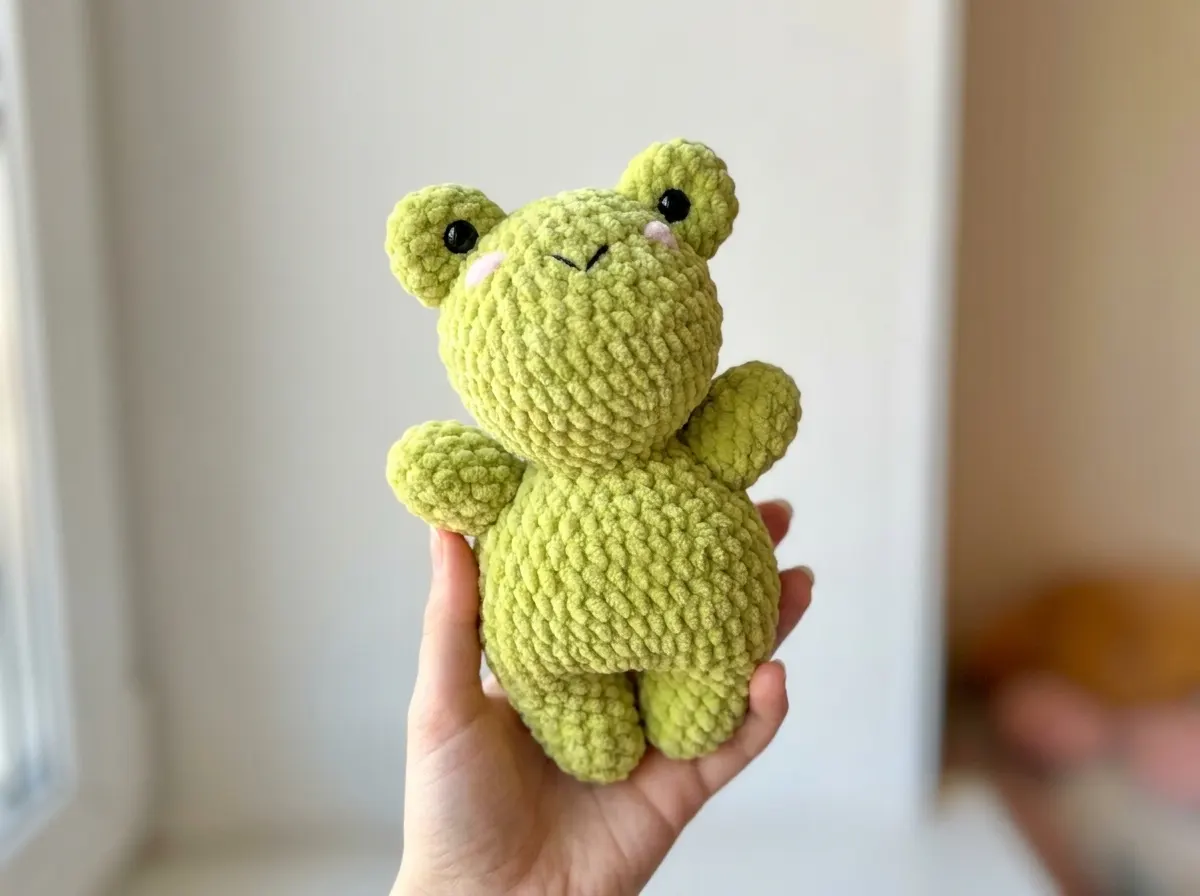
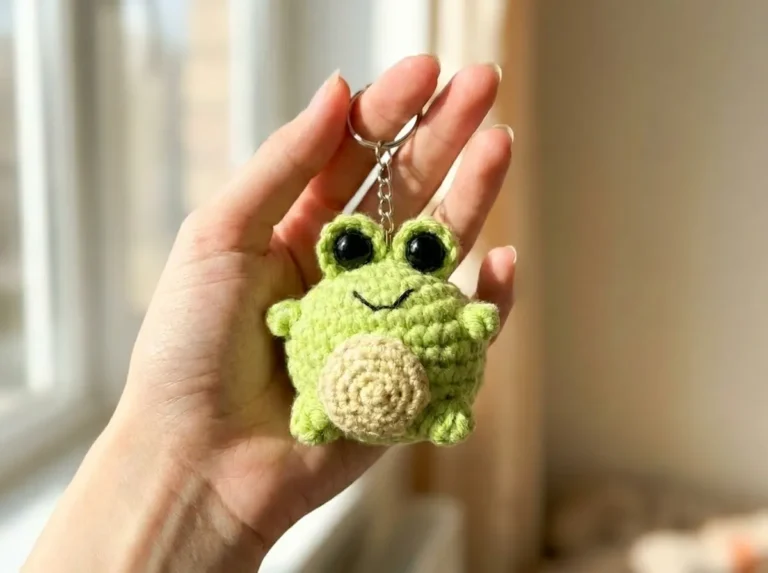
This frog crochet pattern free amigurumi creates the most wonderfully round, squishy little frog — velvety soft chenille body, those big glossy eyes perched on top of the head, and the sweetest embroidered rosy cheeks you’ve ever seen on an amphibian. She’s chubby in the best possible way, with thick little legs and a belly so plump it practically begs to be squeezed. I may have squealed a little when I finished this one. She’s just so much. Let’s make her together.
🩷 Pattern Highlights
- Cuteness Rating: 🩷🩷🩷🩷🩷
- Finished Size: approx. 8.5–8.75 in (21–22 cm)
- Difficulty: Intermediate
- Hook Size: J/10 (6mm) recommended — adjust for your tension
- Yarn Palette: soft sage green chenille, blush pink chenille accent, black DK cotton for the mouth
- Key Detail: embroidered rosy cheeks, 12mm glossy safety eyes on raised eye bumps, and a signature cinching technique that sculpts her irresistible curves
- Estimated Time: 6–9 hours
Materials for This Free Frog Crochet Pattern Amigurumi
The chenille yarn is what gives this frog her magic. It’s that velvety, cloud-soft texture that makes you want to pet her even before she’s finished. Pick a color that makes you happy — the original is a warm, muted green that photographs beautifully, but a soft mint, dusty sage, or even a pastel lavender frog sounds absolutely dreamy.
- Main yarn (body and all parts): Bulky weight (5) chenille / plush yarn in your chosen frog color — approx. 100g / 120 yds. Recommended: YarnArt Dolce (color 741 is the original warm green) or US alternatives: Bernat Baby Velvet, Premier Parfait Chunky.
- Accent yarn (cheeks): A small amount of the same Bulky (5) chenille in soft blush pink. Recommended: a contrasting shade of YarnArt Dolce, Bernat Baby Velvet, or Premier Parfait in pink.
- Accent yarn (mouth): A small amount of DK / Light Worsted (3) cotton yarn in black for embroidering the tiny V-shape mouth. US alternatives: Drops Muskat, Paintbox Simply Cotton DK.
- Cinching yarn: A small amount of DK / Light Worsted (3) cotton in your main frog color (not chenille — cotton holds the cinch firmly). US alternatives: Drops Muskat, Paintbox Simply Cotton DK.
- Hook: 6mm (US J/10) — or 5.5mm (US I/9) if your tension tends to run loose. Chenille works up best at a slightly snug gauge so the stuffing doesn’t peek through.
- Safety eyes: 12mm black safety eyes × 2 (one pair for the eye bumps). That size gives her exactly the wide, expressive look that makes a kawaii frog irresistible.
- Stuffing: Polyfill / polyester fiberfill — this frog needs generous stuffing in the belly and thighs, so have plenty on hand. Poly-Fil by Fairfield (available at Joann, Michaels, and Hobby Lobby) is always a reliable choice.
- Other tools: Stitch marker, tapestry needle, pins for placement, scissors.
This yarn sits in the Bulky (5) weight category according to the Craft Yarn Council — it works up quickly and the soft pile hides stitch texture beautifully, which is exactly what you want for a smooth, velvety amigurumi finish.
Abbreviations Used in This Free Frog Amigurumi Pattern
| Abbreviation | Meaning |
|---|---|
| mr | magic ring |
| sc | single crochet |
| inc | increase — 2 sc worked into the same stitch |
| inv dec | invisible decrease — insert hook through front loops only of next 2 stitches simultaneously, yarn over, pull through, yarn over, pull through 2 loops |
| sl st | slip stitch |
| ( ) × N | repeat instructions in parentheses N times |
| ( ) | stitch count at end of row |
🩷 Chloe’s Detail Tip: The invisible decrease is everything in amigurumi. It keeps the surface smooth and gap-free, which matters even more in chenille — that plush pile means any little hole catches the light in the most obvious way. If invisible decreases are new to you, our invisible decrease tutorial walks through it step by step.
Before You Begin — Tips for a Perfectly Precious Frog
A frog this chubby has a few special moments that really make the difference between cute and absolutely irresistible. Here’s what to keep in mind before you start.
Chenille yarn direction matters. Plush/chenille yarn has a pile direction — it lies differently depending on which way you work. Keep your tension consistent and avoid ripping back more than necessary, as chenille can pill and fray with repeated frogging. Work carefully and check your stitch count at the end of each row.
That belly needs real stuffing. This frog’s signature shape — those pillowy thighs and round bottom — comes from generous stuffing in exactly the right places. The pattern will tell you when to stuff, and it means it. Don’t hold back in the increase sections. Our full guide to stuffing amigurumi has tips on building a firm, shapely base without creating lumpy spots.
The eye bumps are the centerpiece. These aren’t just flat safety eyes pressed into the head — each eye gets its own small crocheted piece that sits proud of the head like a little dome. The 12mm safety eye nestled in that dome is what gives her that wide, surprised kawaii expression. Take your time getting those bumps positioned symmetrically before you sew them on. If this is your first time working with safety eyes in a separate piece, our safety eyes tutorial covers placement, sizing, and how to get that perfectly centered look.
The cinching technique shapes her curves. This is the step that transforms a stuffed tube into a genuinely curvaceous little frog with a defined waist and a plump bottom. It sounds intimidating but it’s really just a single pass of cotton yarn through the body at two specific points. We’ll walk through it carefully in the assembly section.
And a final thought before you cast on — this is an intermediate pattern because of the leg join and the cinching, not because the stitches are difficult. If you can make a magic ring, single crochet, increase, and invisible decrease, you have everything you need. Take it one section at a time and she’ll come together beautifully. If any of the foundational techniques feel shaky, our complete beginner’s guide to amigurumi is a lovely place to get comfortable before you start.
Free Frog Crochet Pattern — Amigurumi Instructions
This frog is worked in continuous rounds throughout. Use a stitch marker to track the beginning of each round — especially through the leg join, where it’s easy to lose your place.
Lower Legs (make 2)
Yarn: main color chenille. Starting method: magic ring.
These little round legs are so satisfying — they start compact and gradually widen into the sweetest stubby shape. Make both before you start the body.
Row 1: 6 sc in mr (6)
Row 2: 6 inc (12)
Row 3: 12 sc (12)
Row 4: (3 sc, inc) × 3 (15)
Row 5: 15 sc (15)
Row 6: 15 sc (15)
Row 7: 15 sc (15)
Row 8: (4 sc, inc) × 3 (18)
Finishing the first leg: Work a sl st, cut yarn leaving a tail, and set this leg aside — you’ll come back to it. Crochet the second leg in exactly the same way, but do not fasten off. You’ll continue directly into the body from the second leg.
Body
Yarn: main color chenille. Starting method: continuation from the second leg.
This is the moment. Row 9 joins both legs into one piece and the frog starts to exist as a real, recognizable shape. It’s genuinely magical.
Row 9: Insert hook into the sl st on the first leg and work: (5 sc, inc) × 6 (42)
🩷 Chloe’s Detail Tip: Move your stitch marker to the first stitch of Row 9 right as you make the join — this becomes your new round marker. The leg join can feel confusing at first because you’re suddenly working across two separate pieces, but just follow the pattern around and the shape will reveal itself within a few rows.
Row 10: 42 sc (42)
Row 11: 2 inc, 19 sc, 2 inc, 19 sc (46)
Row 12: 3 inc, 20 sc, 3 inc, 20 sc (52)
🩷 Stuffing note: After Row 12, stuff both legs firmly with polyfill. Really press it in — the thighs and bottom of this frog should have generous volume. This is where her signature chubby shape comes from, and it’s worth taking the time to pack them well before the body closing rows make access harder.
Row 13: (11 sc, inv dec) × 4 (48)
Row 14: (6 sc, inv dec) × 6 (42)
Row 15: 42 sc (42)
Row 16: (5 sc, inv dec) × 6 (36)
Row 17: 36 sc (36)
Row 18: (4 sc, inv dec) × 6 (30)
Row 19: (3 sc, inv dec) × 6 (24)
Row 20: (2 sc, inv dec) × 6 (18)
Row 21: (1 sc, inv dec) × 6 (12)
Stuff the body after Row 21 before continuing. Pay special attention to the belly, thighs, and the bottom of the frog — these are the areas where the increases were worked and they should feel pleasantly plump. Do not stuff to a hard, firm density — she should be squishy, not rigid.
Head
Yarn: main color chenille. Starting method: continuation from the body (Row 22).
The head grows up from that 12-stitch opening at the top of the body and fans out into a lovely round dome. Watch it bloom.
Row 22: 12 inc (24)
Row 23: (3 sc, inc) × 6 (30)
Row 24: (4 sc, inc) × 6 (36)
🩷 Stuffing note: After Row 24, firmly stuff the neck area where the head meets the body. This is the part that takes a little extra love — a loose neck makes the head wobble and the face won’t sit at the right angle. Pack it well, then continue.
Row 25: (5 sc, inc) × 6 (42)
Row 26: (6 sc, inc) × 6 (48)
Row 27: 48 sc (48)
Row 28: 48 sc (48)
Row 29: (6 sc, inv dec) × 6 (42)
Row 30: (5 sc, inv dec) × 6 (36)
Row 31: (4 sc, inv dec) × 6 (30)
Row 32: 30 sc (30)
Row 33: (3 sc, inv dec) × 6 (24)
Row 34: (2 sc, inv dec) × 6 (18)
Row 35: (1 sc, inv dec) × 6 (12)
Row 36: 6 inv dec (6)
Continue stuffing the head as you work through the decrease rows — add a little more each time the opening gets smaller. Pull the remaining 6 stitches closed using a tapestry needle, tie off with a knot, and weave in the end.
Eye Bumps (make 2)
Yarn: main color chenille. Starting method: magic ring.
These little eye bumps are my absolute favorite part of this pattern. They’re small, they work up fast, and the moment you nestle that 12mm safety eye into the center of the finished piece and see that glossy dome looking back at you — the whole frog suddenly has a personality. Make two.
Row 1: 6 sc in mr (6)
Row 2: 6 inc (12)
Row 3: (3 sc, inc) × 3 (15)
Row 4: 15 sc (15)
Row 5: (3 sc, inv dec) × 3 (12)
Installing the safety eyes: Insert a 12mm safety eye through the center of each piece. The standard method is to press the locking washer firmly onto the post from the back until it clicks and sits flat — this holds the eye permanently and securely. Do not stuff the eye pieces.
Upper Arms (make 2)
Yarn: main color chenille. Starting method: magic ring.
Tiny little arms with just enough width to look like she’s about to give you a hug. So precious.
Row 1: 6 sc in mr (6)
Row 2: 6 inc (12)
Row 3: 12 sc (12)
Row 4: 12 sc (12)
Row 5: 12 sc (12)
Row 6: 12 sc (12)
Row 7: (2 sc, inv dec) × 3 (9)
Stuff the arms with fiberfill before sewing them on.
Assembly
The assembly is where all those separate pieces find each other and the frog becomes a frog. Our full guide to sewing amigurumi parts together has helpful tips on positioning and securing pieces if you’d like extra guidance before you start.
- Attach the upper arms. Pin both arms to the sides of the body, roughly level with the mid-torso. Sew them on using your tapestry needle and the yarn tail, adding a little more stuffing to each arm through the opening as you sew if needed. They should sit with a slight forward angle — like she’s ready to hold something small and precious.
- Attach the eye bumps. Place both eye bumps on top of the head with the safety eyes facing forward and slightly outward. Pin them carefully and check from directly in front before sewing — symmetry here is everything. Once you’re happy with the placement, sew them firmly in place.
- Cinching (shaping the curves). This is the step that gives your frog her signature chubby silhouette. Thread your tapestry needle with a length of DK cotton yarn in your main frog color (not chenille — cotton holds the tension better).
- Identify Point T1: the spot between the legs at the bottom center of the body.
- Identify Point T2: a point on the back of the body, approximately 7 rows higher up from T1.
- Insert the needle at T1 and bring it out at T2.
- Pass the yarn over the surface and reinsert at T1, then bring back out at T2.
- Pull the yarn taut — you’ll see the bottom and belly compress gently into a more defined, rounded shape. You can press the cinched area softly with your fingers to encourage the curve.
- Reinsert at T2, bring out at T1, pull taut, tie a couple of firm knots, and weave in the end.
Making It Extra Cute — Finishing Details
This is the part where she goes from a nicely made frog to an absolutely irresistible one. The finishing details are everything here, and they deserve all the attention you have left.
Embroidered cheeks. Thread a small amount of blush pink chenille yarn onto your tapestry needle. On each side of the face, just below and slightly outside the eye bumps, embroider 2–3 small satin stitches packed closely together to create a soft rosy circle. The chenille pile means these will puff up slightly, which is exactly the effect you want — plump, peachy little cheeks. Work slowly and don’t pull too tight. Step back and check that both cheeks are the same size and the same distance from the eyes before you finish off.
Embroidered mouth. Thread a short length of black DK cotton onto your tapestry needle. Find the center-front of the face, just below where the cheeks end. Embroider a simple V-shape (like a small checkmark) — one straight stitch down and slightly left, then one back up and slightly right. It should look like the gentlest little smile. The DK cotton creates a clean, fine line against the plush chenille, which is why you use a thinner yarn here rather than the main chenille. It’s a tiny detail but it changes her entire expression.
Eye symmetry check. Before the eye bumps are sewn on permanently, hold the frog at arm’s length and look at her from directly in front. Are the eyes at exactly the same height? Do they both tilt at the same angle? The 12mm safety eyes catch light beautifully, which means any asymmetry will be the first thing everyone notices in photos. Take thirty extra seconds here. It’s always worth it.
Color variation ideas. This frog is magical in the original warm green, but she’s also stunning in soft mint, dusty lavender, powder blue, or even a warm cream. For the cheeks, a deeper rose against a pale body color, or a peachy coral against a warm green, both look wonderful. If you make her in white or cream, she becomes a little snow frog. A pale yellow version with buttercup cheeks is going to make someone very happy.
🩷 Chloe’s Detail Tip: Before you snap the safety eye washers in, hold the eye bump piece under a bright lamp and check from directly in front. Once the locking washer is seated, there’s no going back — so take an extra thirty seconds to confirm both eyes are sitting at exactly the same angle before you press them in. That perfect symmetry is the difference between cute and devastatingly cute.
Chloe’s Final Look
I’ve been holding this finished little frog for way too long and I genuinely cannot put her down. The way those glossy eyes catch the light on top of those raised bumps, the soft blush circles of the cheeks against the velvety green chenille, the plump little arms and that gloriously round belly — she’s just so much. The cinching gives her this tiny waist that makes her thighs look even more gloriously chubby, which is everything.
Make her in a soft sage and she looks like she lives in a pond surrounded by lily pads. Make her in mint and she looks like a little sweet. Make a whole row of them in different pastel shades and line them up on a shelf and try — just try — to look at them without smiling. This is my new favorite frog crochet pattern, and I suspect it might be yours too. 🩷
What yarn is best for this frog amigurumi pattern?
Bulky weight (5) chenille or plush yarn gives this frog her signature velvety texture. YarnArt Dolce, Bernat Baby Velvet, and Premier Parfait Chunky are all excellent choices that work up smoothly and hide stitch definition for a polished finish.
How long does it take to crochet this frog crochet pattern?
Expect 6–9 hours total, depending on your speed and experience with amigurumi. The main body and head are worked in one continuous piece, which saves assembly time.
Is this frog pattern suitable for beginners?
This pattern is rated intermediate — not because of difficult stitches, but because of the two-leg join and the cinching technique. If you’re comfortable with magic rings, single crochet, increases, and invisible decreases, you have everything you need.