A Free Octopus Amigurumi Pattern — Meet Pearl, the Tiny Deep-Sea Dreamer
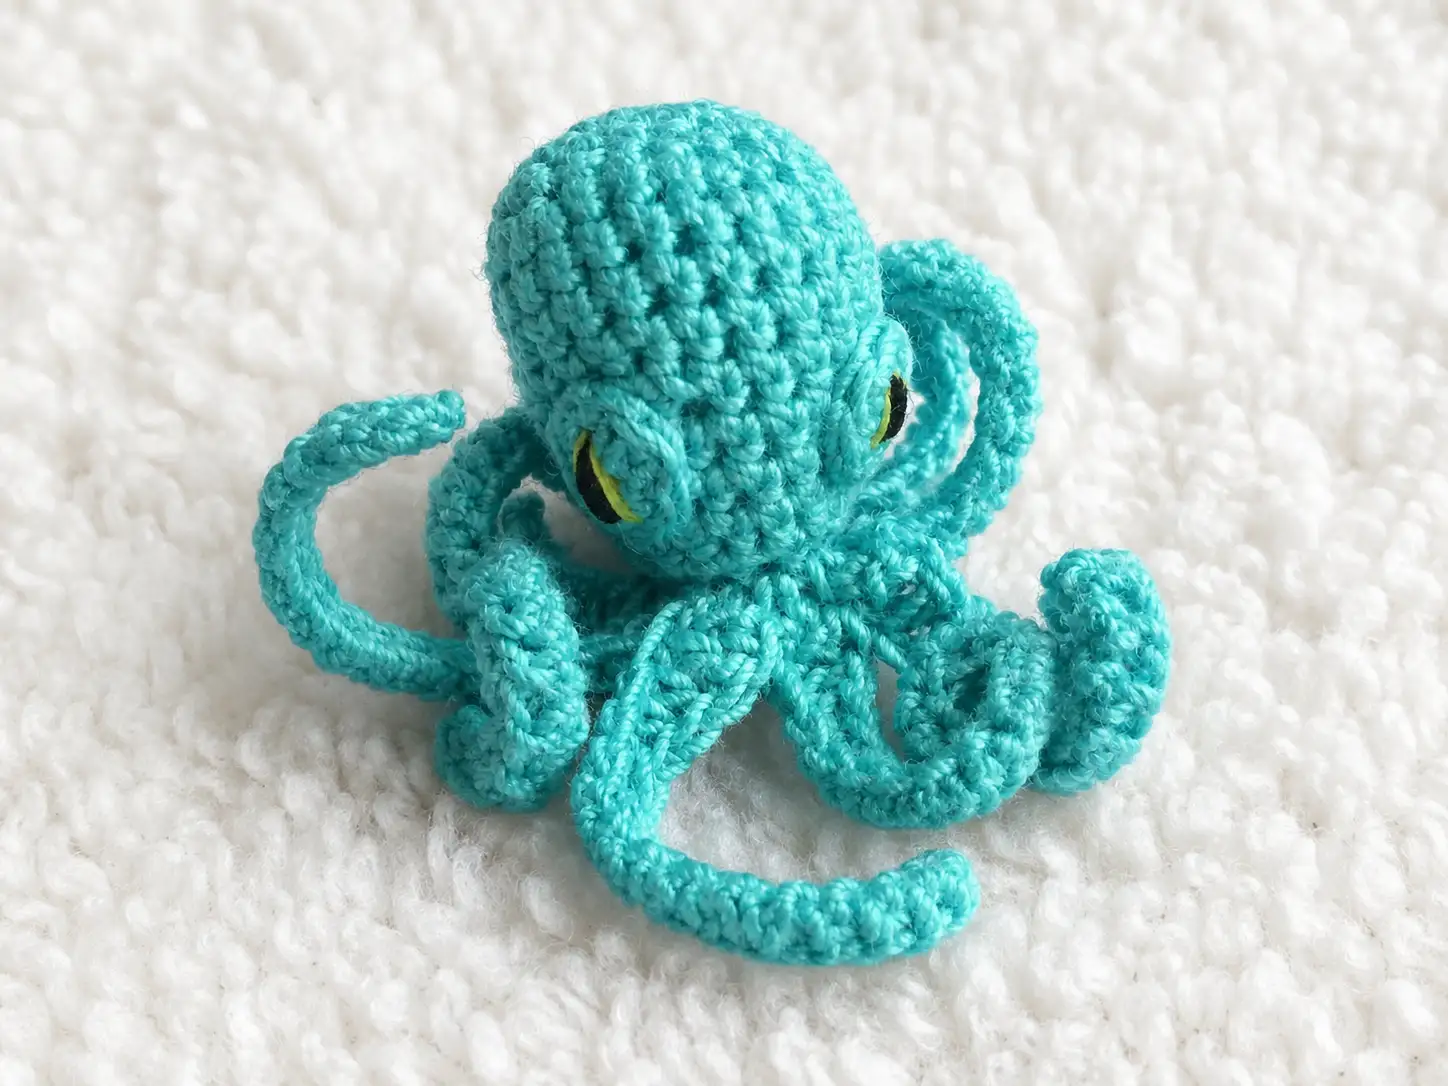
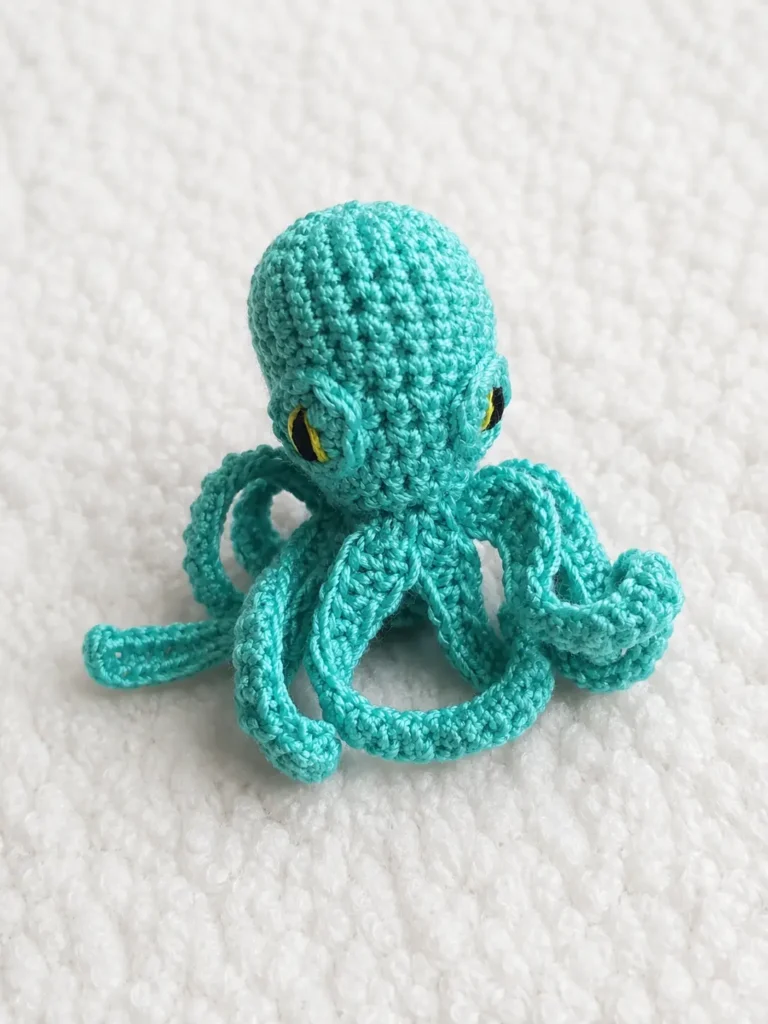
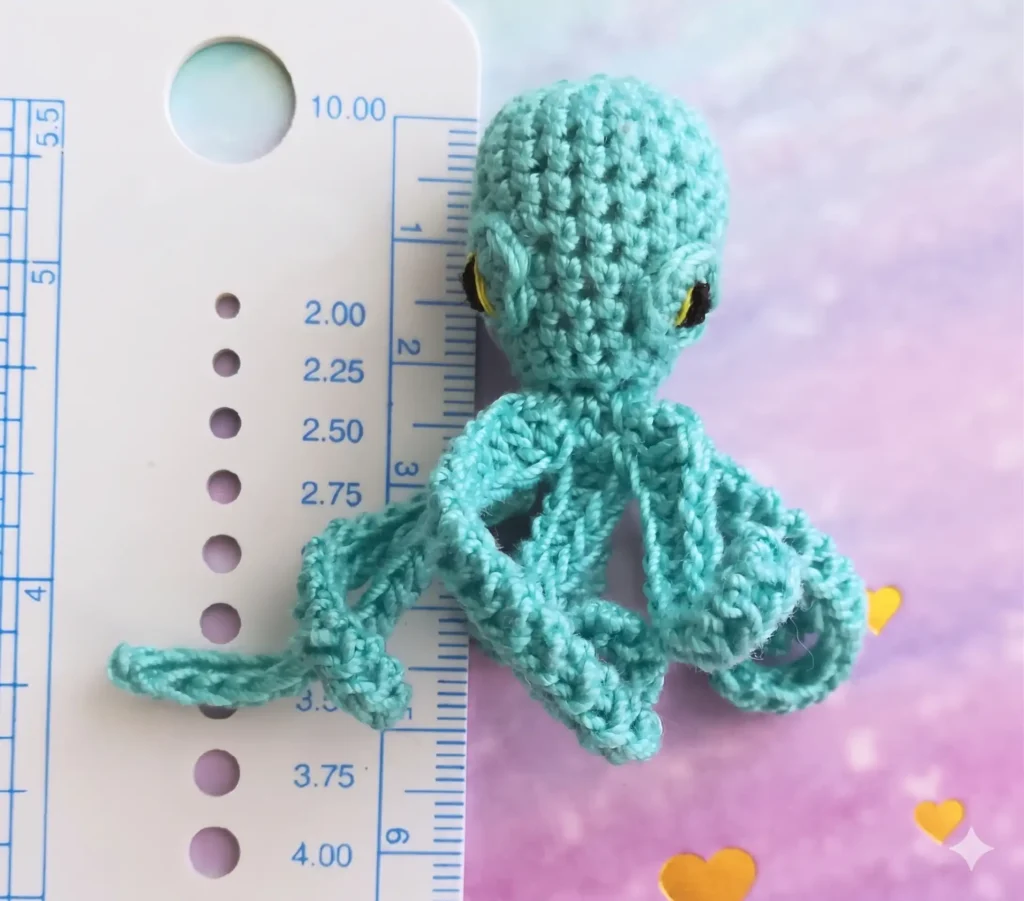
This octopus amigurumi free pattern makes one of the most unexpectedly charming creatures I’ve ever stitched — a small, round-bodied little thing with eight curling tentacles and a pair of embroidered eyes that look, somehow, like they’ve seen things. Quiet things. Interesting things. I named mine Pearl before the tentacles were even finished, which is always the sign of a good project. She sits on my windowsill now, looking out at nothing in particular, entirely content. If you’ve been wanting to make something that’s technically simple but ends up feeling genuinely alive, this is a wonderful place to start.
📖 Meet Pearl
- 🌟 Personality: dreamy, watchful, gently mysterious
- 🎨 Color Palette: your choice — I imagine her in deep tide-pool teal, soft coral, or warm sandy ivory
- 📏 Size: approx. 1.5 in (4 cm) tall — a true miniature
- 🪝 Hook: 1.25mm (finer than US B/1)
- ⏱️ Time: 2–4 hours
- ✨ Signature Detail: eight hand-chained tentacles that curl naturally, embroidered pupils with a colored iris
- 💡 Difficulty: Beginner–Intermediate (the hook size asks for patience, but the construction is straightforward)
What You’ll Need for This Octopus Amigurumi Free Pattern
- Main yarn: Fingering / Super Fine weight mercerized cotton (CYCA 1), approximately 20–30 yds — any color you love. Mercerized cotton is the right choice here: it has a slight sheen that makes the tentacles look almost wet, and the stitch definition at this tiny scale is exceptional. US alternatives: Lion Brand 24/7 Cotton (size 3 works if you size down your hook), Paintbox Simply DK (go down a hook size), or any CYCA weight 1 fingering cotton you have in your stash.
- A small amount of black yarn or embroidery floss for the pupils
- A small amount of a second color for the iris — yellow, amber, soft green, or whatever feels right for your Pearl
- Hook: 1.25mm (finer than US B/1). This is a specialist hook size — check craft suppliers or online. The fine hook is what gives Pearl her dense, tidy body and keeps the stuffing from peeking through. If you only have a 1.5mm or 1.75mm, that will work too, but your Pearl will be slightly larger.
- Polyester fiberfill for stuffing — a small pinch is all you need
- Tapestry needle for sewing and weaving in ends
- Scissors
- Stitch marker
✨ Sophie’s Note: The matte-to-soft-sheen quality of mercerized cotton gives Pearl a storybook quality that acrylic just doesn’t quite capture at this scale. The yarn holds the round shape of the body beautifully and lets the embroidered eyes sit cleanly on the surface. If you’ve never worked with a 1.25mm hook before, expect your first few rounds to feel slow — but within a row or two, the rhythm comes.
Abbreviations Used in This Pattern
| Abbreviation | Meaning |
|---|---|
| mr | magic ring |
| sc | single crochet |
| inc | increase — 2 sc worked into the same stitch |
| inv dec | invisible decrease — insert hook through front loops only of next 2 stitches simultaneously, yarn over, pull through, yarn over, pull through 2 loops |
| hdc | half double crochet |
| ch | chain |
| BLO | back loop only |
| FLO | front loop only |
✨ A note on decreases: The original pattern calls for a standard decrease. At AmiLoops, we always use the invisible decrease (inv dec) instead — it keeps the surface of the body smooth and gap-free, which matters especially at this small scale where every stitch is visible. The stitch counts are identical; only the technique changes.
Before You Begin — Bringing Pearl to Life
Pearl is a small creature, but she’s made with care. A few things worth knowing before you start:
The magic ring is where every character begins. Pearl’s body and her eyes both start from one — a closed, adjustable loop that eliminates the hole you’d otherwise see at the center. If you haven’t made one before,
our magic ring tutorial walks through it step by step. It’s simpler than it sounds, and once it clicks, you’ll use it forever.
The invisible decrease keeps her looking clean. At 1.25mm with fingering-weight cotton, every stitch shows. The inv dec method — working through the front loops only of two stitches at once — prevents the gap that a standard decrease would leave. If you’re new to it, our invisible decrease tutorial has a clear walkthrough. It’s worth pausing here before you reach Row 7.
Row 12 is the hinge between body and tentacles. You’ll work Row 12 in BLO — back loop only. This leaves a ring of free front loops at the base of the body, and that’s exactly where the tentacles attach. Don’t skip the BLO note or you’ll lose your anchor points.
Pearl is small, so stuff gradually. Because the finished body is only about 1.5 in tall, it’s easy to overstuff and distort her shape. Add fiberfill a little at a time as you close the final rows — our guide on how to stuff amigurumi properly has good advice on getting the right density without lumpiness.
Work in continuous rounds throughout — no joining, no turning chains. Place your stitch marker at the first stitch of each round and move it up as you go.
The Octopus Amigurumi Free Pattern
The Body (× 1)
Main color yarn. Begin with a magic ring.
Row 1: 8 sc in mr (8)
Row 2: 8 inc (16)
Row 3: (1 sc, inc) × 8 (24)
Rows 4–6: 24 sc (24)
Row 7: (6 sc, inv dec) × 3 (21)
Row 8: 21 sc (21)
Row 9: 3 inv dec, 15 sc (18)
Row 10: 2 inv dec, 14 sc (16)
Row 11: 16 sc (16)
Row 12: BLO — 16 sc (16)
✨ Sophie’s Note: After Row 6, Pearl’s body is at its widest — round and satisfying, like a small smooth stone. As you work the decreases in Rows 7 through 10, you’ll feel the shape begin to narrow at the bottom, forming the gentle taper where the tentacles will eventually emerge. By Row 12, she looks almost complete. Set her down and look at her straight on. There’s already something there — a shape that’s waiting to become someone.
Finishing the body: Break the yarn, leaving a long tail. Stuff the body firmly but gently with fiberfill — this is a small piece, so a pinch or two is usually enough. Thread the yarn tail onto a tapestry needle, draw the needle through each remaining front loop around the opening, pull closed, and hide the end inside the body.
✨ A note on working inside out: You can crochet this body inside out (wrong side facing outward as you work) or the regular way. Working inside out reverses the texture of the sc stitches, giving a slightly smoother exterior. Both are correct — try both and see which Pearl you prefer.
The Tentacles (× 8)
Main color yarn. The tentacles attach directly to the ring of free front loops left at the base of the body from Row 12’s BLO round. You’ll have 16 free loops. Each tentacle uses 2 adjacent loops — one to anchor at the start, one to close — giving you exactly 8 tentacles.
For each tentacle:
Attach yarn to the next free front loop. Work 1 sc in that loop, then ch 15. Starting from the 3rd ch from the hook, work 14 hdc back along the chain. Work 1 sc into the next free front loop to close the tentacle. (1 sc, 14 hdc, 1 sc)
Repeat for all 8 tentacles, working around the full ring of 16 free loops.
✨ Sophie’s Note: This is the part where Pearl comes alive. As each tentacle forms, it curls naturally from the weight of the hdc stitches — you don’t need to shape them or coax them. They just do it. By the time you’ve attached all eight, she looks like she’s in motion, like she’s just settled down from somewhere. I find myself spinning the body slowly after each one, just to watch them move.
Finishing: After the final tentacle, break the yarn, leaving a short tail. Secure with a small knot and hide the end inside the body using your tapestry needle.
The Eyes (× 2)
Main color yarn. Begin with a magic ring.
Row 1: 8 hdc in mr (8)
Finishing: Pull the magic ring closed. Break the yarn, leaving a tail long enough to sew with.
Assembly
- Orient the body correctly. The decreases from Rows 9–10 should sit at the back of Pearl’s body — this gives her a natural “facing forward” posture. Take a moment to find this orientation before attaching anything.
- Position the eyes. Hold the two eye circles against the upper front of the body and experiment with placement before sewing. Move them slightly closer together for a more focused expression, slightly further apart for something dreamier. Even a stitch or two of difference changes her entire personality.
- Sew the eyes in place. Using the yarn tails, sew each eye securely to the body. Weave the ends inside to hide them.
✨ Sophie’s Note: The eyes are where Pearl’s character is decided. I placed mine closer together than I expected to — almost touching — and something about that gave her a very focused, slightly serious expression that I love. A little lopsided? That’s character, not a mistake.
Decoration — Pearl’s Eyes
Once the eye circles are attached, it’s time to give them life. Using a tapestry needle threaded with black yarn or embroidery floss, embroider a vertical oval pupil onto each eye — two or three stitches worked closely together give a clean, narrow shape. Then, using a second color (yellow, amber, warm green, or whatever suits your Pearl’s personality), add a few stitches around the pupil to suggest an iris.
The vertical pupil is what gives Pearl her slightly otherworldly expression — it’s the detail that makes her look like she’s from somewhere deep and quiet. Don’t skip it.
✨ Sophie’s Note: I used a warm gold for Pearl’s iris, which against the teal body gives her this luminous, old-painting quality — like something out of an illustrated ocean atlas. But a pale green on a coral body, or black-on-black for a dramatic monochrome Pearl — there are so many directions you can take her. The embroidered eyes are where the pattern ends and you begin.
Other Tiny Creatures You Might Love
If Pearl has you in the mood for small, character-rich creatures, our axolotl amigurumi pattern has that same dreamy, quietly unusual quality — another aquatic little soul with an expression that’s hard to describe but impossible to look away from. And if you love working at this compact scale, our free frog amigurumi pattern is another wonderfully expressive tiny creature worth spending an afternoon with.
Meet Pearl — Closing
Meet Pearl. She’s sitting somewhere quiet right now — on a windowsill, maybe, or the corner of a shelf — tentacles arranged just so, embroidered eyes catching the light at a particular angle that makes her look like she’s thinking about something. That’s the thing about small creatures made carefully: they accumulate personality in the making. You put the stitches in, and somewhere around the eighth tentacle, they start to look back at you.
Name yours. Choose a color that suits them. Put them somewhere they can be seen — next to a plant, on a stack of books, guarding the edge of a desk. Pearl is tiny, but she has presence. She deserves a spot. 🧶
FAQ
What yarn is best for this octopus amigurumi free pattern?
Fingering or Super Fine weight mercerized cotton yarn is ideal. It provides excellent stitch definition at a tiny scale and gives the tentacles a nice storybook sheen.
Can beginners make this octopus amigurumi pattern?
Yes, the pattern uses basic stitches like single crochet and chains. However, working with a tiny 1.25mm hook requires some patience and practice for absolute beginners.
How long does it take to crochet this tiny octopus?
Because of its miniature 1.5-inch size, it typically takes between 2 to 4 hours to complete the entire project from start to finish.