Free Bat Crochet Pattern — Meet Patrick, Your New Favourite Amigurumi
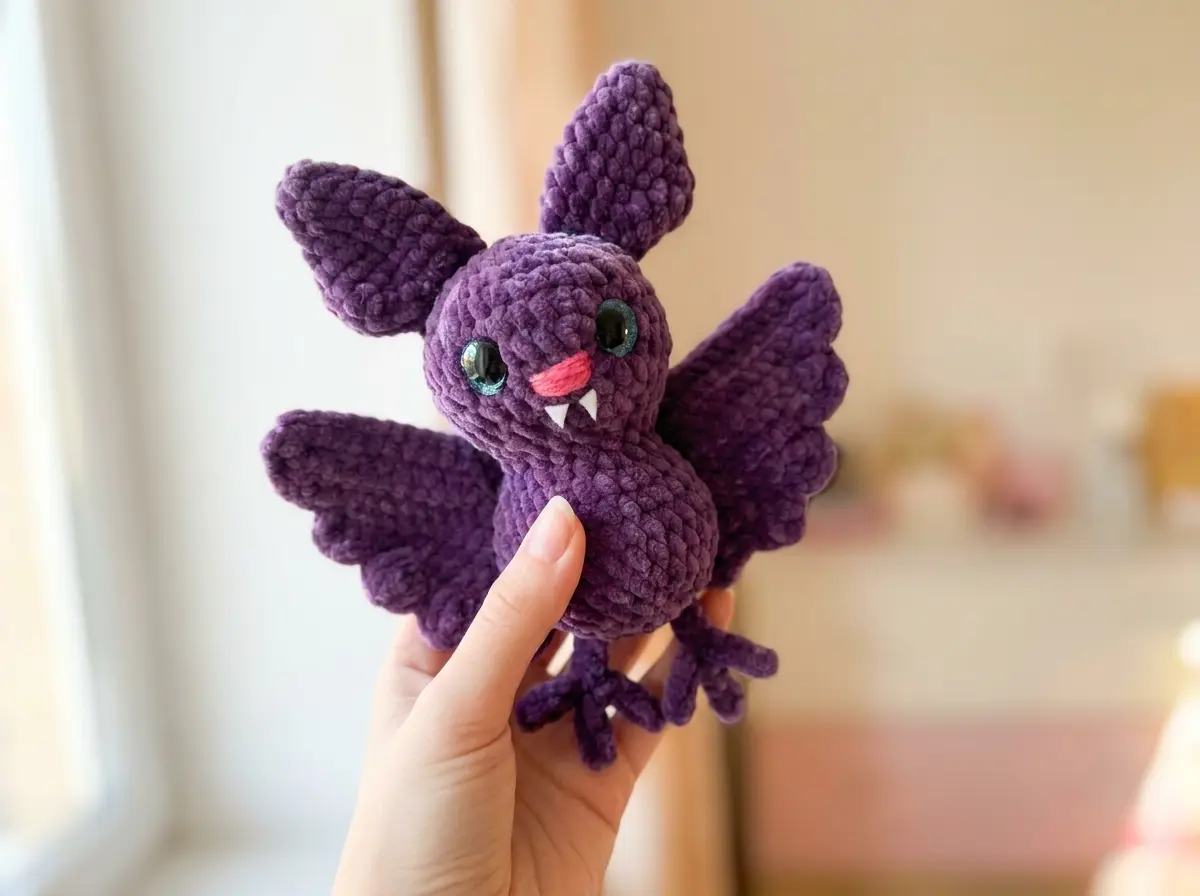
This bat crochet pattern free to download and work through at your own pace — and I promise it’s one of those projects you’ll actually finish in a single weekend. I designed the formatting of this write-up with chenille beginners in mind, but Patrick’s winged silhouette and needle-felted teeth will appeal to any maker who appreciates a little spooky charm on their shelf. If you’ve been looking for a free bat crochet pattern that doesn’t sacrifice structure or stitch clarity, you’re in the right place. Every count in this pattern has been checked.
📋 Pattern Quick Stats
- Difficulty: Beginner–Intermediate
- Finished Size: Approx. 5–6 in (13–15 cm) tall, depending on tension
- Hook Size: G/6–7 (4.0–4.5 mm)
- Yarn Weight: Bulky (5) — chenille/velvet
- Techniques Used: magic ring, invisible decrease, chain foundation, safety eye placement, surface crochet feather trim on wings
- Estimated Time: 3–5 hours
Materials for This Bat Crochet Pattern
- Main yarn: Bulky (5) chenille or velvet yarn in your colour of choice. Himalaya Dolphin Baby is the original; excellent US alternatives include Bernat Baby Velvet or Premier Yarns Parfait. Any soft chenille at this weight will work beautifully — the pile hides minor tension inconsistencies, which is a bonus for newer makers.
- Sewing yarn: DK or Light Worsted (3) in a matching or tonal colour, for seaming parts and embroidering the nose and eyebrows. YarnArt Jeans is the original; Drops Muskat or Paintbox Simply Cotton DK are solid US alternatives. Embroidery floss works equally well for the face details.
- Hook: G/6–7 (4.0–4.5 mm). I personally reach for the 4.0 mm end of that range — tighter fabric means cleaner shaping around the head.
- Safety eyes: 16 mm
- Stuffing: Polyester fiberfill (Poly-Fil by Fairfield, widely available at Joann, Michaels, and Hobby Lobby)
- White felt: A small scrap for the teeth
- Tapestry needle: Blunt plastic needle for seaming and weaving in ends
- Straight pins: Essential for planning ear and wing placement before you commit with a needle
- Hot glue gun or fabric glue: Optional, for securing the felt teeth
The chenille yarn used here falls into the Bulky (5) category on the Craft Yarn Council yarn weight system — a useful reference if you’re substituting and want to confirm your yarn is in the right neighbourhood before you cast on.
Abbreviations Used in This Bat Crochet Pattern
| Abbreviation | Meaning |
|---|---|
| sc | single crochet |
| inc | increase — 2 sc worked into the same stitch |
| dec | decrease (see note in Special Techniques below) |
| mr | magic ring |
| ch | chain |
| sl st | slip stitch |
| sl st (no ch) | slip stitch without a turning chain (turning only — not counted) |
| dc | double crochet |
| tr | treble crochet |
| FLO | front loop only |
| FO | fasten off |
Special Techniques — Before You Start
Patrick is a well-rounded beginner-to-intermediate project, but a few techniques deserve a proper introduction before you pick up your hook.
Magic Ring: Every piece in this pattern except the wings begins with a magic ring. It’s the cleanest way to start a round piece — no gap, no hole in the centre. If it’s new to you, take ten minutes with our step-by-step magic ring tutorial before diving in. It’ll save you a lot of frustration.
Invisible Decrease (inv dec): The pattern calls for dec throughout. I always work this as the invisible decrease — inserting through the front loops only of the next two stitches simultaneously rather than using the standard sc2tog method. With chenille especially, the inv dec gives you a much neater, gap-free result. If you’re not already comfortable with it, our complete invisible decrease tutorial walks through both methods side by side so you can see exactly why it makes a difference.
Safety Eyes — Timing Is Everything: Patrick uses 16 mm safety eyes, and they go in during the head section, before you close the piece. Once the washer clicks on from the inside, it’s permanent. Read the placement note carefully in Row 13 of the head. If you’re making this bat for a young child, check the U.S. Consumer Product Safety Commission guidance on toy safety eyes before using plastic hardware — for children under three, embroidered eyes are the safer route. Our full guide on how to attach safety eyes covers sizing, placement, and the child-safety question in detail.
Wings — Flat Rows, Not Rounds: The wings are the one piece worked in turning rows rather than continuous rounds. The decreasing row structure creates the triangular bat-wing shape. Read the feather trim note at the end of the wing section carefully before you start — it’s a small burst of surface crochet that defines the whole silhouette.
💡 Emma’s Tip: Chenille has a way of hiding your stitch count. Use a stitch marker at the start of every round, no exceptions. I’ve frogged more chenille rows than I care to admit because I trusted my eye instead of my marker.
Free Bat Crochet Pattern — Step by Step
Head (×1)
Yarn: Main colour (chenille/velvet)
Starting Method: Magic ring
Row 1: 6 sc in mr (6)
Row 2: 6 inc (12)
Row 3: (1 sc, inc) × 6 (18)
Row 4: (2 sc, inc) × 6 (24)
Row 5: (3 sc, inc) × 6 (30)
Row 6: (4 sc, inc) × 6 (36)
Rows 7–9: 36 sc — 3 rows (36)
Row 10: (4 sc, dec) × 6 (30)
Row 11: (3 sc, dec) × 6 (24)
Row 12: (2 sc, dec) × 6 (18)
Row 13: 18 sc (18)
⚠️ Safety Eye Placement: At this point — before you continue — insert the safety eyes. Position them around Row 8. In the finished piece, the eyes should have 4 sc between them. Keep in mind that pushing the washer on pulls the fabric inward slightly, because the eye is meant to sit just a little sunken into the head. This means you should space them slightly farther apart than your instinct says — the fabric will close that gap once the washer is on. Once the eyes are locked in, begin stuffing the head firmly before continuing to the body.
Body (×1)
Yarn: Main colour
Starting Method: Continuation from head — do not fasten off after Row 13
Row 14: (2 sc, inc) × 6 (24)
Row 15: (3 sc, inc) × 6 (30)
Rows 16–19: 30 sc — 4 rows (30)
Row 20: (3 sc, dec) × 6 (24)
Row 21: (2 sc, dec) × 6 (18)
Row 22: (1 sc, dec) × 6 (12)
Row 23: 6 dec (6)
Finishing: Continue stuffing the body firmly as you work through these closing rows. Once you reach 6 stitches, fasten off and use the plastic tapestry needle to close the opening and weave in the end securely.
💡 Emma’s Tip: Add stuffing gradually through Rows 16–19 rather than waiting until the end. The cylindrical body is much easier to pack evenly while the opening is still wide. I like to use a pen cap or the blunt end of a crochet hook to push fiberfill into the shoulders without compressing the sides unevenly.
Ears (×2)
Yarn: Main colour
Starting Method: Magic ring
Make two identical pieces.
Row 1: 6 sc in mr (6)
Row 2: 6 sc (6)
Row 3: (1 sc, inc) × 3 (9)
Row 4: 2 sc, (inc, sc) × 2, inc, 2 sc (12)
Row 5: 3 sc, (inc, sc) × 2, inc, 4 sc (15)
Row 6: 4 sc, (inc, sc) × 2, inc, 6 sc (18)
Row 7: 18 sc (18)
Row 8: 4 sc, (dec, sc) × 2, dec, 6 sc (15)
Row 9: 3 sc, (dec, sc) × 2, dec, 4 sc (12)
Row 10: 5 sc, 3 dec in a row, 1 sc (9)
Finishing: Fasten off, leaving a yarn tail for sewing. Do not stuff.
Feet / Claws (×2)
Yarn: Main colour
Starting Method: Chain foundation
Make two identical pieces.
Row 1: Ch 10. Starting from the 2nd ch from hook, work 4 sl st (this is the 1st of three toes). Ch 5, then work back along this chain: 4 sl st (this is the 2nd toe). Ch 5, then work back along this chain: 4 sl st (this is the 3rd toe). Then work 4 sl st back to the very beginning.
Finishing: Fasten off. Leave yarn tails of approximately 2 in on each foot — you’ll use these tails to tie the feet to the body at positioning stage before sewing them in permanently.
💡 Emma’s Tip: These little feet are fiddly but forgiving. If your sl st tension is inconsistent, that’s fine — the toe shapes are small enough that a little variation reads as natural character. Don’t frog unless a toe is dramatically shorter than the others.
Wings (×2)
Yarn: Main colour
Starting Method: Chain foundation, worked in turning rows
Make two identical pieces.
⚠️ Important Note on Turning Stitches: The sl st (no ch) at the beginning of even-numbered rows is a turning action only. It is not counted in the stitch total for that row.
Row 1: Ch 17 (17)
Row 2: Starting from the 2nd ch from hook, work along the chain: 16 sc, turn, ch 1 (16)
Row 3: 14 sc, sl st, turn (15)
Row 4: Sl st (no ch), 13 sc, turn, ch 1 (13)
Row 5: 11 sc, sl st, turn (12)
Row 6: Sl st (no ch), 10 sc, turn, ch 1 (10)
Row 7: 8 sc, sl st, turn (9)
Row 8: Sl st (no ch), 7 sc, turn, ch 1 (7)
Wing Edge — Feather Trim: Once Row 8 is complete, you’ll work along the long diagonal edge of the triangle to create the scalloped feather trim. This is what gives Patrick his wingspan character.
Work into the nearest sc: 1 sc. Then into a single sc work the following combination: (dc, tr, dc). Into the next stitch work 1 sl st. This 3-stitch repeat creates one bump. Work this repeat 4 times along the edge. For the 5th and final bump, work 3 dc into a single sc, then sl st into the tip. Then sc straight across to the end along the top edge of the wing to finish cleanly.
Finishing: Leave longer yarn tails on the wings — you’ll need them for pinning and sewing in the assembly stage.
💡 Emma’s Tip: Take your time reading the feather trim instructions before you start working them. Work a test bump on a scrap piece first if you’ve never done surface scallops — once you understand the rhythm of (dc, tr, dc) followed by a slip stitch, the repeat moves quickly. The bump height comes from that treble in the centre, so don’t skip it.
Assembling Your Bat Crochet Pattern
Assembly is where Patrick really comes to life. Use pins generously at every step — sewing amigurumi without them is guesswork, and guesswork means seam-ripping.
- Ears: Pin both ears to the top of the head first. Try a few angles — a slight outward tilt looks more natural than perfectly upright. Once you’re happy with the placement, sew them on securely with a tapestry needle and matching yarn. Weave all tails in on the inside of the head.
- Wings: Pin both wings to the back of the body before sewing anything. The key detail here: the wings should angle inward toward the centre of the back rather than sticking straight out horizontally. Use three pins per wing minimum, and step back to check the silhouette from a distance. When you’re satisfied with the angle, sew along the flat (non-feathered) edge. Leave the feathered edge free — it creates the draped effect.
- Feet / Claws: Position the feet at roughly the same height as the bottom of the wings on the front of the body. First, tie them in place using those yarn tails you left — just a loose knot to hold them while you check placement. Once positioned, sew them down firmly using the same tails, then thread the tails through the body with your tapestry needle and trim flush.
For a thorough walkthrough of the pinning-before-sewing approach, our guide on sewing amigurumi parts together covers the technique in full, including how to work with chenille yarn specifically.
Finishing — Face Details and Teeth
Eyebrows and Nose: Use your DK or Light Worsted sewing yarn (or embroidery floss) to embroider both. I like a simple straight stitch for the brows — two short horizontal lines just above and slightly outside the eyes. For the nose, a small Y-shape or a few satin stitches gathered together works well at this scale. There’s no rigid template here; try a few options with a water-soluble pen before committing with the needle.
Teeth: Cut small triangle shapes from white felt. You can hand-stitch them in place with a few neat stitches in white thread — or if you want a quicker finish, a small amount of hot glue or fabric glue holds felt beautifully against chenille. If you’re gluing, press firmly and hold for a couple of minutes until the bond sets.
💡 Emma’s Tip: Two or three triangles of unequal width look more charming than a row of identical teeth. Cut a slightly wider middle tooth and two narrower ones flanking it. The asymmetry reads as endearing rather than messy at this scale.
Emma’s Note
Patrick is the kind of project that looks more technically demanding than it actually is — those scalloped wing edges give him a complex silhouette, but once you’re in the rhythm of the feather trim, it moves faster than you’d expect. What I find most satisfying about this bat is how much personality lives in the assembly: the angle of the ears, the inward tilt of the wings. Take your time with the pinning stage; it’s not fiddly detail work, it’s the design decision. If you’re new to amigurumi entirely and found your way here first, our complete beginner’s guide to amigurumi covers every foundational technique this pattern touches, in one place. Happy hooking. 🧶
What yarn is best for this bat amigurumi?
Bulky (5) chenille or velvet yarn is ideal — it gives Patrick a plush texture and helps hide minor tension variations. Himalaya Dolphin Baby is the original; Bernat Baby Velvet and Premier Yarns Parfait are recommended US alternatives.
How long does it take to crochet this bat crochet pattern?
Most makers complete Patrick in 3–5 hours, including all pieces and full assembly. The feather-trim wings add a little extra time but move quickly once you understand the (dc, tr, dc) repeat.
Can beginners make this bat crochet pattern?
Yes — the pattern is rated beginner-to-intermediate. Core techniques are magic ring, single crochet, and invisible decrease. The only slightly advanced element is the surface crochet feather trim on the wings, which the pattern explains step by step.