Zoe the Fox Amigurumi — Free Crochet Fox Pattern
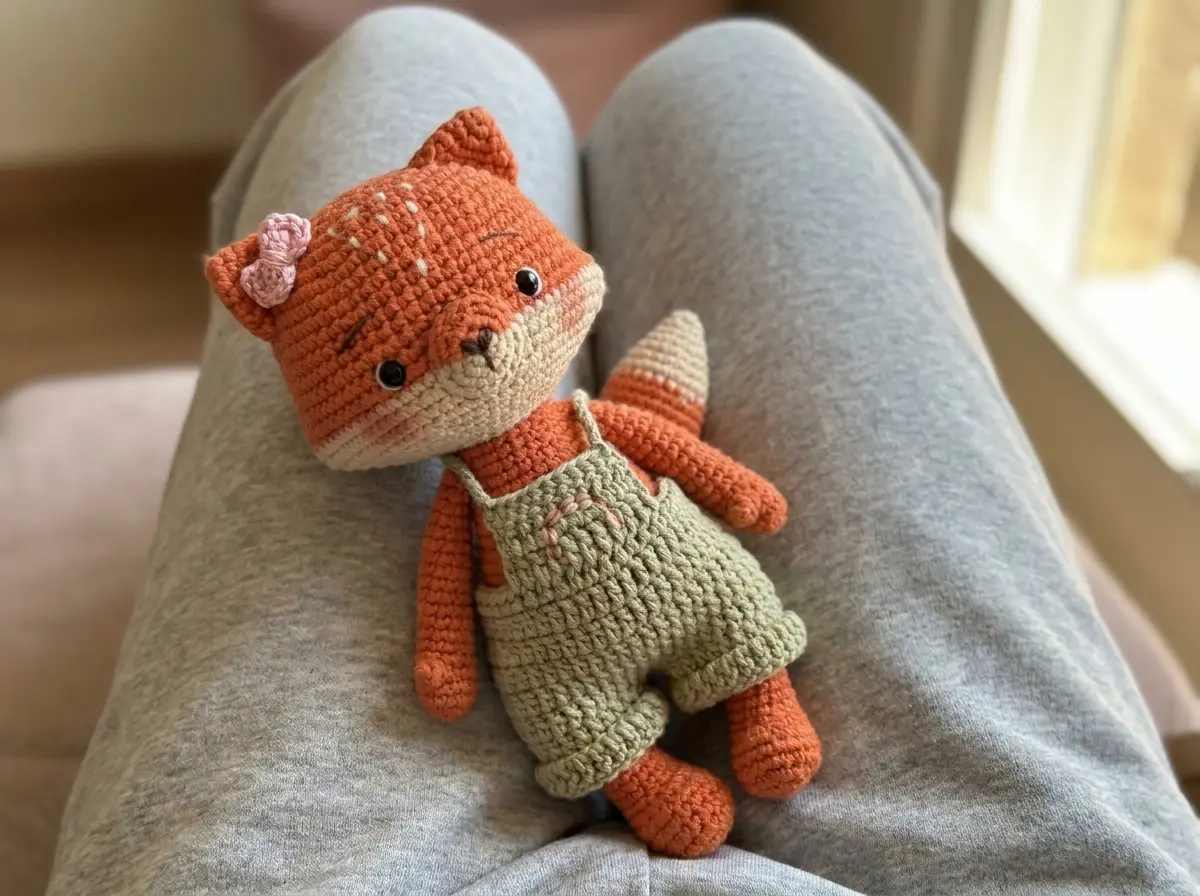
This fox amigurumi has been one of my most technically satisfying projects to put together — Zoe comes with a two-tone head, a spike-stitch tail tip, and her own little green overalls. I worked her entirely on a 2.0mm hook, which gives the fabric that dense, solid feel I always aim for. Every round has been counted and verified. Let’s get started.
📋 Pattern Quick Stats
- Difficulty: Intermediate
- Finished Size: ~9 in (23 cm)
- Hook Size: Steel 4 (2.0 mm)
- Yarn Weight: DK / Sport (2) — cotton
- Techniques: magic ring, invisible decrease, color changes, spike stitch, working flat
- Estimated Time: 8–12 hours
What You Need to Make This Fox Amigurumi
The yarns used in this pattern are Brazilian DK/Sport weight cottons. They’re not widely available in the US, but any DK or Sport weight cotton with good stitch definition will work. The tight fiber structure of cotton — rather than acrylic — is what keeps Zoe’s embroidery details crisp and her color changes clean.
- Yarn A — Orange: Amigurumi Soft Tijolo 4140 (or any DK/Sport weight cotton in orange — check local availability at Joann, Michaels, or KnitPicks)
- Yarn B — Beige: Amigurumi Soft Amendoim 7062 (or any DK/Sport weight cotton in beige)
- Yarn C — Green: Amigurumi Soft Mirante 5072 (or any DK/Sport weight cotton in green)
- Yarn D — Pink: Amigurumi Doçura 3046 (or any DK/Sport weight cotton in pink)
- Yarn E — Brown: Cléa 125 Marrom, or similar crochet thread/embroidery yarn in brown (for embroidery only)
- Hook: Steel 4 (2.0 mm)
- Safety eyes: 7 mm (×2)
- Polyfill stuffing
- Tapestry needle
- Stitch markers
- Scissors
- Pink blush or chalk pastel (for cheeks)
For yarn weight reference, the DK/Sport category falls between CYCA 2 and 3 on the Craft Yarn Council yarn weight system. Staying in that range is what keeps Zoe’s proportions correct at this hook size.
💡 Emma’s Tip: With a 2.0mm hook and cotton yarn, your tension will matter more than usual. I work with deliberately tight tension — that’s what prevents stuffing from showing through the fabric. If your stitches feel loose at this hook size, try going down to a 1.75mm.
Abbreviations
| Abbreviation | Meaning |
|---|---|
| mr | magic ring |
| ch | chain |
| sl st | slip stitch |
| sc | single crochet |
| hdc | half double crochet |
| dc | double crochet |
| tr | treble crochet |
| inc | increase (2 sc in same stitch) |
| dec | decrease (invisible decrease preferred) |
| spike st | spike stitch (sc worked into stitch one row below) |
| st(s) | stitch(es) |
| FO | fasten off |
Techniques in This Fox Amigurumi
Before you cast on, take a moment to review these techniques. Most of them appear in almost every amigurumi pattern, but one — the spike stitch — is specific to Zoe’s tail and worth understanding before you get there.
Magic Ring: Every main part of this pattern starts with a magic ring. If you’re not confident with it yet, our step-by-step magic ring tutorial walks through the method clearly. At a 2.0mm hook, getting a tight, clean close on your magic ring is especially important.
Invisible Decrease (dec): This pattern uses the invisible decrease throughout. That means inserting your hook through the front loops only of the next two stitches simultaneously, then completing as a single crochet. This is non-negotiable for a clean fox — the standard sc2tog leaves a gap that’s particularly visible on fine cotton. If you need a refresher, check out our complete invisible decrease tutorial.
Color Changes: Zoe’s head transitions from orange to beige at Row 19, and her tail transitions from beige to orange at Row 12. Both color changes happen at the start of a round — complete the last stitch of the previous round with the new color. Our seamless color change tutorial covers exactly how to carry the unused color cleanly on the inside.
Spike Stitch: Used in Row 12 of the tail to create a textured edge at the color boundary. To work a spike stitch, insert your hook into the corresponding stitch of the row below the current row, pull up a loop to the height of your current row, then complete as a standard sc. It sounds more complicated than it is — once you do the first one, the rest follow naturally.
Safety Eyes: Install the 7mm safety eyes before you close the head. Our safety eye installation guide has the positioning details you need. Place them between Rows 17 and 18, 10 sc apart — mark the stitches before committing.
Fox Amigurumi Pattern Instructions
Muzzle (×1)
Yarn: beige, orange
Start: mr
Row 1: 3 sc [beige], 4 sc [orange] in mr (7)
Row 2: 3 inc [beige], 4 inc [orange] (14)
Row 3: (inc, 1 sc) × 3 [beige], 8 sc [orange] (17)
Finishing: FO both colors. Cut yarn, leaving tails of both colors for sewing.
💡 Emma’s Tip: The muzzle works two colors simultaneously from Row 1. Keep each color’s tension consistent — I find it helps to hold both strands lightly in my non-dominant hand and drop the unused one straight down rather than carrying it across.
Ears (×2)
Yarn: orange
Start: mr
Row 1: 6 sc in mr (6)
Row 2: 6 sc (6)
Row 3: 6 inc (12)
Row 4: (inc, 3 sc) × 3 (15)
Row 5: (4 sc, inc) × 3 (18)
Finishing: Leave a long tail for sewing. Do not stuff the ears.
Head (×1)
Yarn: orange, beige
Start: mr
Row 1: 6 sc in mr (6)
Row 2: 6 inc (12)
Row 3: (1 sc, inc) × 6 (18)
Row 4: (2 sc, inc) × 6 (24)
Row 5: (3 sc, inc) × 6 (30)
Row 6: (4 sc, inc) × 6 (36)
Row 7: (5 sc, inc) × 6 (42)
Row 8: (6 sc, inc) × 6 (48)
Row 9: (7 sc, inc) × 6 (54)
Row 10: 54 sc (54)
Row 11: (8 sc, inc) × 6 (60)
Rows 12–15: 60 sc (4 rows) (60)
Row 16: (9 sc, inc) × 6 (66)
Row 17: 20 sc, 2 inc, 31 sc, 2 inc, 11 sc (70)
Row 18: 21 sc, 2 inc, 33 sc, 2 inc, 12 sc (74)
Rows 19–20: 74 sc (2 rows) [beige] (74)
Row 21: 19 sc, 4 dec, 29 sc, 4 dec, 10 sc (66)
Row 22: (9 sc, dec) × 6 (60)
Row 23: (8 sc, dec) × 6 (54)
Row 24: (7 sc, dec) × 6 (48)
Row 25: (6 sc, dec) × 6 (42)
Row 26: (5 sc, dec) × 6 (36)
Row 27: (4 sc, dec) × 6 (30)
Row 28: (3 sc, dec) × 6 (24)
💡 Emma’s Tip: Change to beige before Row 19. Rows 17 and 18 shape the muzzle area of the head — those paired increases create the slight forward projection that gives Zoe her fox face. Install your safety eyes between Rows 17 and 18, 10 sc apart, before you close up. You cannot easily reposition them afterward.
Finishing: FO, cut yarn, weave in ends. Stuff the head firmly.
Body (×1)
Yarn: orange
Start: mr
Row 1: 6 sc in mr (6)
Row 2: 6 inc (12)
Row 3: (1 sc, inc) × 6 (18)
Row 4: (2 sc, inc) × 6 (24)
Row 5: (3 sc, inc) × 6 (30)
Row 6: (4 sc, inc) × 6 (36)
Row 7: (5 sc, inc) × 6 (42)
Row 8: (6 sc, inc) × 6 (48)
Rows 9–16: 48 sc (8 rows) (48)
Row 17: 15 sc, (1 sc, 1 dec) × 6, 15 sc (42)
Row 18: 42 sc (42)
Row 19: (5 sc, dec) × 6 (36)
Rows 20–21: 36 sc (2 rows) (36)
Row 22: (4 sc, dec) × 6 (30)
Rows 23–24: 30 sc (2 rows) (30)
Row 25: (3 sc, dec) × 6 (24)
Rows 26–27: 24 sc (2 rows) (24)
Finishing: FO, cut yarn, leaving a long tail for sewing to the head. Stuff the body firmly.
💡 Emma’s Tip: Start stuffing the body gradually from around Row 10 — I always find it easier to add stuffing as I go rather than trying to pack it in at the end. Aim for firm but not rock-hard. You want Zoe to hold her shape but still have a slight give when you squeeze her.
Arms (×2)
Yarn: orange
Start: mr
Row 1: 6 sc in mr (6)
Row 2: 6 inc (12)
Rows 3–4: 12 sc (2 rows) (12)
Row 5: 5 sc, 1 tr, 6 sc (12)
Rows 6–20: 12 sc (15 rows) (12)
Finishing: Work 3 more sc in the last row. Stuff the arms halfway, leaving the top unstuffed. Fold the two sides of the arm together and work 6 sc to join. Leave a tail for sewing.
💡 Emma’s Tip: The single treble crochet in Row 5 creates a small thumb-like bump at the paw. It’s a subtle detail but it makes a difference up close. Make sure both arms are worked as mirror images of each other so the thumbs face correctly when assembled.
Legs (×2)
Yarn: orange
Start: chain of 6 ch
Row 1: Starting from the 2nd ch from hook: 4 sc, 3 sc in last ch, along the other side 3 sc, inc (12)
Row 2: inc, 3 sc, 3 inc, 3 sc, 2 inc (18)
Row 3: (1 sc, inc), 3 sc, (1 sc, inc) × 3, 3 sc, (1 sc, inc) × 2 (24)
Rows 4–6: 24 sc (3 rows) (24)
Row 7: 6 sc, 6 dec, 6 sc (18)
Row 8: 6 sc, 3 dec, 6 sc (15)
Rows 9–20: 15 sc (12 rows) (15)
Row 21: (3 sc, dec) × 3 (12)
Rows 22–24: 12 sc (3 rows) (12)
Row 25: Work 5 sc only (5)
Finishing: Stuff the leg, leaving approximately 0.4 in (1 cm) at the top unstuffed. Fold the leg and work 5 sc and 1 sl st to join the two sides. Leave a tail for sewing.
Tail (×1)
Yarn: beige (Rows 1–11), orange (Row 12 onward)
Start: mr
Row 1: 6 sc in mr (6)
Row 2: (1 sc, inc) × 3 (9)
Row 3: (2 sc, inc) × 3 (12)
Row 4: 12 sc (12)
Row 5: (1 sc, inc) × 6 (18)
Row 6: 18 sc (18)
Row 7: (2 sc, inc) × 6 (24)
Row 8: 24 sc (24)
Row 9: (3 sc, inc) × 6 (30)
Rows 10–11: 30 sc (2 rows) (30)
Row 12: (1 spike st*, 4 sc) × 6 [change to orange before this row] (30)
Rows 13–15: 30 sc (3 rows) (30)
Row 16: (3 sc, dec) × 6 (24)
Row 17: 24 sc (24)
Row 18: (2 sc, dec) × 6 (18)
Row 19: 18 sc (18)
Row 20: (1 sc, dec) × 6 (12)
Rows 21–22: 12 sc (2 rows) (12)
Row 23: (2 sc, dec) × 3 (9)
Rows 24–25: 9 sc (2 rows) (9)
*Spike stitch: Insert your hook into the stitch one row below the current row (not into the current round), pull up a loop to the height of a standard sc, then complete as a regular sc. The spike stitches in Row 12 create a textured, feathered edge right at the color boundary — this is what gives Zoe’s tail its naturalistic look.
Bow (×1)
Yarn: pink
Start: chain of ch
- Make 3 ch, 3 dc, 3 ch and sl st into the first ch.
- Repeat: 3 ch, 3 dc, 3 ch and sl st into the first ch.
Finishing: Leave a long tail for sewing.
Overalls (×1)
Yarn: green
Start: chain of 24 ch
Pant Legs (make 2):
- For the first pant leg, chain 24 ch, join into a round with sl st.
- Rows 01–03: 24 dc (24). Cut yarn.
- Work the second pant leg the same way, but do not cut yarn. Join to the first pant leg with 2 ch.
Main Body:
- Rows 04–07: 48 dc (52)
- Row 8: 48 dc (48) — worked flat (turning rows)
- Row 9: 48 hdc (48). Chain 21 ch for the tie.
Bib:
- Count 20 stitches from the chain, attach yarn.
- Row 01: 2 ch, 11 dc, turn.
- Row 02: 2 ch, 10 dc, turn.
- Row 03: 2 ch, 10 hdc.
Straps:
- Chain 18 ch, fasten to the back with sl st (crosswise) 7 stitches apart.
- Make the second strap from the other corner of the bib in the same way.
Assembling Zoe the Fox
Take your time with this part. I always pin every piece in place before committing a single sewing stitch — it takes a few extra minutes and saves you from frogging an entire assembly session. Our guide to sewing amigurumi parts together has the technique details if you want a refresher.
- Muzzle: Sew onto Rows 16 and 21 of the head at the center, aligning the color change of the muzzle with the color change of the head.
- Ears: Fold and sew between Rows 6 and 11 of the head. The bottom of the ears should sit 7 rows above the eyes.
- Eyes: Position between Rows 17 and 18, 10 sc apart. Install and lock the washers before closing the head.
- Body: Sew firmly to the head.
- Arms: Sew between Rows 26 and 27 on the sides of the body.
- Legs: Sew between Rows 10 and 11 of the body.
- Tail: Sew to the back of the body.
- Bow: Sew onto the left ear.
- Overalls: Dress the fox, tie the straps and ties at the back.
Finishing Details and Embroidery
- Nose: Embroider with brown yarn in the shape of a heart on the orange part of the muzzle — approximately 5 stitches on each side, with one stitch going down two rows. I always do this before attaching the muzzle to the head, so I can rotate it freely while I work.
- Head stripes: Embroider with beige yarn on Rows 7, 9, 11, and 13. These thin parallel lines across the top of the head are a fox-specific detail that makes a real difference in the finished look.
- Eyebrows: Embroider with brown yarn diagonally, 2 rows above the eyes, 3 sc in length.
- Eye whites: Embroider the whites of the eyes with white yarn.
- Cheeks: Apply pink blush or chalk pastel to the beige part of the head. This is one of those details that makes all the difference — it adds warmth and expression without any extra stitching.
- Rainbow on overalls: Embroider a boho rainbow using backstitch on the bib, using pink, brown, and beige.
This fox amigurumi is one of those projects where the finishing details carry as much weight as the construction itself. Don’t rush the embroidery — work in good light, take breaks if your eyes get tired, and step back after each detail to check the placement before moving on.
If you enjoyed making Zoe, you might love our free crochet cat amigurumi pattern — she uses a similar fine cotton construction and has the same meticulous shaping approach. And if you want another fox on your shelf, our step-by-step fox amigurumi pattern is a great companion piece in a slightly different style.
I’ve made Zoe twice now, and the spike-stitch tail tip is the detail I keep coming back to — it’s such a small thing technically, but it’s what makes this fox feel like a fox and not just an orange blob with ears. If your tension is anything like mine, the 2.0mm hook will feel completely natural. Take your time on the two-color head; getting that color change to sit cleanly across the face is worth every extra minute. Happy hooking! 🧶
What yarn is best for this fox amigurumi?
We recommend DK or Sport weight cotton yarn (CYCA 2 or 3) for the best stitch definition and a crisp finish on the embroidery details.
Can a beginner make this fox pattern?
This pattern is rated as Intermediate due to the color changes in the head and the spike stitch in the tail. Confident beginners can try it by following our linked tutorials.
What size hook is needed?
A 2.0mm (Steel 4) hook is used to ensure tight tension so that the stuffing doesn’t show through the fabric.