Fox Amigurumi — Free Crochet Pattern Step by Step
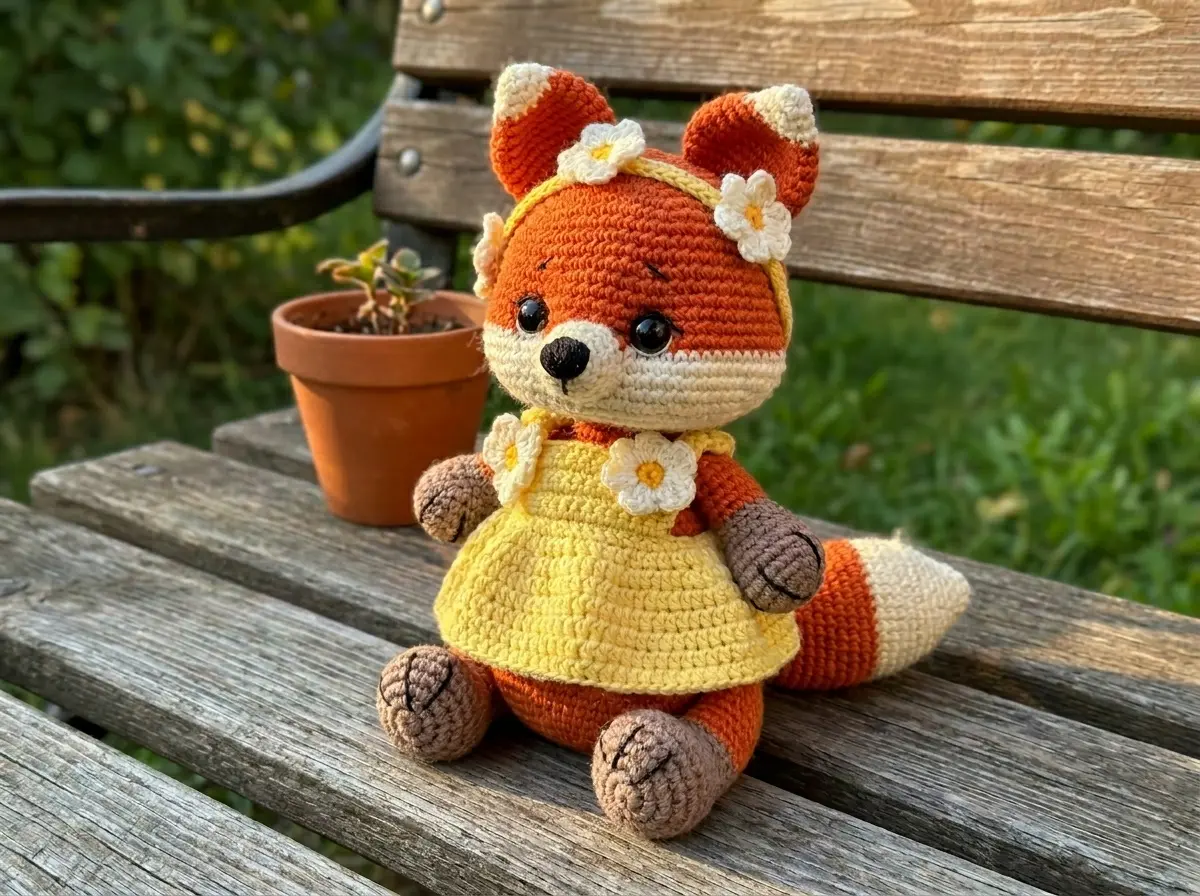
This fox amigurumi has been sitting in my project queue for longer than I’d like to admit — and now that it’s finally written up and tested, I completely understand why I kept coming back to it. The fox amigurumi shape is one of the most satisfying builds I’ve worked through in a while: the muzzle placement, the two-tone ears, the fluffy tail with its cream tip. Everything about this pattern rewards patience. I crocheted it at 2.0mm with tight tension, and the result is dense, clean, and completely worth the hand stretches between rounds.
📋 Pattern Quick Stats
- Difficulty: Intermediate
- Finished Size: Approximately 7–8 in (based on 2.0mm hook and DK weight yarn)
- Hook Size: Steel 4 (2.0mm)
- Yarn Weight: DK / Light Worsted (3)
- Techniques: magic ring, single crochet, invisible decrease, color changes, working in continuous rounds, joining parts while crocheting
- Estimated Time: 8–12 hours
Materials for This Fox Amigurumi Pattern
The original yarn for this pattern is YarnArt Jeans, a DK/Light Worsted cotton-acrylic blend (50g / 160 yds per skein). It’s a reliable, widely used amigurumi yarn with excellent stitch definition at small hook sizes. If you can’t find it locally, good US alternatives include Drops Muskat or Paintbox Simply DK Cotton — both are classified as DK / Light Worsted (Weight 3) by the Craft Yarn Council.
You’ll need four colors:
- Main color — rust/fox orange (YarnArt Jeans shade 85 or equivalent)
- Cream — off-white (shade 03 or equivalent) — used for the head bottom, ear tips, muzzle, and tail tip
- Brown — medium brown (shade 71 or equivalent) — used for the paws
- Black — embroidery only (shade 53 or equivalent) — used split in half for claws, eyebrows, eyelashes, nose, and whiskers
Additional supplies:
- Steel 4 (2.0mm) crochet hook
- 12mm safety eyes (×2)
- Polyester fiberfill (polyfill) for stuffing — Poly-Fil by Fairfield is widely available at Joann, Michaels, and Hobby Lobby
- Tapestry needle for assembly and weaving in ends
- Long sculpting needle for muzzle tightening
- Stitch marker
- Scissors
- Straight pins for positioning parts before sewing
💡 Emma’s Tip: At 2.0mm, your hook is doing serious work. I always keep a few extra stitch markers on hand for this kind of project — when you’re tracking color changes and row shifts simultaneously, you’ll thank yourself for marking more than you think you need to.
Abbreviations Used in This Fox Amigurumi Pattern
| Abbreviation | Meaning |
|---|---|
| mr | magic ring |
| ch | chain |
| sl st | slip stitch |
| sc | single crochet |
| inc | increase — 2 single crochets worked into the same stitch |
| dec | invisible decrease — insert hook through front loops only of the next 2 stitches simultaneously, yarn over, pull through, yarn over, pull through 2 loops |
| FLO | front loop only |
| FO | fasten off |
| ( ) × n | repeat the instructions in parentheses n times |
⚠️ Note on decreases: Wherever this pattern calls for a decrease, I use the invisible decrease exclusively. It’s worked through the front loops only of the next two stitches and produces a virtually seamless result — no gap, no bump. The standard sc2tog creates a visible hole that’s hard to hide, especially on a small, tight piece like this fox. Trust me on this one.
Special Techniques for This Fox Amigurumi
Before you start, I’d recommend getting comfortable with three techniques that come up repeatedly in this pattern:
Magic Ring: Every part of this fox — the head, body, tail, ears, and muzzle — starts with a magic ring. It closes completely at the center, which is essential for clean amigurumi. If you’re not confident with yours yet, our complete magic ring tutorial walks through it step by step.
Invisible Decrease: This pattern has a lot of decreasing rounds, particularly in the head closure. The invisible decrease is the only method I use for amigurumi — it keeps the fabric smooth and prevents stuffing from peeking through. If you haven’t tried it, check out our invisible decrease tutorial before starting.
Working in Continuous Rounds: This entire fox is worked in continuous rounds — no joining, no turning. Keep a stitch marker in your first stitch of each round. Our guide to continuous rounds explains how and why this is the standard for amigurumi.
Joining Parts While Crocheting: The legs are attached during Row 16 of the body, and the arms during Row 35. This technique integrates the limbs directly into the body structure rather than sewing them on separately. The notes for each section explain exactly how to work this.
Color Changes and Row Shifts: Several parts in this pattern include row shifts — a small number of extra stitches worked at the end of certain rows to reposition the round start. These are clearly marked in the notes for each part. Don’t skip them; they’re built into the shaping.
Fox Amigurumi Pattern
Head (×1)
Yarn: Main color, switch to cream at Row 21
Start: Magic ring
Row 1: 6 sc in mr (6)
Row 2: 6 inc (12)
Row 3: (1 sc, 1 inc) × 6 (18)
Row 4: (2 sc, 1 inc) × 6 (24)
Row 5: (3 sc, 1 inc) × 6 (30)
Row 6: (4 sc, 1 inc) × 6 (36)
Row 7: (5 sc, 1 inc) × 6 (42)
Row 8: (6 sc, 1 inc) × 6 (48)
Row 9: (7 sc, 1 inc) × 6 (54)
Row 10: (8 sc, 1 inc) × 6 (60)
Row 11: (19 sc, 1 inc) × 3 (63)
Rows 12–16: 63 sc (63)
Row 17: (20 sc, 1 inc) × 3 (66)
Row 18: (10 sc, 1 inc) × 6 (72)
Row 19: 23 sc, 2 inc, 34 sc, 2 inc, 11 sc (76)
Row 20: 23 sc, 2 inc, 35 sc, 2 inc, 14 sc [end of main color — ROW SHIFT: the extra 5 sc at the end shift your round start] (80)
Rows 21–22: 80 sc [cream] (80)
Row 23: (18 sc, 1 dec) × 4 (76)
Row 24: (17 sc, 1 dec) × 4 (72)
Row 25: (10 sc, 1 dec) × 6 (66)
Row 26: (9 sc, 1 dec) × 6 (60)
Row 27: (8 sc, 1 dec) × 6 (54)
Row 28: (7 sc, 1 dec) × 6 (48)
Row 29: (6 sc, 1 dec) × 6 (42)
Row 30: (5 sc, 1 dec) × 6 (36)
Row 31: (4 sc, 1 dec) × 6 (30)
Row 32: (3 sc, 1 dec) × 6 (24)
💡 Note: Switch to cream (03) before beginning Row 21. Safety eyes are placed between Rows 20 and 21, spaced 11 stitches apart. Install them before you close up the head — once you’re past Row 25, access gets tight fast. Leave a long yarn tail for sewing to the body.
Upper Arms (×2)
Yarn: Brown (71), switch to main color at Row 12
Start: 7 ch
Row 1: 7 ch
Row 2: Starting from the 2nd ch from hook: 1 inc, 4 sc, 3 sc in 1 st, 5 sc (14)
Row 3: 2 inc, 4 sc, 3 inc, 4 sc, 1 inc (20)
Row 4: (1 sc, 1 inc) × 2, 4 sc, (1 sc, 1 inc) × 3, 5 sc, 1 inc (26)
Rows 5–6: 26 sc (26)
Row 7: 23 sc [ROW SHIFT: 1 sc remains unworked — this repositions the round start for shaping]
Row 8: 9 sc, 4 dec, 9 sc (22)
Row 9: 7 sc, 4 dec, 7 sc (18)
Row 10: 5 sc, 4 dec, 5 sc (14)
Row 11: 14 sc (14)
Rows 12–18: 14 sc [main color — at END of Row 18, work 2 additional sc (ROW SHIFT)] (14)
💡 Finishing the Arms: Stuff each arm approximately 2/3 full. Fold in half and join both edges by working 6 sc through both layers. FO, cut yarn, weave the end inside the arm. Optional: embroider claws using black yarn (53) split to half its thickness for fine, clean lines.
Lower Legs (×2)
Yarn: Brown (71), switch to main color at Row 15
Start: 7 ch
Row 1: 7 ch
Row 2: Starting from the 2nd ch from hook: 1 inc, 4 sc, 3 sc in 1 st, 5 sc (14)
Row 3: 2 inc, 4 sc, 3 inc, 4 sc, 1 inc (20)
Row 4: (1 sc, 1 inc) × 2, 4 sc, (1 sc, 1 inc) × 3, 5 sc, 1 inc (26)
Row 5: (2 sc, 1 inc) × 2, 4 sc, (2 sc, 1 inc) × 3, 6 sc, 1 inc (32)
Rows 6–9: 32 sc [at end of Row 9, work 4 additional sc (ROW SHIFT)] (32)
Row 10: 6 sc, 10 dec, 6 sc (22)
Row 11: 7 sc, 4 dec, 7 sc (18)
Row 12: 8 sc, 1 dec, 8 sc (17)
Rows 13–14: 17 sc (17)
Rows 15–21: 17 sc [main color — at END of Row 21, work 2 additional sc (ROW SHIFT)] (17)
💡 Finishing the Legs: Stuff each leg approximately 2/3 full. Fold in half and join both edges by working 8 sc through both layers. FO, cut yarn, weave the end inside the leg. Embroider claws using black yarn split in half, matching the arms.
Ears (×2)
Yarn: Cream (03), switch to main color at Row 5
Start: Magic ring
Row 1: 6 sc in mr (6)
Row 2: (1 sc, 1 inc) × 3 (9)
Row 3: (2 sc, 1 inc) × 3 (12)
Row 4: (3 sc, 1 inc) × 3 (15)
Row 5: (4 sc, 1 inc) × 3 [switch to main color before this row] (18)
Row 6: (2 sc, 1 inc) × 6 (24)
Row 7: (3 sc, 1 inc) × 6 (30)
Rows 8–9: 30 sc (30)
Row 10: (3 sc, 1 dec) × 6 (24)
Row 11: 24 sc (24)
Row 12: (6 sc, 1 dec) × 3 (21)
💡 Finishing the Ears: Work 1 additional sc, then fold the ear in half and join both edges by working 10 sc through both layers. FO and weave in ends.
Muzzle (×1)
Yarn: Cream (03)
Start: Magic ring
Row 1: 6 sc in mr (6)
Row 2: (1 sc, 1 inc) × 3 (9)
Row 3: (2 sc, 1 inc) × 3 (12)
Row 4: (3 sc, 1 inc) × 3 (15)
Row 5: (4 sc, 1 inc) × 3 (18)
Work 1 sl st to finish. FO, cut yarn, leave a yarn tail for sewing.
Body (×1)
Yarn: Main color
Start: Magic ring
Row 1: 6 sc in mr (6)
Row 2: 6 inc (12)
Row 3: (1 sc, 1 inc) × 6 (18)
Row 4: (2 sc, 1 inc) × 6 (24)
Row 5: (3 sc, 1 inc) × 6 (30)
Row 6: (4 sc, 1 inc) × 6 (36)
Row 7: (5 sc, 1 inc) × 6 (42)
Row 8: (6 sc, 1 inc) × 6 (48)
Row 9: (7 sc, 1 inc) × 6 (54)
Row 10: (8 sc, 1 inc) × 6 (60)
Row 11: (19 sc, 1 inc) × 3 (63)
Rows 12–15: 63 sc (63)
Row 16: 12 sc, 8 sc (working through lower leg), 23 sc, 8 sc (working through lower leg), 12 sc (63)
Row 17: 63 sc (63)
Row 18: (19 sc, 1 dec) × 3 (60)
Row 19: 60 sc (60)
Row 20: (8 sc, 1 dec) × 6 (54)
Rows 21–22: 54 sc (54)
Row 23: (7 sc, 1 dec) × 6 (48)
Rows 24–25: 48 sc (48)
Row 26: (6 sc, 1 dec) × 6 (42)
Rows 27–28: 42 sc (42)
Row 29: (5 sc, 1 dec) × 6 (36)
Rows 30–31: 36 sc (36)
Row 32: (4 sc, 1 dec) × 6 (30)
Row 33: 30 sc (30)
Row 34: (3 sc, 1 dec) × 6 (24)
Row 35: 6 sc, 6 sc (working through upper arm), 6 sc, 6 sc (working through upper arm) (24)
Row 36: 24 sc (24)
💡 Attaching the Limbs: For Row 16, hold each finished lower leg against the body and work the 8 sc through both the body stitches and the open edge of the leg simultaneously. This locks the leg directly into the body structure. For Row 35, attach the upper arms the same way — position them directly above the lower legs. Pin them in place first if you’re not sure about placement. FO with a sl st after Row 36 and cut yarn.
💡 Stuffing the Body: Start stuffing firmly after Row 15, before you attach the legs. Add more as you work through the upper rows. The body needs to be quite firm — with a 2.0mm hook the fabric is already tight, but inadequate stuffing will leave you with a fox that doesn’t hold her shape.
Tail (×1)
Yarn: Cream (03), switch to main color at Row 7
Start: Magic ring
Row 1: 6 sc in mr (6)
Row 2: (1 sc, 1 inc) × 3 (9)
Row 3: (2 sc, 1 inc) × 3 (12)
Row 4: (3 sc, 1 inc) × 3 (15)
Row 5: (4 sc, 1 inc) × 3 (18)
Row 6: (2 sc, 1 inc) × 6 (24)
Row 7: (3 sc, 1 inc) × 6 [switch to main color before this row] (30)
Rows 8–9: 30 sc (30)
Row 10: (3 sc, 1 dec) × 6 (24)
Row 11: 24 sc (24)
Row 12: (2 sc, 1 dec) × 6 (18)
Row 13: 18 sc (18)
Row 14: (4 sc, 1 dec) × 3 (15)
Rows 15–16: 15 sc (15)
Row 17: (3 sc, 1 dec) × 3 (12)
Rows 18–19: 12 sc (12)
💡 Finishing the Tail: Stuff the tail firmly — it needs enough shape to stand upright or curve attractively when sewn on. Fold in half, work 5 sc through both layers to close, FO, cut yarn, and weave the end inside.
Assembly: Putting Your Fox Amigurumi Together
- Attach the head to the body. Use the long yarn tail left on the head and sew stitch by stitch around the neck opening. Pin the head in place first and check the angle — I like to tilt mine very slightly forward for a natural look. Take your time here; this join is the most visible one on the finished piece.
- Tighten the eyes. Once the head is attached and stuffed, use your long sculpting needle to pull the eye threads through to the back of the head and tighten. This pulls the eyes slightly inward and gives the muzzle area its characteristic fox shape.
- Position and sew the ears. Pin both ears in place before committing to any stitches — I usually go through a few rounds of repositioning before I’m happy. The ears should sit symmetrically above the eyes, angled slightly outward toward the sides of the head.
- Position and sew the muzzle. Pin the muzzle below the eyes, centered on the cream section of the head. Sew around the full edge, leaving a small gap to stuff lightly before closing completely. This small bit of stuffing makes all the difference to the muzzle’s shape.
- Sew on the tail. Position the tail at the back lower section of the body. The curved tip should angle upward or to the side — pin it first and stand the fox up to check the silhouette before sewing.
Finishing & Embroidery Details
The embroidery is what brings this fox amigurumi to life, and it’s worth slowing down here.
Nose and mouth: Using black yarn split to half its thickness, embroider a small inverted triangle for the nose at the top center of the muzzle. Work two short lines downward from the bottom point of the triangle to form the mouth.
Whiskers: Use the same split black yarn to embroider three or four whiskers extending from each side of the muzzle. Keep them light and fine — just a few stitches each.
Eyelashes and eyebrows: Work short upward strokes above each eye for the eyebrows, and two or three fine downward strokes at the outer corner of each eye for the lashes. Don’t overdo either — less is more with small safety eyes.
Eye whites: A few small stitches of white or cream yarn at the inner corner of each eye add expression. This is optional but worth the extra few minutes.
Claws: If you haven’t already, embroider 3 small claws on each paw using split black yarn. Three short straight stitches fanning out from the toe area is all it takes.
💡 Emma’s Tip: I always do all embroidery under good direct lighting, not overhead ambient light. The difference in precision is significant when you’re working with split yarn on a 2.0mm-gauge piece.
Emma’s Note
This fox amigurumi took me two full evenings the first time through — I frogged the head once at Row 23 because one of my invisible decreases had slipped out of the front loops and left a visible ridge. If you notice something similar, don’t try to work around it. Frog back, redo the row. The closed-up head is what everyone sees first, and it’s worth getting right. Once the assembly is done and the embroidery is in, the whole thing comes together beautifully. The cream-tipped tail alone is worth the extra color change. I hope yours turns out exactly as you’re imagining it — happy hooking. 🧶
What yarn is best for this fox amigurumi?
YarnArt Jeans (DK/cotton-acrylic) is the original yarn for this pattern. Good US alternatives are Drops Muskat or Paintbox Simply DK Cotton — both are Weight 3 (DK/Light Worsted) with similar stitch definition.
How long does it take to crochet this fox amigurumi?
Expect 8–12 hours total, depending on your experience with color changes and limb integration. Working through all parts over two full sessions is a common approach.
Can beginners make this fox amigurumi pattern?
This pattern is rated Intermediate. Before starting, you should be comfortable with magic rings, invisible decreases, working in continuous rounds, and basic color changes. Complete beginners may want to practice these techniques first.
What hook size do I need for this fox amigurumi?
This pattern is designed for a Steel 4 (2.0mm) hook with DK yarn, which produces tight, dense fabric ideal for amigurumi. Using a larger hook will result in a larger finished size and looser fabric that may show stuffing.