Whale Amigurumi Pattern Free — Squishy Chenille Plush with a Curled Tail
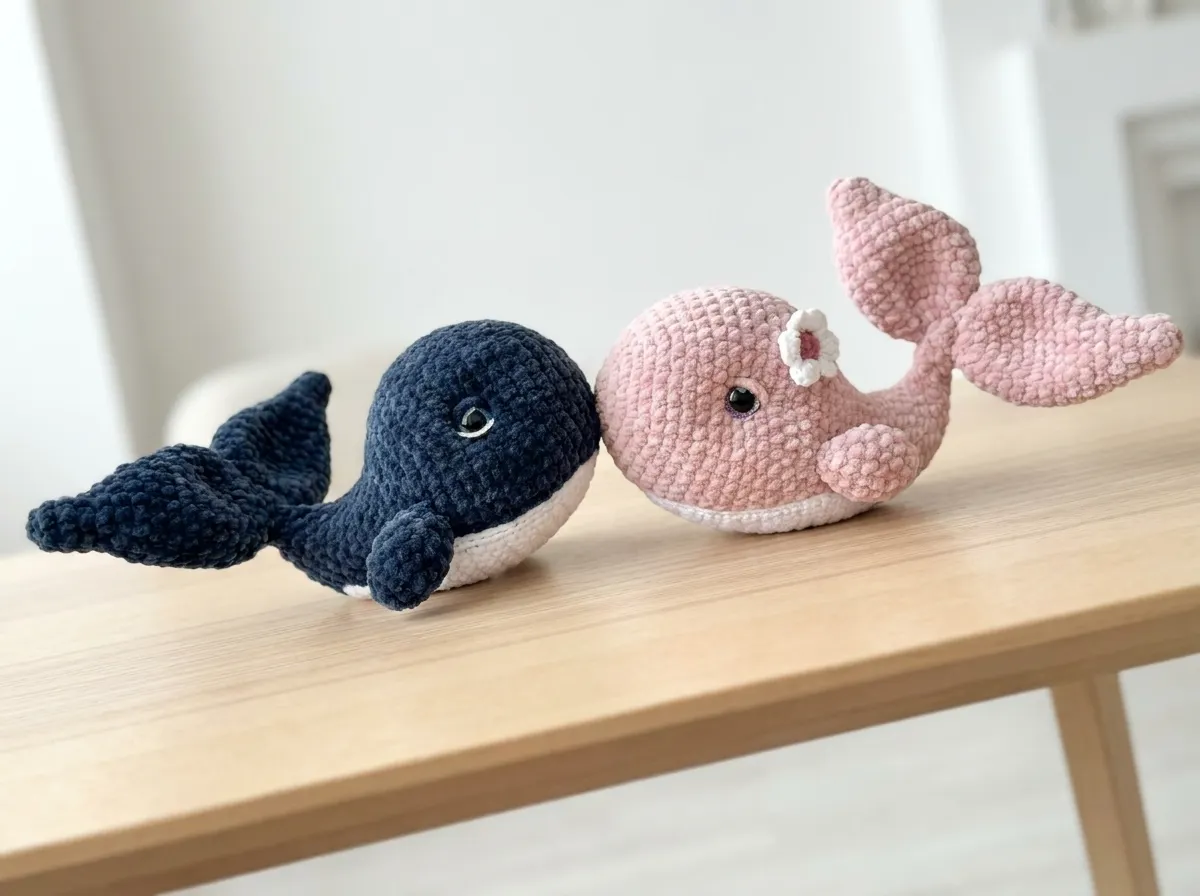
This whale amigurumi pattern free version is the kind of project that makes a half-used skein of chenille feel like treasure — the entire body works up from one color, uses a simple wire trick to get that signature curved tail, and finishes with a white belly panel that takes less than 50 yards of DK yarn to complete. If you’ve got leftover chenille from any recent plush project, you probably already have enough. Pick your color — blue or powder pink both work beautifully — and let’s get into it.
🧶 What You’ll Need From Your Stash
- 💰 Yarn Needed: ~170 yds body color chenille (blue or powder pink) + ~50 yds white DK + small amount pink for flower
- 🎨 Colors: blue or powder pink (body), white (belly + eye detail), powder pink (flower center)
- 🪝 Hook: E/4 (3.5 mm)
- ⏱️ Time: 5–7 hours
- 📏 Finished Size: approximately 8–9 in (20–23 cm) including curled tail
- 💡 Difficulty: Intermediate
- 🎁 Great For: gifts, nursery décor, baby shower presents, shelf display
Materials for Your Whale Amigurumi Pattern
- Bulky (5) chenille yarn — body color: approximately 170 yards in blue or powder pink. US alternatives include Bernat Baby Velvet or Premier Parfait. One standard skein of most brands is more than enough — you’ll likely have some left over.
- DK / Light Worsted (3) yarn — white: approximately 50 yards. US alternatives include Drops Muskat or Paintbox Cotton DK. This is the belly panel and eye detail — a small leftover ball handles it easily.
- Small amount of powder pink yarn — only needed for the flower center, roughly 10–12 yards. Scraps absolutely welcome here.
- Polyfill stuffing — enough to firmly fill the head and body. Poly-Fil by Fairfield is widely available at Joann, Michaels, and Hobby Lobby.
- 16 mm glitter safety eyes (×2)
- Floral wire, 1.2 mm diameter — two short pieces, approximately 7 in (18 cm) each. This creates the tail armature. Find it at any craft store in the floral supply section.
- Medical or athletic tape (e.g., Leukoplast or similar) — for wrapping the wire ends before inserting. A small strip goes a long way.
- Tapestry needle for sewing parts and weaving ends.
- Long doll needle — optional, for creating eye indentations.
- Stitch marker — non-negotiable for tracking rounds in the body.
- Hook: E/4 (3.5 mm)
The chenille plays beautifully at this hook size — tighter than the yarn’s recommended gauge, which gives you a dense, clean fabric that hides the stuffing perfectly. If you want to understand why hook sizing matters for amigurumi, our guide to choosing the right hook size breaks it down clearly.
The 16 mm safety eyes are on the larger side. If this whale is intended for a child under 3, embroider the eyes instead — the U.S. Consumer Product Safety Commission recommends avoiding attachable plastic parts on toys for young children.
Abbreviations for This Whale Amigurumi Pattern
| Abbreviation | Meaning |
|---|---|
| ch | chain |
| sc | single crochet |
| inc | increase — 2 sc worked into the same stitch |
| inv dec | invisible decrease — insert hook through front loops only of next 2 stitches simultaneously, yarn over, pull through, yarn over, pull through 2 loops |
| sl st | slip stitch |
| mr | magic ring |
| dc | double crochet |
| RS | right side (outside of the piece) |
Smart Crafter Tips
The wire trick is simpler than it sounds. Cut your floral wire to about 7 in (18 cm) and wrap it thoroughly in medical tape — focus especially on the tips, since exposed wire ends can poke through the fabric over time. When you reach Row 33 of the body, screw one taped end into the stuffing and let the other end extend about 2–2.5 in (5–6 cm) above the crochet fabric. Bend it upward before continuing. That’s what gives the tail its natural upward curve. You’re not doing surgery — it takes about 90 seconds.
The invisible decrease keeps everything clean. This pattern has significant decreasing in the snout and tail sections — Rows 22–35 of the body in particular. Using the invisible decrease instead of a standard sc2tog prevents gaps from forming in your chenille fabric, which is especially important because chenille has a way of making every imperfection visible. Our invisible decrease tutorial shows the exact technique if you haven’t used it before.
The belly is flat — don’t panic. The belly panel is worked in turning rows, not in the round. You’ll chain 9, turn, and work back and forth with a ch-1 at the start of each row. This is straightforward, but if you’re used to working only in continuous rounds it can feel strange at first. Just remember to begin every row with 1 ch before your first sc.
Two yarns, one hook. Both the chenille and the DK white use the same E/4 (3.5 mm) hook throughout. The DK yarn will produce noticeably tighter stitches than the chenille at this size — that’s intentional for the belly panel and eye detailing. No hook switching needed.
Once you’re ready to sew everything together, our guide to sewing amigurumi parts covers the cleanest techniques for attaching fins and panels to a chenille body without the seams showing.
Pattern
All rounds are worked in continuous rounds (spiral) unless otherwise noted. Use a stitch marker to track the beginning of each round.
Body (×1)
Yarn: body color chenille (blue or powder pink)
🧶 Scrap Check: The body is the most yarn-heavy piece — budget approximately 120–130 yards of your body color for this section alone. If you’re working from a single full skein, you’re fine.
Starting method: Chain 2. Work 6 sc into the second chain from the hook, sl st to join.
Row 1: Chain 2, 6 sc in second chain from hook, sl st (6)
Row 2: 6 inc (12)
Row 3: (1 sc, inc) × 6 (18)
Row 4: (2 sc, inc) × 6 (24)
Row 5: (3 sc, inc) × 6 (30)
Row 6: (4 sc, inc) × 6 (36)
Row 7: 36 sc (36)
Row 8: (5 sc, inc) × 6 (42)
Row 9: 42 sc (42)
Row 10: (6 sc, inc) × 6 (48)
Rows 11–17: 48 sc (7 rows) (48)
📌 Note: Insert the 16 mm safety eyes between Rows 12 and 13, with 24 sc between them. Install them now — before you stuff — so the washers click on cleanly. Our safety eyes tutorial covers the full process including how to get symmetrical placement.
Row 18: (6 sc, inv dec) × 6 (42)
Row 19: 42 sc (42)
Row 20: (5 sc, inv dec) × 6 (36)
Row 21: 36 sc (36)
📌 Note: Begin stuffing the head firmly starting at Row 21. Pack it well — chenille plush benefits from a firm fill to hold its shape. See our guide on how to stuff amigurumi properly if you want tips on avoiding lumps in larger pieces.
Row 22: 16 sc, 2 inv dec, 16 sc (34)
Row 23: 15 sc, 2 inv dec, 15 sc (32)
Row 24: 12 sc, 4 inv dec, 12 sc (28)
Row 25: 28 sc (28)
Row 26: 12 sc, 2 inv dec, 12 sc (26)
Rows 27–28: 26 sc (2 rows) (26)
Row 29: 11 sc, 2 inv dec, 11 sc (24)
Row 30: 24 sc (24)
Row 31: (10 sc, inv dec) × 2 (22)
Row 32: (9 sc, inv dec) × 2 (20)
Row 33: (8 sc, inv dec) × 2 (18)
📌 Wire Insert — Row 33: This is where you add the armature. Wrap your 7 in (18 cm) piece of floral wire thoroughly in medical tape, paying extra attention to the tips. Screw one end into the stuffing already inside the body. Allow the remaining end to protrude approximately 2–2.5 in (5–6 cm) above the crochet fabric, then bend it upward. Continue crocheting the body around the wire from this point forward, stuffing the tail section firmly as you go.
Row 34: (7 sc, inv dec) × 2 (16)
Row 35: (2 sc, inv dec) × 4 (12)
Row 36: 12 sc (12)
Row 37: (4 sc, inv dec) × 2 (10)
Row 38: 1 sc, inv dec, 3 sc, inv dec, 2 sc (8)
Rows 39–41: 8 sc (3 rows) (8)
Finishing: Using a tapestry needle, close the opening by threading through the front loops only. If the wire tip remains slightly exposed above the crocheted fabric, work a few additional rows of 8 sc until it is fully covered before closing.
Tail Fin Lobes (×2)
Yarn: body color chenille
🧶 Scrap Check: Both tail fin lobes together use approximately 25 yards of body color. If you’ve got even a small leftover ball in the same color, check it before reaching for a fresh skein.
Starting method: Chain 2. Work 6 sc into the second chain from the hook, sl st to join.
Row 1: Chain 2, 6 sc in second chain from hook, sl st (6)
Row 2: 5 sc, inc (7)
Row 3: 6 sc, inc (8)
Row 4: (3 sc, inc) × 2 (10)
Row 5: (4 sc, inc) × 2 (12)
Row 6: (5 sc, inc) × 2 (14)
Row 7: 5 sc, 2 inc, 7 sc (16)
Row 8: 6 sc, 2 inc, 8 sc (18)
Row 9: 7 sc, 2 inc, 9 sc (20)
Row 10: 8 sc, 2 inc, 10 sc (22)
Row 11: 9 sc, 2 inc, 11 sc (24)
Rows 12–14: 24 sc (3 rows) (24)
Row 15: (4 sc, inv dec) × 4 (20)
Row 16: (3 sc, inv dec) × 4 (16)
Row 17: (2 sc, inv dec) × 4 (12)
Row 18: 6 inv dec, sl st (6)
Finishing: Do not stuff the fin lobes. If sewing with chenille yarn, cut and leave a tail for sewing. If you’re using a DK cotton yarn for the fins, weave the remaining tail inside the fin with your tapestry needle before sewing on.
Small Side Fins (×2)
Yarn: body color chenille — approximately 6 yards per fin
🧶 Scrap Check: Both side fins together use about 12 yards. The tiniest leftover scrap of your body color covers this.
Starting method: Chain 2. Work 6 sc into the second chain from the hook, sl st to join.
Row 1: Chain 2, 6 sc in second chain from hook, sl st (6)
Row 2: (1 sc, inc) × 3 (9)
Row 3: (2 sc, inc) × 3 (12)
Rows 4–5: 12 sc (12)
Row 6: (2 sc, inv dec) × 3 (9)
Row 7: (1 sc, inv dec) × 3 (6)
Finishing: Fold the fin in half and work 2–3 sc through both layers to join the opening closed. Do not stuff.
Belly Panel (×1)
Yarn: white DK/Light Worsted yarn — approximately 45–50 yards
Important: The belly is worked flat in turning rows, not in the round. Begin each new row with 1 ch before your first sc. This chain does not count as a stitch.
Starting method: Chain 9. Turn. Begin working from the second chain from the hook.
Row 1: Ch 9, turn. Work from 2nd chain from hook.
Row 2: 8 sc (8)
Row 3: 1 sc, 1 inc, 6 sc (9)
Row 4: 1 sc, 1 inc, 7 sc (10)
Row 5: 2 sc, 1 inc, 7 sc (11)
Row 6: 2 sc, 1 inc, 8 sc (12)
Row 7: 3 sc, 1 inc, 8 sc (13)
Row 8: 3 sc, 1 inc, 9 sc (14)
Row 9: 4 sc, 1 inc, 9 sc (15)
Row 10: 4 sc, 1 inc, 10 sc (16)
Row 11: 5 sc, 1 inc, 10 sc (17)
Row 12: 5 sc, 1 inc, 11 sc (18)
Row 13: 1 sc, 1 inc, 16 sc (19)
Row 14: 1 sc, 1 inc, 17 sc (20)
Rows 15–22: 20 sc (8 rows) (20)
Row 23: 1 sc, inv dec, 14 sc, inv dec, 1 sc (18)
Row 24: 1 sc, inv dec, 12 sc, inv dec, 1 sc (16)
Row 25: 1 sc, inv dec, 10 sc, inv dec, 1 sc (14)
Row 26: 1 sc, inv dec, 8 sc, inv dec, 1 sc (12)
Row 27: 1 sc, inv dec, 6 sc, inv dec, 1 sc (10)
Row 28: 1 sc, inv dec, 4 sc, inv dec, 1 sc (8)
Rows 29–30: 8 sc (8)
Finishing: Do not cut the yarn. Continue working sc evenly around the entire perimeter of the belly panel. Leave a long tail for sewing onto the body.
Flower Accent (×1)
Yarn: powder pink (center), white (petals) — small amounts only
The flower starts with a magic ring. If you haven’t made one before, our magic ring tutorial covers it quickly — it’s the cleanest way to start a small piece like this without a visible hole at the center.
Round 1: 6 sc in mr; change to white yarn (6)
Round 2: (4 ch, sl st into next stitch) × 6 (6 arches)
Round 3: (3 ch, 5-dc cluster into arch, 3 ch, sl st into same arch) × 6
📌 Optional raised center: For a more dimensional look, crochet 6 sc into a separate magic ring using powder pink yarn and sew the resulting circle onto the center of the flower over the original pink center. This adds a small padded button effect that photographs well.
Assembly
- Eye indentations (optional): Using a long doll needle threaded with a length of body color yarn, pull through from the back of the head and create a slight indent around each eye socket. This gives the face more dimension. Fasten securely inside the head.
- Eye finishing: Work the upper eyelid in body color chenille yarn directly over each safety eye. Outline the lower portion of each eye with white DK yarn for contrast. Take your time here — this detail is what gives the whale its expression.
- Tail fin lobes: Sew both lobes to the tail end of the body, wavy edge facing upward. The wire inside the tail will hold the curve while you position them.
- Small side fins: Sew both side fins to the body between Rows 19 and 20, one on each side. Position them roughly symmetrically — a tape measure and a few pins help here.
- Belly panel: Sew the belly panel onto the underside of the body, aligning it between Rows 8 and 29. Pin generously before sewing. The panel is wider in the middle and tapers at both ends — work from the center outward for the most even result.
- Flower: Sew the flower onto the head or body as a decorative accent. There’s no fixed placement — go with what looks balanced once everything else is assembled.
Stretch It Further
💡 Stretch It Further: This pattern works in any bulky chenille color — teal, lilac, charcoal, coral. Make a blue, pink, and teal set and you’ve got a handmade baby shower gift that looks like it cost real money. Chenille is one of the more giftable textures out there — people always want to touch it. Skip the flower on the blue version for a cleaner look, or swap it for a small bow made from ribbon scraps. Total yarn cost for a single whale, if you’re buying new: under $8, and you’ll have most of a skein left over for the next one.
Mia’s Take
One skein of chenille, about 50 yards of white DK you almost definitely already have, and a piece of floral wire from the dollar bin — that’s what this whale costs. The wire armature sounds fussy until you do it, and then it takes about 90 seconds and suddenly your whale has a perfect curled tail. That’s a good trick to have. Make a second one in the leftover chenille, which you will absolutely have, and give them as a set. Two squishy whales in a kraft gift bag is a genuinely excellent handmade present. 🧶
I hope you enjoy this whale amigurumi pattern free of charge and share your results with us!
Looking for more plush animal patterns? Check out our axolotl amigurumi — another chenille-friendly character with a lot of personality — or the squishy velvet panda if you want to keep working with the same yarn weight.
What is the best hook size for this whale amigurumi pattern?
We recommend using an E/4 (3.5 mm) hook. This size ensures tight stitches with chenille yarn, preventing stuffing from showing through.
Is the wire armature safe for children’s toys?
While the wire adds a great look, it is not recommended for toys intended for very young children. If making this for a baby, omit the wire and embroider the eyes.
Can I use velvet yarn instead of chenille?
Yes! Velvet yarns like Bernat Baby Velvet work perfectly as a substitute for bulky chenille in this pattern.