Crochet Cat Plush Amigurumi — Free Chenille Pattern Step by Step
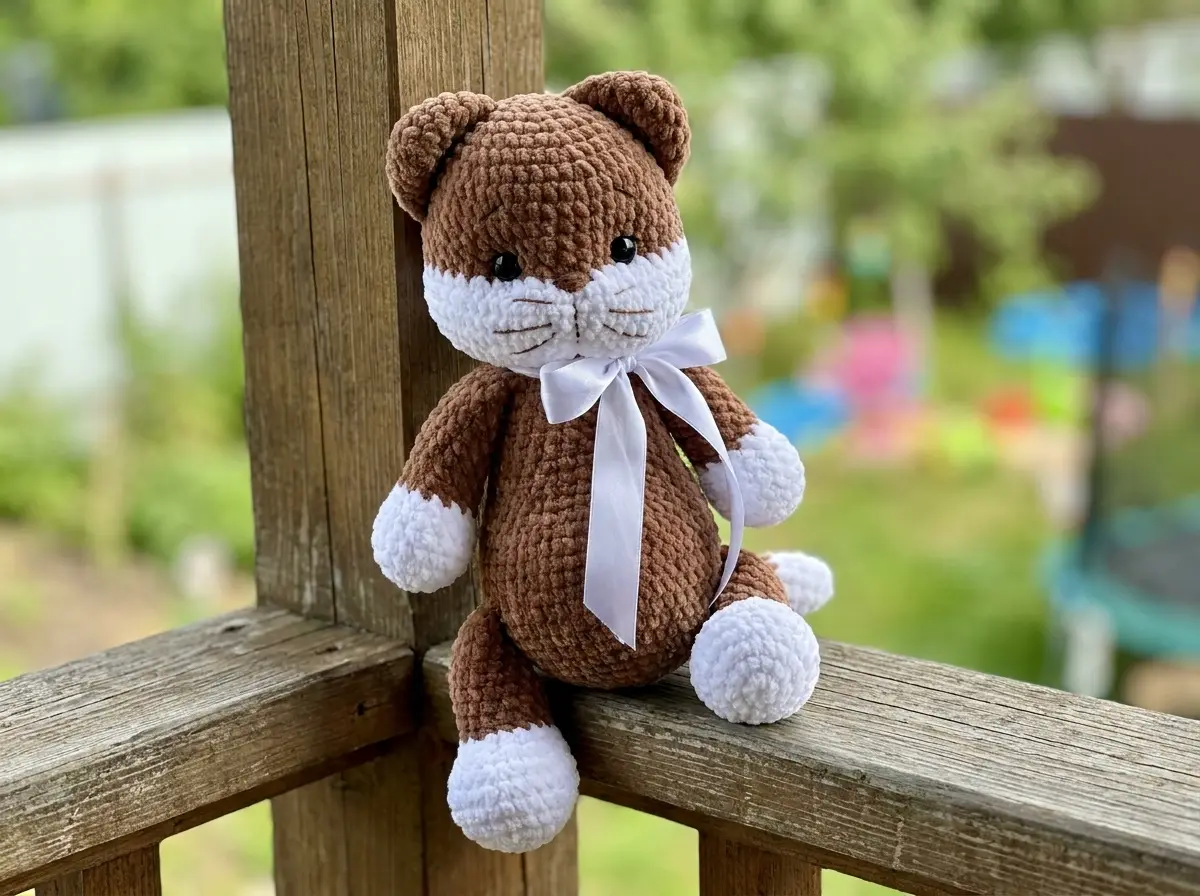
This crochet cat plush is everything I want in a chenille amigurumi: dense, squishy fabric, clean shaping, and a face that earns its embroidery work. I’ve tested every round of this pattern and the counts are solid throughout. Six separate pieces that come together into something genuinely satisfying to hold. If you’ve made a simple sphere amigurumi before and you’re ready for the next step, this is the right project.
📋 Pattern Quick Stats
- Difficulty: Intermediate
- Finished Size: Approx. 9–10 in (depending on tension and stuffing density)
- Hook Size: G/6 (4.0 mm)
- Yarn Weight: Bulky (5) — chenille/velvet for the body; DK/Light Worsted (3) for embroidery details
- Techniques: Magic ring, invisible decrease, color changes, joining limbs in-round, surface embroidery
- Estimated Time: 6–8 hours
Materials for Your Crochet Cat Plush
Yarn — Main Body (Bulky Weight, Chenille):
- Bulky (5) chenille yarn — brown (main body color) and white (muzzle, paws, tail tip)
- Recommended: Wolans Bunny Baby, Premier Parfait, or Bernat Baby Velvet
- Available at Joann, Michaels, Hobby Lobby, or Amazon US
Yarn — Embroidery Details (DK/Light Worsted, Smooth):
- DK/Light Worsted (3) smooth yarn — dark color for eyelash and eyebrow lines; off-white or cream for eye whites; light color for whiskers and nose
- Recommended: Drops Muskat or Paintbox Simply DK
- A small amount of each color is all you need — yarn scraps work perfectly here
For more guidance on choosing the right yarn for your amigurumi, our complete yarn guide walks through everything you need to know about fiber, weight, and how chenille behaves differently from cotton or acrylic.
This pattern uses Bulky (5) weight chenille as classified by the Craft Yarn Council yarn weight system.
Tools and Supplies:
- G/6 (4.0 mm) crochet hook
- 14 mm safety eyes × 2
- Polyfill stuffing (Poly-Fil by Fairfield, or equivalent)
- Tapestry needle
- Stitch markers
- Scissors
⚠️ Safety Note: If this cat plush is intended as a toy for a child under 3, replace the 14 mm safety eyes with embroidered eyes to eliminate any choking hazard. The U.S. Consumer Product Safety Commission (CPSC) has guidelines on toy safety that are worth reviewing before gifting handmade items to young children.
Abbreviations
| Abbreviation | Meaning |
|---|---|
| mr | magic ring |
| sc | single crochet |
| inc | increase — 2 sc worked into the same stitch |
| inv dec | invisible decrease — insert hook through front loops only of next 2 stitches simultaneously, yarn over, pull through, yarn over, pull through 2 loops |
| sl st | slip stitch |
| ch | chain |
| shift st | shift stitch — a slip stitch used to reposition the start of a round |
| FLO | front loops only |
| BLO | back loops only |
| FO | fasten off |
💡 A note on decreases: This pattern calls for decreases throughout. I always use the invisible decrease (inv dec) in amigurumi — it works through the front loops only and leaves no visible gap. The sc2tog method creates a noticeable hole, which is especially obvious in chenille fabric. If invisible decreases are new to you, check out our complete invisible decrease tutorial before starting.
Before You Begin: Key Techniques
Every part of this pattern starts with a magic ring. If you’re not fully comfortable with it yet, our step-by-step magic ring tutorial covers it thoroughly — including how to close it tightly so no hole remains at the center.
This pattern also requires color changes within several pieces (head, arms, legs, and tail). The color transition on chenille yarn is softer than on cotton or acrylic, but it’s still worth making your switch at the last yarn over of the final stitch in the previous round. Our color change tutorial walks through this exactly.
The assembly on this cat involves sewing six separate pieces onto the body. I pin everything in place before sewing a single stitch — it saves a lot of frogging later. Our guide on how to sew amigurumi parts together covers positioning, pinning, and the ladder stitch method I rely on for clean joins.
Work all parts in continuous rounds unless otherwise stated. Place a stitch marker at the beginning of each round and move it up as you go.
Crochet Cat Plush: The Full Pattern
Head (×1)
Yarn: Brown (main color) for Rows 1–14; switch to white before Row 15
Start: Magic ring
Row 1: 6 sc in mr (6)
Row 2: 6 inc (12)
Row 3: (1 sc, inc) × 6 (18)
Row 4: (2 sc, inc) × 6 (24)
Row 5: (3 sc, inc) × 6 (30)
Row 6: (4 sc, inc) × 6 (36)
Row 7: (5 sc, inc) × 6 (42)
Row 8: (6 sc, inc) × 6 (48)
Rows 9–14: 48 sc (6 rows) (48)
💡 Safety Eyes: Install the 14 mm safety eyes between Rows 13 and 14, spaced 7 stitches apart (measured edge to edge). Do this before Row 15 — once you’ve switched colors and continued shaping, reaching back in is a real problem. Check our safety eyes tutorial if you want guidance on positioning and locking them securely.
🎨 Color Change: Switch to white yarn before beginning Row 15. Make the switch on the last yarn over of Row 14.
Row 15: (7 sc, inc) × 6 (54)
Rows 16–19: 54 sc (4 rows) (54)
Row 20: (7 sc, inv dec) × 6 (48)
Row 21: 3 sc, inv dec, (6 sc, inv dec) × 5, 3 sc (42)
Row 22: (5 sc, inv dec) × 6 (36)
Row 23: 2 sc, inv dec, (4 sc, inv dec) × 5, 2 sc (30)
Row 24: (3 sc, inv dec) × 6 (24)
💡 Emma’s Tip: Start stuffing the head firmly after Row 20. Make sure you pack the cheek area well — the white muzzle section needs to hold its round, forward-facing shape. If you wait until the opening is too small, you won’t get even distribution. Our guide on how to stuff amigurumi properly has everything you need on this.
Row 25: (6 sc, inv dec) × 3, sl st (21)
Cut yarn, FO, and weave in ends.
Upper Arms (×2)
Yarn: White for Rows 1–8; switch to main color before Row 9
Start: Magic ring
Row 1: 6 sc in mr (6)
Row 2: 6 inc (12)
Row 3: (1 sc, inc) × 6 (18)
Row 4: (5 sc, inc) × 3 (21)
Rows 5–6: 21 sc (2 rows) (21)
Row 7: (5 sc, inv dec) × 3 (18)
Row 8: 6 sc, 3 inv dec, 6 sc (15)
🎨 Color Change: Switch to main color before Row 9.
Rows 9–16: 15 sc (8 rows) (15)
💡 Assembly Note: Stuff the arm firmly through Row 12, then leave the upper portion unstuffed. Fold the piece in half and sc through both walls for 7 sc to close the flat edge. When joining to the body, you’ll be working 8 sc into the body — the flattened arm end gives you the stability to attach cleanly. Cut yarn, FO. Repeat for the second arm.
Lower Legs (×2)
Yarn: White for Rows 1–11; switch to main color before Row 12
Start: Magic ring
Row 1: 6 sc in mr (6)
Row 2: 6 inc (12)
Row 3: (1 sc, inc) × 6 (18)
Row 4: (2 sc, inc) × 6 (24)
Row 5: (3 sc, inc) × 6 (30)
Rows 6–8: 30 sc (3 rows) (30)
Row 9: 9 sc, 6 inv dec, 9 sc (24)
Row 10: 9 sc, 3 inv dec, 9 sc (21)
Row 11: 8 sc, 2 inv dec, 9 sc (19)
🎨 Color Change: Switch to main color before Row 12.
Rows 12–19: 19 sc (8 rows) (19)
💡 Assembly Note: Stuff the leg firmly through Row 15, then leave the upper portion unstuffed. For the right leg only: work 1 shift st before folding — this repositions your working loop so both legs will sit symmetrically when joined to the body. Fold each leg in half and sc through both walls for 9 sc to close. Cut yarn, FO. Repeat for the second leg.
Body (×1)
Yarn: Main color throughout
Start: Magic ring
The legs are joined directly into the body during Row 12. Have both finished legs ready before you begin this section.
Row 1: 6 sc in mr (6)
Row 2: 6 inc (12)
Row 3: (1 sc, inc) × 6 (18)
Row 4: (2 sc, inc) × 6 (24)
Row 5: (3 sc, inc) × 6 (30)
Row 6: (4 sc, inc) × 6 (36)
Row 7: (5 sc, inc) × 6 (42)
Row 8: (6 sc, inc) × 6 (48)
Row 9: (7 sc, inc) × 6 (54)
Rows 10–11: 54 sc (2 rows) (54)
💡 Joining the Legs — Row 12: Work 9 sc along the body, then sc 9 stitches across the top of the left leg (the flat closed edge), work 18 sc along the body, then sc 9 stitches across the top of the right leg, then work the remaining 9 sc along the body. The total stitch count stays at 54 because you are substituting 9 stitches of leg for 9 stitches of body on each side. Take your time here and keep your tension even — this is one of those rows where rushing shows.
Row 12: 9 sc, 9 sc joining left leg, 18 sc, 9 sc joining right leg, 9 sc (54)
Rows 13–16: 54 sc (4 rows) (54)
Row 17: 19 sc, (1 sc, inv dec) × 6, 17 sc (48)
Row 18: 48 sc (48)
Row 19: 19 sc, (inv dec, 2 sc) × 3, inv dec, 15 sc (44)
Row 20: 44 sc (44)
Row 21: (20 sc, inv dec) × 2 (42)
Row 22: (5 sc, inv dec) × 6 (36)
💡 Stuff now. After Row 22, add your polyfill firmly through the opening. You want the body to feel solid but not stretched — stuffing that pushes out against the stitches will distort the chenille fabric and make the seams spread. Add more at the very end before closing.
Row 23: 36 sc (36)
Row 24: 2 sc, inv dec, (4 sc, inv dec) × 5, 2 sc (30)
Row 25: 30 sc (30)
Row 26: (3 sc, inv dec) × 6 (24)
💡 Joining the Arms — Row 27: Work 5 sc along the body, then sc 7 stitches across the top of the left arm (the flat closed edge), work 5 sc along the body, then sc 7 stitches across the top of the right arm. As with the legs, the arms substitute for body stitches — count stays at 24. Add any final stuffing before the opening gets too narrow.
Row 27: 5 sc, 7 sc joining left arm, 5 sc, 7 sc joining right arm (24)
Row 28: (6 sc, inv dec) × 3, sl st (21)
Cut yarn, FO, and weave ends into the inside of the body.
Ears (×2)
Yarn: Main color throughout
Start: Magic ring
Row 1: 6 sc in mr (6)
Row 2: 6 inc (12)
Row 3: (1 sc, inc) × 6 (18)
Row 4: (5 sc, inc) × 3 (21)
Row 5: 21 sc (21)
Fold the piece in half and sc through both walls for 10 sc to create the flat ear shape. Cut yarn, FO, leaving a long tail for sewing. Repeat for the second ear.
Tail (×1)
Yarn: White for Rows 1–5; switch to main color before Row 6
Start: Magic ring
Row 1: 8 sc in mr (8)
Rows 2–5: 8 sc (4 rows) (8)
🎨 Color Change: Switch to main color before Row 6. The white tip at the end of the tail is one of those small details that makes the whole piece feel considered — worth doing cleanly.
Rows 6–15: 8 sc (10 rows) (8)
Cut yarn, FO, leaving a long tail for sewing.
Assembly
- Pin first, sew second. Lay all pieces out and pin them to the body before committing to a single stitch. Small adjustments in placement make a significant difference in the final posture and expression of the cat.
- Attach the head to the top of the body. I center the muzzle (the white section) facing directly forward and make sure the head sits slightly tilted down — it gives the cat a more natural, relaxed look.
- Embroider the eye indentations: Using your tapestry needle and a length of main color yarn, pull the needle through the head at the bottom inner corner of each safety eye to draw the eye slightly inward. This creates the subtle indentation that makes the face look sculpted rather than flat.
- Embroider the muzzle indentations on the white section of the face using the same technique.
- Embroider the nose on the white muzzle between Rows 14–15 of the head, using the light-colored DK yarn (whisker/nose color). I like a small triangular shape, worked in satin stitch for a clean fill.
- Embroider the eye whites using the off-white DK yarn — a small half-moon shape just below and inside each safety eye reads as a highlight and adds a lot of life to the face.
- Embroider the eyelash lines and eyebrows using the dark DK yarn. Keep lines thin and confident — one deliberate stitch reads better than several tentative ones.
- Sew the ears in place at the level of Rows 3–11 on the head. Angle them slightly outward. I sew through the fold at the base of each ear for a clean, tight attachment.
- Embroider the whiskers using the light-colored DK yarn — 3 long straight stitches per side, radiating outward from the muzzle.
- Sew the tail to the back of the body between Rows 12–13. Let it curve naturally to one side.
💡 Emma’s Tip: The embroidery is what separates a good cat amigurumi from a great one. Don’t rush it. I use a very fine tapestry needle for the detail work and always knot and bury my ends deep inside the head so nothing shows on the surface.
Finishing Your Crochet Cat Plush
Once all parts are sewn and the embroidery is done, go over the whole piece and check every seam. Chenille fabric is forgiving — it hides a lot — but it also flattens slightly where stitches pull tight, so make sure none of your attachment points are puckering the fabric.
Weave in all remaining ends securely. On chenille yarn, I always leave a slightly longer tail than I would on cotton and knot it once before weaving — the fiber is slippery enough that a clean weave alone can work its way loose over time.
If you want to add a final touch, a few quick strokes with a soft pet slicker brush or a stiff-bristle baby brush over the chenille surface brings up the pile and makes the whole cat look freshly groomed.
If you love making plush-style amigurumi with chenille yarn, my plush amigurumi dog pattern uses very similar construction — the leg and arm joining method is almost identical, so if you made it through this one cleanly, that project will feel very familiar. And if you want a simpler, smaller cat in a different yarn weight and style, our cozy gray kitty pattern is a nice companion piece.
Emma’s Note
I’ve always had a soft spot for chenille amigurumi — there’s something about the way the pile catches light that makes the embroidered details pop in a way you just don’t get with cotton. This cat took me two evenings to make, including some time spent frogging Row 24 of the head because one decrease sat off-center and it was bothering me. Trust me, it was worth going back. Take your time on the face embroidery especially — that’s where this project lives or dies. Happy hooking. 🧶
What is the best yarn for this crochet cat plush?
Bulky (5) weight chenille or velvet yarn is recommended to achieve the soft, plush texture. Brands like Wolans Bunny Baby or Bernat Baby Velvet work best.
Is this pattern suitable for beginners?
This is an intermediate pattern because it involves joining limbs during the body rounds and detailed facial embroidery.
How do I make the eyes safe for a baby?
Replace the plastic safety eyes with embroidered eyes using black yarn to eliminate any choking hazards for children under 3.