Meet the Sweetest Axolotl Amigurumi of Your Life
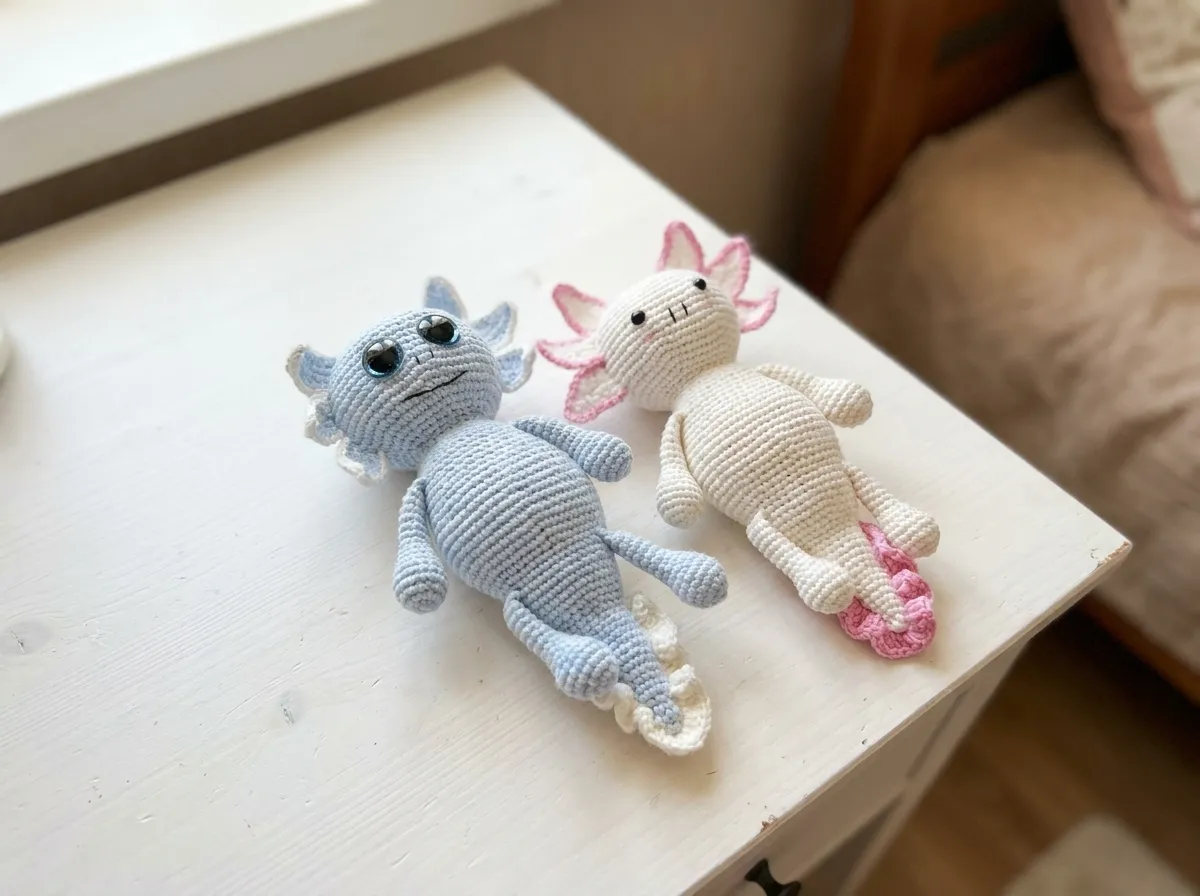
This axolotl amigurumi is soft, squishy, and honestly a little magical — cloud white all over with the most delicate blush pink fins fanning out around its face and the glossiest little eyes you can imagine. It finishes at around 7 inches of pure squeezable cuteness, with those iconic frilly head fins that make this creature completely unlike anything else in your amigurumi collection. Every single detail on this one is special. Come make it with me.
🩷 Pattern Highlights
- Cuteness Rating: 🩷🩷🩷🩷🩷
- Finished Size: ~7–7.5 in (18–19 cm)
- Difficulty: Intermediate
- Hook Size: 2.0mm (Steel 4) for body & legs; 1.5mm for fins
- Yarn Palette: cloud white (main), soft blush pink or powder blue (accent)
- Key Detail: six crocheted frilly head fins, 12mm glossy safety eyes, and embroidered pink cheeks
- Estimated Time: 8–12 hours
What You’ll Need for This Axolotl Amigurumi
- Main yarn — cloud white: Gazzal Jeans II01 in white (58% Cotton, 42% Acrylic — 50g/170m). A smooth, slightly structured cotton-acrylic blend that shows off every stitch beautifully. US alternatives: Drops Safran or Paintbox Simply DK in Paper White. This yarn is classified as DK / Light Worsted (weight 3) — lightweight enough for fine detail work and perfect for the crisp stitch definition this little face deserves.
- Accent yarn — soft blush pink: Yarnart Jeans #20 in pink (55% Cotton, 45% Polyacrylic — 50g/160m). US alternatives: Drops Muskat or Paintbox Simply DK in Blush Pink. You won’t need a full skein — the fins use small amounts — but this color is the detail that makes the whole piece sing.
- Optional variation: Yarnart Jeans #75 in light blue can replace the pink accent for a softer, more aquatic palette. Both are lovely — it comes down to whether you’re in a rosy mood or a dreamy-ocean mood.
- Hooks: 2.0mm (Steel 4) for the legs and body; 1.5mm (no standard US letter equivalent) for the small fins. A 1.75mm works too if that’s what you have. These intentionally fine hooks create the tight, stuffing-proof fabric amigurumi needs.
- Safety eyes: 12mm glossy black safety eyes (×2). The larger size gives this axolotl that wide, sweet, kawaii expression — trust me on the 12mm.
- Polyfill stuffing: Poly-Fil polyester fiberfill or similar, available at Joann, Michaels, or Hobby Lobby. You’ll add stuffing gradually as you work the body.
- Tapestry needle: Blunt-tipped, for sewing all parts together and weaving in ends.
- Stitch marker: One clip-style marker for tracking your round beginnings. With 71 rounds on the main body, this is non-negotiable.
- Black embroidery thread: A small amount of thin black thread for the nose and mouth embroidery.
- Pink embroidery floss: A single strand for embroidered cheeks. The finishing touch that completes the face.
Abbreviations Used in This Pattern
| Abbreviation | Meaning |
|---|---|
| mr | Magic ring |
| ch | Chain |
| sl st | Slip stitch |
| sc | Single crochet |
| dc | Double crochet |
| inc | Increase (2 sc worked into the same stitch) |
| dec | Decrease (always worked as invisible decrease — see tip below) |
| FO | Fasten off |
🩷 Chloe’s Detail Tip: Every time you see “dec” in this pattern, work it as an invisible decrease: insert your hook through the front loops only of the next two stitches simultaneously, yarn over and pull through, then yarn over and pull through both remaining loops. It closes up those decrease points almost invisibly, and on a piece as detailed as this axolotl, it makes a genuinely beautiful difference.
Before You Begin — A Few Details That Make All the Difference
This entire pattern is worked in continuous rounds — no joining, no slip stitches between rounds. Move your stitch marker up every single round without fail. With 71 rounds on the main body piece, that little marker is what stands between you and a very confusing counting situation.
The four legs are made first and set aside. They get joined directly into the body at Rows 25 and 43 by crocheting through both the body stitches and the flattened leg edge simultaneously. It sounds more complex than it is — take it slowly on those four joining stitches, and the legs will look like they simply grew right out of the body. So satisfying when it clicks.
Safety eyes go in between Rows 55 and 56, before the head closes. Getting them positioned perfectly is everything on a piece like this — if you’re newer to working with safety eyes, our safety eyes tutorial walks you through exactly how to place and press the washers so both eyes lock in symmetrically every time.
Switch to your 1.5mm hook (or 1.75mm) for all the fins. That finer gauge creates a delicate, slightly lacy texture on the fins that contrasts beautifully against the firmer body stitches. The difference in texture is part of what makes this axolotl amigurumi look so dimensional.
🩷 Chloe’s Detail Tip: Before pressing your safety eye washers in permanently, stuff the head section lightly and hold the finished piece at arm’s length. Look at the face from directly in front under a bright lamp. Try the eyes at different positions — a little wider apart for a more surprised expression, slightly lower for something sleepier and sweeter. Take an extra minute here. Once those washers click, that’s forever.
If this is your first time working a piece this involved, our complete beginner’s guide to amigurumi covers everything from working your first magic ring to reading stitch counts row by row — a wonderful place to spend a little time before diving in.
Free Axolotl Amigurumi Pattern
Legs (×4)
Yarn color: cloud white (main color) | Starting method: magic ring
Make all four legs for your axolotl amigurumi first and set them aside— they need to be ready before you reach Row 25 on the body. Stuff only the very tip of each leg lightly, just enough to give that rounded end its soft shape. Then flatten the opening and close it with 4 sc worked through both layers.
Row 1: 6 sc in mr (6)
Row 2: 6 inc (12)
Row 3: (1 sc, inc) × 6 (18)
Rows 4–6: 3 rows of 18 sc (18)
Row 7: (1 sc, dec) × 6 (12)
Row 8: 12 sc (12)
Row 9: (2 sc, dec) × 3 (9)
Rows 10–16: 7 rows of 9 sc (9)
Stuff the tip lightly, flatten the opening, and work 4 sc through both edges to close. FO, cut yarn, and weave the end inside the piece. Set aside and repeat three more times.
Tail, Body & Head (×1)
Yarn color: cloud white (main color) | Starting method: magic ring
This is the heart of your axolotl amigurumi project — one long, continuous piece that begins at the tiny tip of the tail and travels all the way through the body and into the head. Stuff as you go, adding a little at a time so the shape stays even. Have all four legs ready before Row 25. Around Rows 32–36, when the body is at its fullest and roundest — that’s the moment this little creature starts to look like itself. It’s the part where the magic happens.
Row 1: 6 sc in mr (6)
Rows 2–3: 2 rows of 6 sc (6)
Row 4: (1 sc, inc) × 3 (9)
Rows 5–6: 2 rows of 9 sc (9)
Row 7: (2 sc, inc) × 3 (12)
Rows 8–9: 2 rows of 12 sc (12)
Row 10: (3 sc, inc) × 3 (15)
Rows 11–12: 2 rows of 15 sc (15)
Row 13: (4 sc, inc) × 3 (18)
Rows 14–16: 3 rows of 18 sc (18)
Row 17: (2 sc, inc) × 6 (24)
Row 18: 24 sc (24)
Row 19: (3 sc, inc) × 6 (30)
Row 20: 30 sc (30)
Row 21: (4 sc, inc) × 6 (36)
Rows 22–24: 3 rows of 36 sc (36)
🩷 Chloe’s Detail Tip: Before Row 25, have your two front legs flattened and closed. On the four joining stitches, work slowly — insert your hook through both the body stitch and the corresponding edge stitch of the leg at the same time, then sc as normal. Keep the leg snug and aligned with the body as you go. The result looks completely seamless.
Row 25: 5 sc, 4 sc together with leg, 18 sc, 4 sc together with leg, 5 sc (36)
Row 26: 36 sc (36)
Row 27: (5 sc, inc) × 6 (42)
Row 28: 42 sc (42)
Row 29: (6 sc, inc) × 6 (48)
Row 30: 48 sc (48)
Row 31: (7 sc, inc) × 6 (54)
Rows 32–36: 5 rows of 54 sc (54)
The body is at its widest and roundest here — keep stuffing as you go to maintain that beautiful plump shape.
Row 37: (7 sc, dec) × 6 (48)
Row 38: 48 sc (48)
Row 39: (6 sc, dec) × 6 (42)
Row 40: 42 sc (42)
Row 41: (5 sc, dec) × 6 (36)
Row 42: 36 sc (36)
🩷 Chloe’s Detail Tip: Before Row 43, have both back legs ready. Check that your stuffing is even across the body so the back legs sit at the same height and angle as the front ones — symmetry in the leg placement gives the finished axolotl that perfectly balanced, almost-alive look.
Row 43: 7 sc, 4 sc together with leg, 18 sc, 4 sc together with leg, 3 sc (36)
Row 44: 36 sc (36)
Row 45: (4 sc, dec) × 6 (30)
Row 46: 30 sc (30)
Row 47: (3 sc, dec) × 6 (24)
Row 48: 24 sc (24)
The piece narrows here into the neck — and then it opens back up beautifully into that wide, round axolotl head.
Row 49: (3 sc, inc) × 6 (30)
Row 50: (4 sc, inc) × 6 (36)
Row 51: (5 sc, inc) × 6 (42)
Row 52: (6 sc, inc) × 6 (48)
Row 53: (7 sc, inc) × 6 (54)
Row 54: (8 sc, inc) × 6 (60)
Rows 55–62: 8 rows of 60 sc (60)
🩷 Chloe’s Detail Tip: Insert your safety eyes between Rows 55 and 56 — this is the moment. Stuff the head section gently so it holds its shape, then spend a little extra time positioning the eyes exactly where you want them. Check from directly in front, and from slightly above. When the placement feels right, press the washers in slowly and firmly until they click. That sound is so satisfying. Then continue with Row 56.
Row 63: (8 sc, dec) × 6 (54)
Row 64: (7 sc, dec) × 6 (48)
Row 65: (6 sc, dec) × 6 (42)
Row 66: (5 sc, dec) × 6 (36)
Row 67: (4 sc, dec) × 6 (30)
Row 68: (3 sc, dec) × 6 (24)
Row 69: (2 sc, dec) × 6 (18)
If you’d like to add an eye indent or pull stitch for extra dimension and expression, Row 69 is the time — the opening is still large enough to work through.
Row 70: (1 sc, dec) × 6 (12)
Row 71: 6 dec (6)
Make sure the head and body are fully and evenly stuffed before this final row. Use a tapestry needle to close the remaining 6 stitches, FO, and weave the end inside the piece.
Tail Fin (×1)
Yarn color: soft blush pink (accent color) | Starting method: chain of 32
This is the piece that gives your axolotl amigurumi‘s tail all its flutter and personality. The double crochets create a naturally ruffled, wavy edge that shapes itself — no extra manipulation needed. Watch it curl up as you work across the row and try not to squeal.
Foundation: ch 32
Row 1: Starting from the 3rd ch from hook: 2 dc in each ch across (60)
Leave a long tail of yarn for sewing. FO.
Back Fin (×1)
Yarn color: soft blush pink (accent color) | Starting method: chain of 29
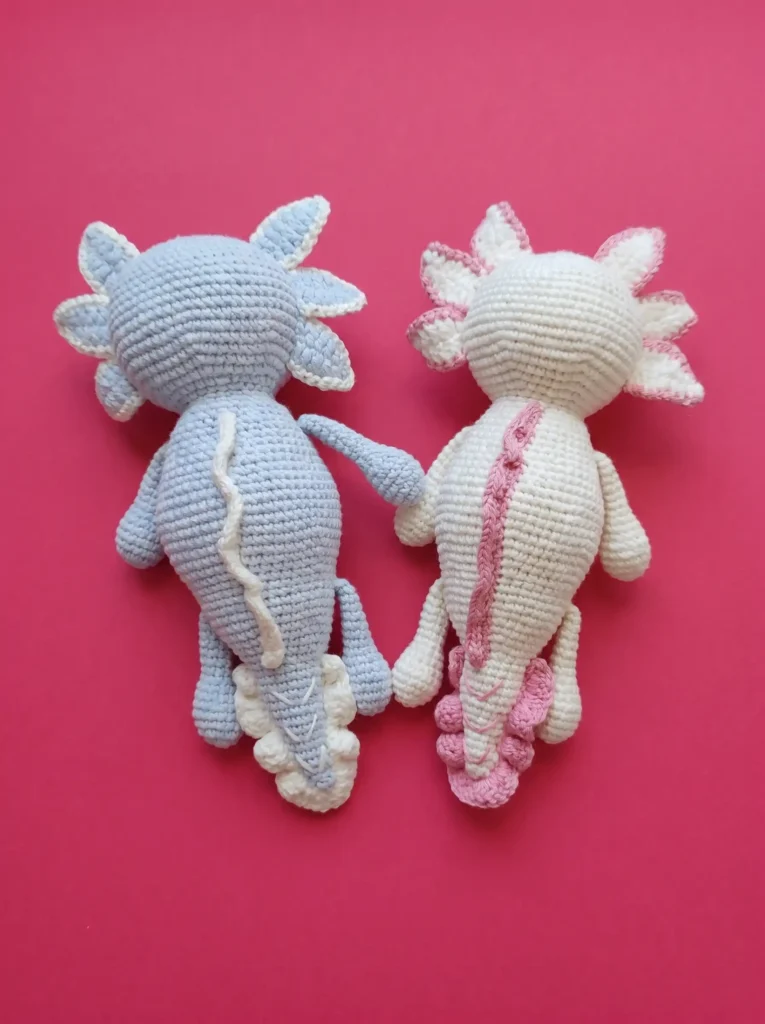
The back fin runs the full length of the spine and gives this little axolotl that gorgeous animated silhouette. The increase pattern creates a soft, gentle wave along the edge that drapes beautifully once it’s sewn down.
Foundation: ch 29
Row 1: Starting from the 2nd ch from hook: (1 sc, inc) × to end of row (42)
Leave a long tail of yarn for sewing. FO.
Head Fins (×6)
Yarn color: cloud white (main color) + soft blush pink (accent color) | Starting method: chain of 10
These are the stars of the entire piece — the six feathery frills that fan out from the sides of the head and give this little axolotl amigurumi its whole personality. Switch to your 1.5mm hook here. The finer gauge creates a delicate, almost lacy texture that contrasts so beautifully against the firmer body stitches. Make all six and try not to get distracted staring at how tiny and precious they are.
Foundation: ch 10
Row 1: 4 dc, 4 sc; along other side: 4 sc, 4 dc (16)
Row 2 (edging): (1 ch, 1 sl st in each st) —
Leave a long tail of the main color yarn for sewing. FO. Repeat for all six fins.
Assembling Your Axolotl Amigurumi
Before you begin, lay all the finished pieces out together — the plump white body, the ruffled pink fins, all six tiny frilly head fins. Take a moment. You made all of that. Now let’s put your axolotl amigurumi together.
- Tail fin: Starting at approximately Rows 17–18 at the tail end of the body, pin the tail fin in place so it wraps evenly around the tip. Sew it down using the long yarn tail and a tapestry needle, working in small even stitches. Check from above and from the side as you go to keep it centered.
- Scale embroidery: Using the same pink yarn (leftover from the tail fin), embroider small V-shaped chevrons along the tail section to suggest scales. A few neat rows of these little details adds so much character — this is the part that makes people look twice.
- Back fin: Pin the back fin along the spine from roughly mid-body toward the head. Stand the piece upright and check from above that it runs true down the center, then sew it down with the long yarn tail.
- Head fins: Position three fins on each side of the head, fanning outward from just behind the eye line. Pin all six in place and step back to check the symmetry before committing to any stitches. Our sewing amigurumi parts together guide shows exactly how to attach pieces so the joins are completely invisible from the outside.
- Face embroidery: Thread a fine needle with thin black embroidery thread and embroider a small nose (two or three tiny stitches) and a gentle curved smile just below center. Keep it minimal — this face is expressive enough with just a hint of a smile and those big glossy eyes.
Making It Extra Cute — The Details That Make Your Axolotl Amigurumi Irresistible
This is the section I look forward to most on every single project. Your axolotl amigurumi might look finished right now — but these last details are what take it from sweet to completely, utterly irresistible.
The cheeks. Thread a single strand of soft pink embroidery floss and bring it up through the inside of the head, surfacing just below and to the outside of each eye. Work a few small satin stitches in a soft rounded shape — roughly the size of a small coin. Pull gently so they lie flat and soft against the surface rather than puckering inward. The pink cheeks are the single detail that makes every amigurumi face feel alive. Okay but those cheeks though.
The eyes. Step back and look at your axolotl’s finished face. Those 12mm glossy safety eyes should be catching light and giving this little creature the most perfect wide-eyed expression. If anything feels slightly off in the eye placement now that the head is fully closed and stuffed, try gently reshaping the head with your hands — a soft squeeze and re-round does more than you’d think.
Head fin positioning. Before you finalize the fin placement, pin all six and hold the piece up to check them together. They should fan out like a little soft crown — three on each side, at gently varying angles, radiating outward from behind the eyes. Wider outer fins, slightly more upright inner fins, tends to look the most natural. Check in natural light. When the arrangement looks exactly right, sew them down.
Color variations. The white-and-blush-pink combination is the most classic axolotl look and always stunning. But swapping in the light blue accent yarn completely transforms the mood — it becomes something dreamier and more ethereal, like an axolotl from an underwater fairy tale. A warm peachy tone for the accent would make a beautiful golden variation. Make a set of three in different accent colors and line them up on a shelf — I promise you won’t be able to stop smiling at them.
🩷 Chloe’s Detail Tip: Once the cheeks are done, hold your finished axolotl under a lamp and look at the whole face together — the glossy eyes, the tiny embroidered smile, those rosy cheeks. There’s a moment when it suddenly stops looking like yarn and starts looking like a real little creature. You’ll know exactly when that moment arrives. It’s the best part of the whole project.
Chloe’s Final Look
I have been staring at my finished axolotl amigurumi for an embarrassing amount of time and I regret every second of exactly nothing. That cloud white body, those blush pink fins fanned out like a tiny crown, the glossy eyes catching the light just so — it’s soft and squishy and completely wonderful. Try making a little set in different accent colors and arrange them together somewhere they can be seen, because this is genuinely one of those pieces that makes people stop and pick it up the second they notice it. You made something really special here. 🩷
What yarn is best for this axolotl amigurumi pattern?
A smooth DK-weight cotton-acrylic blend gives the best stitch definition. The original pattern uses Gazzal Jeans II01 for the cloud white body and Yarnart Jeans #20 for the blush pink fins; US alternatives include Drops Safran or Paintbox Simply DK in matching colorways.
How long does it take to crochet this axolotl amigurumi?
Plan for approximately 8–12 hours total. The main body piece (71 rounds) takes the most time; the fins and finishing details work up relatively quickly.
Is this axolotl amigurumi pattern suitable for beginners?
The pattern is rated Intermediate. Crocheters comfortable with magic rings, continuous rounds, and invisible decreases can absolutely attempt it — reviewing the site’s complete beginner amigurumi guide first is strongly recommended.