Free Halloween Bat Crochet Pattern — Meet Your New Favorite Spooky Plush
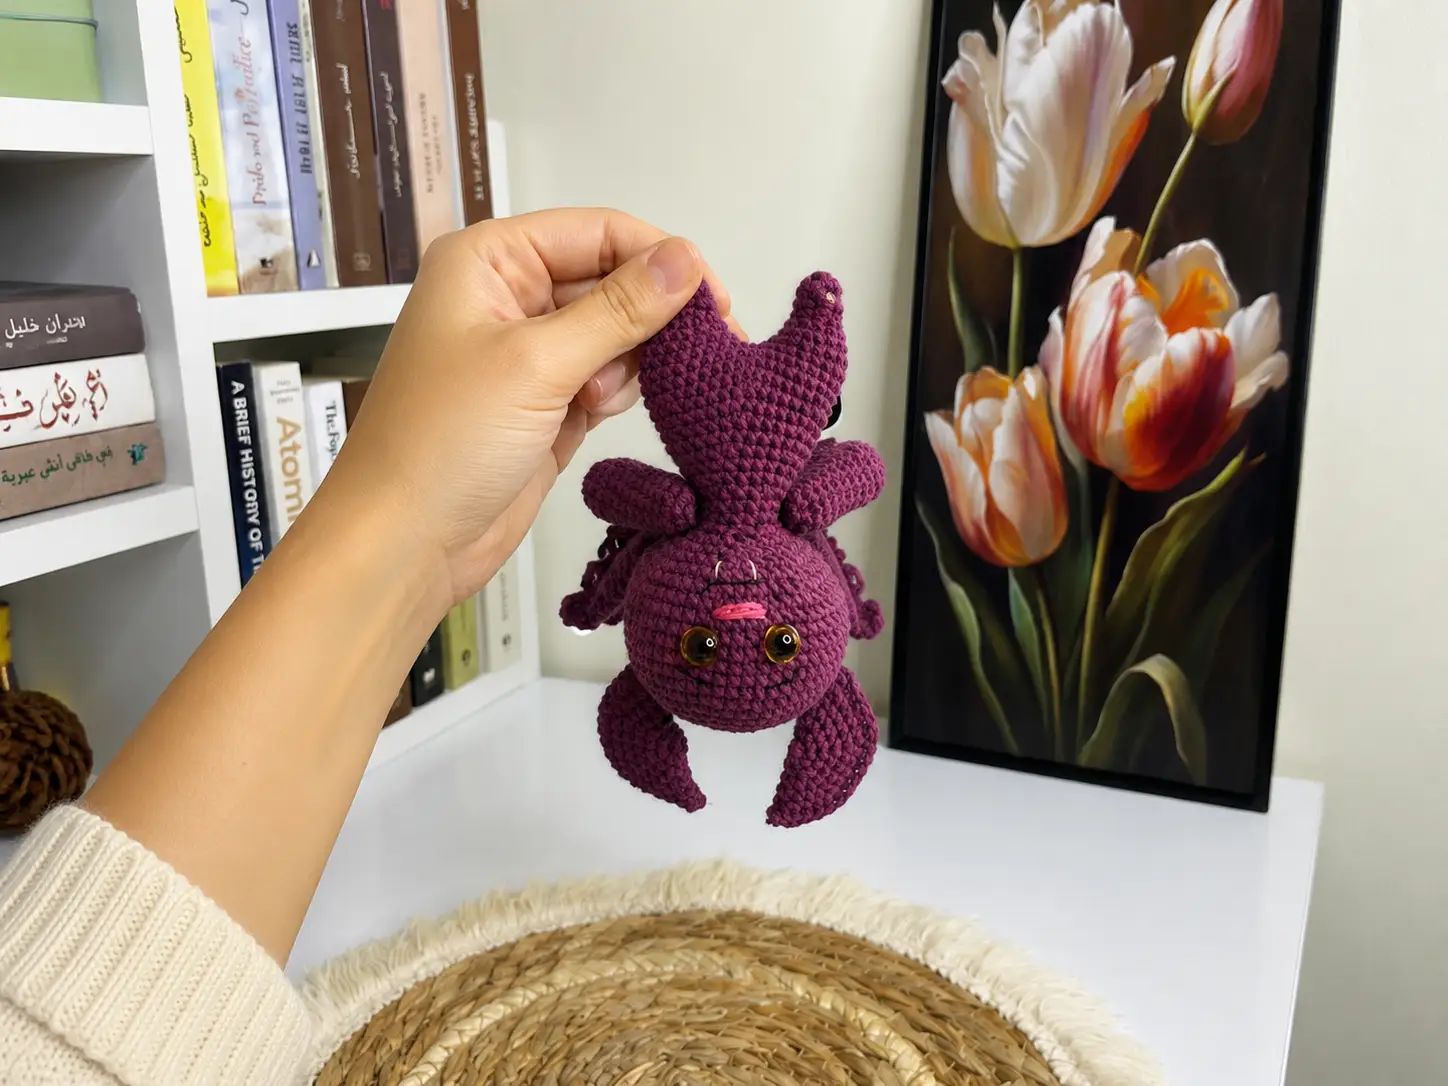
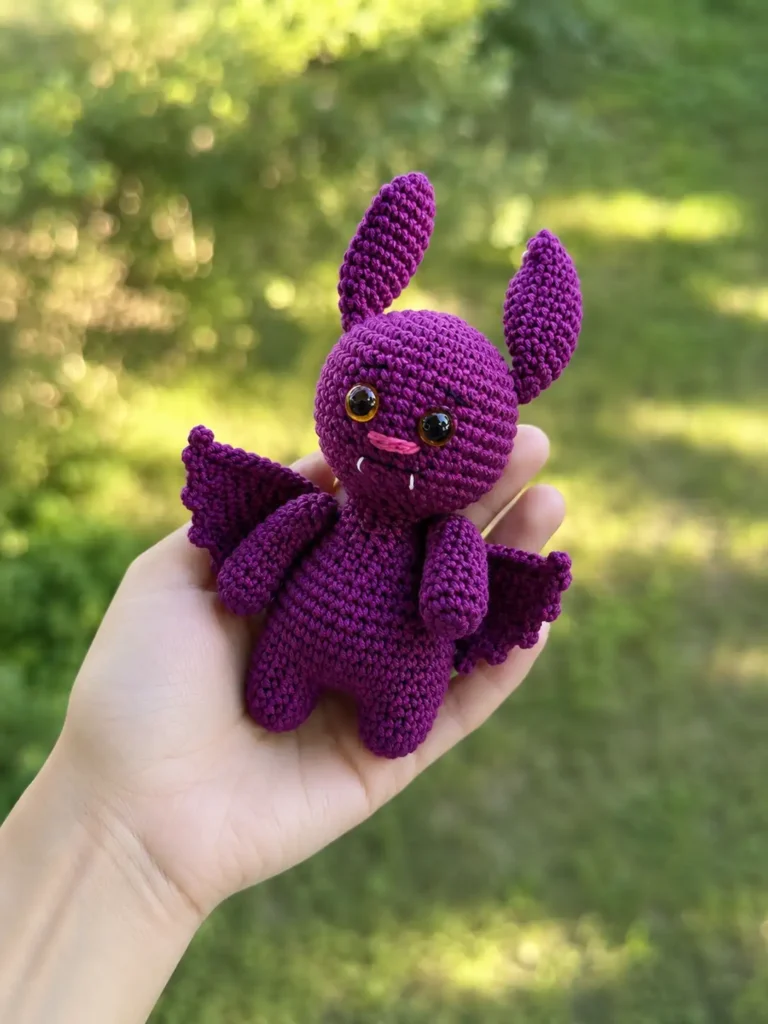
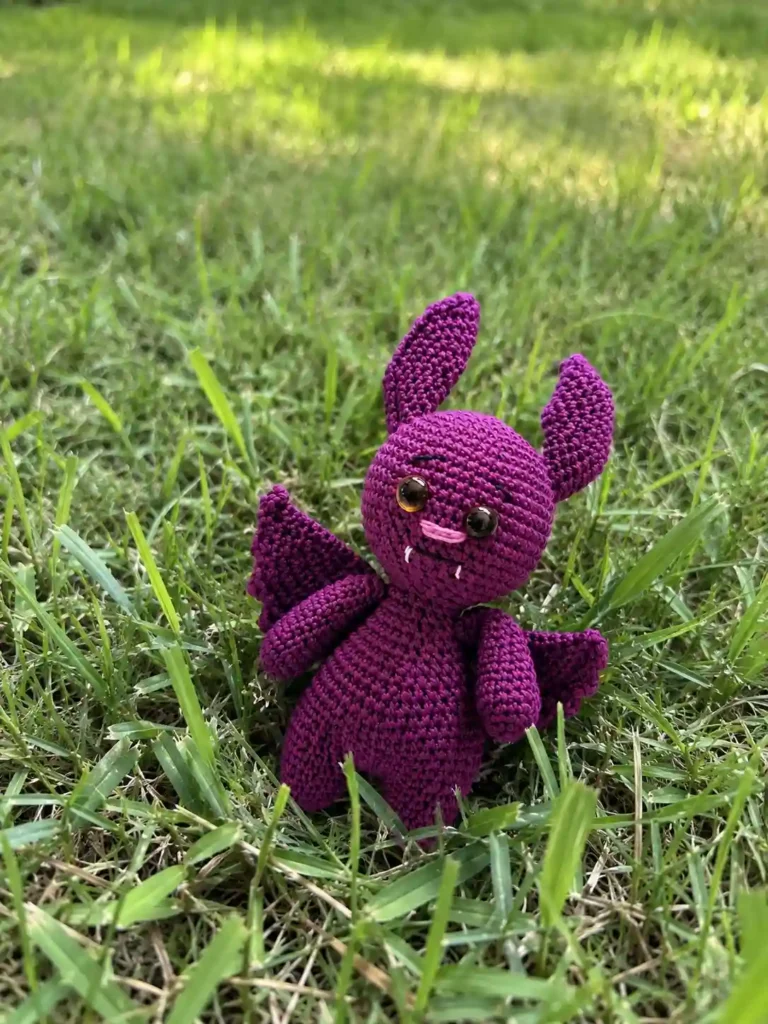
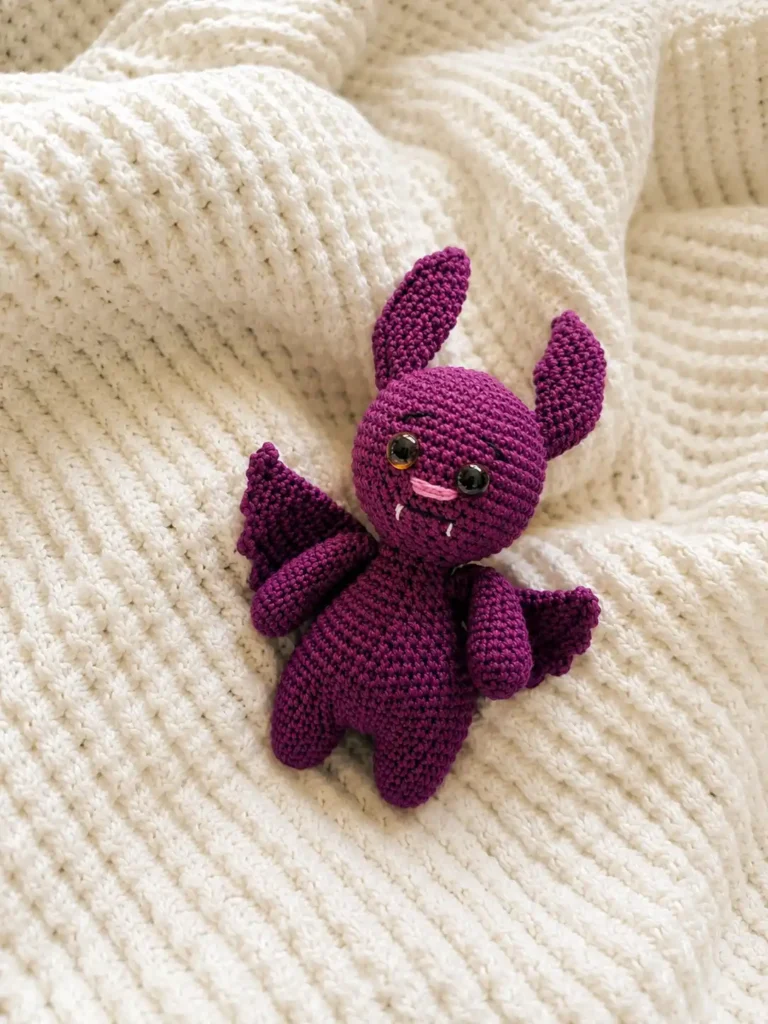
This halloween bat crochet pattern is the little vampire friend your October shelf has been missing — tiny fangs, scalloped wings, and a face that’s more sweet than scary. Fair warning: this one takes patience and some real sewing. But the finished bat? Absolutely worth it. Let’s make him.
🧶 Why You’ll Love This Pattern
- ⭐ Difficulty: INTERMEDIATE — honest rating, see my note below
- ⏱️ Time: Roughly 6–9 hours (my estimate — this is a multi-evening project, not a one-movie one)
- 🪡 Sewing: Standard — head, 2 ears, 2 wings, and 2 arms all get sewn on
- 🧵 Yarn: DK / Light Worsted cotton-acrylic blend on a tiny hook
- 💰 Yarn needed: About 1 skein of your main color, plus scraps of pink
- 📏 Finished size: Not listed in the original pattern — I’m not going to make a number up
Okay, real talk before we go any further. You know me. I’m the chunky-chenille, big-hook, “please don’t make me sew four limbs on” person. This pattern is not that. It uses a 2.0 mm hook, DK yarn, and every single piece gets sewn on at the end.
So why am I writing it up? Because it’s gorgeous, and because I think a lot of you are ready for it even if you don’t feel ready yet. The stitches themselves are all beginner stitches — sc, inc, dec, a few dc for the wing scallops. There’s nothing here you haven’t already done. It’s just longer, smaller, and fiddlier than my usual stuff. If you’ve finished two or three amigurumi and you’re itching for something with more personality, this is a great step up.
And if you’re brand new? Bookmark this one. Make a chunky no-sew plush first, then come back. I’ll wait. 🦇
What You’ll Need for This Halloween Bat Crochet Pattern
Yarn
- Main color (the bat’s body): YarnArt Jeans in color 50 — about 1 skein. This is a cotton-acrylic blend that gives you crisp stitch definition without feeling stiff.
- US-friendly swaps: Drops Muskat or Paintbox Cotton DK both work beautifully here. Any smooth DK / Light Worsted (3) weight cotton or cotton blend will do the job.
- Pink scraps: A few yards for the embroidered nose. Genuinely just scraps — dig through your bin.
Honestly? Don’t stress about matching the exact yarn. Purple, charcoal, black, deep plum — all of them make a great bat. Pick what’s already in your stash and go.
Hook
- 2.0 mm hook. Heads up: 2.0 mm doesn’t have an exact US letter equivalent. The closest standard US size is B/1 at 2.25 mm, so if that’s what you own, use it — your bat will just come out a touch bigger. You can double-check the conversions on the Craft Yarn Council hook chart.
Yes, that’s a small hook for DK yarn. That’s on purpose — tight fabric means no stuffing peeking through the stitches. Your hands will feel it after a while, so take breaks. I’m serious. Set the bat down, shake out your hands, come back.
Eyes and Face
- 12 mm sew-on eyes with loop backs — or 12 mm safety eyes if you’d rather attach them before closing the head. Either works.
- White sewing thread (use several strands together) or white iris thread — this becomes the fangs.
- Black iris thread for the mouth and eyebrows.
Everything Else
- Polyester fiberfill stuffing
- Tapestry needle (the blunt one with the big eye)
- Stitch marker — non-negotiable, you’re working in continuous rounds
- Scissors
All of this is easy to find at Joann, Michaels, Hobby Lobby, or Amazon. Nothing exotic on this list.
Abbreviations Used in This Pattern
| Abbreviation | What It Means |
|---|---|
| mr | magic ring — the adjustable loop you start rounds with |
| sc | single crochet — the workhorse stitch of amigurumi |
| inc | increase — work 2 single crochets into the same stitch |
| dec | decrease — use the invisible decrease here (through front loops only) so you don’t get a visible gap |
| ch | chain |
| dc | double crochet — taller stitch, used only for the wing scallops |
| BLO | back loop only — creates a fold line or ridge |
| sl st | slip stitch |
| FO | fasten off |
Beginner Tips Before You Start This Halloween Bat Crochet Pattern
Use the invisible decrease. Every time. This bat has a lot of decreasing, especially on the head, and a standard sc2tog will leave little gaps all over your bat’s face. Not cute. Our invisible decrease guide shows you exactly how — it’s one small change to how you insert your hook, and it makes a huge difference.
Move your stitch marker every single round. Everything here is worked in continuous rounds, no joining. The head alone is 21 rounds. Lose your place at round 14 and you’ll be counting stitches for twenty minutes trying to figure out where you are. Ask me how I know.
Stuff firmly, but slowly. Small pieces on a small hook show every lump. Add stuffing in little pinches and shape as you go — our stuffing tutorial covers the technique. The head should feel firm, the legs stay light, and the arms only get stuffed at the bottom half.
Never done a magic ring? Four of the five pieces start with one, so it’s worth two minutes. Our magic ring tutorial walks you through it. It sounds fancy. It’s really just a loop you pull tight.
The Halloween Bat Crochet Pattern — Part by Part
Five pieces total: head, legs-and-body (worked as one continuous piece — nice), two ears, two wings, two arms. I’d tackle it over two or three sittings rather than trying to power through in one.
Part 1: Head (make 1)
Main color. Start with a magic ring.
Row 1: 6 sc in mr (6)
Row 2: 6 inc (12)
Row 3: (1 sc, inc) × 6 (18)
Row 4: (2 sc, inc) × 6 (24)
Row 5: (3 sc, inc) × 6 (30)
Row 6: (4 sc, inc) × 6 (36)
Row 7: (5 sc, inc) × 6 (42)
Row 8: (6 sc, inc) × 6 (48)
Rows 9–16: 48 sc (8 rows) (48)
Eight plain rounds in a row. This is the part where you put a show on. No counting, no thinking, just loops.
Row 17: (6 sc, dec) × 6 (42)
Row 18: (5 sc, dec) × 6 (36)
Row 19: (4 sc, dec) × 6 (30)
Row 20: (3 sc, dec) × 6 (24)
Row 21: (2 sc, dec) × 6 (18)
Finishing: FO and leave a long tail for sewing — longer than you think you need. Stuff the head firmly with fiberfill.
Planning ahead: if you’re using safety eyes instead of sew-on eyes, you need to install them before you finish Row 21. Once that opening closes you can’t reach inside anymore. Skip down to the face section for exact placement, then come back. Our safety eyes tutorial covers the washer part if you haven’t done it before.
🎉 One piece down! That’s the biggest single piece of the whole bat, and you just made a perfect little dome. Everything from here is smaller. You’ve got this.
Part 2: Legs + Body (make 2 legs, joined into 1 body)
Main color. This one’s clever — you make two legs, then join them and keep going straight up into the body. Read the whole section once before you start.
Starting method: Ch 3, turn, and begin in the 2nd chain from the hook.
Row 1: In 2nd ch from hook work 3 sc in 1 st, 1 sc, 3 sc in last st. Continue on the opposite side of the chain: 1 sc (8)
Row 2: (3 inc, 1 sc) × 2 (14)
Row 3: 14 sc (14)
Row 4: 14 sc in BLO (14)
Row 5: 14 sc (14)
Row 6: 3 dec, 6 sc (leave the remaining 2 sts unworked to shift the round marker) (9)
Row 7: 3 dec, 5 sc (8)
Row 8: 8 sc (8)
Row 9: (1 sc, inc) × 4 (12)
Row 10: (3 sc, inc) × 3 (15)
Row 11: (4 sc, inc) × 3 (18)
Row 6 is the trickiest line in the entire pattern, so let’s slow down. You work 3 decreases, then 6 single crochets, and then you just… stop. Two stitches stay unworked. That’s not a mistake — it deliberately shifts where your round begins so the shaping lands on the right side of the foot. Move your stitch marker to where you actually stopped, and keep going.
Row 4 in BLO creates the little ridge that defines the top of the foot. Don’t skip it.
Joining the Legs
First leg: FO and cut the yarn after Row 11.
Second leg: Do not cut the yarn after Row 11. Ch 3. Fold the first leg in half at the top. Join to the first leg and work 18 sc along the first leg, 3 sc along the ch 3, 18 sc along the second leg, and 3 sc along the opposite side of the ch 3. (42)
This is the moment it stops being two weird little tubes and starts being an actual body. Take your time lining things up — make sure both legs are facing the same direction before you commit. Honestly, this part feels like magic once it clicks.
Continuing Up the Body
Rows 12–15: 42 sc (4 rows) (42)
Row 16: (5 sc, dec) × 6 (36)
Row 17: 36 sc (36)
Row 18: (4 sc, dec) × 6 (30)
Row 19: 30 sc (30)
Row 20: (3 sc, dec) × 6 (24)
Rows 21–22: 24 sc (2 rows) (24)
Row 23: (2 sc, dec) × 6 (18)
Rows 24–25: 18 sc (2 rows) (18)
Finishing: FO and weave in your ends. Stuff the legs lightly and the body firmly.
Start stuffing the legs before you get too far up the body — reaching down into finished legs through a narrow neck opening is no fun at all. Learn from my mistakes.
🎉 You’re over the hardest part! Head done, body done, legs done. Everything left is small and fast — ears, wings, arms. The finish line is right there.
Part 3: Ears (make 2)
Main color. Start with a magic ring.
Row 1: 6 sc in mr (6)
Row 2: 6 inc (12)
Row 3: (1 sc, inc) × 6 (18)
Row 4: (2 sc, inc) × 6 (24)
Row 5: (3 sc, inc) × 6 (30)
Row 6: (4 sc, inc) × 6 (36)
Folding: Fold the ear in half flat and work 18 sc through both opposing layers to close the opening. (18)
Finishing: FO and leave a long tail for sewing. Do not stuff.
See what just happened? A flat circle turned into a pointy bat ear with one row of stitching. That’s it. Make the second one — it’ll take you half the time.
Part 4: Wings (make 2)
Main color. Start with a magic ring. This is the showpiece.
Row 1: 6 sc in mr (6)
Row 2: 6 inc (12)
Row 3: (1 sc, inc) × 6 (18)
Row 4: (2 sc, inc) × 6 (24)
Row 5: (3 sc, inc) × 6 (30)
Row 6: (4 sc, inc) × 6 (36)
Row 7: (5 sc, inc) × 6 (42)
Folding: Fold the circle in half flat and work 21 sc through both opposing layers to close it into a semicircle. Do not turn. (21)
Edging: Work along the curved edge. (Ch 3, 2 dc in same st, skip 2 sc, 1 sc in next st) — repeat 6 times, which uses up 18 stitches. For the 7th shell: Ch 3, 2 dc in same st, skip 1 sc, 1 sc in the last (21st) stitch. (7 shells)
Finishing: FO and leave a long tail on the flat folded edge for sewing to the body. Do not stuff.
Here’s the thing about the edging — it looks complicated written down, but it’s the same little move seven times. Chain 3, two double crochets in that same stitch, skip ahead, anchor with a single crochet. That’s one scallop. The last one is slightly different because you only skip 1 stitch instead of 2, which makes the count come out even at the end.
And when you lay that finished wing flat with all seven scallops? Okay, that is satisfying.
Part 5: Arms (make 2)
Main color. Start with a magic ring.
Row 1: 6 sc in mr (6)
Row 2: 6 inc (12)
Row 3: (3 sc, inc) × 3 (15)
Rows 4–5: 15 sc (2 rows) (15)
Row 6: (3 sc, dec) × 3 (12)
Rows 7–14: 12 sc (8 rows) (12)
Finishing: Stuff only the bottom half of the arm lightly and leave the top empty. Flatten the top opening and sew or pull it closed. FO and leave a long tail for sewing.
That empty top half isn’t laziness — it’s what lets the arm lie flat against the body when you sew it on. Stuff the whole thing and you’ll get a stiff little sausage that sticks straight out.
Assembly — The Honest Part
Alright. I’m not going to pretend this bit is my favorite. There are seven pieces to attach and they all need to be even. But pinning first genuinely fixes 90% of the frustration, so grab your pins and let’s be methodical about it. Our guide to sewing amigurumi parts covers the invisible stitch technique if you want your seams to disappear.
- Head to body. Line the head’s final round (Row 21, 18 sts) up directly on the open neck of the body (Row 25, 18 sts). Using the long tail on the head, sew stitch by stitch all the way around. Right before you close the seam, push in one last pinch of fiberfill so the neck doesn’t wobble.
- Ears to head. Place the folded base of each ear (18 sts) symmetrically on the top-sides of the head, curving them slightly to follow the dome. Pin both, step back, look at them, adjust. Then sew securely.
- Wings to body. Pin the flat 21-sc folded edge of each wing vertically along the back-sides of the body. Sew along the entire straight edge so the wings stand out cleanly instead of flopping.
- Arms to body. Position the flattened top of each arm on the sides of the body just below the neck seam, around Rows 24–25. Sew securely so they angle slightly forward.
Pin everything before you sew anything. Look at your bat from the front. Are the ears level? Are the wings the same height? Fix it now while it’s just pins.
Giving Your Halloween Bat Crochet Pattern Its Face
This is where he stops being yarn and starts being a character. Take your time here — a face that’s slightly off changes the whole personality.
Eyes: Sew the 12 mm loop-back eyes onto the front of the head between Rows 11 and 12, leaving roughly 6 to 7 stitches between them. (Using safety eyes instead? Same placement — but attach them before you finish Row 21 of the head.)
Nose: With pink yarn and your tapestry needle, embroider a small horizontal nose between the eyes, sitting just below their center line. Make 3 to 4 horizontal passes across 2 stitches.
Mouth: With black iris thread, embroider a thin, gentle smile just below the nose, across 3 to 4 stitches.
Fangs: With white sewing thread doubled or tripled for thickness (or white iris thread), make two small vertical stitches hanging down from the outer corners of the smile. Two tiny stitches. That’s the whole vampire situation.
Eyebrows: With black iris thread, add two small diagonal lines 1 to 2 rows above each eye. This is the detail that gives him actual attitude — angle them however you like. Steeper for grumpy, softer for sleepy.
You Did It!
Look at him. Fangs, scalloped wings, tiny embroidered eyebrows and all — you made that. This was not a quick project and it was not a no-sew project, and you finished it anyway. That’s a real step up in your crochet, and you should feel great about it.
Tag AmiLoops if you share yours — I want to see every colorway you come up with. And if you’re on a Halloween roll, try our other free bat amigurumi pattern for a different take, or swing into the holidays with our crochet snowman pattern when you need something a little gentler on your hands. 🦇
FAQ
What is the best yarn for this Halloween bat crochet pattern?
A smooth DK / Light Worsted (3) weight cotton or cotton-acrylic blend is best for crisp stitch definition without feeling stiff. Recommended yarns include YarnArt Jeans, Drops Muskat, or Paintbox Cotton DK in colors like purple, black, charcoal, or deep plum.
How long does it take to crochet this amigurumi bat?
This bat takes roughly 6 to 9 hours to complete. It is an intermediate multi-evening project that involves crocheting five distinct multi-round pieces and standard sewing for assembly.
Can beginners make this bat crochet pattern?
This pattern is rated Intermediate due to using a small 2.0 mm hook, DK yarn, and sewing multiple limbs and facial details. Brand new beginners are encouraged to practice on chunky no-sew amigurumi before tackling this project.