Crochet Cat Amigurumi — Meet Oscar & Mary, Two Kittens in Love
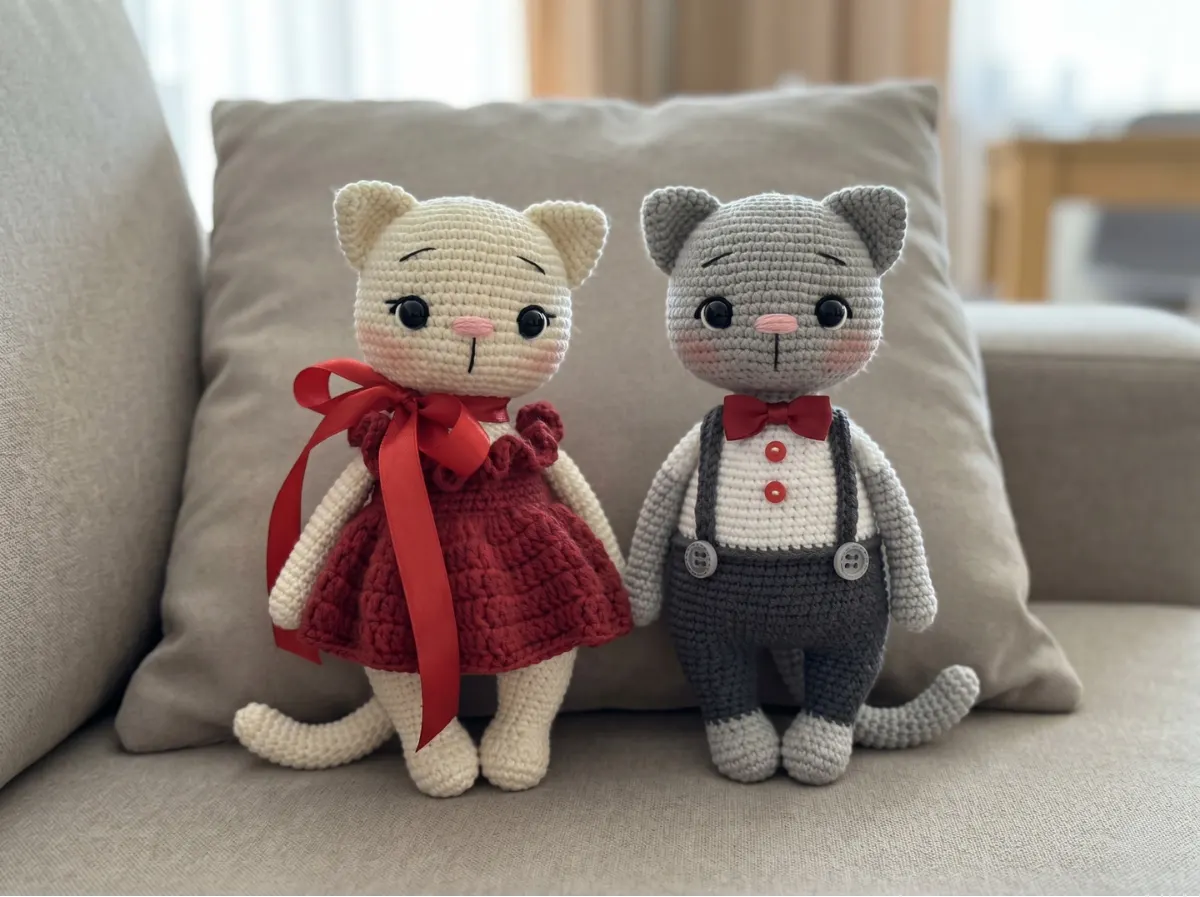
This crochet cat amigurumi pattern is one of the most detailed I’ve worked with — two complete kittens, each with their own outfit, color palette, and personality. Oscar comes in gray with dark suspender pants and a white t-shirt; Mary is cream with a rich dark red dress and puff sleeves. I was drawn to this pattern because of the structural complexity: the tail is integrated directly into the body during crocheting, the arms are joined mid-round, and the head shaping starts from a foundation chain rather than a magic ring. It requires attention, but every single count adds up. Let’s make them both.
📋 Pattern Quick Stats
- Difficulty: Intermediate
- Finished Size: Approx. 6.4 in (16.5 cm) each
- Hook Size: 2.0mm (approx. US B/1 — steel hook)
- Yarn Weight: Worsted (4) for bodies; DK/Light Worsted (3) for dress details
- Techniques: Foundation chain start, magic ring, invisible decrease, BLO, color changes, integrated tail, arm join mid-round, needle sculpting
- Estimated Time: 10–15 hours (both figures)
Materials for Your Crochet Cat Amigurumi
Yarn — Oscar (Boy)
- Gray — Worsted weight (4), approx. Lion Brand 24/7 Cotton or similar cotton worsted — for the body, head, arms, ears, tail
- Dark Gray — Worsted weight (4), same base yarn — for the pants and suspenders
- White — Worsted weight (4), same base yarn — for the t-shirt
Yarn — Mary (Girl)
- Cream — Worsted weight (4), approx. Lion Brand 24/7 Cotton or similar — for the body, head, arms, ears, tail
- Dark Red — DK/Light Worsted (3), approx. Drops Safran or Paintbox Cotton DK — for the dress skirt and top
- Coordinating accent color — DK/Light Worsted (3), same weight as dress yarn — for collar/dress detail (see original color notes)
Both yarns fall within the standard weight categories defined by the Craft Yarn Council yarn weight system. Note that the body yarn is Worsted (4) while the dress uses a lighter DK (3) — this is intentional and creates the layered look of real clothing.
Tools & Notions
- 2.0mm steel crochet hook (approx. US B/1)
- 8mm safety eyes — 2 per figure
- Polyester fiberfill (Poly-Fil by Fairfield works perfectly)
- 1.5mm wire — two pieces, each 11 cm long (for tails)
- 2.0mm wire — two pieces, each 22 cm long (optional neck support)
- Small amounts of black, white, and pink embroidery thread — for muzzle details
- Satin ribbon, 12mm wide — for bow tie and dress decoration
- 2 buttons, 10mm — for Oscar’s pants
- 2 buttons, 6mm — for Oscar’s t-shirt
- Blush or soft pastels — for cheeks
- Clear craft glue — for attaching safety eyes after sculpting
- Stitch markers, tapestry needle, scissors, pins, adhesive tape
💡 Emma’s Tip: The wire in the tail is essential — without it, the tail won’t hold its curve. Wrap the bent end with tape before inserting so it doesn’t snag the yarn from the inside. I always do this step before stuffing the tail at all.
Abbreviations Used in This Crochet Cat Pattern
| Abbreviation | Meaning |
|---|---|
| mr | magic ring |
| ch | chain |
| sc | single crochet |
| dc | double crochet |
| sl st | slip stitch |
| inc | increase (2 sc in same stitch) |
| dec | invisible decrease (through front loops of next 2 sts) |
| BLO | back loop only |
| FLO | front loop only |
| st(s) | stitch(es) |
| FO | fasten off |
| (…) | total stitch count at end of round |
| (…)*X | repeat instructions X times |
Special Techniques for This Crochet Cat Amigurumi
Before you start, I want to flag a few techniques that show up repeatedly in this pattern. If any of them are new to you, it’s worth getting comfortable with them before you begin — it’ll save you a lot of frogging later.
Magic ring: The ears, arms, and tails all start with a magic ring. If this technique is still tripping you up, our step-by-step magic ring tutorial walks through it slowly with photos.
Invisible decrease: This pattern uses dec throughout the head closure and body shaping. I always use the invisible decrease method — it keeps the surface clean and tight with no visible gap. If you’re used to the standard sc2tog, I’d encourage you to switch. Our invisible decrease tutorial shows the difference side by side.
Foundation chain start: Both the head and the feet start from a chain rather than a magic ring. This creates an oval base shape. It works differently than round starts — you crochet to the end of the chain, then turn and work back along the other side. Take it slow the first time.
BLO color transition: Several color changes in the body use back loop only rows. This creates a clean ridge line that visually separates the pants from the shirt, or the skirt from the bodice. Working BLO in the transition row is what gives the outfit that crisp edge.
Integrated tail join: Oscar and Mary’s tails are not sewn on — they’re crocheted directly into the body at rows 24–25. This is one of the more precise steps in the pattern. I recommend pinning the tail in position before you reach that row and double-checking it’s centered.
For a broader overview of how amigurumi assembly works, our guide on sewing amigurumi parts together covers the principles that apply to the head-to-neck join here.
The Pattern — Oscar (Boy Kitten)
Head — Oscar
Yarn: Gray | Start: ch 12
Row 1: Starting from the second ch from hook: 10 sc, 3 sc in the last ch. Then crochet along the other side of the chain: 9 sc, inc (24)
Row 2: inc, 9 sc, 3 inc, 9 sc, 2 inc (30)
Row 3: 1 sc, inc, 9 sc, (1 sc, inc)*3, 9 sc, (1 sc, inc)*2 (36)
Row 4: 2 sc, inc, 9 sc, (2 sc, inc)*3, 9 sc, (2 sc, inc)*2 (42)
Row 5: 42 sc (42)
Row 6: 3 sc, inc, (6 sc, inc)*5, 3 sc (48)
Rows 7–8: 48 sc (2 rows) (48)
Row 9: (7 sc, inc)*6 (54)
Rows 10–11: 54 sc (2 rows) (54)
Row 12: 4 sc, inc, (8 sc, inc)*5, 4 sc (60)
Rows 13–14: 60 sc (2 rows) (60)
Row 15: (14 sc, inc)*4 (64)
Rows 16–17: 64 sc (2 rows) (64)
Row 18: 3 sc, dec, (6 sc, dec)*7, 3 sc (56)
Row 19: (5 sc, dec)*8 (48)
Row 20: 2 sc, dec, (4 sc, dec)*7, 2 sc (40)
Row 21: (3 sc, dec)*8 (32)
Row 22: 1 sc, dec, (2 sc, dec)*7, 1 sc (24)
Row 23: (4 sc, dec)*4 (20)
Stuff the head firmly. FO, cut yarn, weave the end inside.
Ears — Oscar (make 2)
Yarn: Gray | Start: mr
Row 1: 6 sc in mr (6)
Row 2: (1 sc, inc)*3 (9)
Row 3: (2 sc, inc)*3 (12)
Row 4: 1 sc, inc, (2 sc, inc)*3, 1 sc (16)
Row 5: (7 sc, inc)*2 (18)
Row 6: 18 sc (18)
Fold the piece in half and crochet 9 sc to close. Do not stuff. FO, cut yarn, leaving a long tail for sewing.
Arms — Oscar (make 2)
Yarn: Gray, then White | Start: mr
Row 1: 6 sc in mr [gray] (6)
Row 2: inc in each st [gray] (12)
Rows 3–5: 12 sc (3 rows) [gray] (12)
Row 6: (4 sc, dec)*2 [gray] (10)
Rows 7–17: 10 sc (11 rows) [gray] (10)
Rows 18–23: 10 sc (6 rows) [white] (10)
💡 Emma’s Tip: After Row 17, change to white and cut the gray yarn. After Row 23, crochet a few extra sc (about 4) so that the color change point lands on the inside of the arm when joined to the body — you won’t see it that way. Then fold the edges in half and crochet 5 sc to close. Stuff lightly up to the middle only; leave the upper half unstuffed.
Tail — Oscar
Yarn: Gray | Start: mr
Row 1: 6 sc in mr (6)
Row 2: inc in each st (12)
Rows 3–11: 12 sc (9 rows) (12)
Row 12: dec, 10 sc (11)
Rows 13–19: 11 sc (7 rows) (11)
Row 20: dec, 9 sc (10)
Rows 21–24: 10 sc (4 rows) (10)
Finish with sl st, FO, cut yarn. Prepare an 11 cm length of 1.5mm wire — bend one end, wrap the bent tip with tape, and insert it into the tail. Stuff the tail lightly. Leave the top approximately 1.5 cm unstuffed.
Legs + Body — Oscar
Yarn: Gray → Dark Gray → White → Gray | Start: ch 6
Row 1: Starting from the second ch from hook: 4 sc, 3 sc in the last ch. Then crochet along the other side of the chain: 3 sc, inc [gray] (12)
Row 2: inc, 3 sc, 3 inc, 3 sc, 2 inc [gray] (18)
Row 3: 1 sc, inc, 3 sc, (1 sc, inc)*3, 3 sc, (1 sc, inc)*2 [gray] (24)
Rows 4–5: 24 sc (2 rows) [gray] (24)
Row 6: 6 sc, 6 dec, 6 sc [gray] (18)
Row 7: 18 sc [gray] (18)
Row 8: 5 sc, 4 dec, 5 sc [gray] (14)
Rows 9–10: 14 sc (2 rows) [dark gray] (14)
Row 11: 3 sc, inc, 6 sc, inc, 3 sc [dark gray] (16)
Row 12: 16 sc [dark gray] (16)
Row 13: (7 sc, inc)*2 [dark gray] (18)
Rows 14–15: 18 sc (2 rows) [dark gray] (18)
💡 Emma’s Tip: After Row 15 on the first leg, crochet 3 extra sc + 1 sl st to shift the marker to the side of the leg. FO, cut yarn. Make the second leg the same way, but crochet 4 extra sc so the marker stays centered when you join. The exact count here affects the symmetry of the final join — don’t skip it.
Row 16: Crochet 9 sc on second leg, make ch 4 and join with the first leg at the st that follows the sl st. Then crochet 18 sc along the first leg, (inc, 2 sc, inc) along the ch-4 bridge, 9 sc [dark gray] (46)
Row 17: 9 sc, inc, 2 sc, inc, 33 sc [dark gray] (48)
Row 18: (7 sc, inc)*6 [dark gray] (54)
Rows 19–23: 54 sc (5 rows) [dark gray] (54)
Row 24: 38 sc, then crochet 5 sc inserting the hook through the sts on the inner side of the tail AND into the sts of the body simultaneously, 11 sc [dark gray] (54)
Row 25: 38 sc, 5 sc along the outer side of the tail, 11 sc [dark gray] (54)
Rows 26–28: 54 sc (3 rows) [dark gray] (54)
Row 29: 8 sc, dec, (16 sc, dec)*2, 8 sc [dark gray] (51)
💡 Emma’s Tip: Do not cut the dark gray yarn after Row 29. Leave it hanging outside the work — you’ll need it later for the suspenders.
Row 30: In BLO only: 51 sc [white] (51)
Row 31: 51 sc [white] (51)
Row 32: (15 sc, dec)*3 [white] (48)
Rows 33–34: 48 sc (2 rows) [white] (48)
Row 35: 5 sc, dec, (10 sc, dec)*3, 5 sc [white] (44)
Rows 36–37: 44 sc (2 rows) [white] (44)
Row 38: (9 sc, dec)*4 [white] (40)
Row 39: 40 sc [white] (40)
Row 40: 4 sc, dec, (8 sc, dec)*3, 4 sc [white] (36)
Row 41: 36 sc [white] (36)
Row 42: 2 sc, dec, (4 sc, dec)*5, 2 sc [white] (30)
Row 43: 30 sc [white] (30)
Row 44: 5 sc (join first arm — insert hook through both arm sts and body sts simultaneously), 10 sc, 5 sc (join second arm the same way), 10 sc [white] (30)
Row 45: (3 sc, dec)*6 [white] (24)
Row 46: 2 sc, dec, (4 sc, dec)*3, 2 sc [gray] (20)
Rows 47–48: 20 sc (2 rows) [gray] (20)
Stuff the piece firmly throughout. Finish with sl st, FO, cut yarn leaving a long tail for sewing. Prepare 22 cm of 2.0mm wire, fold it in half, wrap the folded end in tape, and insert into the body so the wire runs through the full length — the neck portion plus about 3.5–4 cm should extend above the body for inserting into the head.
Suspenders — Oscar
Yarn: Dark Gray (the yarn left from Row 29) | Start: Attach to FLO of Row 29
Row 1: Crochet 38 sl st in FLO of Row 29, along the entire front side and to the middle of the back (38)
Row 2: Ch 31, crochet 23 sc from the second ch from hook. Then ch 24, crochet 23 sc from the second ch from hook (these form the two suspender straps)
Row 3: Continue crocheting along the chain: 7 sc to the end (7)
Row 4: Continue crocheting along the pants edge: 13 sl st (13)
FO, cut yarn, weave end inside. Sew the straps to the top edge of the pants and secure them in place.
The Pattern — Mary (Girl Kitten)
Head — Mary
Yarn: Cream | Start: ch 12
Work Rows 1–23 exactly as written for Oscar’s head, substituting cream for gray. Stitch counts are identical.
Stuff firmly. FO, cut yarn, weave end inside.
Ears — Mary (make 2)
Work Rows 1–6 exactly as Oscar’s ears, substituting cream for gray. Same finishing instructions apply.
Arms — Mary (make 2)
Yarn: Cream only | Start: mr
Row 1: 6 sc in mr (6)
Row 2: inc in each st (12)
Rows 3–5: 12 sc (3 rows) (12)
Row 6: (4 sc, dec)*2 (10)
Rows 7–22: 10 sc (16 rows) (10)
No extra sc needed before closing. Fold the edges in half. Stuff lightly up to the middle. FO, cut yarn, weave end inside.
Tail — Mary
Yarn: Cream | Start: mr
Work Rows 1–24 exactly as Oscar’s tail, substituting cream for gray. Same wire finishing applies.
Legs + Body — Mary
Yarn: Cream → Dark Red → Cream | Start: ch 6
Rows 1–29: Work exactly as Oscar’s Legs + Body, Rows 1–29, substituting cream for all gray and dark gray sections. The dark red color does not appear in this section — keep everything in cream. Stitch counts are identical.
Rows 30–31: 51 sc (2 rows) [cream] (51)
Row 32: (15 sc, dec)*3 [cream] (48)
Rows 33–34: 48 sc (2 rows) [cream] (48)
💡 Emma’s Tip: Before Row 35, crochet a few additional sc if needed to shift the marker to the side. Then change to dark red and cut the cream yarn. This color transition marks the start of the dress bodice.
Row 35: 5 sc, dec, (10 sc, dec)*3, 5 sc [dark red] (44)
Row 36: In BLO only: 44 sc [dark red] (44)
Row 37: 44 sc [dark red] (44)
Row 38: (9 sc, dec)*4 [dark red] (40)
Row 39: 40 sc [dark red] (40)
Row 40: 4 sc, dec, (8 sc, dec)*3, 4 sc [dark red] (36)
Row 41: In BLO only: 36 sc [cream] (36)
💡 Emma’s Tip: The BLO row here is your clean break between the dress bodice and the neckline. Change to cream and cut the dark red yarn. I also recommend crocheting the skirt (instructions below) before continuing with Rows 42–48 — the skirt is attached to Row 35 and it’s much easier to work while the body is still open at the top.
Row 42: 2 sc, dec, (4 sc, dec)*5, 2 sc [cream] (30)
Row 43: 30 sc [cream] (30)
Row 44: 5 sc (join first arm), 10 sc, 5 sc (join second arm), 10 sc [cream] (30)
Row 45: (3 sc, dec)*6 [cream] (24)
Row 46: 2 sc, dec, (4 sc, dec)*3, 2 sc [cream] (20)
Rows 47–48: 20 sc (2 rows) [cream] (20)
Insert wire same as Oscar. FO, cut yarn, leaving long tail for sewing.
Skirt — Mary
Yarn: Dark Red | Start: Attach yarn to Row 35 of the body. Work in rounds — begin each round with ch 3 as turning chain; end with sl st.
Row 1: In FLO only: dc inc in each st (88)
Rows 2–3: 88 dc (2 rounds) (88)
Row 4: (2 dc, dc-inc)*29, 1 sc (117)
Row 5: 117 dc (117)
Row 6: ch 1, 117 sc (117)
Finish with sl st, FO, cut yarn, weave end inside.
Dress Edge & Straps — Mary
Yarn: Dark Red | Start: Attach yarn to Row 40 of the body
Row 1: Crochet 14 sc along the back, ch 6, skip 4 sts (armhole), 14 sc, ch 6, sl st to join
Row 2: Turn the work. Ch 3, then work 3 dc inc in each st to create a puff sleeve effect. Continue along the neckline with sl st to close.
FO, cut yarn, weave end inside. Sew the shoulder straps to the arms with a few securing stitches.
Assembly
- Insert the wire from the body up into the head to connect the neck. Pin the head to the neck first to check placement, then sew it securely with a strong seam using your tapestry needle and a long tail of matching yarn.
- Pin the ears to the sides of the head using the finished figure as reference for height and angle. Sew them in place.
- Oscar: Sew the 10mm buttons onto the top edge of the pants. Sew the 6mm buttons onto the t-shirt. Secure the suspender straps at the front.
- Make a small bow tie from the satin ribbon and sew it to Oscar’s neck.
- Tie or sew a ribbon detail to Mary’s dress if desired.
⚠️ Note on Tail Timing: The tail is not sewn on — it is integrated into the body at Rows 24–25. Make sure the tail is fully prepared (wire inserted, stuffed) before you reach that row in the body construction.
Face & Details — Both Figures
Needle Sculpting for Eye Placement
The eyes on this pattern are sculpted, not simply placed — and that sculpting is what gives Oscar and Mary their expressive faces. Take your time with this step. It’s worth it.
Mark two points (Points 1 and 2) between Rows 13 and 14 of the head, with 11 stitches between them. Mark Points 3 and 4 one stitch to the outside of Points 1 and 2 respectively. Thread a long needle and insert it through the bottom of the head, pulling out at Point 1. Insert back at Point 3, pull out from the bottom. Repeat once more. Do the same for Point 2 and 4. Pull the thread ends gently and tie a secure knot — this creates the subtle indentation that makes the eyes sit naturally.
Safety Eyes
If your safety eyes have a stem, trim the stem leaving a small nub. Apply a small dot of clear craft glue to the sculpted points and press the eyes in place. Allow to dry completely before handling. Review our guide on how to safely attach safety eyes if this is your first time working with them.
Once the eyes are set, use white embroidery thread to make small stitches around each eye. Embroider upper eyelids in black thread. For Mary: add a few eyelash stitches above each eye.
Nose & Mouth
Using pink thread, embroider the nose between Rows 14 and 15 with horizontal stitches. Embroider the mouth below the nose, add eyebrows above the eyes, and add whisker lines if desired.
Cheeks
Apply blush or soft pastels to the cheek area with a dry brush or cotton swab. Build the color slowly — you can always add more, but you can’t take it away once it’s in the yarn.
Emma’s Note
This crochet cat amigurumi pattern is genuinely one of the more involved ones I’ve worked through — two full figures, integrated tails, needle sculpting, and outfit construction all in one project. I won’t pretend it goes quickly. But the result is two figures that feel complete and considered, like they belong together, which of course they do. If you make them both, I’d start with Oscar just to get the body construction method solid before tackling Mary’s skirt and straps. And if you frog — no shame. Happy hooking. 🧶
What yarn is best for this crochet cat amigurumi?
A worsted weight cotton yarn, like Lion Brand 24/7 Cotton, is ideal for the body, while a lighter DK weight yarn works best for the dress details to create a realistic layered look.
How long does it take to crochet this cat amigurumi pattern?
It takes an estimated 10 to 15 hours to complete both the Oscar and Mary cat figures, depending on your crochet speed and experience with structural details.
What size hook do I need for this pattern?
You will need a 2.0mm steel crochet hook (approximately US B/1) to keep the stitches very tight and prevent the fiberfill from showing through the amigurumi fabric.