Free Simon’s Cat Crochet Pattern — Giant Chenille Amigurumi
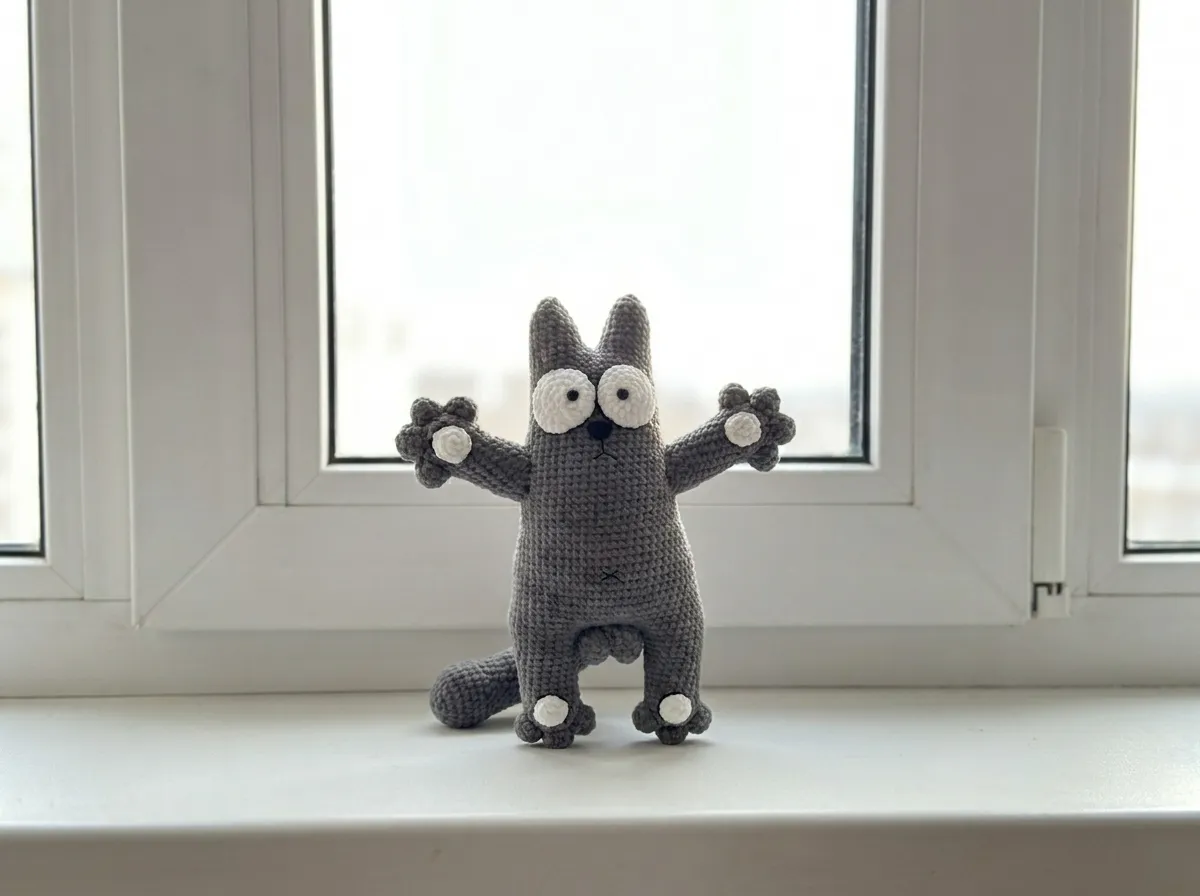
This free crochet cat pattern creates the most wonderfully expressive cartoon kitty you’ve ever seen in chenille — velvety gray, dramatically wide white eyes with glossy safety eyes inside, bold embroidered whiskers, and a long curving tail with that signature kink at the tip. At 17 inches of pure plush squishiness, this cat has presence. The stitches are all basic. The result is completely extraordinary. Ready to fall in love? Let’s go.
🩷 Pattern Highlights
- Cuteness Rating: 🩷🩷🩷🩷🩷
- Finished Size: 17 in (43 cm)
- Difficulty: Easy (simple stitches throughout — many parts, take your time)
- Hook Size: G/6 (4.0mm)
- Yarn Palette: soft dove gray, crisp white
- Key Detail: white oval eye surrounds with inset safety eyes — the face is everything
- Estimated Time: 8–12 hours (multiple parts)
Materials for This Crochet Cat Pattern
The magic of this project is almost entirely in the yarn choice. You need chenille — that plush, velvet-soft texture is what makes this cat look so irresistibly touchable. A Bulky weight (CYCA 5) chenille gives you the perfect rounded stitch definition and that squishy, stuffed-animal quality that makes people immediately want to pick it up.
- Gray chenille yarn — Bulky (5) — almost 2 full skeins. Suggested brands: Himalaya Dolphin Baby, Bernat Baby Velvet, or Premier Parfait. Look for a soft, cool dove gray — not too warm, not too dark. This is a very light gray, almost the color of a storm cloud at sunrise.
- White chenille yarn — Bulky (5) — a small amount, just for the eye surrounds and paw pads. The same brand and weight as your gray, so the textures match perfectly.
- Hook: G/6 (4.0mm)
- Safety eyes: 9mm or 10mm — these go inside the crocheted white eye surrounds, so choose the glossiest black ones you can find. That shine is what gives the face its personality.
- Safety nose: 20×16mm — this is a larger oval nose hardware piece that gets inserted directly into the face. Make sure it’s installed before you close up the head.
- Black embroidery floss — several strands — for the whiskers, facial details, and the chain-stitch outlines around the eyes and paw pads.
- Polyfill stuffing — enough for a 17-inch piece, so have a generous bag on hand.
- Stitch marker
- Tapestry needle
- Scissors
🩷 Chloe’s Yarn Tip: When choosing your gray, hold it next to the white in natural light before you buy. You want a clear contrast — a medium dove gray that reads obviously lighter than charcoal, but still distinctly gray against the white. That contrast is what gives the face and paw pads their pop.
Abbreviations
| Abbreviation | Meaning |
|---|---|
| sc | single crochet |
| inc | increase — 2 sc worked into the same stitch |
| dec | invisible decrease — insert hook through front loops only of next 2 stitches simultaneously, complete as one sc |
| sl st | slip stitch |
| ch | chain |
| mr | magic ring |
| st(s) | stitch(es) |
| FO | fasten off |
Before You Begin Your Crochet Cat Pattern
This pattern has nine separate parts — back legs, body-head, ears, eyes, front arms, toes, paw pads, tail, and a small underbody accent. The individual parts are all simple (really, just sc, inc, and dec throughout), but the construction method is genuinely clever: the back legs are made first, then connected with a chain bridge so the body grows directly out of them. It’s so satisfying to watch it come together. Take it one part at a time and you’ll be amazed how quickly it builds.
Start with the magic ring. Almost every part of this pattern begins with a magic ring. If you’ve never worked one before, our magic ring tutorial walks you through it step by step — it’s simpler than it looks and it gives you a perfectly closed center every time.
Master the invisible decrease. All decreases in this pattern are invisible decreases (dec). This technique eliminates the visible gap that a standard decrease leaves behind, keeping the chenille surface looking smooth and plush. If you haven’t tried it yet, our invisible decrease tutorial shows you exactly how — it’s quick to learn and it will genuinely transform how neat your finished pieces look.
Plan your assembly before you finish parts. With a pattern this size, knowing how everything fits together before you start sewing saves so much stress. A quick read-through of the assembly section first means no last-minute surprises. When the time comes to sew everything on, our guide to sewing amigurumi parts together has all the tips you need for clean, secure attachment.
The Crochet Cat Pattern — Part by Part
Work in continuous rounds throughout unless otherwise noted. Use a stitch marker to track the beginning of each round.
Back Legs (×2) — Gray
Start with a magic ring. Make both legs before moving on — you’ll join them to start the body.
Row 1: 6 sc in mr (6)
Row 2: 6 inc (12)
Row 3: (1 sc, 1 inc) × 6 (18)
Row 4: (2 sc, 1 inc) × 6 (24)
Row 5: 24 sc (24)
Row 6: 1 dec, 10 sc, 1 dec, 10 sc (22)
Row 7: 1 dec, 9 sc, 1 dec, 9 sc (20)
Rows 8–14: 20 sc (20)
Row 15: 1 inc, 9 sc, 1 inc, 9 sc (22)
Row 16: 1 inc, 10 sc, 1 inc, 10 sc (24)
Row 17: 24 sc (24)
Finishing the first leg: FO, stuff the leg, weave in ends. Set aside.
Finishing the second leg: Do NOT cut the yarn at the end of Row 17. Instead, work 2 more sc to shift your position, then ch 8. You’ll continue from here into the body.
🩷 Chloe’s Tip: Stuff the legs firmly enough that they hold their rounded shape, but not so hard that the chenille stretches. They should feel solid and satisfyingly squishy at the same time — like a plush toy, not a stuffed sausage.
Body-Head (×1) — Gray
This is worked directly from the second leg, bridging across to the first with the chain you just made. The body and head are worked as one continuous piece — the shaping is clever and it really does look like magic when it starts to form.
Row 18: 24 sc along the first leg, 9 sc along the ch sts (work 1 sc into the joining point of the ch to the leg, then continue along the chain — this closes the gap at the join), 24 sc along the second leg, 9 sc along the ch sts (66)
Rows 19–21: 66 sc (66)
Row 22: 11 sc, 1 dec, 31 sc, 1 dec, 20 sc (64)
Row 23: 10 sc, 1 dec, 30 sc, 1 dec, 20 sc (62)
Row 24: 62 sc (62)
Row 25: 11 sc, 1 inc, 30 sc, 1 inc, 19 sc (64)
Row 26: 11 sc, 1 inc, 31 sc, 1 inc, 20 sc (66)
Row 27: 11 sc, 1 dec, 31 sc, 1 dec, 20 sc (64)
Row 28: 11 sc, 1 dec, 30 sc, 1 dec, 19 sc (62)
Row 29: 62 sc (62)
Row 30: 10 sc, 1 dec, 30 sc, 1 dec, 18 sc (60)
Row 31: 10 sc, 1 dec, 29 sc, 1 dec, 17 sc (58)
Row 32: 10 sc, 1 dec, 27 sc, 1 dec, 17 sc (56)
Row 33: 9 sc, 1 dec, 27 sc, 1 dec, 16 sc (54)
Rows 34–35: 54 sc (54)
Row 36: 10 sc, 1 dec, 25 sc, 1 dec, 15 sc (52)
Rows 37–43: 52 sc (52)
Row 44: 10 sc, 1 dec, 25 sc, 1 dec, 13 sc (50)
Row 45: 50 sc (50)
Row 46: 9 sc, 1 dec, 24 sc, 1 dec, 13 sc (48)
Row 47: 48 sc (48)
Row 48: 9 sc, 1 dec, 23 sc, 1 dec, 12 sc (46)
Row 49: 46 sc (46)
Row 50: 8 sc, 1 dec, 22 sc, 1 dec, 12 sc (44)
Rows 51–52: 44 sc (44)
Row 53: 9 sc, 1 dec, 21 sc, 1 dec, 10 sc (42)
Rows 54–58: 42 sc (42)
🩷 Important Notes: The decreases and increases in the body section fall on the sides to create the cat’s natural waist curve. If your dec/inc aren’t landing on the sides after following the row instructions, adjust by working more or fewer sc between them — without changing the stitch count in the row. Also: stuff the body as you work. If you are using a safety nose, insert it now between approximately Rows 45 and 46 before the opening gets too small.
Finishing: Fold the flat piece in half. Find the center — your stitch marker should sit exactly at the center between both sides. If it doesn’t, work or undo the necessary number of sc until it does. Insert the hook into the corresponding stitch on the opposite edge and crochet the two edges together across the top. This seams the head down the middle, forming two openings for the ears. Continue directly to the ears from here.
Ears (×2) — Gray
The ears are worked directly from the two openings left in the top of the head. This is such a satisfying moment — the head suddenly looks like a cat.
Row 59: 20 sc around one of the openings (20)
Row 60: 9 sc, 1 dec, 9 sc (19)
Row 61: 1 dec, 17 sc (18)
Row 62: 18 sc (18)
Row 63: 1 dec, 7 sc, 1 dec, 7 sc (16)
Row 64: 1 dec, 6 sc, 1 dec, 6 sc (14)
Row 65: 1 dec, 4 sc, 1 dec, 6 sc (12)
Row 66: 6 dec (6)
Row 67: 6 sc (6)
Finishing: FO, stuff the ear as you go, close the opening, weave in ends. Work the second ear the same way starting from Row 59.
Eyes (×2) — White
These are the white oval surrounds that frame the safety eyes — and honestly, this is the detail that makes the whole face. That crisp white against the gray, with the glossy safety eye peeking through from inside. I may have squealed a little the first time I finished a pair of these.
Row 1: 6 sc in mr (6)
Row 2: 6 inc (12)
Row 3: (1 sc, 1 inc) × 6 (18)
Row 4: (2 sc, 1 inc) × 6 (24)
Row 5: 24 sc (24)
Finishing: 1 sl st, FO. Insert the 9–10mm safety eyes between Rows 2 and 3 before sewing the eye surrounds onto the face — or embroider them in the same location if you prefer. Make both eyes, then set them aside while you finish the remaining parts.
🩷 Chloe’s Eye Tip: This is the moment I always pause and take a breath. Before you push the safety eye washer all the way down, hold both finished eye surrounds against the face together and check the position. Look straight on from the front, then from slightly above. The eyes should sit symmetrically — same height, same distance from center. Once those washers click, they’re permanent. That thirty seconds of checking is always worth it.
Front Arms (×2) — Gray
The Row 16 shaping on these arms is a little twist — one edge is worked taller than the other on purpose, so the arms angle upward when sewn on rather than flopping straight down. It’s a small thing that makes a huge difference to the pose.
Row 1: 6 sc in mr (6)
Row 2: 6 inc (12)
Row 3: (1 sc, 1 inc) × 6 (18)
Row 4: (2 sc, 1 inc) × 6 (24)
Row 5: 24 sc (24)
Row 6: 1 dec, 10 sc, 1 dec, 10 sc (22)
Row 7: 1 dec, 9 sc, 1 dec, 9 sc (20)
Row 8: 1 dec, 8 sc, 1 dec, 8 sc (18)
Rows 9–15: 18 sc (18)
Row 16: 7 sc, turn, work 11 sc in the opposite direction, turn again, 1 dec, 6 sc, 1 dec
Row 17: 16 sc, 1 sl st (16)
Finishing: FO, stuff the arm. Make the second arm the same way.
Toes (×14) — Gray
Yes, fourteen. I know. Put on something to listen to and make them in batches — they work up very fast and the moment you sew them all on, the paws suddenly look incredibly detailed and perfect.
Row 1: 5 sc in mr (5)
Row 2: 5 inc (10)
Rows 3–4: 10 sc, 1 sl st (10)
Finishing: FO, stuff. Repeat for all 14 toes.
Paw Pads (×4) — White
Small, white, and so satisfying to sew on. These go flat against the bottom of each paw — no stuffing, just pressed gently in place and outlined with black embroidery after.
Row 1: 6 sc in mr (6)
Row 2: 6 inc (12)
Finishing: 1 sl st, FO. Do not stuff.
Tail (×1) — Gray
The tail is the longest single part of this pattern — 35 rows — and the shaping is what gives it that beautiful, distinctive curve and kink. Stuff as you go to keep control of the shape. This is the part that takes a little extra love, and it’s completely worth it.
Row 1: 6 sc in mr (6)
Row 2: 6 inc (12)
Row 3: (1 sc, 1 inc) × 6 (18)
Row 4: (2 sc, 1 inc) × 6 (24)
Row 5: (3 sc, 1 inc) × 6 (30)
Row 6: 30 sc (30)
Row 7: 1 dec, 13 sc, 1 dec, 13 sc (28)
Row 8: 1 dec, 12 sc, 1 dec, 12 sc (26)
Row 9: 26 sc (26)
Row 10: 1 dec, 9 sc, 2 dec, 9 sc, 1 dec (22)
Row 11: 1 dec, 18 sc, 1 dec (20)
Row 12: 1 dec, 9 sc, 1 inc, 8 sc (20)
Row 13: 18 sc, 1 dec (19)
Row 14: 1 dec, 8 sc, 1 inc, 8 sc (19)
Row 15: 1 dec, 15 sc, 1 dec (17)
Row 16: 1 dec, 6 sc, 1 inc, 6 sc, 1 dec (16)
Row 17: 16 sc (16)
Row 18: 8 sc, 1 dec, 6 sc (15)
Row 19: 1 dec, 6 sc, 1 inc, 6 sc (15)
Row 20: 7 sc, 1 inc, 7 sc (16)
Row 21: 1 dec, 12 sc, 1 dec (14)
Row 22: 1 dec, 12 sc (13)
Row 23: 1 dec, 5 sc, 1 inc, 5 sc (13)
Row 24: 6 sc, 1 inc, 6 sc (14)
Row 25: 14 sc (14)
Row 26: 1 dec, 6 sc, 1 inc, 5 sc (14)
Rows 27–28: 14 sc (14)
Row 29: 1 dec, 6 sc, 1 inc, 5 sc (14)
Row 30: 1 dec, 5 sc, 1 inc, 6 sc (14)
Rows 31–35: 14 sc (14)
Note: From Row 10 onward, the decreases and increases should fall on the sides of the tail to create the curve. If they aren’t landing on the sides following this description, adjust by working more or fewer sc between the dec/inc — without changing the stitch count in the row. Stuff the tail as you go. When finished: work 2 sc to shift position, then fold the piece in half and work 6 sc through both layers to close.
Underbody Accent (×1) — Gray
This is a two-piece rounded detail that sits at the underside of the cat — a characteristic feature of this particular cartoon cat design that makes the silhouette immediately recognizable. Make two small rounds and join them together.
Make the first piece:
Row 1: 5 sc in mr (5)
Row 2: 5 inc (10)
Row 3: 10 sc (10)
Make a second piece identically. Do not fasten off the second piece — continue directly into the joining rows.
Join and continue:
Row 4: 10 sc along the first piece, 10 sc along the second piece (20)
Row 5: 20 sc (20)
Row 6: 4 sc, 1 dec, 3 sc, 1 dec, 4 sc, 1 dec, 1 sc, 1 dec (16)
Row 7: 3 sc, 1 dec, 6 sc, 1 dec, 3 sc (14)
Row 8: (2 sc, 1 dec) × 3, 2 sc (11)
Finishing: FO, stuff. Sew up any gap between the two joined pieces, then stitch them firmly together so they sit snugly against each other and don’t pull apart.
Assembly
Take your time with this section — positioning everything correctly before you sew a single stitch is the difference between a finished cat that looks exactly right and one that looks a little off. Lay all your parts out on a flat surface first and play with the arrangement.
- Eyes: Sew the white eye surrounds onto the face between approximately Rows 46 and 56, lightly stuffed. Position them symmetrically and check from the front, slightly above, and both sides before you commit.
- Toes: Sew 4 toes onto each front arm and 3 toes onto each back leg. Arrange them in a fan shape for the most natural paw look.
- Paw Pads: Sew the white paw pads flat onto the paws — no stuffing. Press them gently against the surface so they sit flush.
- Front Arms: Sew to the sides of the body, a couple of rows below the eyes. Position them so they angle upward (the asymmetric Row 16 shaping will help naturally). Add a small amount of stuffing as you sew to help them hold their upward angle without drooping.
- Tail and Underbody Accent: Sew both to the back of the toy, with the underbody accent positioned at the underside.
Making It Extra Cute — The Finishing Details That Complete Your Crochet Cat Pattern
Okay, this is the part I wait for the entire time I’m working through a pattern. The embroidery. The outlining. The moment a completed piece stops looking like a craft project and starts looking like a character.
The face embroidery: Using several strands of black embroidery floss and a tapestry needle, embroider the facial details — the whisker lines, the mouth curve, and any other features. Work slowly. The chenille is very forgiving of small adjustments, and you can always add a second pass to thicken a line that looks too fine. The navel detail at the belly is also embroidered in black.
Chain-stitch outlines: This is the detail that truly elevates the piece. Using black floss, work a chain stitch outline all the way around each white eye surround, and around each white paw pad. That thin black line creates a graphic, cartoon-style contrast that makes every white element pop against the gray. It’s a small thing that makes an enormous difference — do not skip it.
Getting the eyes perfectly level: Before you sew the eye surrounds down permanently, hold the cat at arm’s length and look at it from directly in front. The eyes should be the same height and equidistant from the center. Pin them in place first, walk away, come back and look again with fresh eyes. I do this every single time without exception, and I have never once regretted the extra few minutes.
Color variation ideas: The classic version is gray and white, but this pattern would be completely adorable in a warm toffee brown with cream accents for an orange tabby feel, or even a deep charcoal with soft silver-white details. The embroidery lines work equally beautifully against any base color. If you love the look of this but want to try our Stitch amigurumi pattern, that’s another character-style build that uses a similar multi-part construction with wonderful results.
And if you’re new to the whole world of putting character amigurumi together, our gray kitty amigurumi pattern is a gentler starting point — fewer parts, same cozy chenille energy — and perfect practice before tackling a piece this size.
Chloe’s Final Look
I have been staring at this finished cat for an embarrassing amount of time and I cannot bring myself to put it down. The chain-stitch outlines around those wide white eyes, the way the glossy safety eyes catch the light from inside the white surrounds, the satisfying rounded shape of the whole body — it’s everything. The embroidered whiskers give it that instantly recognizable cartoon expression that makes people smile the moment they see it. Set him on a shelf. Put him in someone’s arms. Make him in toffee brown and name him something completely different. You really won’t be able to stop at just one. 🩷